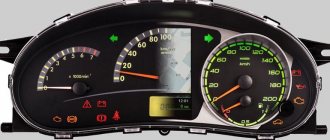
Manufacturers display the main indicators on the car dashboard, the activation of which is given special attention. After all, a malfunction is indicated by the corresponding light bulb, which allows you to quickly determine the type of failure.
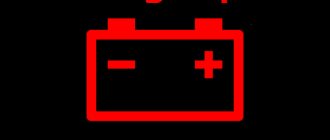
According to car owners, a common problem is a constantly burning battery light, which indicates a malfunction: the generator, battery, wiring, etc.
Causes
If the system is working properly, the light will light for a short time and then go out.
The cause of the malfunction is checked according to a certain scheme. As a rule, the problem lies in a malfunction of the generator or battery, so the test starts with them.
| Light bulb illumination option | Cause |
| Doesn't go out | Generator, battery |
| Lights up intermittently | Loose alternator belt, poor output contact |
| Dim | Wiring |
| Flashing | Battery, wiring, ground |
| Lights up at low speed, then goes out | Battery terminals, brushes, relays, alternator belt |
| After re-gassing | Diode bridge |
| When driving | Damaged battery, brushes, ground |
If the indicator lights up while driving, it is recommended to drive to a repair site or a parking lot, since there is a high probability that you will not start the car after stopping.
List of faults that cause the lamp to light up
So, if you notice that the battery icon on the instrument panel is on and does not go out, you can conclude that it is not charging. There may be several reasons for this:
- the charge is either completely absent or so small that its value is less than the potential difference at the battery terminals;
- the lamp control relay has failed;
- the contacts of the circuit elements are burnt, oxidized or weakened (on the battery itself, on the ground wire, on the generator).
Let's look at these cases in more detail.
Generator
At the first stage, the generator is checked. Possible causes of the malfunction include:
- Weak voltage connections. Often in the spring, after severe frosts, the compounds oxidize.
- Loose or broken drive belt. Modern cars control the parameter with a special sensor that sends information to the on-board computer.
- Malfunction of the diode bridge or pulley bearings.
- Worn slip rings or brushes.
A generator breakdown is known by its characteristic accompanying signs. Rapid battery discharge, extraneous noise while driving. A characteristic feature is a voltage drop during operation of consumer sources (dim light, slow operation of brushes, low volume of the radio). A common problem with old cars.
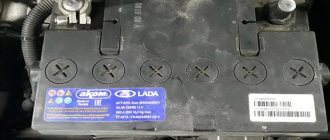
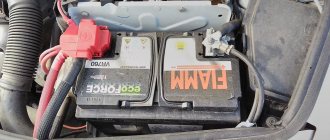
Battery
A common cause is lack of charge. To clarify, check the voltage at the terminals using a load fork or measure it with a tester. Normal voltage is 14V, in case of problems it will be lower.
Options for solving the problem depending on the situation.
- The generator supplies voltage, but the battery discharges quickly. In this case, the wires and contacts are stripped, after which the readings are taken again. When the current level is not restored, the voltage on the device is measured. If it is higher than on the battery, then the cable is replaced.
- No voltage to the battery. The cause may be a blown fuse that needs to be replaced.
- The voltage is normal, but drops sharply under load. The reason is a generator malfunction.
Also check the battery terminals. Oxidized weak contacts are protected with fine sandpaper and then coated with a special agent.
Lost contact at battery terminals
At this diagnostic stage, you need to check the condition of the wire terminals and battery contact terminals. Often they oxidize, as a result of which the contact between them weakens. In the case when the battery light is on, but there is charging, this malfunction is most often the cause.
The generator operates normally, voltage is supplied to the terminals, but is lost due to poor contact. So it turns out that charging is in progress, but the battery charging light is on. Moreover, in most cases it burns with a dim light. This type of malfunction can be eliminated by cleaning the terminals and contact terminals of the battery, as well as treating them with a water-repellent liquid.
Signal lamp
A signal block, emergency lamp or indicator that conveys the status of the system. If there is a malfunction, it does not light up. In the described case, it lights up constantly, which is often caused by problems with the LED device. When the engine is running at idle speed, the voltage in the system does not exceed 12V - the light is on. But when it increases to 2000 rpm, it goes out.
Other malfunction options:
| Glow | Procedure |
| Not for long | The error is temporary. The system automatically returns to normal. |
| Permanent | It is necessary to quickly eliminate the cause, which avoids expensive repairs. |
| Fast flashing | Reduce speed or stop the engine, since the error is fatal and requires an immediate solution. |
Monitoring the battery charging process
To correctly understand the reasons for the unstable operation of the lamp that controls the charging progress of the battery, you need to understand the interaction of the generator and the direct current source. When the engine is running, the battery is constantly charged with a voltage of 13.6 to 14.2 volts. The charging current is generated by the generator. The voltage of the output electricity depends on the speed of the generating device. The higher the speed, the greater the voltage. To limit the voltage within specified limits, a regulator is connected to the rotor winding circuit. It is this that stabilizes the output voltage, which is then supplied to the battery terminals for charging.
If the charging current is constantly supplied within the specified limits to maintain the battery in working condition, the battery charging indicator lamp should not light up. A constant glow of the light indicates that the generator is not working or that the supply wires are broken. The most common cause of generator failure is a weakened or torn drive belt.
Video: car battery charging system
Generator circuit
The operation of the generating device is based on the principle of electric magnetism. Structurally, there are two main parts with the help of which alternating current is produced.
The rotor and stator generate current into the vehicle's on-board network
These are the stator and the rotor. The rotor is driven by a drive belt from the engine crankshaft. The stator is stationary and consists of windings that are attached to the generator housing. Together they form a structure in which the rotor is centrally located inside the stator. There is a gap between them, which allows the rotor to rotate at enormous speed.
Scheme of operation of the generator and connection of the charging control lamp
The stator includes 3 windings that form a three-phase current system. The terminals from the windings are connected to the diode bridge separately, as in the diagram above.
The rotor consists of many electromagnets, which together create a powerful magnetic field. It crosses the stator windings, and a three-phase alternating current is generated in them. The output voltage depends on the speed and is controlled by a regulator, which is built into the system for supplying current to the rotor. To convert alternating current into direct current, a diode bridge consisting of diode rectifiers is used. They only allow current to pass in one direction.
Current is supplied to the electromagnets of the rotating rotor using two copper-graphite brushes in contact with copper slip rings located on the rotor shaft. As the speed increases, the relay-regulator reduces the current in the rotor, thereby reducing the magnetic field.
The battery charging control lamp is connected to a set of diodes that are connected in parallel to each of the three stator windings. This is a separate circuit and the amount of current here is small, but sufficient to light the LED indicator. So, to the light bulb, on one side there is a positive wire from the general network of the charging system, and on the other contact there is a positive wire from the ignition switch. If equal voltage is applied to both sides, the light bulb does not light. If there is no voltage on one contact, the light comes on. If the charging current begins to pulsate or decrease, the light begins to flash or light up with less brightness.
Generator belt
During load (optics light, radio on) with low belt tension, the battery quickly loses voltage. Signs of weakened tension are squealing and whistling, which is often observed when it is cold.
To clarify, check the degree of tension - measure the amount of deflection. First turn off the engine. According to the instructions, press on the part. Belt deflection of less than 5 mm is considered normal. If the deflection is greater, the part is tightened.
The manipulation does not cause any difficulties, especially in older cars and if there is an adjustment bar. Scroll the screw of the mechanism, which is usually located on top of the device. In this way, the generator is moved relative to the engine, creating the required tension.
In modern cars they are adjusted without a bar. For this:
- Loosen the generator fasteners;
- Turn the screws in a circle;
- Move the device away from the engine to the desired tension;
- Tighten the nuts.
At the end, check the degree of belt tension.
Troubleshooting the battery charging system
If previous measures to check the condition of the belt, fuses, terminals, contacts and connectors did not produce a positive effect, it is necessary to dismantle the generator and take it to a specialized workshop to test its performance.
In many cases, you can remove the generator yourself, if this does not require the use of special equipment and placing the car on a lift. Detailed descriptions of the process of dismantling the generator for a specific car model and engine are easy to find on the Internet.
Generator brushes
The brushes receive current and transfer it to the battery. Although the parts are small, they are very important because they ensure the car’s performance. I make them from graphite, sometimes impregnated with a special solution for long-term operation.
To identify malfunctions, remove the brush assembly and inspect it. Opal marks and other characteristic signs indicate worn parts. Brush failure is also caused by mechanical wear. To do this, measure the height of the graphite elements. Replace the part immediately if the height is less than 5 mm.
On old foreign cars and domestic cars, brush problems are checked using a different method. With the engine running, remove the minus from the battery. If the motor continues to run, everything is in order, the brushes supply voltage.
Fuse failure
The electrical charging circuit of the battery, like any other, is protected by a fuse. It is located in the mounting block under the hood of the car. In “sixes” and “sevens” this fuse is usually designated as F10, but, in any case, it is better to look through the user manual before checking. Most often, when it malfunctions, no voltage is supplied to the battery at all, but it also happens that it is the reason why the battery charging light is on, but there is charging.
The fuse is checked with a tester after it is removed from the socket. If the device shows that the part has become unusable, simply replace it.
Generator circuit open
When the battery light is on, check for an open circuit, the reasons for which may be:
- Poor contact between brushes and rotor rings. This is typical for car owners who do not properly monitor cleanliness under the hood. Over time, the connections become coated with dirt and oil, which increases the resistance in the field circuit. As a result, the generator power drops. To fix the problem, disassemble the device and clean the contacts with a rag previously soaked in gasoline, and check the brush assembly.
- Excitation winding is broken. At the junction of the winding ends and slip rings. The battery is not receiving a charge. The defect is detected with a voltmeter or tester. The devices are connected to the battery and checked to see if the light comes on and if the voltmeter needle has deviated. A negative result confirms a break. In this case, by connecting a probe to each coil and taking readings, a bad one is determined. The breakage area is sealed with a special product containing soft solder. If there is a break inside the system, the problematic coil is rewound or replaced.
- Interturn breakdown. The result of a violation of the insulation of the protective cable.
- Breakdown to the body. Determined by a 220V control. The probes are connected to the slip ring and the core. The control lights up when violated.
- Breakdown of rectifier diodes. The result of overheating.
The battery light comes on: why does the battery light on the panel light up?
Let's start with the fact that every driver, when starting the engine, paid attention to the red battery icon that appears when the key is turned in the ignition. In this case, the battery indicator lights up until the engine starts. In other words, normally the battery icon goes out after the engine starts.
So, when the engine is not running and the ignition is turned on, self-diagnosis of all vehicle systems occurs before starting. After such a check, some indicators go out after a short period of time, others go out after the engine starts. The same thing happens with the battery. If everything is normal with the battery, and while the engine is running, it is being charged, then the battery lamp lights up for a short amount of time (a few seconds) and then goes out.
In other words, the circuit is such that after turning on the ignition, voltage is supplied through the fuse to the battery warning lamp (battery charge lamp) on the instrument panel.
The voltage then passes through the diodes, relay regulator, brushes, slip ring and winding. After starting the engine, the voltage at the terminals of the battery light is equalized, and the light goes out. At the same time, the battery is being charged. If the battery on the panel lights up constantly or such an icon lights up periodically, then this indicates a malfunction.
So, to understand why the battery light is on, you need to look at the reasons why the battery light may come on. Let us immediately note that this indicator monitors the connection between the battery and the generator. Let's figure it out.
The battery charging light is on: possible causes of the malfunction
As you know, a car battery is closely connected to the generator. To start the engine, electricity from the battery is supplied to the starter, but after the internal combustion engine starts working, the current is generated by a generator that spins from the running engine.
In this case, the battery is in recharging mode from the generator. Moreover, if the engine speed increases, then the voltage produced by the generator also increases. To prevent overcharging the battery or supplying too high voltage, there is a relay regulator on the generator.
The main task of the device is to ensure that the current from the generator to the battery is always optimal, that is, the voltage does not depend on engine speed. This makes it possible to constantly obtain and maintain the required voltage.
So, the battery light most often comes on when the battery is not being charged from the generator. It turns out that the driver started the car from the battery, the engine started running, but the battery icon is on (the battery light does not go out).
As a rule, the list of frequent breakdowns includes:
- problems with the relay regulator;
- failure of the diode bridge;
- the alternator belt is broken, poorly tensioned or slipping;
- severe play in generator bearings and wedging;
- blown fuses;
- poor contacts at the battery terminals, at the generator output, on the ground wire;
- generator circuit open;
- wear of generator brushes or brush holders;
- there may be problems with the ignition switch;
Voltage regulator
A part with a direct connection to the generator, due to which incorrect operation of the alternating current device affects the condition of the part.
A visually small detail, malfunctions of which lead to many troubles. For example, overcharging or undercharging the battery. The relay often breaks on cars manufactured in the last 5 years. Main reasons:
- Interturn breakdown of the generator;
- Destruction of generator brushes;
- Diode breakdown;
- Changing the battery poles.
The problem is diagnosed by the battery charge level. Overcharging or undercharging indicates a defective regulator. If there is a malfunction, the part must be replaced as it is not repairable.
What does the battery indicator mean?
After you start your car's engine, the car will perform a test to ensure that the battery or alternator is generating the correct voltage.
Then after a few seconds the warning light will turn off if the dashboard computer determines that the battery or alternator is working properly. If it remains on, the computer will most likely detect a problem with the charging system. If this warning light comes on, you can only use the necessary accessories, including headlights and windshield wipers, to avoid draining your vehicle's battery.
Five problems that cause the battery indicator on the dashboard:
Diode bridge
Placed on the back surface of the generator, it is responsible for converting alternating current. Common faults include breakdown and breakage.
To clarify, check the bridge with a multimeter, placing one probe on terminal 30 of the generator, and the second on the housing. The resistance of a working bridge tends to infinity. First make sure that there is no short circuit in the circuit.
Checking the generator and troubleshooting problems
A simple and proven method, long used by motorists, helps to find out whether the generator is working:
- Start the engine and apply load to the battery by turning on the headlights or heated glass.
- Remove the “–” terminal. To do this you will need a 10 key.
- If after removing the terminal nothing has changed, the engine runs without interruptions, the headlights do not go out, everything is in order with the generator.
- If the headlights go out and the engine stalls, the car's generator is faulty.
Brushes
To check the operation of the brushes, you need to remove and disassemble the generator, then remove the brushes and visually assess their condition. If they are worn, traces of sparking will be visible on the surface. In this case, you will have to replace the entire assembly.
Voltage regulator
This element breaks due to a short circuit in the circuit. It can also be damaged mechanically or connected incorrectly.
Examination:
- Set the limit on the multimeter to 20V.
- Measure the voltage at the terminals with the engine running at idle speed (1-1.5 thousand rpm). Normally, the tester will show 13.2-14 V.
- Increase speed to 2-2.5 thousand rpm. The indicator should increase to 13.6-14.2 V. When the speed increases to 3.5 thousand rpm, U should remain no higher than 14.5 V.
If the measurement values differ significantly from the norm, the most likely reason is a malfunction of the regulator.
Diode bridge
To check the diode bridge, a multimeter is enough. As an example, here is the procedure for testing the 37.3701 generator, which was installed on domestic “eights” and “nines”.
Check with a multimeter to see if there is a short circuit in the circuit:
- Turn on ohmmeter mode.
- Touch pin 30 with one probe of the device, and touch the generator housing with the other.
- A working bridge will produce a resistance value approaching infinity.
The next step is to check the serviceability of the diodes to see if they are broken. The procedure for checking “+” diodes:
- Place the first probe on pin 30, the second on any of the bolts that secure the diode bridge.
- With working diodes, the resistance approaches infinity.
To check the negative diodes, the probes are placed differently: the first - on the bolt, the second - to the generator housing. With healthy semiconductors, the voltage will also be close to infinity.
To complete the bridge test, additional diodes must be examined. To do this, the first probe is placed at pin 61, the second – at one of the bridge mounting bolts. If the diodes are working properly, the ohmmeter will show a tendency to infinity.
Having detected a malfunction of the diode elements, they are simply replaced with new ones. If the soldering is damaged, it is enough to re-solder the diode.
On a note! Diode bridges in generators of all brands are checked the same way, only the numbering of the contacts changes.
Bearings
A faulty bearing causes the pulley to become unbalanced. This is easy to guess by the abrasion of the belt, which leads to its accelerated wear. The second possible sign of bearing failure is jamming or stopping of the generator shaft. They solve the problem by replacing the bearing or the entire pulley. When the bearing plays, a knocking sound appears in the generator.
Contacts
Conduct a visual inspection of the positive terminal of the generator. If there is dirt, dust, oil stains, or traces of corrosion on it, clean the surface. Then do the same with the “mass”. Lubricate the contacts with a protective compound.
If the wire connecting the generator and the battery is damaged, replace it with a new one. Clean all terminals at the same time. If the generator brushes are oxidized, they are also cleaned. But so that graphite dust does not fall on the remaining elements of the generator.
Open circuit
If one of the phases of the generator is broken, you will have to first dismantle it to check. The further diagnostic procedure is as follows:
- Check the bolts connecting the phase terminals to the diode bridge. As a rule, traces of corrosion, poor bolt tightening or dirt are found on one of the contacts. Correct the damaged contact, and at the same time prevent all the others. If the wire is broken, replace it. If the winding wires are damaged, the generator may need to be replaced.
- Check the stator winding for any darkened turns. Inspect the wire insulation and measure its resistance with a multimeter. If you find dark spots on the insulation, it means that the generator is worn out and you need to rewind the winding. After repairing the generator, the problem should be resolved.
A lit battery indicator during normal charging can indicate various malfunctions in the car. To find and eliminate the cause, you need to conduct a comprehensive diagnosis yourself or contact a service station.