Speakers 16 cm in the door
and used a jigsaw to cut out what was unnecessary.
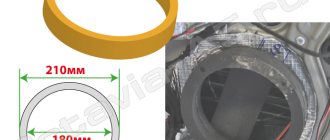
By the way, here are the approximate dimensions, the rest can be adjusted according to location
as a result this was born
then I roughly estimated it on the upholstery and drew
first fitting and comparison of 13 and 16 speakers
nothing interferes, nothing touches
I placed the plywood insert on the sealant and screwed it to the door, the speaker was also on the sealant
put the upholstery and plastic in place
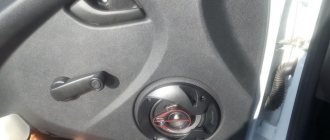
I decided to put the tweeters on the triangles of the mirrors, temporarily for now, maybe I’ll cut down the podium later
Well, on the right everything is similar and it turned out faster
Source
Door trims "Lux VAZ 2110-12" + mounts for 16th speakers.
Hello.
In previous entries I talked about the multiple preparation of doors and door cards (technical hole plugs, backlight lamps, ESP control unit).
Today we will talk directly about installing the skins. I’ll be honest, the process of installing “Lux” cards was simply painful! The skins themselves are great, but the fastenings... I heard about the problems, prepared, tried them on, but to be sure: D During the hasty fittings, I didn’t notice any serious problems. The discrepancies were not great, the largest “run-up” of the fastenings was about 4mm. If we consider individual fixation points, these are all little things. But when you need to latch at once (all six pistons), then millimeter distortions result in very big problems. By the way, from the factory there are 8 clips per door, here on all cards there are fewer! About the process. 1) Selection of pistons, clips.
There are a huge number of them, but due to the peculiarities of the fastenings, only “herringbone” ones are standard (1)
.
Feature: inserted into the hole. I liked the white ones from Priora and the yellow ones from Largus (2)
. At first I tried to remake the fastenings for them (grooves instead of holes).
I attached the clips, but later during the installation process they did not fit. It turned out that in addition to the shift to the right/left and up/down, there is a jamb with long fastenings (plastic platforms). Most of them are not pressed against the metal and remain at a distance, leaving no opportunity for the clip (Largus or Priors) to snap into place.
Further, the so-called “Euro pistons”
Stopped on them. Reviews about Euro pistons are good and the price is not high. Made from normal materials, moderately soft and not hard. Compared to other options, they are dismantled with less effort, for example, from the same viburnum they simply cling tightly (there is a high risk of breaking off the soldered holders from the casing).
2) Accessories for assembly.
New (standard) internal velvets and a replacement for the original “fungi” - lock release button 21700-6105125-00 (Sold as a set, bushings 21700-6105129-00 are not needed). Taped corners of the rear doors.
Front door trims without holes and inserts into handrails. Old scratched handles had to be replaced on all doors.
3) About the nuances of assembly.
Everything is clear with the fastenings, there was a complete collapse. In addition, it was necessary to return the ten-point locking rods to their place; the priors have a different bend and length. The locks were installed from 2170 along with the rods!
In general, the velvets snap in place normally, they rise a little at the edge due to the fact that they fit on the ring around the button (can be trimmed).
The handles are very tight in several places; I had to trim the hole to press it tightly to the card. Moving plastic parts were greased with Permatex white lithium grease
, now when opening the doors there are no extraneous creaking sounds (door opening handles, pulls). Otherwise, everything is fine) The triangles fit into place.
In addition to the clip mounts, there are 12 places for self-tapping screws; I didn’t give them up. Extra fixation won't hurt! Bought from a hardware store, painted black. The original screws turned out to be short.
Source
Audio system in VAZ-2110
Andrey RYABOV, Penza region.
I come from the Penza region and lived there until recently. In a nutshell, I will say that our mass passion for car audio is gaining momentum. The time when they installed a “radio tape recorder and 6 speakers,” and always from the same company, is becoming a thing of the past, and that’s very good!
- System type: audio
- Composition: 3-way front + rear + subwoofer
- Source: Alpine CDA 9847R
- Amplifier: Crunch PZI-4125
- Acoustics: Ivolga SB-6.0, Ivolga CS-2.5 MID, Oris AS-694
- Subwoofer: Alpine SWL-1242
Now let's get down to business. It’s very interesting to read the “Own Game” section: you can see something new and learn not only from your own mistakes. I decided to send you photos of my car and what I did with my own hands.
At first, my head unit was a Pioneer DEH-5730. Later I changed it to Alpine CDA-9847R. I chose this model because I am convinced that for the money it is the best option.
Acoustics. The Kicx GFQ-6.2 components were left over from the old car, but I decided to experiment. In my search I settled on Ivolga SB-6.0 components. Inexpensive, quite bassy and not picky about installation. The low-frequency speakers are installed on podiums with a slight inclination towards the listener and are secured with self-tapping screws to the metal of the door. The doors are treated from the inside with Kicx noise and vibration insulation sheets. The podiums are made of plywood, polyurethane foam, automotive putty and covered with carpet. I will say in advance that at the time of work I did not have a camera, so I was not able to capture the assembly process, only the result. Next time I will record everything, and I have no doubt that the next time will come, it is not customary for us to mark time.
The HF heads are made using the so-called “knitted technology” already known to everyone and are also covered with carpet. During preliminary listening, I decided to direct them to a distant listener. Even when conceiving the system, I assumed a three-way front; with two components so far apart, the sound stage would be ruined. For the role of the midrange unit, we purchased components that are not very often found in the work of professionals with multi-thousand dollar budgets, but which regularly appear in the “Own game” section - Ivolga CS-2.5 MID.
The Alpine head unit, in my opinion, is the optimal combination of price and quality for a user with claims
The podiums for mid-frequency drivers are made almost in the same way as for low-frequency ones. I secured the plywood rings to the panel at the required distance and height, and then foamed them to give the base a curved shape. Next, I cut the foam with a knife, giving the approximate shape of the upper surface, covered it with putty and treated it with sandpaper for a long, long time. Then I covered it with carpet, the result was these compact podiums. All crossovers are hidden under the dashboard. The rear shelf for subwoofer contains Oris AS-694 coaxials.
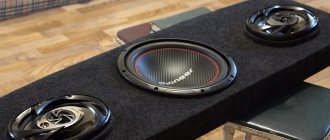
The subwoofer is built on an Alpine SWL-1242 head. Since my duty sometimes requires me to transport bulky cargo with the rear seats removed, I decided to make a subwoofer-amplifier unit that could be removed at any time. I calculated the volume of the box in Speaker Shop, correcting the results according to the recommendations in the “A3” test. The closed box turned out to have a volume of slightly less than 30 liters. The walls of the box consist of double sheets of 18 mm chipboard, glued together with construction adhesive and fastened with self-tapping screws. All wall joints are also coated with glue. I also covered the finished box with carpet, and after the first listening I also covered the inner walls with penofol. The sub diffuser is directed into the rear shelf, which is also made of chipboard and is acoustically transparent (the hole in the center of the shelf is covered with carpet). As already noted, I wanted to assemble a single unit, so both the Crunch PZI-4125 four-channel amplifier and the Stinger capacitor were screwed to the wall of the subwoofer.
The tweeters are embedded in the pillars, and the midrange speakers in compact podiums are “built on” on the dashboard
Connection. Midranges with their crossovers are connected to the front channels of the amplifier in parallel with the Ivolga SB-6.0, since the sound of the midrange heads from the built-in “head” amplifiers is not at all the same, and the amplifier can cope with such a load. The second pair of channels in the bridge connection serves the sub. Rear coaxials operate from the “head”.
The tuning was done by ear using the AudioDoctor FSQ disc. The main problem was that the front and rear of the amplifier work at different loads, so it took a long time to turn the channel level controls to achieve the desired result. The amplifier filters were used, the “Bass boost” for the subwoofer was added a little; In addition, I took advantage of the fairly wide adjustment options of the head unit.
Bottom line. The entire system was assembled in the apartment and on the balcony, and installed near the house, since I don’t have a garage. Therefore, the work largely depended on what the weather presented to us. After all the settings, the sound turned out to be good, just right for such musical styles as progressive, trance, house. In general, what was required. Of course, there are shortcomings in the system (the amplifier is “not a fountain”) and a lack of experience, but there was no goal to prepare the car for the competition stage. Although who knows, if the weather permits...
6-inch Ivolga “silver bullets” are installed traditionally in the door corners
Bass enters the cabin through a newly-made, anti-reflective rear shelf.
To ensure ease of transformation of the trunk, the subwoofer box, amplifier and buffer capacitor form a single unit
Tags: VAZVAZ-2110
Installing audio speakers in the front doors
In VAZ cars of the “tenth” family, the installation of front speakers is provided in the windows of the internal panels of the front doors. The window sizes are designed for speakers with a diameter of 130 mm. An important point when installing speakers is the method of routing the wires from the head unit to the speakers. As the doors open and close, the wiring harness located between the end of the door and the body pillar will constantly bend. Therefore, the wires should be reliably protected.
The wire can be taken out from under the instrument panel and passed under the door trim. In this case, the wire in the cabin will be constantly visible, which is not very aesthetically pleasing. In addition, such a wire can easily be damaged, and in the place where it goes under the upholstery, the upholstery will not adhere to the door. This, in turn, will lead to loosening of the upholstery and, accordingly, rattling and squeaking when moving, which will certainly appear after a short time. In addition, the upholstery, constantly acting on the wire, will grind it. This method of laying wires can only be considered temporary.
In order to lay the wires more thoroughly, special holes are provided in the A-pillars and the ends of the doors. However, simply passing the wires through the holes is only half the battle, since vibration will quickly rub the insulation of the wires against the edges of the holes. Therefore, to protect the wires, it is necessary to install a corrugated casing between the door and the stand. Such casings are commercially available and inexpensive. Speakers are usually equipped with connecting wires. When connecting speakers to the head unit, it is necessary to take into account the polarity of their terminals.
Source
Location and connection diagrams
There are also several ways to play music in a car with the participation of a subwoofer. In most cases, the subwoofer speaker is located in the luggage compartment, which allows for a minimum number of alterations. Only with such an organization of music in the “ten”, the sound must overcome a closed space in the form of a sedan partition, which will significantly reduce the power of the bass.
Another scheme involves the option when the 2110 subwoofer is installed on the rear shelf. This technology for creating sound in a car does not have the disadvantages described above, however, its implementation can also pose a problem.
Note. We are talking about “damage” to the rear shelf. The fact is that after this the “ten” will have to be sold with built-in subwoofers, otherwise some of the buyers will like the hole in the shelf.
Subwoofer in the rear shelf of a VAZ 2110
Now directly about the schemes. As it may seem at first glance, connecting according to the diagram is a delicate and complex matter, but this is not entirely true.
Here are a few points:
- An active sub can be integrated with speakers by connecting the linear outputs of the head unit to the RCA inputs of the sub;
- Power can be supplied from the battery to the positive charges of the subwoofer;
- As for the minus, in most cases it is carried out from the car body, but for powerful subs it is already from the battery.
Important. You cannot install wires and cables near standard automotive electrical wiring, as this may cause interference.
Amplifier for subwoofer for VAZ 2110
For competent and error-free integration of the amplification device, it is more effective to use a ready-made installation kit. Much here will depend on the acoustic wiring, on which it is recommended not to skimp at all.
Regarding connecting the amplifier:
- The power cable should run along one side of the car;
- One of the ends of the wire is connected via a separate capacitor to the positive of the battery;
- The other end is connected to the positive output of the amplifier;
- The ground cable usually goes from the car body to the GND amplifier;
- The rest of the wiring (linear and control) should be laid as follows: it goes to the amplifier along the other side of the “ten” to avoid intersections with power cables. In this case, manager The cable must be connected to Remote, but linear. – to the corresponding amplifier inputs;
- The speaker cable runs from the amplifier to the speakers.
Installing a VAZ 2110 subwoofer according to the diagram
Specific details about connection diagram options can be found in the table below.
| Scheme name | detailed instructions |
| Simple scheme 1: front and rear | The connection is made via front and rear speakers without other additional components. |
| Simple diagram 2: front, rear and tweeters | The connection is made through the use of 3 components: front speakers, rear speakers and tweeters (the latter are usually placed on the sides of the unit on the “tens” stands). |
| Complex circuit 1: front, rear, amplifier and subwoofer | Connection using front and rear speakers, tweeters, subwoofer and amplifier. |
| Complex circuit 2: front, rear and amplifier | In this case, the front speakers are connected to the head unit, and the rear speakers are connected to the amplifier. |
| Complex circuit 3: front, rear, subwoofer and amplifier | The front speakers are connected to the head unit, and the rear speakers and subwoofer are connected to the amplifier. |
| Complex circuit 4: front, rear and amplifier | Front and rear acoustics go to an amplifier (4-channel) or amplifiers (in this case, the 1st is configured for mid-high frequencies, the second for mid-low frequencies). |
| Complex circuit 5: front, rear, subwoofer and amplifier | The front acoustics go to the first amplifier (tuned for the mid-high frequency range), the rear acoustics together with the subwoofer go to the second amplifier (tuned for the mid-low frequency range). Or a 5-channel amplifier is used. |
| Bridge connection | All elements are connected via a bridge circuit. |
Installing audio speakers in the front doors
Die-hard motorists value a good audio system just as much as a good engine. It is she who is the driver’s constant companion on long-distance trips and an indispensable assistant for car repairs in the garage.
Today I would like to talk about a separate element of any car music system - acoustics, or speakers. The sound quality of the entire system will depend on the correct selection and proper installation.
So, what types of car speakers are there and where is the best place to install them?
Which 16 cm speakers are best to put in a car without an amplifier?
The main thing in choosing a speaker is to decide on the type of speakers and what kind of music the car owner likes to listen to. Most acoustics reproduce individual frequencies well, but there are also balanced models.
If the user needs a car speaker with bass sound, then Morel Tempo Coax 6 is suitable for this purpose.
Among the speakers that play music equally across the entire range, the Audison Prima APK 165 stands out.
And for those car enthusiasts who are looking for which speakers without an amplifier are best to buy for their car, it is recommended to take the SoundMAX SM-CSA603.
How to choose the right speaker size:
By opening the speaker protection (grills), you can easily determine the speakers of what diameter you need. Now let's talk about the subtleties that you may encounter.
It is a great success to fit tweeters into standard places without modifying them, therefore, when installing tweeters, standard mounting points are usually modified.
When installing speakers in a door, you should take into account their depth, because... Excessively deep speakers will interfere with the glass.
Having decided on the budget and the required size of speakers, we will begin selecting new components.
Installation of 16 speakers in Priora
When installing non-standard speakers, change the speakers in the front doors of the Priora, then in the rear and on the trunk shelf. Additionally, audio components are mounted in the rear doors.
Speakers for the front doors of Priora
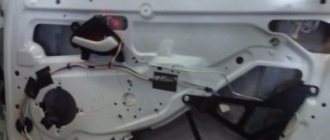
The first stage of installing the speakers is removing the interior trim in those places where the components will be installed, in this case the front door panels. For good sound, noise and vibration insulation (NVI) of the car body elements in which the radio speakers are installed is necessary. Therefore, in its absence, it is advisable to use the disassembled state of the front doors and glue vibration and noise insulation material.
Installing the speakers from the front involves cutting metal, since the standard holes are designed to mount speakers with a diameter of 13 cm. The easiest way to do this work is to use a jigsaw with a metal file.
First you need to mark the metal of the front door, for which you use a template cut out of paper or cardboard according to the size of the column. Sometimes a ready-made template is included with the audio components. Move the center of the new hole straight up, in this case the 16 cm speaker will not interfere with the fastening of the front door trim.
After cutting out a piece of metal, to prevent corrosion, it is advisable to treat the edges of the hole made with an anti-corrosion compound, or better yet, prime and paint.
The place where the speakers are mounted is covered with noise and vibration insulation. If there is no material, foil-coated isolon is suitable. To prevent the transmission of vibrations from the speaker, it should be installed through a spacer made of plywood or similar material, which is also covered with sound insulation. The radio speaker is attached to the spacer with self-tapping screws.
It is necessary to cut off the plastic edge of the door card located around the holes in front of which the radio speaker is installed. After that, all that remains is to connect the audio cables, assemble the casing, and you can enjoy the improved sound.
In addition to radio speakers, some audio systems include crossovers and tweeters (tweeters). As a rule, the crossover has a place on the front door map, and the tweeters are installed on the triangular elements of the interior trim opposite the place where the side mirrors are mounted. Advanced acoustic systems require the installation of tweeters on the A-pillars.
How to install speakers in the rear doors on a Priora car
There is no standard place for installing rear door radio speakers. Therefore, in order to install speakers in the rear doors, it is necessary to cut out part of the door trim. The internal space of the rear doors is limited; installation of speakers with a diameter of 16 and even 13 centimeters requires the manufacture of a spacer. If it protrudes beyond the door, it is sheathed with carpet, leatherette or other material.
Back to rear shelf
The rear shelf is a place for oval speakers. Among the manufacturers, pay attention to JBL. If necessary, holes on the shelf are cut to fit the size of the speakers to be installed. The material of this part is quite soft, so it cuts easily.
Installation of front speakers 16 cm in diameter, installation of speakers without cuts and podiums
The content of the article:
1. Installation of front speakers 16 cm in diameter
2. Installation of 16 columns in Priora without cutting
3. Installation of 16 speakers in a door without podiums
Installation of front speakers 16 cm in diameter
I finally got a radio. Inexpensive radio tape recorder SoundMAX SM-CCR3037.
SoundMAX
I bought Mystery speakers.
As a friend advised, I took 16, they should have better sound. But the question is how to install it in the door, because the size is standard for 13 speakers. Today I decided to install it myself. Below is a photo report of the installation process of the front speakers. To remove the trim you will need: a screwdriver and an asterisk wrench. Thanks to AvtoVAZ I will have to buy a set of asterisk keys. There are probably many more such pitfalls.
Looking ahead, the plastic, as well as the clips on the doors of the Priora, are not bad, compared with the former two-piece.
There is a standard place for speakers for 13. There is audio preparation - it’s correct to say two wires for the speakers are brought out.
This piece of paper was already included with the speakers, all I had to do was draw a circle in a convenient place.
For the future, you shouldn’t move the hole as in this picture. The outermost clip on the casing will touch the speaker. I made a hole on the second door without moving it higher to the side. It was inconvenient to attach, but the casing fit perfectly.
To securely attach the speaker to the door sheet, I used 9mm as a backing. plywood
To prevent the clip fastening on the casing from touching, I ground down the edge of the speaker.
Speaker on spacer
Speaker on plywood spacer
tried on the speaker
There was no suitable material for sound insulation, but there was one at hand - foil-coated isolon.
That's not a professional thing to say, I agree. But isolon is better than nothing at all.
Everything is ready, you can put on the trim.
installation complete
cover with casing
original grille
Installation of 16 columns in Priora without cutting
The process itself is not complicated, I chose the music carefully, but not expensively, I think this option will suit many.
The basis was a Pioneer head, which I got from my father when I was still driving a 99. A nice thing with AUX and Bluetooth. I don’t remember the name, but it’s not so important, because now most tape recorders play “at the level”, that’s enough for me. The most important incident for me was the purchase of speakers, I walked around a lot, listened, and chose. I settled on an Alpine SXE-1750s in the front and an SXE-69c2 in the rear. Good mids, not crunchy lows + tweeters included (albeit without crossovers, but it doesn’t matter, they pull). I read a huge number of blogs about installing 16″ speakers in the front doors. The vast majority of them in the text seemed to hint that the doors would have to be sawed and spacers made. I decided to buy spacers at the car market so as not to suffer and make a mistake. No problem, I thought, and armed with patience, a tool and a jigsaw, I went to the dacha.
In analysis, under the noise already, the bottom layer
Having disassembled the car (doors, sills, back seat), I began to make noise on the doors. For one door, a sheet of foil-coated isolon was enough (forgive me if I named this material incorrectly, the dealer sold it to me under that name). Next, having tried on the column itself in the standard 13″ position, I was pleasantly surprised that the core is almost completely hidden in the door and, together with the spacer, reassures us that there are no hard metalwork sculptures with Zhiguli metal.
Shelf, nothing interesting, cut with a jigsaw without problems, glued well
Spacer
Having thought about it with my father, we decided to transform the little guy’s spacer, namely, we sawed it under the bend of the door and “oh, miracle.”, the column fit “like a glove,” the only thing was that we had to trim the plastic of the door a little from the inside, because touched a little and could create unpleasant rustling noises when moving.
Plastic, the main thing is not to overdo it and not touch the skin
There was no tool, the plastic was scratched a little, no big deal
The spacer is cut
Almost in original mounting holes
The place for tweeters was chosen solely from an aesthetic point of view, because... They don’t give any special highs, and I didn’t want to turn them up on the racks.
The door is the final result
The rear speakers installed without problems after a little customization (I just like that word) of the shelf. To support low frequencies, a simple Korean active subwoofer Fusion FBS-AW12 was chosen. There was also no hassle with its installation, I will only say that it is more convenient to throw the power cable not to the battery, but to the fuse block, and this option looks more successful and many times more convenient, and after some manipulations with the block itself, it generally looks like a standard one the wire.
Just drilled 2 holes and that's it
Final view
Installation of 16 speakers in a door without podiums
On the top ten, these speakers stood on podiums on top of the casing, which made it possible not to cut the casing or cut out the metal of the door.
But on the Prior, you have to cut the trim for all the podiums, and the podiums that I saw take up a lot of usable space, and some do not allow the glove compartment to open completely.
I decided not to cut the trim, but to cut the doors into the metal (it’s more reliable, and it sounds better at 16 than at 13)
I traced the outline of the new hole using a template.
Cut it out with a jigsaw and a metal file
Extra
I attached the speaker, marked it and drilled the mounting holes.
Since the landing plane is not level, I glued it in 2 layers in the depressions, and then glued it on top. The plane is now level
The landing plane is flat
The bezel is a centimeter from the speaker. Just in case, you need to cut it off.
Fitting
Final map view
It’s difficult to compare the sound (because I didn’t glue the door in the top ten), but it sounds decent.
https://www.drive2.ru/l/288230376152566849/, https://www.drive2.ru/l/4035257/, https://www.drive2.ru/l/211248/
next article:
Making and installing an acoustic shelf in a Lada Priora with your own hands
Contents of the article: 1. Making an acoustic shelf in a Lada Priora with your own hands 2. Capital installation
Rating 0.00 [0 Vote(s)]
Why do you need to install so many speakers:
Since the time of the first manufacture, people have realized the advantage of the division of labor. Similar benefits can be obtained from the “division of labor” of speakers. Each speaker must play its own frequency range: tweeters - high, mid-bass - middle frequencies, subwoofer - low. Installing speakers for each range will allow you to get the highest quality sound and audio stage.
An audio scene in a car is the construction of a system in such a way that during playback you can clearly “separate” the sound locations (the direction where the individual instrument is located), i.e. as if you are in front of a real stage.
Amplifier
A subwoofer amplifier is a must-have component. Without it there will be no amplification and the current is linear. the output of the PG will be insufficient for the normal functioning of the subwoofer.
How to install a subwoofer in a VAZ 2110
The amplifiers themselves also differ by class:
- Class one includes devices with low efficiency but the purest signal. A-class amplifiers, as they are called, are, however, relatively expensive. They are not used so often in automotive systems.
- B-class amplifiers are almost twice as efficient as A-class amplifiers, but due to high distortion they are unpopular.
- C-class devices are capable of delivering up to 75 percent efficiency, which makes them very efficient. Again, due to high distortion, these amplifiers are not suitable for Hi-Fi audio systems.
How to connect a subwoofer to a VAZ 2110
- AV-class amplifiers borrowed all the strengths from devices of the first and second types. Thus, they have clear sound and good efficiency. Today they are considered the most popular for Hi-Fi acoustics.
- D-class amplifiers (see Class d amplifier for a subwoofer: advantages and differences from others) are modern devices. Unlike other classes, they process the signal digitally, and due to their compact size, they are ideal for use in a car.
How to connect a subwoofer VAZ 2110
What speakers to put in car doors
While two-way speakers satisfy most car enthusiasts, those who love good music require better speakers. A good model for any car would be the three-way coaxial speaker system PioneerTS-1339. The compact size allows you to install the speakers in the doors of any car. Users note the high sound quality and reliability of the design. The Pioneer coaxial speaker system provides a power of 40 watts, which at its peak reaches 200 watts, and such an increase in power has almost no effect on the sound.
The sensitivity of the dynamic heads at 91 dB allows the speakers to be connected to any low-frequency amplifier. Users note that an additional amplifier is not required for normal operation of the acoustics, since the Pioneer 1339 works well with standard equipment. The complete acoustics of a car can consist of four similar speakers, with two working as front speakers and two as rear speakers.
Coaxial and component speakers, what are they:
The coaxial speaker is designed to reproduce the entire range of frequencies and combines a high-frequency and mid-range speaker. They come in one, two and three-way - which looks like additional speakers located on the main body and are designed to reproduce, for example, high frequencies).
Component speakers are actually a set of two, rarely three pairs of individual speakers, each pair of which reproduces a different frequency range. The division into the range occurs on the crossover, which is included in the kit. The principle of operation of a crossover is to cut off an unnecessary part of the range for each pair of speakers, for example, for tweeters, the middle and lower parts of the range are cut off.
Variety of speaker systems
Acoustics for cars are conventionally divided into the following types:
Coaxial acoustics - produced in the form of a complex structure, always consisting of several speakers placed on one suspension. This is usually one or two tweeters and midrange speakers, and one woofer. This type is more affordable and makes it possible to obtain higher sound quality compared to standard car systems.
Please note: it is difficult to recommend or not recommend this type; if you purchase a speaker system from a trusted manufacturer or a well-known brand, then the design, price and quality of the sound stream will vary. We advise you to carefully read the technical characteristics of the system and the material before you buy. It's better to listen if possible.
Component acoustics - includes several separate speakers: a low-frequency speaker for transmitting low frequencies, as well as a tweeter for high frequencies. As a rule, the manufacturer also provides a crossover, which is made as a separate unit, which is responsible for separating low frequencies from high ones. This type is much more difficult to install, is more expensive, and compared to a coaxial system it has better sound quality.
The main advantage is the ability to choose the location for mounting the tweeter. The disadvantages include that installation requires knowledge of setup and installation, as well as cutting holes yourself.
Important information about acoustic shelves
It would be advisable that the owner of a VAZ 2110 car, before making the shelf himself, familiarize himself with the following information:
- Shelves are usually made from MDF or natural wood. Generally, wood is the better option as it is durable, but in terms of appearance and the benefits that an audiophile is looking for, the two materials are essentially the same;
DIY acoustic shelf 2110
- All acoustic shelves, no matter what their properties, type or purpose, must be covered with some kind of material.
Note. Basically, it's carpet. But it also happens that the owner has to cover the shelf with another material, in order to match the interior trim, which can be made of Alcantara or leatherette.
- The acoustic shelf must be firmly fixed in place. It should not creak or wobble;
- The acoustic shelf does not have to be installed at the back. Today, side acoustic door shelves are known, the installation of which does not require replacing manually operated windows or boxes placed under the seats.
Note. All this taken together is called an acoustic system and is aimed at producing a cleaner, more powerful sound.
Making the rear shelf
So, first, let's look at how you can make a rear acoustic shelf with your own hands, spending a minimum of time and effort on it. Begin:
- We find a piece of plywood, the thickness of which would not be less than 10 mm and more than 20 mm. The shelf can be made either single-layer or multi-layer;
- We take the dimensions of the workpiece using a factory shelf as a template, which will need to be carefully dismantled, or a ready-made version downloaded from the Internet.
Note. Creative people draw their own template based on the appropriate dimensions. Thus, they add individual touches and original solutions to the product.
- The finished template now needs to be attached to a sheet of plywood, take a pencil and trace the workpiece;
The process of working on an acoustic shelf
- Now we arm ourselves with a jigsaw and cut everything along the lines.
Note. In this case, it is important to act slowly, remembering the rule: measure seven times - cut once. In the process, you need to adjust the shelf in place, check everything, cut off the excess. Careful attention should be paid to the cracks between the shelf and the rear window, trunk hinges that could become an obstacle, etc.
- We determine in advance what kind of shelf we will make: multi-layer or single-layer. In the first case, we get a shelf with better rigidity and a more beautiful design. But to make it you will have to spend more time and effort. In particular, the sheets will need to be firmly secured to each other using PVA glue and self-tapping screws;
- It's time to cut holes for the speakers (see How to choose speakers for a car radio on your own). Here we will need to build on the size of the speakers that we will install.
Note. Let us immediately note that it is recommended to protect plywood from moisture. To do this, it will be useful to treat it with drying oil or paint (you can do both). It is advisable to paint the material in a ventilated area and leave it to dry for at least a day.
- After all this, all that remains is to reupholster our shelf with the appropriate material (carpet, alcantara, substitute). The material must be covered with the correct glue.
Note. For carpet, Yerevan glue Nairit or some kind of aerosol glue is ideal.
- As a result, the rear shelf is ready and all that remains is to install it.
Advice. If we are working with carpet, then it can be made into a perfectly “obedient” material in your hands using ordinary water and a hairdryer. By sprinkling a few drops of water on the carpet, you can achieve its “obedience” if you tighten it properly and dry it with a hairdryer. The material will take absolutely any shape.
As a rule, the rear acoustic shelf is not left like this. It is modified in the following ways:
- They make a recess in the shelf itself for storing various things. This is easy to do if you use two sheets of plywood: one at the bottom, the second with holes for the speakers at the top;
- On the rear shelf you can make podiums for acoustics, thereby giving direction to the sound. For this purpose, inserts from the same plywood are used, installed at the appropriate angle in the form of a ring. Just don’t forget about giving strength to such podiums (they need to be lubricated with epoxy glue and then treated with polyurethane foam);
How to make an acoustic shelf 2110 with podiums
- The rear shelf can be made soft if foam rubber is placed at the manufacturing stage (upholstery).
Production of an acoustic system in the door of a VAZ 2110
Acoustic system in VAZ 2110
If the windows in the doors of the VAZ 2110 are mechanical, then you will have to replace them with electric ones. This will make it possible to free up additional space by allowing you to install a shelf with podiums here (acoustic podium).
Note. Typically, the layout of such a podium in the door should have a hole cut out to fit the diameter of the acoustics. The layout must have the required depth, and the speaker must be installed there so as not to touch the metal part of the door.
Again, to make such a podium, plywood is used, pre-treated with moisture-resistant substances (paint, drying oil). As for the thickness of plywood, it is advisable to select it within the range of 12-15 mm.
Advice. In order for the doors of the VAZ 2110 to close without interference, the podium with the shelf must follow the curves and shape of their front part.
Such a shelf with a podium or several podiums must be well fixed so that it does not wobble or creak.
Sound system VAZ 2110 in the door
How to choose speakers for yourself:
There are two fundamental types of speaker selection: listening at a stand and selecting on the Internet. Each of them has its own advantages and disadvantages. At the stand you can hear the speakers in color, compare several manufacturers, choose the best option, but it is worth considering that in the car they will, in most cases, play differently. Choosing from reviews on the Internet allows you to buy the best option in terms of price-quality ratio, but everyone’s hearing is different and what plays well for one, for another is a chaotic set of sounds. The same set plays differently in different brands of cars. Choose speakers according to your preferences, because each speaker, as well as audio systems, are designed for certain types of music, be it classical, rock or club music. You can read about the quality of playback by a particular speaker of your favorite genre of music on specialized forums.
Speaker sizes
Before you buy acoustics, you should understand that devices from the same series often have different design features. How to correctly determine what is most important – a presentable appearance or speaker parameters?
The car owner chooses the speakers at his own discretion. The choice depends on the type of system, the size of the car interior and the musical preferences of each individual.
In the event that it is not possible to increase the staff position. This problem is due to the characteristics of the car or the complete lack of other options for installation.
Speakers with a diameter of 20 cm or 8 inches are considered common. Such models are perfectly combined in three-component acoustic systems. They play the role of a high-frequency link and ideally reproduce average vibrations. Huge speaker models are both an advantage and a disadvantage. They require special effort and experience to install in the front door.
Quite rarely, but still used, two-component systems; their sound quality is much higher than that of coaxial ones. The most optimal use case would be a 20 cm speaker in an acoustic system that does not have a subwoofer.
Currently, manufacturers do not use 6.5-7-inch speakers in the presented models, although they have improved capabilities for reproducing low-frequency vibrations.
We recommend that you familiarize yourself with the speakers, which have a diameter of 13 cm or 5.25 inches. This option is perfect as rear voice acting in a front speaker system. Suitable if there is not enough space in the car showroom for installation work. According to experts, it is better to refrain from such experiments; the systems are limited by bass. If, when replacing the standard system, it was discovered that it is not possible to install speakers of this size, we recommend considering oval models, the diameter of which is 13x18 cm or 5x7 inches.
Quite often they ask about models with a diameter of 10 cm; in this version, the reproduction quality is significantly low. When choosing these models, you should understand that it is better to complement your acoustic system with bass support, for example, midbass speakers.
When choosing a particular model, drivers usually look for inexpensive products. Remember, if you are interested in sound quality, take a look at other options that experts advise. The total cost of such speakers is significantly higher than for 16.5 cm coaxial models.
A fairly good option that deserves attention are three-component systems with diameters of 16.5 cm, 10 cm and HF with a built-in crossover. This type has a compact size and is more difficult to integrate into the front part of the car interior.
Important: all manufacturers recommend paying attention to small speakers that are easy to install. When considering such options, remember that all other characteristics automatically deteriorate: the tonal bass is automatically disrupted, the quality of midbass transmission itself decreases, and these are quite good reasons to think about it.
Types of subs
Without going into too much detail, let's say that there are 2 main types of subs:
- Active speakers are equipped with a built-in amplifier. Organizing sound in the “top ten” with the help of these subs is much simpler and does not require specific knowledge or the use of additional components.
- Passive speakers are a great area for experimentation. In this case, you can arrange the sound in such a way that passengers get the impression not of an ordinary car showroom, but of a real concert hall. True, you will have to supplement such a sub amplifier.
Installing a subwoofer in a VAZ 2110
Note. The quality of active subs in most cases will not satisfy the tastes of a true music lover. If you consider yourself a connoisseur of good, real music, it is better to opt for passive speakers.
Box
Passive subs are divided, in turn, into 3 types:
- The design is of a simple type, made in a ZYa box. There are no air holes in this case. The weaknesses of this design are weak power, the strengths are high-quality bass.
- A more common, but slightly complex design has a special hole in the box for air to pass through. The advantages of this option are a relatively higher efficiency coefficient than in the first case, a bassier and deeper sound, the minus is high cost.
- The third option is a bandpass housing (see Bandpass subwoofer - the best design), rarely used and rather complicated, but with good properties.
Installing a subwoofer on a VAZ 2110
Diameter
In addition, subwoofers differ in diameter. Typically, 12-inch speakers are more popular, although 8, 10 and 15-inch models are also known. It is worth knowing that the larger the size of the speaker, the more powerful the sound will be, but at the same time the box increases, taking up more space in a cramped car interior.
Subwoofer in the trunk of a VAZ 2110