Spread the love
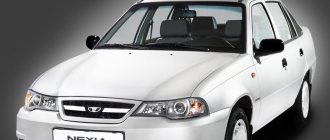
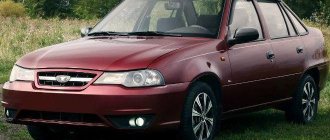
The Daewoo Nexia car is in great demand in different countries. This middle-class sedan model was built in Germany on the basis of the 1984 Opel Cadet. Its production was in five countries, the cars that were blown up in Russia were assembled in Uzbekistan. In our country, the assembly of large components for the Daewoo Nexia has been established. But in 1997, it was decided to stop production assembly, and after that all production was carried out in Uzbekistan.
This model was restyled in 2008, the front and rear headlights were updated. Also, the modified bumpers began to look more current. After restyling, the interior of the car became more modern; it began to resemble the interior of an old cadet less. Depending on the configuration, the car was equipped with air conditioning and power steering. But to reduce the cost, cars could be produced without electric windows and with unpainted bumpers. Nexia had two engines, eight valve and sixteen, after restyling these same engines became a little more powerful. With rare exceptions, 4-speed automatic transmissions were installed on the cars, but most cars were equipped with a 5-speed manual transmission.
The Daewoo Nexia has always been an affordable car, so in order to save time and money, the owners of this car will find it very useful to have information about the lamps used for it and information about replacing them. With the restyling, changes affected both low and high beam lamps. We will tell you about all types of lamps used on this car, and also consider their power.
We can also recommend lamps for low and high beam headlights from such manufacturers as: Osram Night Breaker, Philips X-Treme Vision, Koito Whitebeam
The article on our website, size of wipers for Daewoo Nexia n150, will be useful
1 Low and high beam lamp - H4 halogen lamp; power 60/55 watts. Cylindrical in shape, with three electrical contacts. Has two filaments.
2 Front fog lamp - H3 halogen lamp with a power of 55 watts. A small lamp with one wire at the end.
3 Reversing and turn signal lamp - single-pin incandescent lamp PY21W, 21 watt power.
4 Taillight and brake signal lamp - two-pin incandescent lamp with a metal base P21/5W, power 21/5 watts.
5 The lamp for the interior lighting, glove compartment lighting and trunk lighting is a C10W lamp, 10 watts. Cylindrical in shape, 30 mm long, with two metal contacts at the edges.
6 License plate lighting lamp - a small single-pin W5W lamp with a power of 5 watts.
7 The center console backlight lamp is a small single-pin lamp W1.2W, 1.2 watts.
8 The instrument cluster illumination lamp is a small single-pin W3W lamp with a power of 3 watts.
Lamps for Daewoo Nexia n150
Lamps for the front headlight of Daewoo Nexia N150
1 Front turn lamp - yellow single-pin incandescent lamp PY21W, 21 watts.
2 Low beam lamp - H7 halogen lamp power 55 watts. Cylindrical in shape, with two contacts.
3 The front lamp is a small single-pin W5W lamp with a power of 5 watts.
4 High beam lamp - halogen lamp H1; power 55 watts. Lamp H1 is smaller. A small glass cylinder at the end where the filament is located.
5 The lamp in the fog lamp is a H11 halogen lamp. L-shaped, two-contact lamp, 55 watts with a plastic base.
Tail light bulbs for Daewoo Nexia N150
1 Brake signal and side light lamp - two-pin incandescent lamp with a metal base P21/5W, power 21/5 watts.
2 Turn signal lamp - yellow single-pin incandescent lamp PY21W, 21 watts.
3 Reversing lamp - single-pin incandescent lamp PY21W, 21 watt.
4 Rear fog light lamp - single-pin incandescent lamp PY21W, 21 watts.
Causes of bad light and ways to solve them
Of course, there can be a lot of reasons, we will look at the most common of them, which you can deal with yourself:
| Replacing light bulbs | Standard 55-watt options often do not provide the required brightness due to a design flaw in the reflector. Experienced car owners recommend using Philips Vision Plus lamps with an indicator of +60% illumination, this can significantly improve the quality of the luminous flux, the only negative is the high price and shorter service life, but this is the norm for this type of product |
| Adjusting the headlights | On the motor side of the body there are two adjusting screws that move the beam left and right and up and down, with their help you can make adjustments (how to do this is described in other articles on this site). It is important to set according to the instructions, otherwise you will blind oncoming drivers |
| Keeping it clean | Due to the fact that the light in this model is not very powerful, even minor dirt on the glass causes visibility to deteriorate, so periodically wipe the headlights, and if the road is long, it is advisable to stop every 50-100 km in order to wash or wipe dirt |
| If the low beam goes out | If the low beam on the Daewoo Nexia does not light up, we can recommend the following: when both headlights do not work, the cause will most likely be either the steering column switch or the fuse box. It is necessary to check all contacts using a multimeter; the operating instructions will help you understand the system better |
Important! In any case, if a malfunction occurs, always check the fuse first, then look at the contacts, and then the bulbs. Only if everything is normal with these elements, you need to look for the problem further.
Source
Replacing the low beam lamp on Nexia
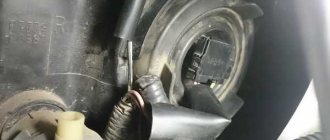
Since the headlight unit on the updated model has become larger in shape and replacing the low beam lamp has become more difficult, we will tell you how to do it as quickly as possible.
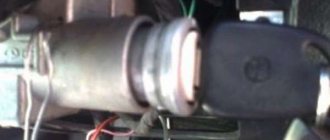
You need to remove the air intake
Next, you need to unscrew the plastic cap covering the lamp
Then remove the electrical connector from the lamp
Then you need to remove the metal spring holding the lamp and pull out the lamp itself. Assembly is carried out in reverse order.
Daewoo Nexia Forest predator › Logbook › Replacing head light bulbs
Almost every Nexia owner will say that their light is not so hot, but if you take my car specifically, then it was murder. In the right headlight there was an ordinary bulb from a Chinese manufacturer, in the left there was a xenon (also Chinese) with which I could not see anything since it was shining in an unknown direction and it was impossible to drive in wet weather with such light, as I wrote about in the post www.drive2. ru/l/8200911/
I myself understand perfectly well that at the same time I was not bad at blinding the oncoming traffic. Thanks to the advice of user denelektron (for which I express my gratitude to him), I decided on the choice of light bulbs for the headlights. I took Philips H4 12342XVS2 New X-treme Vision +130% Blister
I managed to order only the third time, in the two previous online stores they served me breakfast, they promised that I would send it tomorrow, but in the end I was able to order only in the car audio database and there was a mistake, a day after the order the manager did not call me back, I had to order a call back. They admitted their guilt and promised to process my order immediately.
These are inconspicuous lamps
When ordering, I thought that this was another China, but this turned out not to be the case. Lamp manufacturer - Poland. Then doubts about their quality disappeared.
Due to the fact that they are 3700k, the light from them is quite pleasant and bright, and most importantly, yellowish. At night in the rain/snow, visibility became excellent.
I didn’t do the replacement myself, since I have a good friend who is an auto electrician with reasonable prices, and I had to dig out the old xenon, tinker with some more wires + we agreed with him to unload the CG after the NG, but for now I’m driving around and enjoying the good light.
Previously, the direction of the headlights was like this (it is clearly visible that the xenon headlight is shining into nowhere)
We set it up in such a way that it would not blind oncoming traffic and at the same time the road would be clearly visible.
It's a completely different matter. True, I can’t adjust the driver’s headlight, as you can see in the photo, it shines a little lower than the right one. The auto-corrector only works in the left headlight, and in the right it buzzes, but does not lower the beam of light, we will repair it.
UPD from 02/05/2016: we managed to adjust everything, a screw fell out in the corrector on the right, this will be discussed in a separate post.
Proper towing of a car
Published: 06/01/2018
Spread the love
Spread the love Rules for towing a passenger car on a flexible cable If the car breaks down on the road and there is no possibility of quick repairs, you have to tow it to where repairs can be carried out. But towing a car is also not always possible. This happens when, for example, her steering wheel or brakes do not work. In this case, all that remains is to call...
Proper towing of a car Read more »
Search
Many owners of this model are thinking about how to make Daewoo Nexia headlights better. The above article describes a simple, modern method that has been fact-checked several times.
An inexperienced driver of a standard Nexia may not realize that the car’s lighting has objective disadvantages. The same cannot be said about experienced motorists. When driving different cars, they often complain about the insufficient power of the standard Daewoo Nexia headlights. The brightness of the n150 head optics is really not enough even in new cars that have recently rolled off the assembly line. What to say about the technique of used and tarnished lenses.
The root of this situation lies in the electricity settings. For some reason, Daewoo designers made the logic of the system somewhat unusual and incomprehensible. If the battery is 12.5V, only 11 bulbs go to the bulbs, in other words, noticeably fewer. In fact, 10 percent disappear, it is not clear where.
The troubleshooting process will take several hours. It is better, of course, to have a basic understanding of the structure of electricity and devices. Additionally, you will need the ability to solder and determine the voltage of the circuit. The time and energy spent will translate into a safer and more comfortable night ride.
To quickly understand whether you need to change the wiring of your Daewoo Nexia 150, you will need a regular sensitive multimeter. We measure the battery voltage and store (record) the data. When the low beam is flashing, measure the lamp cover at the connections. If, when comparing the 2 numbers obtained, you find a difference of 1.5 V, this is untapped potential that is easy to use. In this case, the operation described below has a positive effect on the efficiency of the optics.
You may also like
Daewoo Nexia N150, part 2, replaces conventional burnt lenses
To improve the Daewoo Nexia n150 headlight, you need to purchase accessories for you:
The approximate amount of necessary costs if you do the work yourself is 350 rubles.
Most of them at least remotely imagine working with a soldering iron; many have held it at least at one point. With the relay situation the opposite, the subject is familiar to the units. But mastery of the basic principles occurs instantly, enthusiasm and the desire to create miracles.
In a four-pin switch, the two main contacts are the positive and negative points, in other words, the power points for the device. You can bring it directly from the battery or try to find the "plus" in another place so that everything works with the ignition on. The third link is the manager. Voltage applied to it causes a corresponding click and redirects power from the main contacts to the fourth. On devices, contacts are usually labeled with standard numbers, so don't be upset when you see 87 or 30 in the annotation.
You must isolate the connection as carefully as possible, using whatever method you wish. The main thing is to check the full density of the conductor.
You may also like
Improvement of lighting by 2000 rubles
This concludes the preparation of the devices. Further work on modifying the Daewoo Nexia n150 headlights is located in the engine compartment and will take a few minutes.
This material is intended only to familiarize you with the standard electrical system of the Daewoo Nexia. Under no circumstances should you interfere with the design of a car unless you are completely confident in your knowledge and abilities. When all the vibrations occur, it is always better to contact a professional auto electrician. This function can simply be performed by specialists from any car service center. Naturally, you will have to pay extra for this, but you will get a guaranteed result.
What causes the squeaking sound when you press the brake pedal?
Published: 03/11/2019
Spread the love
Spread the love Squeaking and other noises during braking. Contents 1 Squeaking and other noises during braking. 1.1 Reasons for squeaking car brakes 1.1.1 Reasons for squeaking brakes when braking 1.1.2 Brake system maintenance Screeching and squeaking of brakes is something that not only causes discomfort the driver, but also makes us feel like our car is faulty. Unfortunately, …
What causes the squeaking sound when you press the brake pedal? Read completely "
Dashboard lighting
Back to the Daewoo Nexia club I'm interested in whether anyone has changed their dashboard lighting. This refers to its color. Maybe this was discussed somewhere, but I couldn’t find it... I changed the topic before, but he left our ranks as a Daewoo driver =(((he just changed the standard ones to blue ones, but in general you need to completely disassemble them, buy Oracle or something like that, use it to glue those places where you need the right light and that's it... Quote: !P@VEL! from March 25, 2009, 22:46:55 Quote: !P@VEL! from March 25, 2009, 22:46:55 Oracle - what is it? Is there some kind of film? How is the backlighting done there? Maybe you can also change the diodes to a different color, if they are there at all..? Oracle is a film... as soon as it gets warmer I’ll deal with all this nonsense... I want to make a different backlight for the stove too... I think it will be more difficult to get there... Quote: dreammas from March 25, 2009, 22:49:56
There are simple incandescent lamps with a light filter. I was also thinking about changing to LEDs... Replacing the lamps is not difficult, the lamps are baseless. And the panel can be easily removed, if anyone is interested, read the “Literature” topic, otherwise Loki tries to post it, but no one uses it, and everything is written there...
I saw a blue light at Tema’s, he just changed it, but clearly not a fountain, in bunches from where they stood from there in a bunch and the light... if you need to do it well, it’s better to surf the Internet and dig up information about parsing... gluing Oracle to places where should shine through and you need to find out how to illuminate the arrow, it will be absolutely gorgeous! Quote: Lion from March 25, 2009, 10:57:03 pm clear... I’ve been reading everything for a long time now (dashboard, heater controls, all the buttons, only the emergency lights were left red and two were inoperative video) changed to blue. If you have hands and they grow from the right place, then everything is done simply, although you will need to tinker a little with the buttons. As for the result, I like it. The dashboard and buttons are well illuminated, the stove is a little worse. If you want everything to be super, like an optitron, then there’s a guy in our city who does this. Tell me how you changed it =))) and about the guy, are you by any chance from IMHO tuning? Quote: russt from March 25, 2009, 23:09 :04how did you change it? did you change the filters? or did you install more diodes? I just changed the light bulbs in the dash to orange 5-watt ones (the original 3). It became much prettier.
initially: 1. illumination of the speedometer and tachometer: 4 light bulbs with green caps for 3 watts 2. illumination of the buttons, small bulbs for 1.2 watts with green caps what can be done: 1. in the buttons you can simply change the cap from green to the color you like, or paint the bulbs with tsaponlak . or plug in diodes.
2. stove control: either put the caps on. either glue it with oracal film.. or stick in diodes 3. speedometer: same with the stove, but don’t forget to set the bulbs to 5 watts and here’s what I got: speedometer: 5-watt bulbs painted with tsapon varnish buttons: changed the caps stove: pleka oracal photo below stove cool looks! So your pen doesn’t have a very bright light, how did you do it? I just drilled a hole and inserted an LED there, now it’s bright and tell me what the prices are for the Oracle film. To reduce the brightness of the LED, either you need to buy a weaker LED.. or more resistance. The oracle is usually a meter long... they cut off at least 10 cm... i.e. we get 100*10 cm, it used to cost 25 rubles for such a piece, but I also took some extra bright ones... now I don’t want to solder and disassemble something =((( I’ll seal them with something
What kind of oracal film is this? And where can I buy it? I really liked the stove lighting.
Quote: russt from March 27, 2009, 00:58:36 oracled this is a light-transmitting film. sold by advertisers.. the color range is very varied. Advertisers = advertising agencies? Is it self-adhesive or is it glued with some special glue? Quote: russt from March 31, 2009, 17:54:49 self-adhesive Quote: F1 from March 31, 2009, 14:32:07 can you tell me the address? Quote: F1 from March 26, 2009, 00 :37:06Tsapon varnish keeps the temperature in the buttons and the tidy properly? doesn't it spread? and also, do we have it in color? I just want to make the tidy exactly the same (orange) or mix it with dyes, what kind of thread will it be necessary? Quote: Griffith666 from March 11, 2010, 18:08:24 and you just take off the caps - you’ll get an orange flower. Anyone who can help make such a backlight would be grateful, otherwise I am not qualified in this field. Thanks in advance =) Quote: Smile132 from October 28, 2010, 20:00:55 fill out your profile, otherwise it’s not clear where you are from
How to treat a car with anticorrosion agent yourself
Published: March 29, 2018
Spread the love
Spread the love Do-it-yourself body anticorrosiveContents1 Do-it-yourself body anticorrosive1.0.1 Types of anticorrosive for cars:1.1 How to properly make anticorrosive underbody with your own hands1.2 Anticorrosive for wheel arches1.3 Anticorrosive in the car interior Do-it-yourself anticorrosive will help you keep your car in its original form for as long as possible time. After all, as soon as a new body comes off the assembly line, it begins to age mercilessly and...
How to treat a car with anticorrosive agent with your own hands Read more »
What kind of oil should be poured into Hyundai Solaris
Published: April 29, 2018
Spread the love
Spread the love What oil to pour into the Hyundai Solaris 1.6 and 1.4? Contents1 What oil to pour into the Hyundai Solaris 1.6 and 1.4?1.1 The principle of choosing oil for a Hyundai Solaris car1.2 Tolerances of Solaris oil1.2.1 The main stages of choosing oil for Solaris.1.2.2 HTHS1 .2.3 Pitfalls HTHS1.2.3.1 5W-30 oils for Hyundai Solaris1.2.3.2 5W-40 oils for Hyundai Solaris1.2.3.3 5W 20 oils for Hyundai ...
What kind of oil should be poured into Hyundai Solaris Read more »