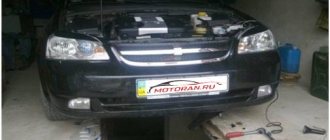
Headlights, especially at night, are an integral part of traffic safety. But it happens that adjustment of the light beams, or rather their directions, is required. Many Chevrolet Lacetti owners prefer to do this operation themselves, but not many know how to do it. This article will help you understand how to adjust headlights, and will also tell you about some of the nuances and subtleties of the process.
Video
The video material will clearly show the process of adjusting the headlight beam, and will also tell you how to carry out the process correctly
Adjusting headlights on a Chevrolet Lacetti: sedan and hatchback
Headlights, especially at night, are an integral part of traffic safety. But it happens that adjustment of the light beams, or rather their directions, is required. Many Chevrolet Lacetti owners prefer to do this operation themselves, but not many know how to do it. This article will help you understand how to adjust headlights, and will also tell you about some of the nuances and subtleties of the process.
Video about adjusting headlights
The video material will clearly show the process of adjusting the headlight beam, and will also tell you how to carry out the process correctly
Light on the road and safety
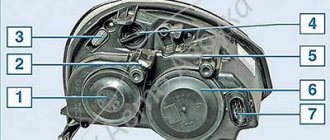
The location of the headlight adjustment knobs is marked with arrows.
Headlights are, first and foremost, a safety factor when driving.
Thus, it is necessary to create visibility on the road, to identify the car for pedestrians, but at the same time, the light rays should not blind an oncoming car. To do this, every car enthusiast must adjust the light beams.
Adjustment process
Device for adjusting headlights.
Many car enthusiasts do not know how to adjust the headlights on a Chevrolet Lacetti, and turn to a car service center, where it is not so cheap. But, this process can be carried out at home, with a minimum amount of necessary materials and tools.
Scheme for adjusting the headlight beam.
So, to complete the process you will need a garage or just a flat wall, chalk and a little time. In fact, the whole process can be completed in half an hour, if you don’t rush at all. For those who don’t want to go through the hassle of drawing lines, special canvas screens with already drawn lines are sold. Having settled in with everything you need, you can proceed directly to the process.
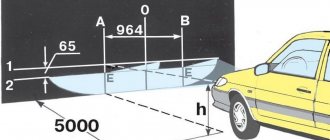
First you need to draw lines on the wall according to the diagram below:
Screen layout diagram for adjusting headlights.
The next step is to find the light trigger regulators. These tools are located behind the headlamp on the engine compartment side.
Sedan and station wagon
For sedan and station wagon vehicles:
Location of headlight adjustment screws for a sedan class car
- Regulator of the horizontal plane of the light beam.
- Regulator of the vertical plane of the light beam.
Headlight adjustment bolts.
Hatchback
For vehicles with a hatchback body:
Location of headlight adjustment screws for a hatchback car
- Regulator for vertical plane of light beam
- Regulator for horizontal plane of light beam
In order to carry out manipulations, you will need a Phillips screwdriver . So, by moving the regulators, the light beams of the headlights are adjusted. The distance of the car from the wall or screen should be five meters. This indicator is mandatory, since it is in this case that the adjustment will be considered correct.
Headlight from a hatchback.
conclusions
Adjusting the headlight beams on a Chevrolet Lacetti is quite simple and every motorist is able to cope with this simple task on their own within half an hour.
How to choose and adjust the optics on a Chevrolet Lacetti?
Lighting on a car is one of the conditions for the safety of the driver and passengers, both in conditions of poor visibility and at night. In order for the headlights to illuminate the road surface efficiently and not blind oncoming drivers, they need to be adjusted. The article talks about optics, the criteria for its selection, and how the Chevrolet Lacetti headlights are adjusted.
What should you know about car optics?
The car's optics consists of head lights, tail lights, daytime and side lights, turn signals, fog lights, interior lighting, trunk lights, and instrument panel lighting. Optics can be divided into two types: standard and tuning. The first type is installed at the factory. The second, called alternative, is installed at the driver’s request to give the car a stylish appearance (video author - Fara70, auto body parts).
Selection options
The following types of lamps can be installed in alternative and standard optics:
- halogen;
- xenon;
- LED
Halogen lamps are more often used in standard optics. They are losing their popularity because they poorly illuminate the side of the road due to the weak luminous flux.
Xenon is used mainly in alternative optics, but many drivers install xenon lamps instead of standard ones, or change the headlights completely. Drivers are attracted by the brightness of xenon and the ability to choose the color of the light beam.
LEDs are no less popular among car enthusiasts. They are less susceptible to mechanical damage and consume a small amount of electricity.
LED angel eyes
When choosing lamps to replace standard ones, you should consider the following points:
- You cannot install xenon in halogen headlights;
- you should choose products from well-known manufacturers; when purchasing Chinese and Korean goods, you need to require certificates allowing sale in European countries and Russia;
- If you have no experience in electrical installation work, it is better to entrust lighting modernization to specialists.
Instructions for adjusting headlights
After upgrading the headlight, replacing optics or lamps, it is advisable to adjust the headlights so that they correctly illuminate the road. Even a novice driver can perform this procedure.
Before making adjustments, the car should be fully fueled, equipped with a spare tire, an assistant should be placed in the front seat or a load of about 75 kg should be placed. In this way, the conditions in which the machine is usually operated will be created. Tire pressure must be normal. Before adjusting the headlights, the vehicle should be rocked under load to allow the suspension to settle.
Adjustments should be made in the dark. The machine must be installed on a flat horizontal plane at a distance of 5 meters from the wall. You need to put markings on the wall according to which the headlights will be adjusted.
Light adjustment circuit
On the stand, a vertical center line is drawn and two parallel lines at the same distance from it, corresponding to the left and right headlights. The horizontal line is drawn at the same height as the centers of the headlights from the floor. A second horizontal one is applied under it at a distance of 65 cm.
How to replace a Chevrolet Cruze low beam bulb
Air ducts to rear passengers. In the base and LS configurations, make a normal screen for the radio, not a strip! The design of the rear is subjective 6. Improve the dashboard materials.
Possible noise 7.
Change the steering column covering materials - the steering wheel is peeling off. Move the knobs for controlling the intensity of the stove's operation and temperature and make a clearer fixation of the positions of these same controls. Provide adjustable lumbar support. Possibility of opening the trunk from a button in the cabin.
Low beam on a Chevrolet Cruze - features of lamp selection and replacement
The box under the seat is like in Lacha. So that in low beam you can leave all the buttons and the radio at maximum brightness. Possibility of installing bi-xenon at least in the top, optional. Daytime running lights at the front and LEDs in the rear lights on ALL trim levels, starting with the base.
There are fewer honeycombs in the radiator grille and a protective mesh in the bumper opening. Change the design of the adjustment knobs for the wipers and turn signals, that is, round the ends, otherwise the stubs stick out from the steering column, the tactile sensations are terrible when you press them and hit the degree edge of the cut.
For example, the design of the adjustment knobs on the CR-V. Reduce the volume spread from 63 to 40 though. I think this will not be an advertisement since many people choose these manufacturers - Catz and Koito. All things being equal, the final choice was made in favor of Catz after I found out that I got a good discount in a Japanese store.
I ordered all-weather lamps on the website with a light temperature similar to the standard ones. There were also options, but I settled on all-weather ones. Which is remarkable. Next to the garage to test. I compared osram from Germany eagleye from Taiwan and catz from Japan. The photo below shows the difference between the lamps. But each type has its own pros and cons. To make the light brighter, you should choose lamps with increased brightness.
Lamps with xenon effect are difficult to see in damp weather. Long life series lamps have a longer service life compared to other lamps.
Change one lamp or in pairs If you are replacing a similar lamp, then there is no point in buying two lamps. If you are installing a lamp from a new company, or a lamp with increased brightness, then of course it makes sense to buy a couple of lamps at once.
The H4 lamp burned out on a Chevrolet Cruze. The lamps can burn out either from exhaustion, that is, they have reached the end of their service life, or as a result of a voltage surge in the network.
Chevrolet lacetti front headlight adjustment video
Chevrolet Lacetti. All about the Chevrolet Lacetti. Video. Tuning. Adjusting the headlights of a Chevrolet Lacetti To carry out this work, you will need an assistant, as well as: a flat horizontal platform (preferably near a wall.
Chevrolet Lacetti headlight adjustment. Mileage: km. Chevrolet Lacetti, petrol engine l., l. p., front wheel drive, manual transmission — do-it-yourself repair.
Tuning / Tuning Chevrolet Lacetti. Adjusting Chevrolet Lacetti headlights. I still couldn’t understand why they constantly shine high beams on me at night. Video.
We seat the assistant in the driver's seat. LEDs are no less popular among car enthusiasts. Fill the tank full of fuel and check the tire pressure 2. Adjusting the headlights A detailed description of the process of adjusting the headlights is in my new video.
Adjusting Chevrolet Lacetti headlights
The video material will clearly show the process of adjusting the headlight beam, and will also tell you how the process is carried out correctly. Light on the road and safety. The location of the headlight adjustment knobs is marked with arrows. Headlights are, first and foremost, a safety factor when driving. Thus, it is necessary to create visibility on the road, to identify the car for pedestrians, but at the same time, the light rays should not blind an oncoming car.
To do this, every car enthusiast must adjust the light beams. Adjustment process Device for adjusting headlights. Many car enthusiasts do not know how to adjust the headlights on a Chevrolet Lacetti, and turn to a car service center, where it is not so cheap. But, this process can be carried out at home, with a minimum amount of necessary materials and tools. Scheme for adjusting the headlight beam. So, to complete the process you will need a garage or just a flat wall, chalk and a little time.
In fact, the whole process can be completed in half an hour, if you don’t rush at all. For those who don’t want to go through the hassle of drawing lines, special canvas screens with already drawn lines are sold. Having settled in with everything you need, you can proceed directly to the process. First, you need to draw lines on the wall according to the diagram below: Screen layout diagram for adjusting headlights.
The next step is to find the light trigger regulators. These tools are located behind the headlamp on the engine compartment side. Sedan and station wagon For cars with a sedan and station wagon body: Location of headlight adjustment screws for a sedan class car Regulator of the horizontal plane of the light beam. Regulator of the vertical plane of the light beam. Headlight adjustment bolts. For vehicles with a hatchback body: Location of the headlight adjustment screws for a hatchback car Adjuster for the vertical plane of the light beam Adjuster for the horizontal plane of the light beam In order to perform manipulations, you will need a Phillips screwdriver.
So, by moving the regulators, the light beams of the headlights are adjusted. The distance of the car from the wall or screen should be five meters. This indicator is mandatory, since it is in this case that the adjustment will be considered correct. Conclusions Adjusting the headlight beams on a Chevrolet Lacetti is quite simple and every motorist is able to cope with this simple task on their own within half an hour.
Bi-xenon headlights Chevrolet Lacetti from LEDSTUDIO
conclusions
Adjusting the headlight beams on a Chevrolet Lacetti is quite simple and every motorist is able to cope with this simple task on their own within half an hour.
I still couldn’t understand why they constantly shine high beams on me at night. After all, I don’t have xenon, but ordinary light bulbs, and I myself switch the high beam on time, I don’t blind anyone. Although, as it turned out, I was wrong, it was very blinding, and all because my headlight beam angle was incorrectly adjusted. I recently replaced both headlights because someone deliberately broke the old ones at night. After this, I did not make any adjustments, so everything becomes clear. Well, I need to adjust it and I will do it myself, without outside help. But in the near future I still plan to buy myself a Volvo.
Adjusting Chevrolet Lacetti headlights
The information presented will be useful to motorists who are repairing their Chevrolet on their own. Adjusting the headlights of a Chevrolet Lacetti To properly adjust the headlights, you need to select a flat area and park the car ten meters from a smooth wall.
In the end, I chose the Lacetti for three reasons: The price of thousands stated in the advertisement turned out to be not entirely correct - in the salon they charged almost thousands more for installing various options. On the plus side: There were no problems with the Chevrolet Lacetti hatchback headlights, despite the fact that the car is always in use on rough roads in the provinces.
How to choose and adjust the optics on a Chevrolet Lacetti?
Over the entire period, the fuel pump and fuel filters showed themselves, which had to be changed at about 45 thousand. Due to carbon deposits over thousands of miles, I heard the knocking of valves, and the timing belt began to act up. I didn’t repair the valve right away, drove it to thousands and then cleaned it. The problem with the timing belt was Chevrolet Lacetti hatchback headlights, replacing and adjusting the drive belt.
Oleg Pavlovich, 58 years old, Kirova: Before that, I only drove domestic cars. I am very pleased with the car, compared to the Lada it is controllable, holds the road on the highway, and has reliable brakes.
Adjusting the headlights of a Chevrolet Lacetti
Chevrolet Lacetti > Maintenance > Adjusting the direction of Chevrolet Lacetti headlight beams. We adjust the direction of the headlight beam by rotating the regulators with a Phillips screwdriver.
Correct adjustment of the car's headlights plays an important role in ensuring safety on the road. It is important that the headlights shine at a certain angle and do not blind other road users.
OPTIMUS-AVTO.RU» Chevrolet » Lacetti » Electrics» We adjust the headlights on the Chevrolet Lacetti: sedan and hatchback. Adjusting the headlight beams on a Chevrolet Lacetti is quite simple and every motorist can handle it.
The border of the light spots should coincide with the second line. This must be done exactly at the same distance and height as in the car. I think it would be better to go to a service station, where a specialist at a stand will adjust the headlights. But, this process can be carried out at home, with a minimum amount of necessary materials and tools.
Adjusting the headlights with your own hands - Chevrolet Lacetti/Gentra/Cruze Fans Club
Adjustments must be made in the dark. Screen marking scheme for adjusting the light of the headlights: In this case, you need to prepare a stop or stand to secure the protection vertically. The sequence of adjusting the light of Chevrolet Lacetti headlights: You can place a sheet of plywood in front of the car under the same conditions. The necessary measurements can be taken using a tape measure. Then we actively rock the vehicle from the side to self-install the suspension.
We adjust the right headlight in the same way. We take the necessary measurements using a tape measure. Then we actively rock the vehicle for self-installation of the suspension.
By turning the adjusting screw of the left headlight with a Phillips screwdriver, we bring the horizontal border of the light beam to line C. Screen layout diagram for adjusting the light of the fog lights of a Chevrolet Lacetti Screen layout for adjusting the light of the fog lights of a Chevrolet Lacetti:
Headlight adjustment
How to set it up correctly
In the lives of active car owners, there are often situations when the regulation of certain components is disrupted.
And he can’t even talk about PTF. Their low stance with careless driving inevitably results in the lights starting to shine incorrectly:
- "Blind" oncoming drivers;
- “Blind” in the fog of the owner (mirror effect).
On proprietary fog lights, the adjustment screw is removed from the front
To restore their parameters it is enough:
- Place the car on a level platform near the wall of the house or garage;
- Measure the distance from the center of the PTF to the ground;
- Draw a horizontal line on the wall at the measured height;
- Turn on the fog lights;
- Adjust the light output so that its border does not exceed the drawn line.
Correctly configured PTFs have a clear horizontal cut of the light flux
In most cases, this will be enough to restore proper operation of the fog lights. (see also the article Features of connecting fog lights to Kalina)
Tip: Making headlight decals will protect your glass from stones, thereby extending the life of your windows.
Chevrolet Lacetti. Adjusting the headlights
Check and adjust the headlights when the vehicle is equipped (with a fully filled fuel tank, a set of tools and a spare wheel).
You will need a Phillips blade screwdriver.
1. Pre-check and, if necessary, adjust the tire pressure to normal.
2. Place the car perpendicular to a smooth wall (for example, a garage) at a distance of 10 m. Place an additional weight weighing 75 kg on the driver’s seat. Mark the screen on the wall as shown in Fig. 4.10. The longitudinal plane of symmetry of the car should pass along line 0 on the screen. Rock the car sideways so that the suspension springs self-align.
3. Measure the height of the headlight centers to the floor on the vehicle. This will be the distance h on the screen.
4. Set the headlight electric adjustment control on the instrument panel to position “0”, corresponding to the load of a car with one driver or with a driver and a passenger in the front seat.
5. Turn on low beam.
6. It is recommended to adjust the direction of the light spot for each headlight separately. Cover the second headlight with opaque material during adjustment.
7. If the location of the light spots does not correspond to the picture, move the brightest sections of the light beams to the points of intersection of the lines on the screen using adjusting screws 1 and 2 vertically or horizontally, respectively.
Rice. 4.10. Adjusting the headlights.
The photo shows the left headlight. The adjustment screws on the right headlight are located symmetrically.
8. Open the hood and, using a screwdriver, rotate the gears of the adjusting screws to adjust the position of the light spot on the screen for each headlight vertically.
9. . and horizontally, if the location of light spots on the screen does not correspond to the picture.
The rotation of the adjusting screws is shown on the removed headlight for clarity.
In addition to a screwdriver, the vertical adjustment screw can also be rotated with a 10mm wrench.
10. The headlights are considered adjusted when the upper boundaries of the left parts of the light spots coincide with line 4 (see Fig. 4.10), and vertical lines 1 and 2 pass through the intersection points E1 and E2 of the horizontal and inclined sections of the light spots.
Replacement process
Chevrolet Lacetti head lighting elements can only be replaced with similar types of lamps. For low beam, H7 single-filament halogen lamps with a power of 55 W are used. It is recommended to change them in pairs so as not to upset the balance of brightness of the left and right headlights.
To replace you will need the following tools:
- open-end and socket wrenches 10 (it is recommended to use a copy with a long tube);
- screwdriver;
- alcohol and clean dry rags;
- Cotton gloves;
- pliers.
Only the most necessary tools are listed; other equipment may be needed during the work process.
Let's look at how to change the low beam of a Chevrolet Lacetti sedan. Procedure:
- open the hood, disconnect the minus from the battery;
- Using wrenches, unscrew the upper fasteners of the headlamp;
- Use a socket wrench to unscrew the nut on the lower stud;
- move the body forward and disconnect the block with wires;
- remove the headlight;
- open the low beam lamp compartment. It is located closer to the wing (or near the block itself, if it is more convenient for someone to navigate). The lid must be turned counterclockwise;
- disconnect the block with power wires from the lamp;
- release the spring clip and move it to the side;
- remove the burnt out lamp;
- Wipe the bulb of the new lamp with a clean cloth moistened with alcohol and install it in the socket. Wear gloves and do not touch the flask. The position of the lamp must be strictly defined - the cut edge with the tendril is directed upward. Otherwise, the focusing of the light beam will be disrupted;
- Reassemble the headlight in reverse order.
After assembling the headlight, it is recommended to immediately check the functionality of the new lamp by completing the procedure before final installation in the opening. If any additional actions are needed, you do not have to remove the housing from the socket again.
Adjusting the headlight angle of the chevrolet lacetti hatchback
Adjusting the headlights of a Chevrolet Lacetti To carry out the work, you will need an assistant, as well as: a flat horizontal platform (preferably near the wall of the house, fence or gate); — tape measure 5 m long; — a sheet of cardboard (to cover the second headlight when adjusting). The adjustment must be made in the dark. The vehicle must be in running order (fully fueled and without additional cargo). Chevrolet Lacetti headlight adjustment. Screen layout diagram for Already visually I saw that on the other headlight the lamp is at a slight angle relative to the one I went through. Only when I disassembled the second one did I realize that during assembly the previous owner had placed them in reverse order.
Chevrolet Lacetti > Maintenance > Adjusting the direction of Chevrolet Lacetti headlight beams. Adjusting the direction of the Chevrolet Lacetti headlight beams. Chevrolet Lacetti Adjusting the direction of headlight beams. The location of the light beam direction regulators on the headlight housing of a car with a hatchback body: 1 - light beam regulator in the vertical plane; 2 - regulator of the light beam in the horizontal plane. The location of the light beam direction regulators on the headlight housing of cars with sedan and station wagon bodies: 1 - light beam regulator in the horizontal plane 2 - light beam regulator in the vertical plane.
Description of the process of adjusting low and high beams on a Chevrolet Lacetti. Characteristics of the elements that will be required and involved in the process. Types of adjustment.
Notify me of new posts by email. I have a lot of experience and try to repair everything with my own hands. Search this forum only? The car's optics consists of head lights, tail lights, daytime and side lights, turn signals, fog lights, interior lighting, trunk lights, and instrument panel lighting. Contents 1 What should you know about car optics?
Adjusting Chevrolet Lacetti headlights
Headlights, especially at night, are an integral part of traffic safety. But it happens that adjustment of the light beams, or rather their directions, is required. Many Chevrolet Lacetti owners prefer to do this operation themselves, but not many know how to do it.
This article will help you understand how to adjust headlights, and will also tell you about some of the nuances and subtleties of the process. The video material will clearly show the process of adjusting the headlight beam, and will also tell you how the process is carried out correctly. Thus, it is necessary to create visibility on the road, to identify the car for pedestrians, but at the same time, the light rays should not blind an oncoming car. To do this, every car enthusiast must adjust the light beams.
Many car enthusiasts do not know how to adjust the headlights on a Chevrolet Lacetti, and turn to a car service center, where it is not so cheap. But, this process can be carried out at home, with a minimum amount of necessary materials and tools. So, to complete the process you will need a garage or just a flat wall, chalk and a little time. In fact, the whole process can be completed in half an hour, if you don’t rush at all.
For those who don’t want to go through the hassle of drawing lines, special canvas screens with already drawn lines are sold. Having settled in with everything you need, you can proceed directly to the process. The next step is to find the light trigger regulators. These tools are located behind the headlamp on the engine compartment side. In order to perform manipulations, you will need a Phillips screwdriver.
So, by moving the regulators, the light beams of the headlights are adjusted. The distance of the car from the wall or screen should be five meters. This indicator is mandatory, since it is in this case that the adjustment will be considered correct. Adjusting the headlight beams on a Chevrolet Lacetti is quite simple and every motorist is able to cope with this simple task on their own within half an hour.
Review of the new Toyota Camry model year - prices and equipment of the new product. Review of the restyled Lada Grants of the year - main changes. Review of the new Toyota Land Cruiser Prado model year in a new body.
Review of Volkswagen Touareg model year. Review of the Volkswagen Polo model year in the new sedan body. Review of the new Ford Transit - what's in store for the year? Review of the new Volkswagen Tiguan model year. We adjust headlights on a Chevrolet Lacetti: Contents 1 Video about adjusting headlights 2 Light on the road and safety 2.
The location of the headlight adjustment knobs is marked with arrows. Device for adjusting headlights. Scheme for adjusting the headlight beam. Screen layout diagram for adjusting headlights. Location of headlight adjustment screws for a sedan class car. Headlight adjustment bolts. Location of headlight adjustment screws for a hatchback car. Add a comment Cancel reply Your e-mail will not be published. Comment Name E-mail Website. The following two tabs change content below.
I have an automotive education, namely: Now there are 2 cars in the family: Peugeot and Dodge Challenger I study each car from “A” to “Z”. I have a lot of experience and try to repair everything with my own hands. Why is the low beam not on on a Chevrolet Lacetti? Why is the heater fan not working on a Chevrolet Lacetti? Why the rear wiper does not work on a Chevrolet Lacetti station wagon.
Lacetti lamps
In this article we will look at Lacetti lamps that are installed on a car. These are the lamps installed on the Lacetti.
The Chevrolet Lacetti has two block headlights. For high and low beam, a two-filament halogen lamp H4U (hatchback) is used, which does not emit ultraviolet rays that can damage the plastic headlight cover. The sedan and station wagon have separate low and high beam lamps - H7 - low beam lamp, H1 - high beam lamp.
Lacetti lamps
Also in the headlights there are lamps for side lights and direction indicators. Turn signals are duplicated by side turn indicators (repeaters) mounted on the front fenders. To adjust the direction of the light beam, there are two screws on the back wall of each headlight unit, which allow you to change the direction of the light beam in the horizontal and vertical planes.
The headlight units are equipped with an electric luminous flux direction corrector, which allows you to change the direction of the light beam in the vertical plane from the passenger compartment in accordance with the vehicle load.
The vehicle is equipped with rear lights consisting of a turn signal, a reverse light and a side light/brake light (double-filament lamps are installed).
Some Chevrolet Lacetti cars are equipped with fog lights, which are installed in the niches of the front bumper.
On some cars, in the front part of the interior ceiling there is an individual lighting lamp, consisting of two sections (for the driver and front passenger). Each section is activated by a corresponding button.
Also installed on the ceiling of the Lacetti's interior is a ceiling lamp, which turns on automatically when any of the side doors is opened (with limit switches installed in the door openings) or forcibly with a switch. When the side light (exterior lighting) is turned on, the rear license plate is illuminated by two lamps. The Chevrolet Lacetti trunk light comes on when the tailgate is opened.
The glove compartment light comes on when the lid is opened.
Here are the installed Lacetti lamps
Lacetti lamps
- H7 - low beam lamp (sedan, station wagon) 55W
- H1 - high beam lamp (sedan, station wagon) 55W
- H4 - high/low beam lamp (hatchback) 60/55W
- H27W/1 - fog lamp 27W
- PY21W - turn signal lamp 21W
- P21W - fog lamp, reversing lamp 21W
- P21/5W - side light and brake signal lamp 21/5W
- C10W - interior lamp, trunk lamp 10W, C5W - glove compartment lamp 5W
- W5W - side light lamp (block headlight), additional brake signal lamp, license plate lamp lamp 5W, W7.5W - individual lamp lamp 7.5W
- WY5W - side turn signal lamp 5W
- W3W - indicator (control lamp) of fuel reserve 3W
- W1.4W - signaling devices (indicator lamps) of the instrument cluster 1.4 W
- W1.4W - instrument cluster illumination lamp 1.4W
- W1.4W - backlight lamps for the heating, ventilation and air conditioning control unit 1.4 W
- W1.4W - switch backlight lamps 1.4W
On this topic:
Instrument lighting Lacetti
License plate light Lacetti
Lacetti lighting. Description, replacement of lamps and tips
Lacetti fuses and relays
Members who liked this post:
- Lacetti fuses and relays
- Lacetti engine
If this is your first time on the site, then read this
You must be logged in to view your scores.
2 Visitors Viewing this page.Who is viewing: 2 Guests
New | Active | Popular
- duyha ($42509)
- Lacetti ($2524)
- Adekvat ($2351)
- sig ($2105)
- Alex130174 ($2104)
- Most Popular Topics
- Unanswered topics
Get a Community sticker for your car Loading...
Loading... New | Active | Popular | Alphabetically