Now to repair the hood that won't open
In most cases, a cable break occurs in the interior of the Lada Kalina. The rupture site is most often located near the handle itself, less often - near the lock in the engine compartment.
The first case is less complicated, since the rest of the cable can be fixed with pliers, after which, by pulling it towards you, open the hood. This manipulation should be performed from the salon.
The second case is less pleasant. Here you will need to acquire a large list of tools. Gloves will do the trick.
1. We drive the Lada Kalina into the pit. First, we study in detail the material on the structure of the castle.
Let us remind you that if the lock is working properly, the hood lid of the Lada Kalina in the first generation opens manually. To do this, pull the lever in the cabin, then go to the hood, insert your hand into the resulting gap and move the safety hook to the side. Now we lift the hood compartment cover with our hands and install the metal holder, which was previously placed in a special groove.
If we are dealing with the second generation LADA Kalina, the lid here is equipped with gas latches that allow it to open and hold on its own.
2. This means that the blocking does not work. The cover can be lifted behind the radiator grille. To do this, select a suitable piece of wire. You can use a thin screwdriver.
3. We illuminate the mechanism with a flashlight and, using one of the indicated available means, press on that section of the lock that ensures the movement of the cable when the hood is opened. Before carrying out this manipulation, we recommend making sure that the lock tongue is in a free state.
Now you know how to open the hood.
Attention! If traces of defects and damage are found on the cable, we replace it.
Easy ways to open the hood with a broken cable
Quite often, drivers have a question: how to open the hood? Most often, this structural element jams due to the fact that the cable breaks. The reason for this is wear of the cable or lack of lubricant in the moving mechanism. This seemingly simple detail plays a very big role. It is thanks to the cable that the hood of the car can open and close. Therefore, when it breaks, it brings significant trouble to the driver.
READ How to open the trunk on an Opel Astra
The most unpleasant thing is that a cable break usually occurs precisely when it is urgently necessary to go somewhere. Therefore, any driver must be able to open the hood of the car in the event of a malfunction. There are two ways to do this, which depend on where exactly the cable .
Most often, the rope breaks in the place where the driver pulls the lever. Less often it breaks off under the hood itself. The second case is much more complicated, but we know how to solve this problem.
Installing a new cable
It is necessary to install the new cable starting from the engine compartment. Attach it to the spring in the same way as the old one. Insert the rope into the fastening and secure using the rubber plug. Before you put it into the salon, put on a special plastic cap. It will act as a limiter.
The cable must be fed into the cabin through a special hole. It must be fixed on the lever. When tightening the loop on the handle, have someone pull the spring along with the cable. Then it will stretch better, that is, it will be installed better. But don't overdo it! A rope that is too tight will break very quickly. Everything is good in moderation.
On the video - replacing the hood cable, part 2:
Finally, we will give you a little advice. To ensure that the hood cable lasts as long as possible, carefully lubricate its outlets with lithol. When replacing a part, select a multi-strand cable. It is much stronger than single-core, so it will not break for a long time. In addition, such a product is very flexible, does not stretch and wears out slowly. We also recommend that you be more careful with the handle on the hood. Do not pull it sharply - handle the lever as carefully as possible.
Please leave your comment on the article! We are interested in your opinion.
Additional manipulations if the hood does not open
There are times when the hood of the LADA Kalina is difficult to open. Here you will need to adjust the mechanism and bumpers designed to keep the lid closed.
For this procedure we resort to the following steps:
- Open the hood compartment cover.
- We tighten the adjustable wrench and use it to release the lock nut. It is located near the base of the castle.
- Turn to adjust the length of the rod.
- Check the ease of opening the lid.
- If you are happy with everything, tighten the locknut.
Before adjusting the block for reach, it is necessary to check the mechanism for movements in both planes (horizontal and vertical).
Important! If the locknut is loose, the mechanism may move. This will make it impossible to open the lid from the interior.
Sometimes the lid stops opening due to unauthorized operation of the limit switch. Especially often this situation manifests itself in the heat. With increased exposure to temperature, slight deformations of the hood lid are observed, but this is also enough to trigger false alarms.
What to do? You can bend the bracket that secures the part, or trim the antennas of the device a little.
If the above measures do not help, replace the limit switch. This part should be purchased taking into account the technical parameters of the specific modification of LADA Kalina.
Recall that the solution to the problem. If the hood does not open, there will be no reduction in the gap!
Additional work
If the engine compartment lid does not open well, then the hood latch and bump stops that hold the hood in the closed position are adjusted. To complete this work you will need:
Before adjusting the hood lock for reach, it is recommended to check whether the mechanism moves in planes (vertical, horizontal). The device may be accidentally dislodged while loosening the locknut. In this case, the lid will not open from the passenger compartment. Therefore, before adjusting the lock, it is recommended to dismantle the radiator grille (to provide access to the mechanism).
The engine compartment lid on the Lada Kalina may not open due to false triggering of the limit switch. A similar phenomenon occurs in hot weather. During this period, the hood becomes deformed, the limit switch button does not reach the lid, which provokes a false alarm.
In this case you can:
- bend the mounting bracket for this part;
- file your mustache.
If necessary, the part is replaced. It is recommended to buy a new limit switch taking into account the technical characteristics of the car. Reducing the gap will not solve the problem.
Self-tuning on a Lada car
The procedure for opening the lid can be simplified if the hood does not open. To do this you will have to resort to installing a gas stop. Experts recommend relying on the installation of a ready-made kit, which, in addition to the stop itself, contains a riser spacer.
It will take the owner about half an hour to replace it. If you're not sure, get a mechanic.
To improve yourself, you will have to “arm yourself” with the following tools and devices:
- keys size “13” and “10”;
- screwdriver;
- bracket (borrowed from VAZ 1118).
- First, we begin disassembling the base where the old unit is present.
- If your vehicle is equipped with a road roughness sensor, it will need to be removed. It is located on the right side next to the support element.
- Disconnect the sensor from the mounting bracket.
- We mount the lower bracket of the future stop on the glass.
- Now we install the sensor itself on the bracket, after which we secure it with M6 bolts.
- Next we move on to attaching the bracket to the hood.
- To do this, completely unscrew the bottom fastener and leave the top one unscrewed by a couple of threads.
- We insert the fixing plate into the hole on the edge of the hood cover.
- By pressing the bottom screw, we turn the indicated bracket.
- Tighten all fasteners.
Attention! It is positioned so that the eye faces down.
The standard assembly is completely removed, after which the hood lid can be closed.
If the owner decides to install a homemade stop, then he will have to focus on making the bracket in question himself.
To implement the “project” we stock up on:
- corner for furniture (parameters: 60x40x40) mm, from which we cut out the border before direct installation;
- metal corner (parameters: 20x20 mm), where it will be necessary to cut off part of the structure during the procedure under the hood.
How to shoot?
Removing the Kalina hood is quite simple. To carry out this procedure yourself, you will need:
- Flat blade screwdriver;
- Key to 13;
- Marker or felt-tip pen.
After opening and installing the hood latch, first remove the hood latch along with the safety hook. How to do this is described in detail below. The next step is to remove the lining. It is necessary to pry up and remove the clamps securing it. After removing the trim, disconnect the windshield washer hose. Now we remove the rubber gasket of this tube from the hood frame.
If the hood cannot be removed to replace it with a new one, it is advisable to note its position relative to the hinges. That's what the marker is for. An assistant is desirable for the final operation. He will have to hold the hood by the latch while unscrewing the bolts securing it to the brackets. Two on each side. This is all. This completes the withdrawal process. Install the Kalina hood in reverse order. After installing a new hood, it may need to be adjusted.
How to remove and install the hood lock with safety hook?
To work you will need:
- Key to 13;
- Flat blade screwdriver;
- Pliers.
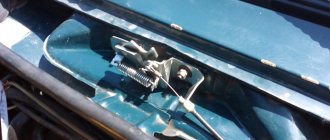
Having opened the hood, we put it on the latch. Then loosen the hood stud locknut. After this, unscrew the pin and remove it along with the spring, lock nut and washer.
Now unscrew the two nuts of the studs securing the hood safety hook and remove this hook. Then we remove the tip of the hood retaining rod housing from the bracket on the body and then remove the tip of the retaining rod from the retaining spring out of engagement with the retaining spring. Then remove the tip of the spring from the hole and remove the locking spring from there. Installation occurs in reverse order.
Replacing the Kalina hood cable
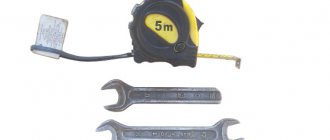
To carry out the work you will need a “13” key and pliers. The stages of the entire replacement procedure are as follows:
- The first step is to remove the plastic lining from the radiator. This is necessary in order to provide access for further technical manipulations.
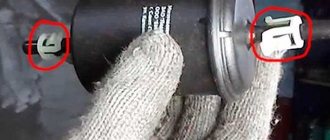
- We remove the cable from the place where the white plastic element is attached to the metal bracket, which is welded to the frame.
- We remove the second plastic tip (plug on the cable) from the loop of the locking mechanism (spring).
- Using a “13” key, unscrew the fastening bolt and remove the hood release handle from the base inside the car.
- We take pliers in our hand and unbend (straighten) the end of the cable that was bent at the factory for its further removal.
- Once the end is straight, it's time to remove the mounting sleeve. This is done so that the two ends of the cable can be separated from each other and freely removed from the handle.
- We remove the handle.
- We pull out the cable (it is best to do this from the engine compartment).
Important! For ease of work and tracking all paths of movement of the cable during removal, a long, thin cord or rope can be tied to its end. This way you will know where to thread the new cable. When installing a new product, it is also advisable to use a rope in order to stretch the cable from the engine compartment into the interior of the car as conveniently as possible.
How to adjust the height?
Some Kalin owners note that the gaps between the hood and fender are not always the same. It would seem that the position of the hood can be adjusted using rubber pads. By unscrewing or rotating them, thus changing the height position of the hood. However, if you use this technology and get perfectly even cracks, then later, when opening the hood, you will have to make significant efforts, and this is undesirable. What should I do? There is another way that seems preferable.
You can make changes using a spring bar, commonly called a mushroom. To unscrew its lock nut, you will need a fairly large wrench, but for simplicity you can use a regular adjustable wrench, also called a gas wrench.
In cases where the cover does not fit well to the lock or hangs completely, it will be necessary to tighten the locking pin with a regular screwdriver, after loosening the locking nut with an adjustable wrench. If the hood is very low, you need to unscrew the rod by loosening the lock nut and making a few turns. Once all of this is done, you can use the aforementioned rubber spacers for a more precise fit. By lowering or raising these cushions, you can achieve almost perfect results. Therefore, it is recommended to adjust the hood latch and do not forget to tighten the lock nut, otherwise it will slowly loosen and the described procedure will have to be repeated after some time.
How to tighten the hood cable on a viburnum
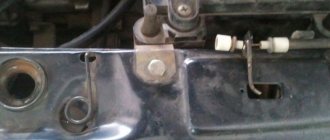
Not long ago I began to notice that the hood at the junction with the fender had become a little lower than it should be and, accordingly, if you look from the side and from a certain angle, you can see that the body parts do not fit perfectly together. This problem was only observed on my driver's side, while on the right side everything was fine. This is what it looks like, I took a photo:
At first I thought that I would adjust the position of the hood using rubber pads that can be twisted and unscrewed, thereby slightly changing the position of the hood in height. But if you set everything up in this way before setting perfectly even gaps on both sides, then when opening the hood you have to apply quite a lot of force, which is not good!
All that remained was to make the adjustment using a rod with a spring, it is also often called a “fungus”. But another problem arose: it was necessary to unscrew the locking nut of this lock, and then they themselves saw that a serious key was needed. I tried to throw it on 36, it turned out to be too small. It turns out that there is either 38 or 41. I couldn’t find such a huge tool among my friends, even one tractor driver didn’t have one. But they fitted me with a gas wrench, which was ideal for performing this procedure.
So, what needs to be done to adjust the hood of the Lada Kalina in height?
- If it dangles and does not close tightly when closing, then it is necessary to tighten the lock pin with a screwdriver, having previously loosened the large locking nut with a gas wrench or other tool that is suitable for this work.
- In the case when, on the contrary, Kalina’s hood is lowered too low, you need to unscrew the rod - after making several turns, loosening the locknut.
Once all this is done, you can adjust the position a little more using the rubber pads mentioned above, lowering them or raising them, depending on what result you want to achieve.
And do not forget to tighten the lock nut later when you adjust the lock, otherwise all your efforts will be in vain, since after some time this healthy nut will gradually unscrew and you will repeat everything again.
Adjusting the hood latch
It is necessary to adjust the Kalina hood lock in cases where the hood is difficult to open or close. The adjustment is quite simple. Even someone who has never done anything like this before can do this. First, open the hood and unscrew the lock nut at the base of the lock with a gas wrench. Now let's take a slotted screwdriver. With its help, we twist or unscrew the lock head, thereby adjusting the length of the rod. During this adjustment, periodically check the ease of opening and closing the Kalina hood. After obtaining the desired result, it is necessary to tighten the previously loosened locknut.
It is worth remembering that in addition to adjusting the overhang, the block can change its position in two planes. Both horizontally and vertically. When the locknut is loose, it is easy to accidentally move it. In this case, it will no longer be possible to open the Kalina hood from the passenger compartment. To avoid getting into an unpleasant situation before starting such work, it is recommended to remove the radiator grille. Then access to the mechanism will be open. But you can not shoot, but use a method that will be discussed later.
How to open the hood of Kalina if the cable breaks?
In fact, there are several popular methods that are most common on the Internet, such as:
- Sawing the hood with a grinder.
- Broken or undercut central plastic grille of Kalina.
- Use a long metal wire with a bent end to open the hood locking mechanism. Here is a video:
- Removing the engine protection to gain access to the mechanism.
- Other, less popular methods.
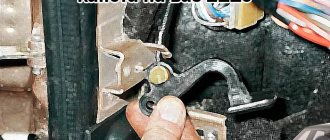
In our opinion, in a situation where the Kalina hood cable has broken, the most rational and less expensive is method No. 3 (using a long metal rod). The point of this method is to insert the wire through the holes of the decorative plastic trim (radiator grille), and pick up the cable at its connection with the loop of the locking spring. In order to understand where and what needs to be picked up, place the wire a little higher and to the left of the center of the nameplate with the VAZ logo. Then pull the cable to the right and the hood will open.
What to do if you can’t open the hood?
The Kalina hood will not open if the hood lock cable breaks. If you come to a car service center with this problem, specialists will most likely disassemble the crankcase protection to get to the mechanism. However, this can be done much easier. With a little skill and patience, you can push the lock latch through the hole in the grille. First you need to make a hook with a thick thread. Even a welding electrode is suitable for this. You can also try using a regular screwdriver to push the stop. It can be pushed through the hole located under the emblem on the radiator grille.
The situation when a car breaks down at the most inopportune moment has affected almost all drivers. A broken hood cable and its replacement is also not the best situation; we will tell you about the replacement process and its nuances.
A car breakdown is always an unpleasant situation for the driver, and it is a waste of time and money. Failures can be divided into external and auditory signs. In any case, you shouldn’t delay repairs, and timely prevention will reduce the possibility of breakdowns.
One of these obvious and unpleasant situations is a broken car hood cable. The cable can break in the most unpredictable way, both in the cabin near the handle and under the hood of the car. We'll look at both options and the process to fix them.
What causes the hood cable to fray?
The first and most common cause is a worn hood cable. If the build quality of the car leaves much to be desired or its age is no longer small, it most often fails near the handle.
Typically, in a cabin, the hood handle is hidden at the bottom of the instrument panel and it is not always possible to calculate the force with which the driver pulls to open the hood. This allows you to disconnect the cable from the handle.
The second and rather rare option is physical wear due to lack of lubrication; as a result, the cable wears out in the most unpredictable place. These are often kinks under the hood or near the hood latch itself.
Situations of breakdowns and the principle of their repair
As already mentioned, the first option is a breakdown in the interior. Let's look at how to open the hood if the cable breaks near the hood cable handle.
First, let's check whether the cable is visible at the place where the hood handle is attached. You will need flashlight cutters. This kind of breakdown is considered the simplest and does not require much time to open. Once you have identified the break, make sure you grab the end of the broken cable with pliers and pull it towards you, the hood latch should engage and the hood should open. On average, the process takes from 10 to 30 minutes.
The second failure option is a broken cable under the hood. In this case, the opening process will be much more difficult. To do this, we need a long metal rod about 40 cm with a curved hook at the end. A tool for removing objects that will interfere with opening.
The car should be raised or driven into an inspection hole so that its entire bottom and engine can be clearly seen from below. Next, remove the engine protection, since in most cars it will interfere with opening the hood. Having removed all the elements that may interfere, we come to the hood cable and proceed to the opening.
If the cable break point is visible and you can reach it with pliers, this is ideal. Simply pull the cap firmly to engage the hood latch. In the event that a breakdown occurs near the latch itself, a metal rod will be needed to help.
With the bent end, it is worth reaching for the latch; most often this can be done in front of the radiator or behind it. Most often, the cable and fasteners are located at the bottom; after connecting the rod to them with a hook, slowly lower the cable attachment point. Basically, wire rod will be used instead of cable.
It is possible that the latch can be reached by hand, but in this case the engine must be completely cooled. Which route is best for the driver or who will make the repairs.
Whatever the situation with a broken hood cable, its repair will be the same. Previously, the first step would be to buy a new hood cable with a new cover. If the hood handle in the cabin is cracked, it should be replaced, otherwise the situation will repeat.
The process of replacing a car hood cable begins with removing the old one. Where to start the replacement procedure, from the inside or from the hood, is decided based on the design of the car itself. Before you begin, you should carefully consider where the beginning and end of the fastener are located.
Most often, they start from the cabin, installing a new cable with a cover in place of the old one, laying the cable from the cab to the engine compartment. It is also worth laying the cable carefully under the hood, since the working mechanisms can damage it, and over time, a similar breakdown will occur again. Do not neglect the fastenings and rubber clamps of the cover, since the engine is a moving part and an improperly secured hood cable can damage the engine mechanisms.
Having laid the cable on the hood latch, unscrew the locking bolt with a wrench, install a new cable with a cover and begin adjustment. To do this, close the latch with a screwdriver, simulating the hood, and try to open the latch from inside the car. If the handle does not work, pull the cable close to the latch, then repeat the procedure and so on until the opening process becomes comfortable and easy enough.
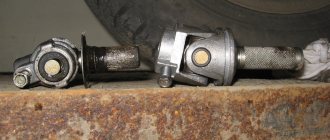
Principle of operation
The cable system for opening the hood is a structure that consists of: - the cable itself and its plastic tip; - locking spring loops; — hood opening handles; — fastenings in the engine compartment.
When the hood is closed, its opening is prevented by a metal pin, which is fixed by the lock spring and ensures reliable retention and coupling of the hood with the fastening located on the frame part of the engine compartment. In order to open the hood, you need to pull the handle located inside the car. As a result, the cable is tensioned and releases the pin from the frame mount.
Varieties
Today, several types of cables are sold on the auto market: 1. Single-core (installed at the factory). There are original and non-original products. Such cables are not particularly strong and durable due to the fact that they have poor resistance to kinks during working bends. 2. Stranded. Compared to the previous type, they are more elastic, strong and durable. Strength is achieved by twisting many metal wires together, resulting in high strength and wear resistance.
How to open the hood of a Lada Kalina if the lock cable is broken! Without breaking anything!
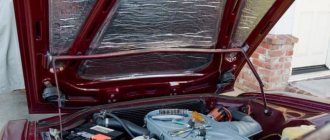
One day I needed to check the oil and coolant levels. Well, as usual, I pull the hood opening flag, it gave in easily, but in response there was silence. And immediately a thought came to mind: The cable flew off or broke. I open Murzilka, and there’s nothing there about this. On the Internet there are only ordinary Kalinas. Remove the radiator grille and pull the spring.
There was another tip that you can remove the underbody protection and open the hood through the bottom. And today I got around to getting my car. I decided that I would open it through the bottom. This was the biggest mistake. Because to get to the lock you need to remove the air intake tube and reach the lock.
I did all these steps. I probably spent more than an hour fiddling around. And so, I got to the castle, but unfortunately, I couldn’t do anything to him. After a little thought, I remembered someone wrote on the Internet that if you tear off the nameplate, there will be a hole there and you can reach through it.
He began to slowly tear off the nameplate and accidentally tore off the grille. And then the solution to the problem came. I carefully, so as not to break the grille itself, squeezed out the screws, i.e. I found where the grille was screwed on and pushed it inward. There was a hole where you could put your hand in and pull the spring.
The hood opened. When I felt the cable, I was very surprised. Apparently the cable stretched out and was adjusted by placing aluminum wire. I removed the bumper, removed the pornography with the wire and adjusted it in the interior. After putting everything back in place and checking that everything worked, I left satisfied. When I was taking it apart I came across a problem: it was pushing oil through the cylinder head gasket(((.
Sources:
https://dalas-avto.ru/ustrojstvo/lada-kalina-kak-otkryt-kapot-porvalsya-trosik.html https://litezona.ru/lada-kalina-kak-otkryt-kapot-porvalsja-trosik/
Extending the service life of the cable
As already mentioned, very often any cable becomes unusable due to wear and moisture; sharp bends are not useful. Many drivers recommend lubricating the cap well with oil or lithium before installing a new cable. However, it is best with machine oil, as it will enter all the holes inside the cover and lubricate the cable itself well.
As for sharp bends, it’s worth taking a closer look during installation. It is in these bends that the lid will be cleaned when the cord is used frequently. Therefore, it is better to buy a slightly longer cable and lay it with a margin to avoid sharp turns and chafing.
It would not be superfluous even from time to time to pour oil into an already laid cable and carry out a major overhaul of it for damage. It is best to pour oil into the installed cable using a regular medical syringe. After collecting the oil with a pin, allow the oil to drain between the cable and the cover, moving the mechanism itself to move the oil along the entire length of the cable.
Price of spare parts and repairs
First of all, you need to decide whether you will fix it yourself or go to a gas station. The cost of the hood cord depends on the make and model of the car; many modern ones have an entire electronic mechanism installed instead of a handle.
On average, the price starts from 2–3 dollars for domestic cars and 10–15 dollars for foreign cars. Mechanisms in the cabin will cost depending on the model; regular mechanics cost about 5-10 dollars per set for domestic cars and 15-20 for foreign cars. If electronics are installed, then such a kit will cost $30.
The average cost of replacing a car hood cable at a service station with the procedure of opening the old one will cost from $15. I wouldn't say it's expensive, but for the price it's not a lot of work. At home everything will be much cheaper.
Video of opening the hood with a broken cable: