1. Turn off the power to the car
2. Remove the front bumper of the VAZ 2172 (see “Removing and installing the front bumper of the VAZ 2171”).
3. Overcoming the resistance of the clamps, remove the sensor from the bracket...
4. ...press the clamp of the wiring harness block...
5. ...and remove the sensor from the Lada Priora.
6. Install the sensor and front bumper of the VAZ 2170 in the reverse order of removal.
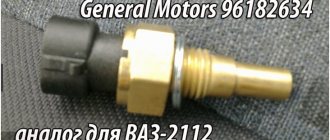
| Manufacturer: | Lada Holding GMBH Vienna |
| Vendor code: | 2172-8121210 |
| Name: | Air temperature sensor VAZ 2170 Priora external 2172-8121210 |
| Department: | VAZ |
Pickup from a warehouse in Yekaterinburg
Payment upon receipt:
- Cash
- Transfer to card
- By bank card
- By invoice (for organizations with VAT)
Important. Before receiving the product, check its availability by phone or place an order on our website.
Delivery by courier in Yekaterinburg and nearby cities
- Payment in cash upon receipt of goods
- The cost of delivery within the city and nearby cities is 100-250 rubles
- Free delivery throughout Yekaterinburg for orders over 10,000 rubles.
- Please check with the RusAvto manager for delivery times and costs.
For minimum order and delivery costs, see the Delivery section.
| Minimum order | Cost of delivery | Free delivery from | |
| Ekaterinburg | 1000 | 150 | 6000 |
| Upper Pyshma | 3000 | 200 | 10000 |
| Berezovsky | 3000 | 200 | 10000 |
| Aramil | 3000 | 200 | 10000 |
| Revda | 5000 | 400 | 17000 |
| Pervouralsk | 5000 | 400 | 17000 |
| Polevskoy | 7000 | 500 | 26000 |
| Sysert | 7000 | 500 | 26000 |
| Novouralsk | 10000 | 600 | 34000 |
| Nevyansk | 12000 | 700 | 37000 |
| * does not apply to large spare parts and special goods. price | |||
Delivery by Russian Post
- Prepayment 30% of the cost of the goods (Cashless payment on invoice)
- The balance of the amount is cash on delivery upon receipt of your goods at the post office.
- Delivery services are paid by the recipient according to the current tariffs of Russian Post.
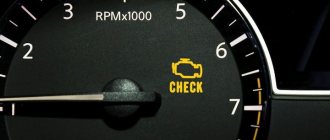
Typical breakdowns
- mismatch between temperature and resistance. In this case, there is a strong increase in resistance values when the outer part of the device is heated;
- a break in the electrical circuit of the converter, due to which the electronics simply fail and does not turn on under any circumstances;
- a rapid increase in voltage and resistance even with slight heating of the external part.
How is the replacement made?
- Remove the rear view mirror cover.
- Remove the mirror itself, which is secured with 2 mounting screws.
- Remove the upholstery container, which is also secured with two Phillips screws.
- Disconnect the cable block from the lighting fixture and temperature sensor.
- Remove the sensor by twisting the fasteners.
Fault diagnosis is carried out using a multimeter. It is necessary to measure the resistance, which should not deviate from the standard values. If you notice too much value for this indicator, get ready to buy a new device. Reassembly after replacement is carried out in the reverse order.
As the weather gets colder, the number of malfunctions in VAZ cars increases. Their number is increased by problems associated with the unregulated operation of the heating system. They lead not only to discomfort inside the cabin, but also to frequent frosting of the windows, including the most important one - the windshield.
Functions and main malfunctions of the interior temperature sensor
The heating system in cars of this brand is controlled by a signal method. The impulses come from the electrical control unit. Temperature is a factor affecting every system controlled by the unit. The essence of its work is to compare the indicators on the sensor (16-30°C) with the real heat intensity, which is measured by it.
When a temperature difference is detected, the motor turns on. Its function is to change the flow of warm air using dampers and fan speed.
The cabin air temperature sensor is a thermistor or semiconductor resistor, which has a close relationship between thermal state and resistance.
From the control electrical unit, voltage is supplied to this device through a resistor located inside.
One of the most traditional defects of this device, which operates on the basis of a semiconductor thermistor, is the discrepancy between the temperature of the external part and the resistance.
To correct this discrepancy, you need to know the main features of its work.
Typically, this defect manifests itself in a rapid increase in resistivity with small fluctuations in the degree of heating of the outer part.
In addition, there may be a break in the electrical circuit of the sensitive element of the converter itself, which is why you will have to buy a new interior temperature sensor.
Periodically, a situation arises in which the thermal state of the device shell varies over a certain small range, and the resistance increases disproportionately with voltage.
As a result, the heat calculated by the block turns out to be less than in reality.
In the event that the difference in temperature becomes significant, the command unit evaluates this as the arrival of cold air flow and reduces its amount, while simultaneously adding fuel.
Replacing the interior temperature sensor
The VAZ 2110 interior temperature sensor is installed near the ceiling lamp. If this device malfunctions, it may need to be replaced. To do this, you must have access to the working mechanism. You can replace it yourself, or use the service at a car service center. Although there is no need to rush into a clear solution to this issue.
If a system malfunction is detected, the first thing you need to do is double-check how correctly it is configured. To do this, with the windows and doors closed, you need to set the temperature a couple of degrees higher than the current one. Then place the thermometer directly next to the converter. After a quarter of an hour, you should look at the readings again.
If there is a discrepancy between the thermometer readings and the set temperature, you can adjust the device using the adjustment screw on the controller. Turning clockwise increases its readings and vice versa.
But if you fail to fix the system, you should look for another reason. This could be a failure of the command unit, damper control micrometer, or temperature sensor. Of all the listed devices, the last one, although it is considered unreliable, is still the most accessible for dismantling, checking and possible replacement.
Since it is located close to the lighting shade and is attached to the drapery with four latches, removing it with a screwdriver is not difficult. Then you need to disconnect a couple of connection pads. Only after these manipulations will the device be dismantled. If you have a new device, install it in reverse order.
Although it is not at all difficult to recheck the old meter. Using the simplest multimeter at room temperature, you should measure the resistance between contacts 1 and 2. Then put the sensor in the refrigerator for a couple of minutes and measure again. If the converter is in good condition, the resistance on the ohmmeter should show a significant increase.
If there are no indicators, you can remove the cover and inspect the print board. There is a real chance of restoring the mechanism when checking the contacts.
During operation of this device, minor breakdowns sometimes occur. For example, the interior temperature sensor “buzzes.”
To eliminate this problem, you should know that this device is equipped with a fan, which helps to quickly and reliably determine the temperature level in the car showroom.
A peculiar annoying sound appears if the lubricant dries out on the axis of the ventilated device. To eliminate the defect, it is enough to apply 2-3 drops of oil.
If you turn off the fan while keeping the sensor connected, the climate control will be quite rough. The stove will work even without a temperature meter. The sensor itself controls the air damper through the climate control unit.
In opposite positions of the temperature regulator of the control unit, the fan and sensor are off. Moving to the left gives cold, right - heating mode. In such cases, the damper will be either completely open or closed. The fan will not emit an unpleasant “buzzing” sound.
One of the signs of increased comfort of a car is the presence of climate control. This is no longer just an old-style heater that had a couple of modes. This is a device that has its own control computer model.
It keeps the cabin at exactly the temperature that is most comfortable for the driver, which he sets from the control panel. And it independently reacts to changes. The cabin air temperature sensor (CAT) reports them to the control unit.
Priora is also equipped with such a system.
How it works and what it consists of
As in most sensors of this type, the main element is a thread that changes its resistance as the ambient temperature changes. The climate control system on the Priora is controlled by an electronic unit. That is, essentially a computer. His task is to create the most comfortable temperature for the driver in the Priora’s cabin. And constantly support her. But for this it is necessary to have accurate data on the state of the air at each moment. The Priora diesel engine is used for prompt delivery of this information.
And in order for air to flow directly to the reading element, it is forced by a special miniature motor with a fan. Therefore, the entire device consists of two parts:
- Direct filament sensor.
- Micromotor with fan.
Connection
Procedure:
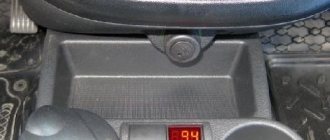
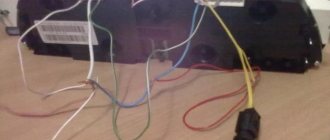
- We insert one wire into the black block of the dashboard between the pink and black and white wires.
- We connect the other wire to ground using a screw under the panel.
We check the presence of outside temperature readings on the display when switching modes. We perform assembly in reverse order. In the comments, leave the versions of your panels on which you managed to install a temperature sensor.
The installation of DTNV is also shown in the video:
Do you know how easy it is to change the interior of your car using vinyl film?
Replacing the engine or coolant temperature sensor
On modern cars, and Priora is no exception, you can find two temperature sensors under the hood. Below we will consider the purpose of each of them:
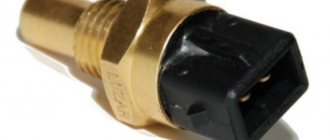
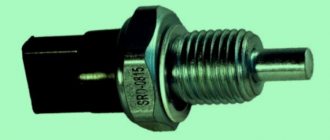
- The first one is screwed into the cylinder head - acts as a pointer that transmits data to the arrow in the instrument panel
- The second is located in the thermostat housing - it has a more important role, it transmits signals to the ECU to turn on the fan, and also plays an important role in forming the fuel mixture during engine starting. Difficulty starting in cold weather or uncertain starting of a warm engine may be due to the failure of this sensor.
This article will discuss the second option, since it plays a more important role in the electronic engine control system. In order to carry out this repair of the Priora, you will need to use the following tool:
- The head is 19 mm deep
- Extension
- Ratchet handle
- Phillips screwdriver
Instructions for replacing the engine temperature sensor (coolant) on a Priora
It’s worth noting right away that Priora comes with both an 8- and 16-valve engine, so many may think that the repair procedure will be different because of this. But in reality, everything will be 99% the same. The thermostat housing is also accessible on both the one and the other motor, so getting to it is not difficult.
Perhaps it is better to first remove the pipe connecting the air filter and the throttle assembly.
We disconnect the chip (connector) from the temperature sensor, as shown in the photo below, after first releasing the latch.
Now we take the head with an extension and a knob, and with its help we unscrew the sensor, which is demonstrated more clearly in the photo below:
When it turns easily, you can finally turn it out by hand.
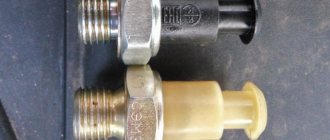
When installing a new temperature sensor on a Priora, you need to use a special thread lock, which is clearly visible in the top picture - dark gray.
A new engine temperature sensor can be purchased at a price of 200 to 300 rubles. The cost depends on the manufacturer of the part.
Source: https://priora-remont.ru/zamena-datchika-temperatury-dvigatelya-ili-ozh/
Where is it located and how is it removed?
VAZ designers placed the DTVS module in a very original way. It is located in the plastic housing of the interior lighting unit. Directly under the rearview mirror. Under two backlights for the driver and passenger, you can see the air intake holes for supply to the combustion engine.
The module is dismantled quite simply. First, the rearview mirror is removed.
After this, two bolts are opened that secure the light module to the body and upholstery. They are simply unscrewed with a screwdriver or hexagon, depending on the type of bolts. When this unit begins to separate, it becomes possible to disconnect the wire connectors from the Priora interior air temperature sensor and directly from the backlight unit.
The DFA itself is a plastic box secured to the module body with two screws. And a wiring harness with a connector coming out of it. By unscrewing these bolts, you can freely separate the diesel fuel assembly.
And when the node is removed, various actions can be carried out with it. But most often, this is simply cleaning and lubricating the fan. Or replacing one of the nodes.
Although practice shows that most often drivers prefer, without bothering too much, to simply replace the complete combustion engine assembly. It’s really simpler, since its cost is not so high. Around 400-500 rubles.
And installing a new one according to the description above, proceeding in the reverse order, is generally not difficult.
And you can watch a short video on this issue:
Source
Replacing the coolant temperature sensor Lada Priora
The Priora engine runs smoothly. The coolant temperature gauge arrow shows the driver that there is no reason to worry. From time to time, the fan on the radiator turns on, cooling the moisture coming from the engine jacket. Everything is fine. But who keeps order in this area? It is clear that there was a sensor involved.
How many coolant sensors are installed on the Priora?
You should immediately decide on the Priora, as on any “injection” car there are two systems independent of each other:
- Engine control system, electronic (ECM).
- On-board control system for standard devices.
The fact is that the Priora instrument cluster is not part of the ECM system. And the radiator cooling fans are subordinated to it. That’s why it turned out that there are two coolant temperature sensors on the Priora. One is for providing readings to the instrument cluster, and the other informs the on-board computer about the need to turn on the fan.
Attention! These devices are completely different and are not interchangeable!
Indicator for the indicator on the instrument panel
The operating principle of this sensor is to change the resistance when the internal element heats up. Passing through the indicator on the instrument panel, the current flows through a single wire to the device.
And here the principle of induction in coils comes into play. Simply put, the higher the resistance, the more the needle on the indicator rises, due to the circulating currents in the coil located inside the indicator.
POSSIBLE MALFUNCTIONS OF THE PRIORA COOLANT TEMPERATURE DISPLAY SYSTEM
Most motorists, having discovered that the engine temperature gauge needle does not rise, believe that it is necessary to change the sensor. However, you should first make sure that this is the case. After all, there are several reasons for this state of the panel:
- Failure of the pointer on the instrument board.
- Break in the wiring.
- Direct failure of the sensor.
Therefore, it is better to conduct a small check on your own.
LOCATION AND CHECKING SERVICEABILITY OF DTOZH
This device is located directly above the Priora flywheel housing. The sensor is embedded in the engine block near the thermostat. It is connected to a single wire with a female connector. The test method for this device is very simple. And it has been used by drivers for a very long time. You need to do this:
- Turn on the ignition.
- Disconnect the connector from the sensor.
- Connect the wire to the block body.
If the DTOZH itself is faulty, the indicator arrow will rise to its highest position. But if no changes occur on the instrument panel, then the reason must be looked for elsewhere. Maybe the circuit is broken, the pointer is broken, or the whole combination.
What kind of device?
3A%2F%2Fi.lada-forum.ru%2Fpublic%2Fstyle_images%2Fmobile%2Fprofile%2Fdefault_large.png" /% lokotcy Dec 17, 2009
Although I don’t have a priory, I think it’s the cabin air temperature sensor. Through it, the heating system regulates the temperature in the cabin. There is a small fan in this sensor, and it makes noise.
Well, I changed my fifteen-swallow to a Priora. First impressions - Super, power + dynamics, and besides, it’s quieter than the tag, although I myself made a total noise with it. Unfortunately, there were some mistakes left, in the form of a rattling rear parcel shelf and the left driver's window. But I’m talking about something else, priorovods explain what this socket with holes near the eyeglasses is, which begins to quietly grumble when the ignition is turned on. The sound is somewhat similar to an old radio at low volume. Tell me that this sound in general is normal or that I already have something short.
Priora coolant temperature sensor - checking the part
The standard coolant temperature sensor in the automotive electronic control system is designed to establish the temperature values of the power plant at the current moment of its operation.
The impulse emanating from this electrical device forces the on-board computer to set the required optimized number of idle speed control steps, while simultaneously regulating the supply of the fuel mixture.
The coolant temperature sensor itself is nothing more than an ordinary thermistor, i.e. a resistor whose resistance value is directly related to the change in the temperature value of the coolant.
This effect in electrical engineering is called “negative temperature coefficient” and means that as the temperature of the coolant (antifreeze) increases, the resistance value of the coolant temperature sensor drops.
An increased temperature value of antifreeze entails a reduced resistance value (70 Ohm + 2% at a temperature value of 130°C), and, accordingly, a decrease in temperature value implies an increased resistance value of the sensor with values of 100-700 Ohm ± 2% at a temperature parameter of - 40°C.
The operating principle of the coolant temperature sensor is as follows: the controller, as an actuator, sends a voltage supply signal with a value of 5 V to the device through a constant resistance integrated into the controller. This executive component calculates the temperature values of the coolant based on changes in voltage readings on a sensor with a variable resistance.
On an unheated motor, the voltage value is high; on an engine that has reached the temperature value of the operating operating mode, the potential difference parameters are low. Thus, if the power plant is not turned on, then the voltage on the temperature sensor has increased values; if it has reached the optimal operating temperature, the values are low.
When the coolant temperature sensor operates in the engine start mode, when the ignition system is initiated, the on-board computer transmits a signal to the electric fuel pump relay. This device, having received a command signal, generates the corresponding pressure value in the fuel line for supply to the injection system.
The on-board computer tests the pulse of the Priora coolant temperature sensor and sends a signal to supply the optimal volume of fuel and air masses.
When the vehicle's crankshaft rotates, the on-board computer initiates the creation of a fixed-type signal to fire the injectors, the pulse interval being related to the frequency of the signal supplied by the temperature sensor.
This interval will be longer when the engine is not warmed up and shorter when the power plant has entered operating mode.
Let's look at the location of the coolant temperature sensors in the Priora. It should be remembered that the two-contact temperature sensor is located between the cylinder head and the thermostat, while the single-contact temperature sensor is located on the dashboard.
Identified defects in the coolant temperature sensor in a Priora car include unstable contact and its loss in the internal cavity of the device and damage to the insulating layer. In other cases, the product is quite reliable if you monitor the condition of the supply wiring. There are times when the device produces incorrect information.
To check the temperature sensor using a tester, set it in ohmmeter mode to the output contact and the body of the product. When located in a room where the temperature is approximately 18-25 degrees Celsius, the resistance of the coolant temperature sensor should be in the range of 1.5-1.7 kOhm.
To measure the resistance of the device at different temperature positions on the output contacts of the device, you need to immerse this electronic gadget in heated water. When the water temperature decreases due to cooling of the liquid, we continue measuring the resistance values and, if the device is in working order, the resistance should increase.
To replace the temperature sensor, you will need basic plumbing tools and a set of wrenches. The procedure for replacing the coolant temperature sensor for Priora:
- Remove the negative wire from the battery terminal.
- Drain a little antifreeze from the radiator.
- We dismantle the air purification filter for comfort during work.
- Squeeze the plastic fastener.
- Disconnect the wiring connector from the Priora coolant temperature sensor.
- Using a wrench, slightly loosen the tightening of the DTOZH and unscrew it from the thermostat body.
- To install the coolant temperature sensor, you need to do all the above steps in reverse order.
- Pour antifreeze into the vehicle's cooling system.
At this point the procedure can be considered successfully completed.
Source: https://avtovx.ru/datchiki-vaz/datchik-temperatury-ohlajdaushey-jidkosti-priora-185/
Installation
You will need : buy a temperature sensor (catalog number: 21150-3828210-00, 21150-3828210-02 or 21150-3828210-03, approximate price - 200 rubles), protective corrugation 3 meters and 3 meters of wires. Find out the model and firmware version of the instrument cluster, it should be 2190-3801010-20 (firmware 90 or 91) or 2192-3801010-20 (firmware 06 or 07). On other versions, the operation of the sensor is not guaranteed (it needs to be flashed).
Procedure:
- We attach the outside air temperature sensor to its standard place behind the bumper, slightly above the towing eye (it is not necessary to remove the bumper).
- We stretch the wires from it along the hydraulic corrector hoses, fastening the corrugation with the wires with plastic clamps.
- From the engine compartment to the passenger compartment we pull the wiring through the hole in the engine panel. Inside, the wires will appear above the clutch pedal.
Coolant temperature sensor on Priora 16 valves
The Priora 16-valve coolant temperature sensor is no different in design from the 8-valve one. Essentially, these are the same device that measures the temperature of antifreeze.
A distinctive feature of the Priora is the presence of two detectors that are not connected to each other. One works only with the dashboard, transmitting measurement data to it, while the other coordinates its work with the brains of the car. Together with them, ensuring uninterrupted engine operation by turning on additional cooling systems if necessary.
The detector operates based on the principles of resistance. Being a thermistor, the device's resistance values are directly related to changes in coolant temperature.
Based on the readings of this meter, among other things, the on-board computer makes a decision on the supply of air and fuel to the engine.
That is why when they talk about a malfunction of the DTOZ, they also talk about increased fuel consumption.
What problems arise?
The coolant temperature sensor in the Priora 16 valves, as already mentioned, is no different from others, and therefore has the same problems, methods of treating and diagnosing them.
In the event of a malfunction of the detector communicating with the instrument panel, the only signal about this will be a missing or deliberately incorrect temperature value. The cause of the malfunction may be:
- breakdown of the indicator itself on the tidy;
- wiring fault;
- failure of the detector itself.
As can be seen from the list, the breakdown is not always caused by the meter itself, but as practice shows, much more often problems arise with the wiring. It is worn out or dirty.
Malfunctions in the operation of the second meter are more significant. Despite the fact that the causes of the malfunction remain the same, the ways to notice the malfunction are completely different and have a whole list of symptoms:
- increased fuel consumption;
- the engine stalls and may not start immediately;
- car power drops;
- You can hear the hum of constantly running fans of the propulsion system.
The Priora coolant temperature sensor is located above the flywheel housing and is inserted into the engine block near the thermostat. It is from there that it is necessary to begin checking the malfunction by inspecting the electronic cable and “ringing” its contacts.
To make it easier to work with the detector, it is best to remove the pipe connecting the air filter and the throttle assembly.
After checking all the contacts, you can start working with the meter itself, and for this you should already turn off the power to the car and be sure to drain the antifreeze.
If the antifreeze is not drained in advance, then when you unscrew the meter, it can come out on its own under pressure, and it will be good if it does not turn out to be hot at that moment.
After all the preparations, you can start removing it; to do this, you just need to disconnect the wires from the meter along with the terminal, and unscrew it using a 19mm deep socket. As soon as the meter moves in, you can then unscrew it and remove it by hand.
The old detector can be cleaned and tested in a glass of heated water. However, if you don’t have the necessary equipment or desire, you can simply insert a new meter and check how everything works. If it works, it means the detector was faulty, and there is no point in bothering with its diagnostics.
Since even if his death is accurately established, it still cannot be repaired and you will have to purchase a new device. And if there is no way to cure the patient, then there is no rational point in diagnosing him, except to satisfy his curiosity and the hope that after cleaning he suddenly came to life.
Types of water temperature sensors
A new detector costs practically nothing, and losses from untimely repairs grow every day like a snowball. Don't neglect your safety and the optimal performance of your vehicle.
Does fuel consumption increase with air conditioning?
In order to drive air inside the device, cool it and release it outside, you need to take energy. What contributes to energy production? Of course the engine is running. The harder it works, the more devices can receive stable “recharge”, and, accordingly, the higher the engine consumption becomes.
Initially, Lada is not ready for the air conditioner to operate, so it has to use additional resources in the form of fuel. Consumption from 100 km increases by 1 liter. By the way, to be fair, we note that the dynamics of the car do not decrease.
Blows constantly hot
Another situation that may arise when using the Priora stove is that it is not possible to regulate the temperature, and only hot air comes out of the system. Turning the regulator does not give any result.
In this case, do the following:
- Measure the voltage at the control unit (see above).
- Measure the voltage at the MMR (gear motor).
- When switching to maximum and minimum voltage, 30 V of a certain polarity appears, and then drops to 0.
- If the quiescent voltage is not 0, but is about 5 V, then the fault concerns the control unit.
- In the case when the voltage is not normal and the damper does not change position, it is necessary to change the MMR.
The heater doesn't heat up at idle
Another problem that car owners face is problems with the kidney idling.
In this case, there are several reasons for the malfunction:
- Low level of antifreeze in the cooling system.
- Leaks that lead to the situation described in paragraph 1.
- Airiness of the system.
The first two problems are rarely difficult to solve. The situation is different when the malfunction is caused by an air lock.
Take the following steps:
- Remove the screen from the motor.
- Loosen the clamp, then remove the throttle assembly heating tube and select any of the options.
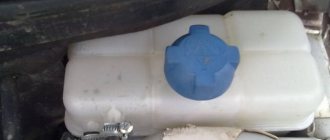
- Unscrew the cap of the expansion tank.
- Place a clean rag on the neck and start blowing until coolant comes out of the removed pipe.
- Place the tube onto the fitting and tighten the clamp.
- Put the screen back in place.
If the considered method does not solve the problem, go through the following steps:
- Warm up the engine to increase the pressure in the system.
- Turn off the car and remove the tube from the throttle heating. In this case, there is no need to remove the plug from the cooling system tank.
Due to the high pressure, excess antifreeze will come out through the tube. Next, all that remains is to insert the tube into the fitting and tighten the clamp.
The stove does not turn on
In a situation where the Priora stove does not turn on, there may be two explanations - a blown fuse, a blown fan motor, a breakdown of the controller, or oxidation of the contacts in the connectors.
After checking the fuse, take the following steps:
- Open the hood and on the left side (looking at the windshield) remove the rubber seal at the top left.
- Remove the four screws to remove the trim.
- Find the heater connector somewhere near the third mount.
- Turn on the ignition.
- Try to press the connector and pay attention to whether the stove starts working or not.
Damage to the connector is a real problem on the Priora, so do not rush to immediately change the control unit or other elements before checking the fuse and the quality of the contact connection.
Principle of operation
To understand the reasons why the stove in Priora does not work, you need to know the principle of its operation. The same system applies here as in the “tens”.
The air flow from the heater is directed to the distributor, where, taking into account the position of the dampers, it directs the air.
Car owners can choose one of three positions:
- Heated / defrostered windshield.
- Ventilation.
- Direction of flow to the feet of people in the rear sofa or front seats.
It is possible to select an intermediate position of the dampers, for example, to direct air to the windows and ventilation.
The position of the flaps changes independently by moving the handle on the main deflector panel. When the blowing/heating is turned on, the air flow is directed through the channels to the desired areas.
Each of these channels is placed separately, which eliminates the mixing of different air flows.