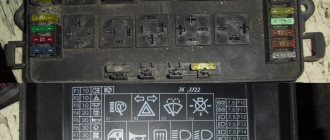
In this material we will introduce you to the Niva fuse box 21213 and 21214 , the purpose of the fuses, and the nuances of the additional VAZ-21214 fuse box, which is responsible for the injection system and is located in a separate block on the left side under the instrument panel. Externally the block looks like this:
The fuse numbers in it are as follows:
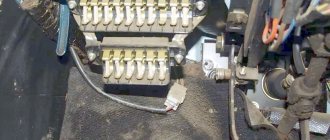
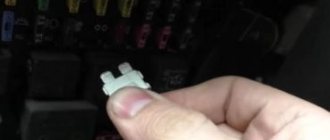
And here’s what a separate injection system unit looks like; by the way, it contains the electric fan fuse , including:
Below are the assignments of the Niva fuse blocks , both the main one and the injection system:
Fuse block located under the control panel
| 1 | 16 | Heater fan - electric motor Headlight cleaner and headlight cleaner motor in all wiper positions except the initial position Heated rear window - on relay (winding) Rear window cleaner and washer Windshield washer |
| 2 | 8 | Turn signal, turn signal and hazard warning signal breaker relay - turn signal mode Reversing lights Windshield wiper (gear motor and relay) Generator - field winding Warning lights: brake fluid level, oil pressure, carburetor choke, parking brake Coolant temperature gauge Gauge fuel level, reserve indicator lamp Voltmeter |
| 3 | 8 | High beam - left headlight, control panel warning lamp |
| 4 | 8 | High beam - right headlight |
| 5 | 8 | Low beam - left headlight |
| 6 | 8 | Low beam - right headlight |
| 7 | 8 |
Attention, on the fields of later years of production, the connection diagram for the second, lower fuse block is slightly different. Instead of the traditionally two fuses involved, as many as four are involved. Here is a photo and diagram of the differences:
All vehicles have a block in which protective inserts for the electrical circuit are located. VAZ 21214 fuses on the Niva injector are installed in several places. In addition, the block diagram has its own nuances associated with the great age of the car design.
Where are the fuse and relay boxes located?
Designation and electrical diagram of the main and additional power supply
Engine control system fuses
Location of fuse and relay blocks Lada 4×4
The main part of the fuses is located in the interior of the Lada 4×4 under the panel to the left of the steering column. Total 4 blocks:
1 — engine control system fuse box; 2 — windshield wiper relay; 3 — fuse blocks; 4 — relay block of the engine control system.
The fourth relay block is located above the gas pedal.
Main and additional fuse blocks
These two blocks are connected to each other. There are 10 fuses in the upper block, and 6 in the lower one. Markings from left to right:
Heater fan, rear window defroster, rear wiper and washer system, windshield washer pump
Steering column switch, windshield wipers, hazard warning lights, breaker relay (in turn signal mode), reverse light, instrument cluster (coolant temperature gauge, fuel level gauge, tachometer, warning lights: turn indicators, differential lock, parking brake, emergency condition of the working brake system, insufficient oil pressure, fuel reserve, battery charge)
Left headlight (high beam), high beam indicator lamp
Right headlight (high beam)
Left headlight (low beam)
Right headlight (low beam)
Side light lamps in the left front and left rear lights, license plate lights, side light indicator lamp
Side light lamps in the right front and right rear lamps, backlight lamps for the instrument cluster, cigarette lighter, switches, heating and ventilation control unit
Hazard switch, breaker relay (in hazard mode), heated tailgate glass relay contacts
Sound signal, interior lamps, brake lamps in the rear lights
Fog light relay contacts in rear lights
Additional fuse circuits in the Urban package:
Fuse number and rating
Electric windows for front doors Electric side mirrors
Air conditioning fan, air conditioning compressor
Side mirror heaters
Central interior lamp
Air conditioning fan, air conditioning compressor
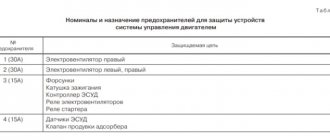
Lada Niva engine management system fuses
| F1 (30A) | Right electric fan relay contacts |
| F2 (30A) | Left electric fan relay contacts |
| F3 (15A) | Relay windings of the right and left electric fans, controller, injectors, ignition coil |
| F4 (15A) | Heating elements for control and diagnostic oxygen concentration sensors, phase sensor, mass air flow sensor, canister purge valve |
Mounting blocks for Lada 4×4 2018
The main and additional units are located in the cabin to the left of the steering wheel, under the instrument panel. The blocks contain fuses of the “Cylinder” size, ten and six fuses, respectively. The ratings and purpose of the fuses are indicated in Table 4 “Circuits protected by fuses”:
Fuse block of standard size “Standard”. The block is located on the left side under the upholstery and contains fuses that are designed to protect engine control system devices. The ratings and purpose of the fuses are shown in Table 5:
The fuse and relay box is located on the left side of the steering column under the instrument panel. The block contains two “Standard” size fuses, which are designed to protect the circuits of the electric fuel pump, electric windows and electric mirrors. The ratings and purpose of the fuses are shown in Table 6:
The fuse and relay box is located on the right side of the steering column under the instrument panel. The block contains one “Maxi” size fuse and two “Standard” size fuses, which are designed to protect the circuits of the hydraulic unit of the anti-lock braking system. The ratings and purpose of the fuses are shown in Table 7:
Replacing fuses
Disconnect the negative cable from the battery. By pulling the latch located on top of the main fuse box cover...
| Fuse number and rating | Protected circuit |
| Fuse | Protected circuit |
| ...remove the cover. |
Similarly, remove the cover of the additional fuse box.
Replace the fuse.
Also interesting: Engine tuning: Niva 4x4 - increasing power using common methods
Mounting blocks for Lada 4×4 2020
The turn signal relay (part number 8450082700, 9-pin), as well as the windshield wiper relay, are located under the trim in the driver’s feet, to the left of the fuse mounting block.
Attention!
The relay and fuse diagram may differ depending on the configuration and production date of the vehicle. Current diagrams of the mounting block are presented in the operating manual for the date of manufacture of the car (download from the official website for 3-door or 5-door).
Why does a fuse or light relay or any other constantly blow out? Before replacing it with a similar one, you must first find and eliminate the cause of its burnout. This could be a short circuit, incorrectly selected rated current, etc. Use electrical circuit diagrams to troubleshoot problems. Questions on this topic can be asked on the forum.
Relay and fuse diagram for VAZ Niva
Car owners are well aware that the VAZ 21214, 21213 (Niva) fuse box is a critical detail that requires detailed study. Knowledge of the electrical circuit allows you to avoid many problems and carry out timely diagnosis of breakdowns. Since the family has existed for many decades, it has managed to go through a number of radical changes - the transition from carburetor to injection engines, for example. This did not entail a radical change in the location and content of the mounting blocks, of which there are two in the cabin and one under the hood.
VAZ Niva fuse diagram for injector
The Niva with fuel injection has today almost completely replaced the carburetor models of the family. With the transition to a new injection system, the manufacturer tried to minimize the inconvenience for the car owner and not radically change the location of the mounting blocks, as well as their filling with protective elements. Traditionally, there are two of them in the cabin. Another one, in the back, is responsible for controlling the engine.
Fuse box VAZ 21214 Niva with description
Both blocks are connected to each other. The total number of fuses in the upper one is ten, while at the bottom there are six, including reserve ones.
Fuse diagram for carburetor VAZ Niva
The only difference between Niva mounting blocks with injection and carburetor systems is related to the block. It is located under the hood of the car in a compartment specially designated for this purpose. His diagram looks like this:
Location of fuses Niva 21213
This scheme is relevant for all models of the family produced from 1997 to 1999.
Chevrolet Niva hub - replacement
To replace the wheel bearing in the field, you need to pull out the hub. This is carried out according to the following plan.
1. Dismounting the conical bushing.
2. Unlocking the nuts. The problem may lie in the fact that they often lick off or turn sour. In this case, you can use a chisel and a light hammer.
3. Use the nineteenth socket or wrench to remove the lever clamps. They are located both front and back.
4. The locking plates are removed. These are metal perforated strips that are often overlooked.
5. The seventeenth and tenth keys require removing the circuit pipes.
6. A stop is installed under the lever. Using two twelfths keys, unscrew the nut fixed on the upper arm retainer bolt.
7. The lower block is also unscrewed in the same way.
8. When there are no fasteners left, it is possible to pull out the entire system at once.
9. By fixing the steering knuckle with a clamp, you can knock out the hub.
10. After this, the screws securing the knuckle to the lever mechanism are removed.
Knowing the structure of the front wheel hub of Niva 21213, you can carry out repairs yourself, without contacting a service center.
Where are the relays located in the field?
In this article I will tell you where the relays are located in the field. Electronic devices and units of the VAZ 2121 car are powered by a voltage of 12 volts. Each element is designed for a precise load, so the current can be tens of milliamps or hundreds of amperes. If power is supplied from control devices to actuators with operating parameters, the car will be entangled in thick cable bundles.
For example, consider connecting fan motor .
From the control unit (4) a low-current signal is supplied to control switches 2, 6, 8. For this, thin wires located in the common control harness are used. Relay coils consume little, and can be energized as long as desired. The operating current is switched to the consumer using power contacts.
From the battery terminal (c) through the fuse (3), voltage is supplied via the power wire
to power the fan motors .
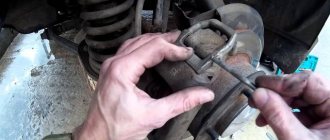
Removal and replacement process
In order to replace a blown electrical fuse, special knowledge and skills are not required. Everything is very simple.
Required Tools
To work, we will need the most common tools that any driver always has at hand, namely:
- a set of new electrical fuses;
- a set of keys;
- screwdriver.
A set of keys that every car enthusiast should have
Stages
- Before starting replacement work, you need to disconnect the negative battery cable.
- Next, using a screwdriver, unscrew the screws that secure the casing and remove it.
- We look at the diagram to see where the blown fuse is located.
- We find it in the block and remove it.
- We take the same one at face value and install it in place of the extracted one.
- Attention! On the back of the block there is an electric fan fuse with a rating of 30 A, its body is painted green. The other elements are rated 15A and are blue.
- If we do not plan to change the block, then the work is finished and all we have to do is install the casing in place and secure it with screws.
- But if you decide to put the system with fuses in order and replace the old block with a new one, then we need to use an 8-mm socket to unscrew a couple of nuts that secure the block.
- Now we remove the block itself.
- Disconnect the block with wires.
- We change the block.
- We install fuses in it.
- We secure it with nuts.
- We return the casing to its place and tighten the screws.
- This completes the work with electrical fuses on the VAZ 2121 Niva.
Attention! If the fuse blows again, then it is necessary to look at the entire circuit, and specifically at the consumer for which this fuse element is responsible.
Never use homemade jumpers or a fuse of a different rating instead of a blown one.
This video uses the example of a VAZ six to show some reasons for replacing the block. As you can see, during operation the body was deformed and melting was noticeable.
Like the video, everything is very simple in terms of time; such work will take no more than half an hour, instead of two or three hours of standing at a service station and spending extra money.
Where are the relays located in Niva
The relay blocks in the VAZ 21213 car are located in the steering wheel area. The first fuse box is located on the left under the instrument panel.
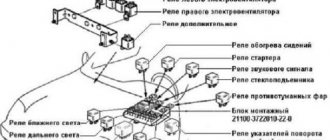
By dismantling it, you gain access to the engine control switching unit. The relays are located there:
- Ignition
- Fan motors (2 pcs)
- Turning on the fuel pump
- Main switch
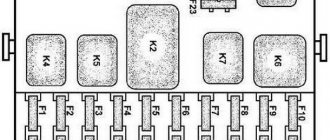
Relay block for engine control system VAZ 2121, 21213, 21214
| №1 | Ignition relay |
| №2 | Main relay |
| №3 | Right cooling fan relay |
| №4 | Left cooling fan relay |
| №5 | Fuel pump relay (fuel) |
| №6 | Fuel pump fuse F5, 15A |
In some vehicle configurations, under the additional unit next to the ignition relay there is a starter relay.