VAZ 1117–2194 (Kalina), equipped with injection engines with electronic control units. The balanced operation of the engine is adjusted by a system that receives impulses from several sensors and controllers. If there is a violation in the circuit, the car loses its performance characteristics, and an alarm signal lights up on the dashboard - Check Engine (check engine). The owner dutifully goes to the service workshop for diagnostics, where he is told: “Your Kalina has a knock sensor failure.” Next, we’ll tell you how to check the sensor yourself and look at the instructions for replacing it.
in our VKontakte group
DIAGNOSE YOUR CAR YOURSELF!
Code P0327 is entered if the following conditions exist:
engine crankshaft speed is more than 1300 rpm; coolant temperature above 60°C; the amplitude of the knock sensor signal is below the threshold. If a permanent malfunction occurs, the “CHECK ENGINE” lamp lights up after 2 drive cycles.
1. The existence of conditions for the occurrence of code P0327 is checked.
2. The serviceability of wires 2 B and 88 G is checked.
1. Connect the adapter cable to the diagnostic connector. Start the engine and warm up to a coolant temperature of 60°C. Set the engine crankshaft speed to more than 1300 rpm.
Code P0327 is intermittent. If it is currently inactive and there are no other codes, analyze the conditions under which the code occurred. It is necessary to check the knock sensor connector for foreign liquids (motor oil), dirt and dust getting into it. In case of severe contamination, clean with gasoline or any solvent that does not destroy plastic and rubber seals. See “Fault Cards” and “Checking the Knock Dampening System” card.
2. Turn off the ignition. Disconnect the harness connectors from the controller and knock sensor. Check the resistance of wires 2 B and 88 G with a multimeter.
Wire resistance less than 1 ohm indicates a malfunction of the sensor or controller, or poor contact in their terminals.
If the wire resistance is more than 1 ohm, repair the break.
After repair, start the engine, reset the codes and make sure there is no signal from the “CHECK ENGINE” lamp.
Since May 2013, our portal has expanded the thematic sections of the forum for the exchange of experience: subforums Americans, Koreans, Germans, French, Japanese have been added, due to the increase in the fleets of our visitors.
In addition to changing the style, our Chat, Mail, Entertainment and photo/video sections, Literature have become built-in and do not require separate registration. In addition, there are other useful and pleasant innovations that you can all familiarize yourself with when visiting the portal.
You can contact the administration with questions and suggestions in a special section of the forum or through the feedback form.
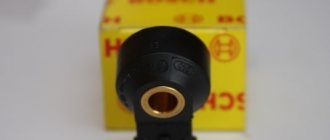
The Lada Kalina knock sensor is a device that is responsible for detecting signs of detonation in a car engine. The main element of the product is a piezoelectric element (plate) that reacts to vibration in the internal combustion engine.
If signs of detonation are detected, the sensor reads the necessary parameters and transmits them to the computer, after which the control unit adjusts the ignition parameters to level out engine operation. The DD is located on the engine block and converts mechanical vibrations into electrical impulses. The presence of the system prevents excessive vibration processes in the engine, which ultimately ensures maximum efficiency and reveals the excellent dynamic qualities of the engine.
In Lada Kalina 1.6 cars, 8 valves, the knock sensor is located between the second and third cylinders.
Why is detonation really so bad?
The inner surface of the cylinder is always protected by a layer of oil. The blast wave generated during detonation can destroy the oil film. And this is already a phenomenon, that is, “erasing” the oil in any case leads to overheating. And then the metal is destroyed under the influence of the following factors: heating, increased shock loads.
The consequences of engine detonation do not appear immediately. Which is exactly what is dangerous: the part is destroyed gradually, but the source of this process is there. It is difficult to notice and cannot be eliminated. Only replacement helps.
Now let's see which parts suffer more from detonation. Their list is small:
- Gasket between the engine block and the cylinder head;
- Piston edges;
- Spark plug housing.
It seems that detonation, even if it occurs periodically, cannot destroy the piston. But this opinion is easy to refute:
The nature of destruction on the pistons is very important
If it’s the edge that’s been “blown away,” we see the result of detonation. Here's what can happen to the cylinder head gasket:
Such destruction can be detected by measuring pressure
In general, the list can be continued. Let's move on to watching the video.
Causes of detonation and measures to prevent it
Of course, the quality and type of gasoline used in the car is decisive. For example, the lower the octane number of the fuel, the less resistance to detonation. The quality of the fuel also plays an important role in the stable operation of the engine. Therefore, always pay attention to the choice of gas station, do not fill with low octane gasoline. The causes of the problems may also lie in faulty spark plugs, as a result of which the fuel in the cylinders does not ignite properly, and therefore signs of detonation appear.
What happens if the causes of detonation are not eliminated in time?
If you ignore problems associated with the engine, as time passes, small vibrations will inevitably develop into stronger ones. As a result, serious damage will occur in the form of destruction of the piston group. In addition, the internal combustion engine will constantly heat up, and if no active action is taken in this situation, a major engine overhaul will not take long.
Symptoms indicating problems with the knock sensor (DS)
1. Knock when the internal combustion engine is running; 2. Deterioration of acceleration (loss of traction); 3. Significant increase in fuel consumption (which does not depend on the time of year); 4. Engine tripping; 5. Disturbed exhaust (increased amount of exhaust gases, appearance of soot, persistent smell of gasoline). 6. Errors appear: 0325 - 0328 inclusive.
Common malfunctions of the Kalina knock sensor Device breakdowns can be caused by various reasons, including: - a short circuit in the network; — mechanical failure of the device itself; — breakage of wires or braid; — oxidation at the junction of the contact block with the sensor; — malfunction of the engine control unit.
Is it possible to avoid detonation?
- When going uphill at a high incline, select a lower gear or one that will allow the engine to operate between 2500 and 3500 rpm.
- Do not use fuel with an octane rating lower than that recommended by the car manufacturer.
- Check the condition of the spark plugs in a timely manner. During scheduled maintenance, monitor the condition of the spark plug wells and check the compression in the piston.
If there is an on-board computer, an error code will be displayed on it:
- 0327 - excessively low signal level from the knock sensor. Most likely, there is a break in the circuits connecting the sensor to the control unit.
- 0328 - signal level too high. The cause of this error may be a malfunction of the device itself.
The Chevrolet Niva is a very specific car, as it is designed for driving in conditions where there is practically no road. Therefore, any problems with it can simply be fatal. The risk of stopping in the middle of the forest increases several times.
Pay attention to where the knock sensor is located on the Chevrolet Niva. It is located in the center of the engine block
The distance from the sensor installation location to the 1st and 4th cylinders is the same, thanks to this it allows you to capture all detonation knocks that appear in the internal combustion engine.
And in order to eliminate the possibility of detonation, it is enough to follow a few simple rules:
- When you drive your car uphill or off-road, you need to downshift. It is desirable that the engine operates at a frequency of 2500..3500 rpm.
- Monitor the condition of the spark plugs - the quality of ignition of the mixture depends on them. It is better to occasionally check the compression in each cylinder.
- It is not recommended to use gasoline with a low octane number. It is advisable to fill the tank only with fuel recommended by the car manufacturer.
Functionality check
In order to dispel all doubts regarding the serviceability of the product, it is necessary to dismantle it. The test is carried out using a multimeter, connecting it to the sensor terminals. The operating and measuring parameters of the device are set within the range of up to 200 mV. After that, the working side of the sensor is knocked on a metal surface and at the same time the readings of the multimeter are observed. If the readings do not change when tapping, we can say with 100 percent probability that the sensor is faulty.
There is another quite useful diagnostic method. It consists in checking the proper supply of the required voltage to the contact block, which is connected to the DD. To check the block, you need to disconnect it from the sensor and measure its contact group with a measuring device (the engine must be running when checking). First, the voltmeter must be switched to the alternating current measurement mode. If voltage is not supplied to the chip, then the cause of the viburnum knock sensor error may be due to a broken electrical wiring or oxidation.
The third method is to replace the “suspect” with a new, known-good device. In addition, it is necessary to understand that in some cases the operation of the system that detects detonation processes may be hampered by: - broken electrical wiring or oxidized contacts at the junctions of elements, as a result - a low signal level of the Viburnum knock sensor; — poor tightening of the fastening nut.
Work progress
The replacement process is the same on different LADA models.
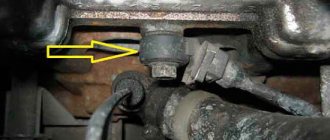
First of all, you need to press the latch, and then disconnect the plug with wires from the sensor itself.
Next, using a 13mm wrench, unscrew the fastening bolt and remove the assembly itself.
The replacement is also demonstrated in the video using the Lada Grant as an example.
The Lada Kalina knock sensor is checked using a multimeter, which for this purpose is switched to the voltmeter operating mode with an upper measurement threshold of 200 mV.
To check you need:
- Connect the multimeter probes to the sensor;
- Lightly tap the metal base of the assembly with another metal tool;
- If the Lada Kalina knock sensor is working correctly, voltage drops will be displayed on the multimeter.
As for a deeper and more complete check, it is possible, but only at a special stand.
Sometimes component failure occurs due to poor contact of the plug. If this is the case, it is necessary to treat them with graphite grease or other composition for cleaning electrical contacts, and then remove oxides from their surface. Don’t forget about contaminants that also need to be removed.
In addition, experts note that detonation is possible if the engine operates under heavy load. In such a situation, the reasons may be as follows:
- The octane number of the fuel does not correspond to that recommended by the factory.
- The heat number of the spark plugs does not correspond to that recommended by the factory.
- The basic ignition timing is incorrectly adjusted.
As you can see, checking and replacing the Lada Kalina knock sensor is not difficult and you can do all the work yourself.
Replacing the knock sensor Lada Kalina
To carry out the work conveniently and quickly, you will need the following simple tools: - a flat-head screwdriver; - a wrench, or better yet a 13mm socket.
- Before working on the car's electrical system, disconnect the negative terminal from the battery. This way you will protect yourself from electric shocks, and your car’s electronics from short circuits and failures.
- To ensure that nothing interferes with the work, the first step is to disconnect the high-voltage wires connected to the spark plugs. Attention! To avoid burns, perform all work with a cold engine.
- Take a 13 mm wrench or socket and unscrew the fastening bolt in a counterclockwise direction. To prevent it from falling, it is recommended not to unscrew it completely. After loosening the fastening using a tool, the bolt can be easily unscrewed by hand.
- Using a flat-head screwdriver, press out the metal bracket securing the contact chip attached to the DD body. Remove the bracket and disconnect the sensor itself.
- Assembly is performed in reverse order. When installing and tightening the fastening bolt of the product, pay attention to the fact that its tightening torque should be 20-25 newton per meter.
- After installation, make several starts of the engine and make sure it is operating normally.
Advancing the ignition
How did you previously adjust the ignition timing? To do this, the initial installation angle of the breaker-distributor was changed. Without going into the design of this rather complex and capricious unit with a centrifugal and vacuum regulator, we note that its initial installation greatly influenced the power and economic characteristics of the engine.
So, it was necessary to set the ignition as early as possible, but without leading to severe detonation. That’s why we usually checked the adjustment while driving: fully warmed up engine, speed 40 km/h, fourth gear, gas pedal to the floor. At the same time, only a few detonation knocks should have been heard, reminiscent of ringing blows with a wrench on the top of the engine.
The onset of detonation combustion was influenced by many factors. Even slight overheating of the engine, as well as changes in ambient air temperature and, of course, the quality of gasoline, accelerated its appearance. After all, the terms we are familiar with - eightieth, ninety-second, ninety-five - these are the octane numbers of the fuel! And the detonation resistance of ninety-five and ninety-eight gasolines is higher than that of the outdated eightieth.
This is how things went until the advent of injection engines with a “smart” control system with several feedback loops.
Knock sensor for Lada Kalina car
VAZ 1117–2194 (Kalina), equipped with injection engines with electronic control units. The balanced operation of the engine is adjusted by a system that receives impulses from several sensors and controllers. If there is a violation in the circuit, the car loses its performance characteristics, and an alarm signal lights up on the dashboard - Check Engine (check engine). The owner dutifully goes to the service workshop for diagnostics, where he is told: “Your Kalina has a knock sensor failure.” Next, we’ll tell you how to check the sensor yourself and look at the instructions for replacing it.
Sensor design
The sensor design includes such elements as:
- frame;
- a vibration-receiving plate;
- braid;
- wires.
The plate is located inside the housing. It reacts to incoming vibrations while the car is moving and sends a signal to the ECU to adjust the ignition timing. Below is a table of the most popular models of knock sensors used in Lada Kalina, as well as their price.
| Knock sensor | Cost, in rubles |
| DD (183855) LADA Kalina, NIVA | 200 |
| DD (183855) VAZ LADA Kalina, NIVA | 200 |
| DD Lada Kalina/ Priora/Vesta, VAZ 1118/2108-2115/2131/2192/2194(¬AIO) 06-09012-SX | 350 |
| DD Lada Kalina/ Priora/Vesta, VAZ 1118/2108-2115/2131/2192/2194 06-09012-SX | 270 |
Thus, any owner of this car will be able, if necessary, to choose the most optimal option for themselves.
Symptoms of a problem
After several years of operation of the Lada Kalina, the engine knock sensor may fail. In most cases, this happens for natural reasons, such as a break in internal contacts. In this case, the car exhibits the following symptoms:
- there is a distinct knocking sound from the engine;
- fuel consumption increases;
- engine troits;
- craving disappears;
- dark smoke;
- error P0327.
Perhaps the problem is related to oxidation of the contacts, a broken wire, or a pop-out block. But most often, it is the knock sensor that needs to be replaced.
For reference! The ECU unit can remember the registration of 2 errors: 0327 and 0328. The first indicates a low amplitude, and the second, on the contrary, indicates that it exceeds the norm.
Are your fingers tapping?
Let's define what detonation is and what causes it.
Anyone who has ever heard of civil defense and protection from a nuclear explosion remembers that one of the effects of such an explosion is a shock wave. By the way, we also encounter a shock wave when flying a supersonic aircraft. In short, this is a wave propagating in a certain medium (in our case, air) at the speed of sound.
Now let's go on an excursion into the engine cylinder - at the moment when the working mixture ignites. If combustion proceeds in the usual manner, then the speed of propagation of the flame front and, accordingly, the increase in pressure is low (usually up to 50 m/s). But it happens that conditions are created for combustion at higher speeds.
So, if the flame front propagates at the speed of sound, then the shock wave, which has significant energy, is what causes the engine parts to emit those sounds that we call detonation knocks. In general, the shortest and most correct definition of detonation is “combustion in the front of a shock wave.”
Which to choose
Experts recommend buying an original knock sensor; it is suitable for Kalina of the first (8-valve) and second (16-valve) generations. Serial number 21120-3855020-01 or 02. The difference is that the first is produced at AvtoVAZ, and the second at related enterprises. But they are both original.
How to check
Even a new sensor must be checked, as defects may occur. To do this, take a tester and ring the circuit. Turn on the ohmmeter mode. It should be at least 5 ohms. If we switch to voltage mode, we get an operating alternating voltage: U= 0.5−3 V. These parameters indicate the health of the device.
What are the consequences of a breakdown?
The consequences of a faulty device can be different. If this part fails, the engine continues to operate, but the control unit cannot correctly set the ignition timing.
As a result, accelerated wear of all engine parts increases the chances of engine failure. Timely identification of problems in the operation of sensors will help to significantly extend the life of the internal combustion engine and delay the date of its replacement.
Basic electronics problems
DD is an electronic device, hence most of the possible malfunctions are inextricably linked with electronics. Possible reasons for the failure of this mechanism:
- short to ground;
- wire circuit short circuit;
- failure of the engine control unit;
- violation of the wire shielding;
- signal wire violation.
Any malfunction symptoms listed above require diagnostics of the device. Each individual case will have a completely different verification method. It all depends on the nature of the breakdown. When it comes to a signal wire failure, you need to check the integrity of the connection between the sensor plug and the harness socket.
Replacement
On 8-valve and 16-valve Kalina, the knock sensor is mounted in the same place - on the outside of the cylinder block. It is easy to find under the 2nd and 3rd spark plugs. For dismantling and installation you will need ring or open-end wrenches: 10 mm and 13 mm. The sequence of actions is as follows:
- Disconnect the negative terminal on the battery (10 mm wrench).
- Disconnect the power connector from the sensor.
- Unscrew the DD fastening bolt (socket wrench 13 mm).
- We clean the mating surface on the block, sand it with fine sandpaper if necessary and degrease it with gasoline.
- We screw in the new DD and tighten the fasteners with a torque (20 N×m).
- Connect the power supply.
- We connect the negative terminal to the battery.
Now turn on the ignition. We connect the diagnostic scanner and erase the error from the ECU memory. In general, all operations will take 10–15 minutes.
Device
The controller is a ring-shaped housing with a side 3-pin connector. The inner ring is made of an alloy of non-ferrous metals. A bolt is threaded through it and screwed into a threaded hole in the engine block. The device is located in the front part of the cylinder block.
Controller installation location:
It should be noted that Lada Granta sensors 8 and 16 valves are no different from each other and are completely interchangeable.
Knock sensor error (codes P0325, P0326, P0327, P0328)
A detonation error can be caused by various reasons - a low or very high signal from it to the electronic engine control unit (ECU), a circuit error, an out-of-range voltage or signal range, as well as a complete failure of the knock sensor (hereinafter referred to as DS), which happens very rarely. However, in any case, the Check Engine light on the car’s dashboard is activated, symbolizing the occurrence of a malfunction, and when the engine is running, there is a deterioration in dynamics, dips in speed and an increase in fuel consumption. Often, “dzhekichana” can be detected as a result of using bad fuel, but often it’s all about the contact and wiring of the motor. The error code can be easily read using diagnostic scanners. For an explanation of all knock sensor errors, indicating the causes and methods for eliminating them, see below.
There are actually four knock sensor errors - P0325, P0326, P0327 and P0328. However, the conditions for their formation, external signs, and methods of elimination are very similar, and sometimes identical. These diagnostic codes cannot specifically report the cause of the failure, but they can point you in the direction of troubleshooting the knock sensor circuit. Quite often, this is a bad contact in connecting the sensor to the connector or in the contact of its surface to the engine, but sometimes the sensor really fails (cannot be repaired, only replacement is possible). Therefore, first of all, the operation of the engine knock sensor is checked.
Mass air flow sensor specifications
The mass air flow sensor is also attached to the top of the cylinder block and covers the air filter inlet. The mass air flow sensor continuously sends signals to the on-board controller, their frequency depends on the amount of air passing through the filter. Failure of this device rarely occurs, but then the behavior of the car can become unpredictable.
The engine may stall and fuel consumption will increase. This is due to the fact that the ECU, without the participation of a sensor, determines the volume of air required for ignition of the air-fuel mixture, based on the crankshaft speed and throttle position. The air flow sensor has a built-in temperature sensor that measures the temperature of the air flow passing through the filter. Signs that the mass air flow sensor is broken are low engine thrust and increased fuel consumption.
If this happens, the mass air flow sensor should be disconnected and replaced with a new one. To do this, you first need to disconnect its connector and start the engine so that the ECU goes into emergency mode. The degree of damage to the sensor can sometimes be assessed by eye
Even in case of symptoms of a malfunction of the mass air flow sensor, you should pay attention to the condition of the inner surface of the pipe on which the sensor is installed. It should be dry and there should be no oil deposits in the pipe
The mass air flow sensor can fail as a result of contamination getting on it, and this happens due to late replacement of the air filter, which draws in many different pollutants from the surrounding air
This is why it is so important to change the air filter on time. The cause of a malfunction of the air flow sensor may also be damage to its sealing ring.
Nevertheless, with all its vulnerability, the mass air flow sensor can serve for a very long time and, if the rules of car care are followed, does not cause problems. By the way, when starting the Kalina engine, you can detect damage to the mass air flow sensor: if the sensor is faulty, the tachometer needle will sway strongly from side to side, and the on-board computer (if installed) will record an increase in fuel consumption.
Jumps in speed, drop in dynamics - this is what threatens a car with a faulty mass air flow sensor. This device cannot be repaired; it must be replaced at the first opportunity. Starting a hot engine with a faulty mass air flow sensor will be difficult, or Kalina will not want to start at all with such a breakdown.
Error P0325
Error code P0325 is called “malfunction in the knock sensor circuit.” In English it sounds like: Knock Sensor 1 Circuit Malfunction. It signals to the driver that the engine control unit does not receive a signal from the DD. Due to the fact that some problems have arisen in its power supply or signal circuit. The cause of this error may be very low or very high voltage coming from the sensor due to a break or poor contact in the wiring harness block.
Possible causes of the error
There are several reasons why error p0325 may occur. Among them:
- broken knock sensor wiring;
- short circuit in the DD wiring circuit;
- malfunction in the connector (chip) and/or contact DD;
- high level of interference from the ignition system;
- malfunction of the knock sensor itself;
- malfunction of the engine control unit (abbreviated as ECM).
Conditions for recording error code 0325
The code is installed in the ECU memory on a warm engine at a crankshaft speed of 1600-5000 rpm. if the problem does not go away within 5 seconds. and more. The archive of fault error codes itself is cleared after 40 consecutive cycles without fixing a fault.
To find out exactly what problem caused the error, additional diagnostics must be performed.
External symptoms of error P0325
External signs of this error may include the following situations. However, they can also indicate other errors, so you should always perform additional diagnostics using an electronic scanner.
- The Check Engine light on the dashboard is activated;
- the engine control unit operates in emergency mode;
- in some cases, engine detonation is possible;
- loss of engine power is possible (the car “does not pull”, loses its dynamic characteristics, accelerates poorly);
- Unstable engine operation at idle.
In general, the symptoms of failure of the knock sensor or its wiring are outwardly similar to those when the ignition is set late in the car (on carburetor engines).
Error diagnosis algorithm
To diagnose error p0325, you must have an electronic OBD-II error scanner (for example Scan Tool Pro Black Edition ). It has a number of advantages over other analogues.
How to get rid of error p0325
Depending on what exactly caused the p0325 error, several options are possible to solve this problem. Among them:
- cleaning contacts or replacing wiring connectors (chips);
- repair or replacement of wiring from the knock sensor to the engine control unit;
- replacing the knock sensor itself, most often this is what is done (this unit cannot be repaired);
- flashing or replacing the engine control unit.
Dieseling
As already noted, an undesirable phenomenon can appear exclusively on a functioning motor. How then to qualify the operation of the power plant with the ignition off? The mechanics' answer is short - dieseling. Its nature is different: self-ignition of gasoline, identical to the working process of a diesel engine.
Beginners who have caught up on their knowledge base on gasoline internal combustion engines will immediately object, citing a couple of arguments “against”: high-octane fuel has poor self-ignition ability, and the compression ratio in a gasoline engine is lower. All this is true, but when the unit is stopped, favorable conditions are created for dieseling.
- Fuel supply to the cylinders.
- Low crankshaft speed.
In reality the process looks like this. The power plant is turned off, the crankshaft rotation speed drops, fuel is supplied. The time allotted for ignition of the mixture increases.
New Lada: Generator Lada Granta | electrical and electronics Lada Granta
Under such conditions, a spark from a spark plug is not needed to ignite the fuel - a gradual increase in pressure and temperature is sufficient. After completing the power stroke, the crankshaft speed increases, and self-ignition does not occur. Then the frequency drops again and dieseling occurs again. And so on for several cycles of “twitching”.
Error p0326
Error code p0326 during diagnostics is deciphered as “ out of the permissible range of the knock sensor signal .” In the English version, the code description is Knock Sensor 1 Circuit Range/Performance. It is very similar to error p0325 and has similar causes, symptoms and solutions. The electronic control unit detects knock sensor failure due to a short or open circuit by checking that the analog input signal from the sensor is within the required range. If the difference between the signal from the knock sensor and the noise level is less than the threshold value over a certain period of time, then this becomes the reason for the formation of error code p0326. This code is also registered if the signal value from the mentioned sensor is higher or lower than the corresponding permissible values.
Conditions for generating an error
There are three conditions under which error code p0326 is stored in the ECM. Among them:
- The knock sensor signal amplitude is below the permissible threshold value.
- The electronic engine control unit (ECU) operates in fuel knock control mode (usually enabled by default).
- The error is not entered into the memory of the electronic device immediately, but only during the third drive cycle, when the engine is warmed up to operating temperature and at a speed above 2500 rpm.
Causes of error p0326
The reason for the formation of error p0326 in the ECM memory may be one or more of the situations described below:
- Poor contact
- An open or short circuit in the car's knock sensor circuit.
- Malfunction of the knock sensor itself.
Diagnosis and elimination of error code P0326
First of all, you need to make sure that the alarm was not false. To do this, as described above, you need to reset (erase from memory) the error using the program code, and then make a test drive in the car. If the error occurs again, you need to look for the cause of its occurrence. So, the check must be performed using the following algorithm:
- Turn off the ignition and disconnect the wires connecting the computer and the knock sensor from one and the other device.
- Using a multimeter, you need to check the integrity of these wires (in other words, “ring” them).
- Check the quality of the electrical connection where the wires connect to the ECU and the knock sensor. If necessary, clean the contacts or carry out mechanical repairs on the chip fastening.
- If the wires are intact and the electrical contact is in order, then you need to check the tightening torque in the knock sensor seat. In some cases (for example, if it has already been replaced and the car owner tightened it “by eye” without observing the required torque value), the sensor may not be tightened enough. Then you need to find out the exact value of the torque in the reference literature for a specific car and use a torque wrench to correct the situation (usually the value of the corresponding torque is about 20...25 Nm for passenger cars).
The error itself is not critical, and the car can be operated with it. However, this is risky because if fuel detonation occurs, the sensor may report incorrect information to the ECU, and the electronics will not take appropriate measures to eliminate it. Therefore, it is advisable to eliminate both the error itself from the ECM memory and the reasons why it occurred as quickly as possible.
Diagnostic features
Diagnostics begins with checking that the error is not the result of a false alarm by the system. This happens sometimes, and after this problem occurs there are no real problems with the engine, fuel system or knock sensor.
Carrying out such a diagnosis is quite simple. To do this, the error code is first erased from memory according to the instructions provided for each vehicle. Recommendations can be found in the operating instructions.
Having reset the error, the driver performs a test drive. In this case, you need to create all the conditions described above under which such a code appears in the ECU. Warm up the engine, raise the speed to the desired level.
If the error appears again, it means there is some kind of problem, a provoking factor.
Further diagnostics involves the implementation of such mandatory measures.
Turn off the ignition on the car. Locate the ECU and the wire that goes to the knock sensor. They need to be separated for a while. Take a multimeter. The most common one is suitable for garage use. You don't have to buy an expensive model. Using a test instrument, the wires connecting the control unit and the controller are checked for integrity. This procedure is called dialing. Now check how well and tightly the wires of the sensor and the ECU are connected to each other. If you see traces of corrosion or oxides, you need to clean them. This can be done with fine-grained sandpaper. Just make sure the car's power is turned off
To do this, simply disconnect the negative terminal from the battery. If everything is fine with the wires, there are no signs of damage, the contacts are intact, then the tightening torque on the seat of the detonation controller is also checked. When replacing or installing, it is extremely important to tighten the sensor in accordance with the manufacturer's recommendations. This should not be done with your hands or regular wrenches, but with a torque wrench
It is important to observe a certain regulated tightening torque. It often happens that the sensor is simply not fully tightened. If over-tightened, mechanical damage occurs and the controller must be completely replaced. Each specific vehicle has its own recommendations for the tightening torque used. But on average it is from 20 to 25 Nm in relation to passenger cars.
If the problem is observed on the part of the electronic control unit, it is strongly not recommended to delve into the brains of the car yourself, try to find or fix something there. This is a complex procedure requiring special skills, knowledge, equipment and software.
Having ruled out all possible problems as part of self-diagnosis, and leaving only the ECU as the only suspect, it is recommended to contact specialized specialists. Or better yet, go to an official dealer who has experience working with specific ECUs of certain brands and models of cars.
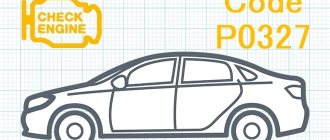
Error p0327
The general interpretation of this error is called “ low signal level from the knock sensor ” (usually the signal value is less than 0.5 V). In the English version it sounds like: Knock Sensor 1 Circuit Low Input (Bank 1 or Single Sensor). In this case, the sensor itself may work, and in some cases it is noted that the Check Engine light on the dashboard is not activated since the “check” light lights up only when a permanent malfunction occurs after 2 drive cycles.
Conditions for generating an error
On different machines, the conditions for generating error p0327 may differ, but in most cases they have similar parameters. Let's consider this situation using the example of a popular domestic car, the Lada Priora. So, code P0327 is entered into the ECU memory when:
- the crankshaft speed is more than 1300 rpm;
- coolant temperature more than 60 degrees Celsius (warm engine);
- the signal amplitude value from the knock sensor is below the threshold level;
- the error value is generated on the second drive cycle, and not immediately.
In any case, the engine must be warmed up, since fuel detonation is possible only at high temperatures.
Causes of error p0327
The reasons for this error are similar to those described above. In particular:
- poor DD fastening/contact;
- wiring short circuit to ground or malfunction in the knock sensor control/power circuit;
- incorrect installation of DD;
- failure of the fuel knock sensor;
- software failure of the electronic engine control unit.
Accordingly, it is necessary to check the specified equipment.
How to diagnose
Checking for the presence of an error and searching for its cause must be carried out using the following algorithm:
- Check for false positives by resetting the error. If, after recreating the conditions for its occurrence, the error does not appear, then this can be considered a “glitch” of the engine control electronics.
- Connect a diagnostic tool with the appropriate software to the adapter connector. Start the engine and warm it up to the operating temperature of the internal combustion engine (if the engine is not warmed up). Use the gas pedal to raise the engine speed above 1300 rpm. If the error does not appear, then you can finish here. If it appears, continue checking further.
- Check the sensor connector for dirt, debris, engine oil, etc. If present, use cleaning liquids that are safe for the plastic sensor housing to remove dirt.
- Turn off the ignition and check the integrity of the wires between the sensor and the computer. An electronic multimeter is used for this. However, a broken wire, in addition to error p0327, also usually causes the above errors.
- Check the knock sensor. To do this, you need to dismantle it and measure its internal resistance using the same electronic multimeter, switched to resistance measurement mode (ohmmeter). Its resistance should be approximately 5 MOhm. If it is very low, it means the sensor has failed.
- Continue checking the sensor. To do this, turn on the multimeter to measure direct voltage (DC) within a range of about 200 mV. Connect the multimeter probes to the sensor terminals. After this, use a wrench or screwdriver to knock in the immediate vicinity of the sensor mounting location. In this case, the value of the output voltage from it will change. After a couple of seconds the value will become constant. If this does not happen, the sensor is faulty and requires replacement. However, this testing method has one drawback - sometimes the multimeter is not able to detect the slightest voltage fluctuations and a working sensor can be mistaken for a faulty one.
In addition to the check steps related to the direct operation of the sensor, make sure that the error was not caused by extraneous sounds, such as vibration of the crankcase protection, knocking of hydraulic compensators, or simply that the sensor was poorly screwed to the engine block.
Other section materials
| The engine does not develop full power |
| Popping sounds in the intake pipe |
| Silenced shots |
| Increased fuel consumption |
| Increased oil consumption |
| Engine knock |
| The engine gets very hot |
| The electric fan of the engine cooling system is constantly running |
| The engine takes a long time to warm up to operating temperature |
| Drop in coolant level in the expansion tank |
| Extraneous noises and knocks in the engine |
| Strong engine vibration |
| Increased content of harmful substances in exhaust gases |
| The "Check" engine management system malfunction indicator lights up when the engine is running. |
| Engine compression test |
| Checking the ignition coil and its circuits |
| Insufficient oil pressure |
| Checking high voltage wires |
| Checking the pressure in the engine power supply system |
| The clutch is slipping |
| Clutch leads |
| Jerking when starting off |
| Rattling, knocking noise when engaging clutch |
| Increased noise when engaging the clutch |
| Gearbox noise |
| Gears are difficult to engage |
| Gears turn on spontaneously |
| Noise, crackling, squealing of gears when the gear is engaged |
| Final drive noise |
| Oil leak |
| Knock when starting |
| Noise when driving on a smooth highway |
| Knock when driving over bumps |
| Knocking, squeaking noises when the suspension operates |
| There are traces of shock-absorbing fluid on the telescopic strut |
| There are traces of grease on the drive joint cover (shaft) |
| Knocking, clicking noises when turning |
| Vibration when driving |
| Deviation from straight-line motion |
| Rapid tire tread wear |
| Uneven tire tread wear |
| Increased free play of the steering wheel |
| The steering wheel turns hard |
| Creaking, squealing when braking |
| Vibration when braking |
| Pull or skid when braking |
| Increased brake pedal travel |
| The brake pedal travel is normal, but the car does not brake well. |
| Incomplete release of all wheels |
| Braking one of the wheels |
Error p0328
Error code p0328 by definition means that “ the output voltage of the knock sensor is above the threshold value ” (usually the threshold value is 4.5 V). In English it is called Knock Sensor 1 Circuit High. This error is similar to the previous one, but the difference is that in this case it may be caused by a break in the signal/power wires between the knock sensor and the electronic control unit or a short circuit of the wiring section to the ECU to “+”. Determining the cause is made difficult by the fact that such an error occurs much more often not because of problems with the chain, but because of poor fuel flow into the combustion chamber (lean mixture), which occurs due to clogged injectors, poor operation of the fuel pump, low-quality gasoline or phase shift and installation early ignition.
External signs
Indirect signs by which it can be judged that error p0328 is occurring are similar to those described above. In particular, the Check Engine light on the dashboard is activated, the car loses its dynamics and accelerates poorly. In some cases, increased fuel consumption is observed. However, the listed signs may indicate other malfunctions, so mandatory computer diagnostics are needed.
The cause must be looked for by studying the symptoms, and the search itself must be done by removing the connector for connecting the knock sensor with the engine running. It is necessary to measure the reading parameters and observe the behavior of the motor.
Causes of error p0328
The causes of error p0328 may be the following malfunctions:
- Damage to the knock sensor connector or significant contamination (ingress of debris, engine oil);
- the circuit of the mentioned sensor has a short circuit or open circuit;
- the knock sensor itself is faulty;
- there is electrical noise in the sensor circuit (interference);
- low pressure in the vehicle fuel line (below the threshold value);
- use of fuel that is unsuitable for the vehicle (low octane number) or its low quality;
- error in the operation of the electronic engine control system (failure).
Another interesting reason noted by car enthusiasts is that a similar error can appear if the valves are incorrectly adjusted, in particular, they have too much clearance.
Possible troubleshooting options
Depending on what caused the p0328 error, the ways to eliminate it will be different. However, the repair procedures are completely similar to those described above, so we’ll simply list them:
- check the knock sensor, its internal resistance, as well as the voltage it outputs to the computer;
- make an audit of the wires connecting the electronic unit and the DD;
- perform an audit of the chip where the sensor is connected, the quality and reliability of the contacts;
- Check the torque value at the knock sensor seat and, if necessary, set the desired value using a torque wrench.
As you can see, the verification procedures and reasons why errors p0325, p0326, p0327 and p0328 appear are largely similar. Accordingly, the methods for solving them are identical.
What else can cause detonation?
The main reason for detonation is a sharp increase in temperature in the combustion chamber. Also, detonation knock can be caused by problems with the valves. For example, the operation of the intake and exhaust is disrupted. In this case, exhaust gases cannot escape freely. This causes detonation in the engine. Of no small importance are the conditions under which the internal combustion engine is operated. In particular, the qualitative composition of the mixture supplied to the combustion chamber. And here the VAZ knock sensor will help, the signs of malfunction of which we are now finding out. It allows you to adjust the operation of the engine.
Additional recommendations
Finally, it is worth noting several interesting facts that will help car enthusiasts get rid of problems with the knock sensor and directly with the phenomenon of fuel detonation.
Firstly, you should always take into account that there are sensors of varying quality (from different manufacturers) available on the market. Car enthusiasts have often noted that cheap, low-quality knock sensors not only do not work correctly, but also quickly fail. Therefore, try to buy quality products.
Secondly, when installing a new sensor, always use the correct tightening torque. Accurate information can be found in the car manual or on specialized resources on the Internet. Direct tightening must be done using a torque wrench. Moreover, the installation of the DD should be done not on a bolt, but on a stud with a nut. It will prevent the sensor from loosening its mount over time due to vibration. After all, when a standard bolt is loosened, it or the sensor itself can vibrate in its seat and falsely provide information that there is detonation.
As for checking the sensor, one of these procedures is checking its internal resistance. This can be done using a multimeter set to resistance measurement mode (ohmmeter). It will be different for each sensor, but the approximate value will be around 5 MOhm (should not be too low or even zero, as this directly indicates its failure).
Also, if the above errors occur, you should always check the condition of the knock sensor wiring. When exposed to high temperatures, it can become brittle and damaged over time. It is sometimes noted on forums that simply wrapping the wiring with insulating tape can solve the error problem. But for this it is advisable to use heat-resistant electrical tape and insulate it in several layers.
Some car owners note that one or several of the errors listed above may occur if they fill the car with low-quality gasoline with an octane rating lower than that prescribed for the engine. Therefore, if after checking you do not find any faults, just try changing the gas station. This has helped some car enthusiasts.
In rare cases, you can do without replacing the knock sensor. Instead, you can try to restore its functionality. In particular, using sandpaper and/or a file, it is necessary to clean its metal surface in order to remove dirt and rust (if any) from it. This way you can increase (restore) the mechanical contact between the sensor and the cylinder block itself.
Another interesting observation is that the knock sensor may mistake extraneous sounds for detonation. An example would be a weakened fastening of the engine protection, due to which the protection itself rattles on the road, and the sensor may falsely trigger and transmit a signal to the ECU, which in turn increases the ignition angle, and “detonation” continues. In this case, the errors described above may occur.
In some car models, such errors may appear spontaneously, and they are difficult to reproduce. Indeed, in some cars the knock sensor is triggered only at a certain position of the crankshaft. Therefore, even when tapping the engine with a hammer, it may be impossible to reproduce the error and understand the reason. This information needs to be clarified further and it is better to contact a car service center for help.
Some modern vehicles have a rough road sensor that disables the knock sensor when the vehicle is driven on a rough road and the crankshaft becomes misaligned and produces a sound similar to fuel knocking. That is why checking the knock sensor with the engine running, when the engine is hit with something heavy, after which the engine speed drops, is not always correct. So it is better to check the value of the voltage it produces during mechanical impact on the engine.
Conclusion
As mentioned above, all four described errors are not critical, and the car can drive to a garage or car service station under its own power. However, this will be detrimental to the engine if fuel detonation occurs in the engine. Therefore, if such errors occur, it is still advisable to get rid of them as quickly as possible and eliminate the causes that caused them. Otherwise, there is a risk of complex breakdowns, which will lead to serious, and most importantly expensive, repairs.
Source
The main signs of detonation
They say that detonation is immediately recognized by a characteristic sound - a clattering sound, a ringing sound, a metallic knock. The sources of ignition are located away from the spark plug, and a blast wave is formed in the chamber volume at increased pressure. Outwardly, this manifests itself as if the walls of the cylinder are being hit with a hammer from the inside.
Dependence of pressure on phase, graph
In addition, the color of the exhaust changes when detonation occurs - it becomes dark black. The temperature of the exhaust gases also changes and decreases. But it will be difficult to notice these phenomena, and if detonation occurs for a short time, it will be practically impossible. Speaking about stable detonation, it should be noted that it can only be caused under load.
There is no point in opening the hood and trying to “accelerate” while monitoring the exhaust - most likely, the effect will not appear. There is also no point in listening to the engine - it needs additional load. Well, few people can hear the “knock of fingers” when driving at speed.
In practice, only indirect signs are often used - failures, overheating, etc. We list them in the chapter on reasons.