Every automobile internal combustion engine needs high-quality cooling and lubrication. For this purpose, cars with 4-stroke engines have a lubrication system in which engine oil is poured. There are two types: dry or wet sump. A similar system is used if the unit is valve or 4-stroke (read about the differences between this modification and a two-stroke here ).
More details about the types of lubrication systems are described in another review . Over time, there is less engine oil in the system, which is why, at a level below the minimum, the power unit begins to experience oil starvation, and in some cases, the electronics shut down the internal combustion engine and prevent it from starting.
To check the lubricant level, the driver periodically uses a dipstick, on which the manufacturer indicates the minimum and maximum values. The oil should be at a level between these marks. However, many modern vehicles do not provide for such a check - there is no dipstick in the engine at all.
Instead of a conventional dipstick, the injector will be equipped with an electronic level gauge. In this case, the electronic control unit controls the operation of the engine and notifies the driver of any problems that arise, including the state of the unit’s lubrication system.
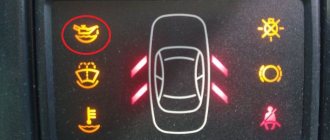
In such machines, the dashboard has a separate indicator that signals an inappropriate oil level. This indicator is triggered by the indicators of the oil sensor. Let's take a closer look at the device, operating principle and types of silent sensors.
What is a car oil level sensor
The word sensor itself indicates that it is an electrical sensor that allows you to determine how much oil is in the engine reservoir (sump). Depending on the design, the device will have an individual electrical circuit.
An engine equipped with an oil level sensor will have a corresponding hole in the lower part of the crankcase in which this device will be installed. In most cases it will be located between the filter and the pan. In addition to the engine, the gearbox can also receive a similar sensor. An electric generator or other mechanical device that uses a 4-stroke internal combustion engine can be equipped with a sensor with a similar operating principle.
Device
The oil sensor may have a different design depending on the principle of operation and additional functions that it can perform. Most modern devices are electronic. Their connection also depends on the principle on which they will work.
The simplest sensor is connected from the on-board electrical network. When it is triggered, the contact of the light closes, which will indicate that it is necessary to replenish the level in the pan. As for electronic modifications, their operating principle boils down to activating the corresponding algorithms programmed in the microprocessor.
When the device is triggered, corresponding signals are generated in the electrical circuit. They go to the control unit. The ECU determines which signal needs to be output to the instrument panel. In some vehicles, an audible signal or graphic is activated along with the illuminated indicator.
The photo shows a simple sensor in cross-section:
A) minimum oil level; B) maximum oil level; 1) magnetic contact; 2) float with magnet; 3) body; 4) connector for wiring.
The device of the simplest sensor (float type) includes the following elements:
- Magnetic contact (reed switch) . This element reacts to the movement of the magnetic float. When the magnet is in the field of action of the contact, the electrical circuit is closed and the signal on the dashboard lights up.
- Float . This element is located on top of the body. When the sensor is in a liquid, under the influence of a dense medium, the float is displaced and is constantly located on top of the oil. The float contains a permanent magnet. Changing the level in the tank causes the float to move. When it drops to the minimum value, the reed switch contact closes.
- Frame . This is a long hollow tube, inside of which the reed switch itself and its electrical component (insulated thin metal rods with an opening contact) are located. A float with a magnet, made in the shape of a ring, moves outside the body.
- Connector for connecting an electrical circuit . In the simplest scheme, the sensor is powered from a battery, and a signal light is connected in series to it.
This design can be used not only in oil tanks. The gas tank or cooling system may receive a similar sensor. In most cases, the device is installed using a threaded connection (screwed into the tank itself: engine block, fuel tank, gearbox housing, etc.).
Replacement
Before repairs, a number of preparatory measures should be carried out. First, you will need a pit, overpass or lift. In other cases, you can jack up the right side of the car and secure it with a stand. Secondly, you will need a tool: a 10 mm wrench (head), an aerosol cleaner for bitumen or oil stains, a rag and gasket sealant. The step-by-step guide looks like this:
- We install the car on a pit or overpass.
- We lock the wheels with the handbrake.
- Disconnect the negative terminal from the battery.
- We climb under the car and find the sensor.
- Under the oil filter and in the sensor area, everything is usually covered in oil and dirt.
- Apply an aerosol cleaner and wait 10–15 minutes.
- We clear the repair area.
- Disconnect the wire plug from the DUM.
- Unscrew the fastening bolt (10 mm wrench).
- Carefully remove the sensor.
- Clean the seating surface.
- Apply sealant to the mating surface of the sensor.
- We put the DUM on the engine and tighten it with a bolt.
- Connect the wire plug.
Some advise removing the engine protection. But for replacement from a pit or overpass, it hardly interferes. And yet, silicone and anaerobic sealants dry at a rate of 0.3 mm per day (±2 hours). Therefore, to ensure a reliable connection, it is recommended not to drive the car until the next day. This circumstance should be foreseen on the eve of repairs and plans should be adjusted taking into account the lack of “wheels”.
How does the oil level sensor work?
The simplest principle of operation is the float type sensor. When the level of lubricant or other monitored fluid drops, the circuit closes (in some cases opens) and an alarm lights up.
The device should not be calibrated on a cold engine. At this point, the oil level will generally be at maximum or within acceptable limits. When the engine starts, some amount of lubricant will definitely leave.
In this modification, the reed switch contact closes at the maximum level, and opens at the minimum level
When the ignition is activated, the electrical circuit is closed and the corresponding signal is sent to the relay. Due to the fact that the float is always on top, uninterrupted level control occurs. As soon as the liquid is produced or leaked, the float gradually lowers and the magnet stops influencing the reed switch contacts (or vice versa, closes the contact). The circuit closes/opens. The relay reacts to the absence or supply of power and closes the signal light circuit.
As mentioned earlier, modern cars are equipped with more complex sensors, which are no longer mechanical, but electronic. Depending on the modification, these devices can perform other functions, not just oil level control.
In a simple version, the sensor only activates the signal light. At the same time, the driver does not receive up-to-date information: he only finds out when the level has dropped to a minimum. More advanced sensors allow you to check oil quality, pressure and temperature. Depending on the signals received from the sensor, a special message may be displayed on the dashboard.
Here is a small display table in some cars:
| Icon: | Signal: | Causes: | How to fix: |
| Yellow oil can | Constantly lit | The oil level has dropped to the minimum value | The engine is turned off, if there is a dipstick, the lubricant level is checked. If there is no dipstick, add a little oil to the filler neck and go to the service station if the signal does not disappear |
| Exclamation mark with scale and arrow (or red oiler) | Constantly lit | Oil pressure does not match the programmed parameter | Go to the service station immediately. While driving, do not rev the engine at high speeds. |
| Red oil can | Blinking | The pressure in the lubrication system is too low | Immediately turn off the engine and measure the lubricant level in the engine (if there is a dipstick). If the light continues to flash when the level is replenished, call a tow truck and have the car towed for service. |
| Yellow oil can | Blinking | There is a malfunction in the engine lubrication system, for example, the sensor is faulty | Contact a car service. Replace sensor. |
Some car models have a dashboard with graphical display of oil level parameters. In this case, you need to look at the meaning of each symbol. Typically, the two central symbols will indicate normal and below average levels. The upper and lower symbols indicate that the maximum and minimum values have been exceeded, respectively.
Condition measurement
The oil condition sensor allows for a more rational use of the coolant lubricant resource, since the replacement period is determined not only by the manufacturer’s mileage recommendations, but also by the actual chemical and physical composition of the engine oil.
The device of the condition and oil level sensor of the N57 engine from BMW.
The meter consists of two cylindrical capacitors (6). The outer and inner metal tubes are used as electrodes, between which there is a dielectric - oil. The operating principle is based on a change in the dielectric properties of the oil during aging, which affects the capacitance of the capacitors.
When the level drops, the capacitance of the upper capacitor (5) changes. The temperature is continuously measured using a platinum temperature sensor (9). The change in capacitive characteristics of the capacitors, as well as the signal from the temperature sensor, is converted into a digital signal and sent to the DME unit. Based on the received data, the DME unit calculates oil change intervals.
Oil level sensor functions
Depending on the design, modification and electrical circuit of the device, the sensor can measure not only the lubricant level. Thus, a car from the BMW model range can be equipped with a sensor for the level and condition of engine lubrication. In addition to monitoring the amount of oil, this device allows you to determine when it needs to be changed.
Many modern cars indicate the need for lubrication system maintenance based on mileage, but this is not always an accurate determination. The reason is that the car can travel 15 thousand on the highway, but the oil will still be suitable for use, since the engine runs stably without overload.
On the other hand, a car operated in a metropolitan area is often stuck in traffic jams and traffic jams. Such a vehicle may not complete the required mileage, and the oil will already need to be replaced, since the engine is running and the car does not move much. This concept is called engine hours. This term is discussed in detail in another article .
Sensors that monitor the condition of the oil, if the indicator does not match, will issue an alarm signal that will be displayed on the dashboard. Some modifications are also capable of measuring pressure in the engine lubrication system, which will also be indicated on the instrument panel by a glowing oil can.
Another function that some oil sensors have is measuring the temperature of the lubricating fluid. Often such devices are used in dry sump systems. They use an individual radiator to cool the oil to the required temperature.
Functionality check
More or less experienced drivers can determine that it is the sensor that is causing confusion in the car’s operation, since there are no noticeable signs of oil leakage. Therefore, the first priority is to check the condition of the device that monitors the lubricant level.
The check is performed as follows:
- The car is placed on an overpass or inspection hole;
- The motor protection is removed. It can be put aside for a while;
- Now find the oil level sensor in the underbody space;
- Turn on the car's ignition. This way you can supply power to a device that may have failed;
- Disconnect the wires going to the sensor;
- Using a voltmeter, connect the probes to ground and the connecting block;
- If the voltmeter shows 12 volts, then the sensor is working normally.
But in the absence of tension, we can talk about one of three reasons for such a situation:
- The display unit is broken;
- There are defects on the contacts;
- There is a break in the wiring in the sensor circuit.
Therefore, if the wiring is in good condition and the contacts are clean, then further actions will consist of replacing the fuel level sensor on your VAZ 2110.
Sensor classification
If we divide all oil sensors into main categories of protection, there will be three of them: waterproof, dustproof, and explosion-proof. As for the classification according to mechanical stability, all devices are divided into vibration-resistant and vibration-resistant types.
In mechanisms equipped with an internal combustion engine, be it a car, a walk-behind tractor or a gas generator, the following types of sensors can be used:
- Float;
- Temperature;
- Ultrasonic.
Each of the listed modifications has an individual device and operating scheme. The location of these devices is basically the same - in the upper part of the pan, but there are also options installed near the oil filter. Let's look at each of these varieties separately.
More information about the float sensor
This type is the simplest not only in design, but also in principle of operation. Its design was discussed a little earlier. The float is loosely attached to a vertical tube in which the reed switch is located. In this case, the oil will drive this element up/down, due to which the magnetically controlled contact either closes or opens.
In most modifications, the device works as follows. As long as the float is at a sufficient level from the sensor contact, the circuit is open. As soon as the amount of oil becomes small, the magnet lowers and begins to act on the contact, closing the electrical circuit. The control unit records this signal and activates the watering can on the tidy.
A) installed on a vertical surface; B) installed on a horizontal surface.
The advantage of a mechanical sensor is that it rarely fails. This happens if the tightness of the tube is broken, when the magnet loses its properties (demagnetizes), a wire breaks or a magnetically controlled contact breaks. The main cause of most breakdowns is engine vibration.
Float sensors also have several significant disadvantages. Firstly, they do not show the real amount of oil, but turn on only when the level drops to a critical value. Secondly, deposits from old oil can accumulate on the surface of the tube, which can make it difficult for the float to move.
A similar problem can occur with the float itself. Due to the large amount of deposits, the float may not be on the surface of the measured medium, but slightly immersed in it, which also distorts the measurements. In this case, the light may remain on even if the lubricant level is acceptable.
Some owners of cars without such sensors upgrade their vehicles by installing a homemade leveler. In essence, it will be a device assembled from models for other cars. To install a homemade sensor, you need to make a corresponding hole in the pan, weld a nut with a suitable thread in this place and install the device from another car.
True, in order for the sensor to show the real critical level, it is necessary to adjust the maximum and minimum height of the float.
Read more about thermal sensors
This modification has a more complex structure. Such sensors simultaneously perform two functions: they measure the level and temperature of the lubricant. They are in great demand because they are easy to manufacture and work reliably over a long period of time. The device consists of a wire and a heating element enclosed in a housing.
Thermal sensors will operate according to the following principle. When the driver's hand activates the ignition (turns the ignition key), voltage is applied to the wire. It's heating up. The oil in which this element is located begins to cool it. The ECU reacts to the cooling rate and determines the oil level based on this (the faster the cooling occurs, the more oil in the reservoir). The entire process (heating and cooling) occurs in milliseconds.
In the category of oil level temperature sensors there is also an electrothermal analogue. Their design is almost identical to conventional sensors. They work on the same principle: heating and cooling the wire in oil.
The exception is the method of calculation. The device has a sensitive element, the resistance of which determines the level of liquid in the pan. So, the more oil in the tank, the deeper the sensor will be located in it, and its resistance will be lower.
Such modifications fail not only when the main components wear out, but also when difficulties arise with heating the wire, corrosion forms on the sensitive element and oil deposits are deposited on it. These devices are not repaired - only replaced. Due to the low cost of production, the price of such a sensor will not be too high.
What makes these types of testers in demand is the simplicity of their design and the ability to record various changes in oil volume. The device more effectively determines the permissible and minimum amount of lubricant compared to the previous modification.
Learn more about ultrasonic sensors
In the modern automotive industry, wireless technology is gaining popularity: steering without physical connection with the rack, accelerator and brake pedals without cables and wires, etc.
Ultrasonic sensors also operate without close contact with the lubricant. There is no need to immerse them in oil. This prevents lubricant leakage if the gasket is leaky or the mechanic has not screwed the device into the crankcase properly (if the device is installed close to the maximum lubricant level).
The device works according to the following scheme. The sensor is installed at the top of the tank (the sensor is not immersed in the oil). When the driver activates the ignition, the device begins to emit ultrasonic waves. The signal is reflected from the surface of the lubricating fluid and reaches the sensor receiver.
The device records the time interval between the pulse itself and the reflection of the signal. This time is analyzed by the control unit (it is programmed for specific time frames), on the basis of which the level in the pan is determined (how much free space is between the receiver and the oil surface). This type of sensor is used in machines with a graphical display of the amount of oil in the system. In addition to measuring the amount of lubricant, most such devices are able to determine its temperature.
Since only electronics take part in the measurement, it allows critical values to be more accurately recorded at different operating modes of the motor. For example, in a cold engine, electronics can detect the oil level as critically high, but after a couple of minutes of operation of the unit, the volume of lubricant decreases sharply.
This may be considered a loss of oil. But in the control unit, based on the data it receives from other sensors, an algorithm is activated indicating that such sudden changes are normal.
Some motorists upgrade their car’s lubrication system by installing a wireless device instead of the standard sensor (a plug is placed in its place). In this case, it is necessary to make some modernization of both the lubrication system itself and the operation of the control unit. The cost of such a procedure may be too high compared to the effectiveness and ease of use of such a sensor. Also, it may not fit your specific vehicle.
Principle of operation
In everyday life and industry, an oil level sensor allows you to record the available volume of liquid at the current moment in time. A variety of sensors are used for this, but the simplest and most understandable to understand is a float-type sensor, so as an example we will look at the principle of operation using its example.
Rice. 2. Operating principle of the oil level sensor
As you can see in Figure 2, the sensor is a sealed tube with a sealed reed switch, on which a float is mounted. The working element of the motion sensor has two boundary positions - the maximum and minimum of the liquid, relative to which further signaling and data transmission occurs. The operating principle is as follows:
- Oil is poured into the vehicle's fuel system up to the specified maximum permissible level. This ensures the nominal operating mode of the unit and cooling of the combustion chamber during technological processes.
- The float at the stage of filling the container to the Max mark also rises due to the Archimedean force to its maximum limit.
- The oil keeps the float at the mark constantly, so the magnet installed in it switches the contacts of the reed switch and the circuit closes, which sends a corresponding signal to the relay or measuring device.
- If the mechanism leaks or produces oil, its level will gradually decrease. The sensor float will begin to drop lower, but the magnets will continue to interact with the reed switch.
- As soon as the float of the oil level sensor drops to the Min mark, its magnetic effect will no longer be sufficient to close the reed switch contacts, and they will move to the off position.
- The sensor circuit will open and no signal will be sent to the relay contacts. An alarm will sound in the car indicating the need to top up the oil.
Today, other types of sensors are used in practice to determine the oil level. The method for determining the position of the liquid in them will differ from that described above, so next we will talk about the types of oil sensors.
Oil level sensor malfunctions
Damage to the oil level sensor cannot be ignored. If the driver misses the moment when the lubricant level drops to a critical minimum value, the engine will experience oil starvation. In addition to the lubricating effect, engine oil performs the function of removing heat from parts of the unit that are not in contact with the cooling jacket.
If there is not enough lubrication, the load on the motor increases, especially thermal (parts are poorly cooled). This negatively affects their work resource. In real life, reviews from many car owners show that even the minimum level of lubrication may not be critical if you do not run the internal combustion engine at high speeds until the oil is changed or until an additional portion of lubricant is added.
A sensor failure is indicated by a constantly burning oil lamp light on the dashboard. If the alarm does not disappear after topping up or completely changing the oil, the sensor must be replaced. This can also happen when the ECU receives incorrect signals.
In addition to the constantly burning light on the dashboard, the engine icon may light up or the oil can periodically light up and go out suddenly. In this case, the control unit receives incorrect data from the lubricant level sensor. The microprocessor determines this as a serious malfunction, and may even block the operation of the motor.
If the car does not have a dipstick for checking the oil in the engine, then there is no way to determine the breakdown except for diagnostics at a service station. Service center workers connect a car scanner and diagnose all equipment. In addition to this method, in the case of some cars, quick self-diagnosis is possible.
An error code is displayed on the vehicle's on-board computer. In most cases, error P250E indicates a malfunction of such a sensor (but often this refers to in-depth diagnostics, which are carried out by a special auto scanner). Details on how to call up the diagnostic menu on the car’s on-board computer are described in another review .
The oil level sensor stops working for the following reasons:
- A large amount of oil deposits have accumulated on the surface of the scanning device;
- Wiring insulation failure or line break;
- The fuse has blown (the pinout, which is usually indicated on the housing cover, will help you find the corresponding element in the fuse box);
- For VAG models, sensor problems are directly related to a breakdown of the hood switch.
It would seem that this has nothing to do with the hood and the oil level sensor. The manufacturer’s logic (applies to cars coming off the assembly lines of companies owned by the VAG concern ) is as follows. The electronic circuit is looped through the hood switch. When the driver notices that the oil can light on the dashboard, naturally, he will open the hood to add oil or at least check its level.
The activation of this sensor gives a signal to the control unit, saying that the driver has made the necessary changes and went to the service station. Counting on this course of action, the manufacturer programmed the ECU to turn off the alarm signal on the dashboard until the car has driven about 100 kilometers (if the oil has not been added).
Problems with the limit switch are regarded as a breakdown of the oil sensor. For this reason, before installing a new sensor in such machines, you must first check the serviceability of the limit switch. Otherwise, even a working lubrication system sensor will not make the oil can on the dashboard go out.
Why do you need an oil pressure lamp on the dashboard?
The indicator is connected to an electrical oil pressure sensor. If it lights up, it means the pressure is critically low and the engine is operating in oil starvation mode.
A lamp in the form of an oil can can tell the driver:
- About problems with the oil filter. After the engine is stopped, some small amount of oil should remain in the filter, which is necessary for the next engine starts. If suddenly the filter is dry, the indicator will light up;
- Oil pump problems. When the pump does not create the required pressure, the corresponding lamp lights up;
- About a clogged mesh in the pump - it protects the system from debris. If low-quality lubricant is poured into the motor, the mesh will quickly become clogged;
- About closing the circuit of the indicator operation circuit.
Selecting a new sensor
Choosing a new device today is quite simple due to the fact that different manufacturers produce a large number of all kinds of automotive parts for different models. Thanks to this, the range of sensors, including those for measuring the level, temperature and pressure of oil in the engine, is huge.
It is better to install a device that is designed specifically for a specific car model, rather than selecting analogues. The most reliable way to find the appropriate leveler is to search by vehicle VIN number. Where this code is located and how it is decrypted is described here . The reason is that the car may belong to a restyled series of a separate generation (read separately ), which is why technically identical models, but of different years of manufacture, may differ.
The second way to search for a device is by the catalog number or the number indicated on the device itself. You can also find an original spare part by telling the seller the car model, engine size (what is the difference between the total and working volume of the internal combustion engine, read here ) and when the car came off the assembly line.
If you want to install a modern ultrasonic type instead of a standard thermal or float type, you should first consult a professional about this possibility. You should not install a homemade version, as it may not work correctly or conflict with the car’s electronics.
Ideally, you should come to the service center with an original spare part or search for an option from the company’s catalog if the car service center offers a similar service. If it is not possible to purchase an original level meter, then you can choose a budget analogue that is not inferior in quality to the original.
The following companies offer similar products:
- German Hella, Metzger, SKV or Hans Pries;
- Italian ERA or Meat&Doria;
- Japanese Denso.
Most mechanical (float) and thermal sensors are universal and can be installed on different cars. As for the cost, the original will cost approximately 50-60 percent more than its budget counterpart, although it may not be superior in quality.
The light only comes on at high speeds
If the rotation speed exceeds 4000 rpm and speeds of more than 140 km/h, oil consumption begins, which is associated with the design features of the internal combustion engine. Because of this, the lamp may light up when a sufficiently large volume of lubricant is burned. The problem is eliminated by adding suitable oil and adjusting the driving pace. There are also situations where sudden acceleration caused destruction of the oil pump, but such cases are quite rare. The problem is solved by delivering the car to the repair area.
Conclusion
So, monitoring the condition of the oil in the engine lubrication system in modern cars is no longer an additional option, but an integral function. An electronic level gauge makes it easier to check the level, temperature, pressure, and in some modifications, the quality of the oil in the crankcase.
The malfunction of this sensor is quite a rare occurrence, but if necessary and desire to tinker around the car, it can be easily changed without the use of additional equipment. The main thing is to make sure that this particular element is faulty.
This video, using a VAZ 2110 as an example, shows where this leveler can be found and how to replace it:
Oil level sensor in the VAZ 2110 engine: what is it, where is it located and how to replace it!
Verification method
Not everyone knows how to check the oil level sensor, however, this is a completely simple operation. For this job we will need:
- a set of keys;
- voltmeter;
- rags;
- inspection pit or overpass.
Pay attention to where the VAZ 2114 oil level sensor is located. This place is located near the oil filter. To get to it we proceed in the following sequence:
- We park the car on an overpass (or on a viewing hole).
- We dismantle the engine protection.
- We get to the DUM.
- We clean from dirt and dust.
- We start the car.
- Disconnect the wire connected to the block.
- Using a voltmeter, measure the voltage at the connection block and ground. A working measuring device should show a voltage of 12 V on the voltmeter.
How to change the oil level sensor on a VAZ 2114
If the specified voltage is not available, then do the following:
- check the functionality of the display unit;
- check the contact and the possibility of wire breaks in the circuit.
If the above actions do not have any result, then replacing the VAZ 2114 oil level sensor becomes the next step in troubleshooting.