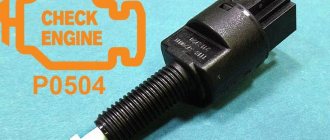
Owners of LADA cars with an electronic gas pedal may encounter error P0504 (mismatch of brake pedal sensors). Along with it, malfunctions in the engine may appear (stalls, speed fluctuates, does not start, etc.). Most often the cause is the brake pedal position sensor (brake light sensor or frog).
The brake pedal position sensor and brake light switch are mounted in one housing. Most often, the cause of its malfunction is a broken spring. In this case, you can repair the sensor yourself by replacing the spring with a new one. Or replace the sensor with a new one.
Video “eliminating squeaks”
You can learn how to solve one of the problems associated with the clutch in a car from the video from the author Konstantin Biyanov.
Replacing the Priora clutch sensor
Clutch sensor on Prior
Priora clutch sensor
Clutch sensor or Error P0830 on Lada Granta
Lada Granta - Error p0830 Clutch sensor malfunction
Clutch sensor or Error P0830 on Niva 21214
PRIORA clutch cable
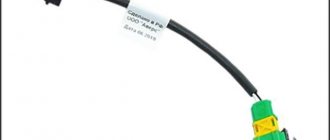
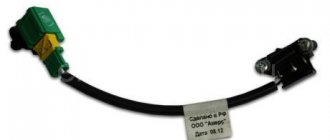
Installing clutch sensor, 6Q0 927 189
CLUTCH PEDAL LIMIT ON NIVA. Repair or replacement #AutoFormula 4x4
Clutch pedal clicking PROBLEM SOLVED
The widespread computerization of cars, adapting to consumer demand, non-stop pushes the best engineering minds to new discoveries. Every year, driving cars becomes more comfortable and safer - and all this thanks to all these innovations. Today we will talk about such an element as the clutch pedal sensor.
There are two versions of the clutch sensor, which are not fundamentally different from each other - one is used in a robotic gearbox, the other in a manual one. What does the clutch sensor do? The answer is quite simple - the electronics send a signal to the control unit so that it, in turn, synchronizes the rotation of the engine crankshaft and the gearbox input shaft.
Brake pedal sensor for Lada Granta
What is a brake pedal sensor, what problems can arise with it and how to fix them yourself. You will learn about all this below.
The introduction of updated standards regarding the level of toxicity of exhaust emissions from vehicles into the atmospheric air has created conditions for the development of new engine control devices by the Volzhsky Automobile Plant.
In addition, a brake pedal sensor appeared on Lada cars, including Grants. But many car owners, after using their car for a very short time, begin to notice error P0504, signaling a breakdown of this element. Let's try to understand this issue in more detail.
Reasons for error p0504
The appearance of a malfunction and, as a consequence, error p0504 on the on-board computer has long been identified by specialists working at the Lada manufacturing plant, that is, at AvtoVAZ:
- A short circuit that occurred in the side lights and brake light network. This could have occurred due to improper installation of the lamps.
- Operating lamps that do not meet standards.
The essence of this design is that on the Lada Granta, instead of the usual “Stop” signal, a double one is installed. The first chain of this design is designed to operate at the moment when the brake pedal is depressed, and the second, on the contrary, when the pedal is completely released. When the driver presses the brake pedal, a signal is sent not only to the stop signal, but also to the controller. And when you release the pedal - exclusively to the controller. In this regard, when these factors are combined, the controller, during its operation, begins to “suspect” that not everything is in order with the “Stop” signal, and therefore issues a similar error.
Performance diagnostics
The functionality test consists of: 1. In testing (checking) the product with a multimeter.2. Disassembly and visual inspection of the internal components of the part.3. The replacement sensor is not known to be good.
The first method involves alternately measuring the contacts of the dismantled sensor. The point is to check each contact individually and in pairs (second and third contact). This is quite convenient to do, since at the place where the contact chip is connected, all connectors are numbered.
The second method is used to identify faulty or deformed internal elements of the product (in most cases, damaged springs). Remove all internal elements and pay attention to their integrity and performance. In addition to the condition of the springs, pay attention to the metal contact plate. There should be no traces of oxidation or contamination. If there are any, clean them out.
The third method is quite simple and trivial. Install a new part to replace the one whose serviceability you doubt. Test the operation of the car by driving in various modes, when switching up and down gears. When the system is restored to normal operation, the malfunction indicator (check engine) should go out (if it does not disappear within 15 minutes, the error should be reset manually).
Clutch sensor replacement
Replacing the clutch sensor on robotic gearboxes is a rather labor-intensive process, which often requires subsequent adjustment of the clutch using special equipment. Therefore, the process of troubleshooting is individual for each type of gearbox.
Replacing the clutch sensor on cars with a manual transmission, as a rule, will not take much time and effort. The clutch pedal sensor is usually located directly next to the pedal itself - with a standard set of tools on hand, you can easily replace it.
The clutch pedal sensor itself is not a complex mechanism, so adjustment is not difficult, and the cost of replacing it yourself is not at all high. The average price in auto stores is from 300 to 700 rubles.
Clutch pedal sensor: functions and malfunctions
The clutch pedal sensor is responsible for the smoothness of speed at idle and during shifts, and also affects the operation of cruise control. Malfunctions of this element will be noticeable immediately, and the driver’s task is to fix the problem in a short time.
There is nothing difficult in troubleshooting and replacing the pedal position sensor - even a novice motorist can remove and replace it by following the instructions given in the article. In addition, the number of necessary tools is small, and there is nothing specific among them. Also in the material we will tell you in more detail about the device and function of this sensor.
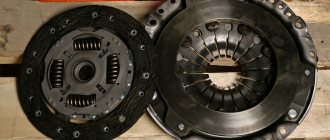
Meaning and design of the clutch
Without a clutch, the transmission will not work properly. It is located between the engine and the gearbox and provides stepwise gear shifting, controls torque, and also temporarily interrupts the connection between the flywheel and the transmission.
The clutch operates thanks to the force of friction (sliding) and includes the mechanism itself and the drive. When the driver needs to brake sharply, it allows the transmission to be preserved, eliminating overload.
If the car has a manual transmission, then the driver controls the clutch using the pedal. It allows you to connect and disconnect the motor and gearbox. The person behind the wheel releases the pedal, and it returns to its original position due to the spring.
If you drive a car with a manual transmission, keeping the pedal constantly depressed, the transmission will overheat and fail. Driving with slipping is only possible in exceptional situations in order to increase the speed.
There is no clutch in hydromechanical gearboxes, as well as in variators. However, hydromechanical type gearboxes have friction clutches that allow you to change gears smoothly. The classic assembly is found only in a robotic gearbox; in this case, gears are switched thanks to servos, which can be hydraulic or electronic.
Often, 2 clutches are used in a robotic gearbox to make shifting without delays and also to increase the efficiency of the transmission. How such a box functions: the first clutch works, while the second one is in a waiting state to change gear.
As mentioned earlier, this unit consists directly of the mechanism itself and the drive. The design includes:
- Pressure disk (or basket) . All other elements of the mechanism depend on this part. Contacts the release springs directed towards the center. The dimensions of the site are directly proportional to the two radii of the flywheel of the internal combustion engine. The main difference between the clamping section is that grinding is done only on one side. The disk is tightly connected to the flywheel of the internal combustion engine.
- The driven disk is located between the clamping section and the flywheel . It is in direct contact with the gearbox thanks to a splined coupling and friction linings. The coupling is framed by damper springs, which absorb all the vibration.
- Friction linings are located at the base ; they are usually made from various composite materials.
- Release bearing . Divided into two halves, the first has a round base to allow action on the basket springs. The bearing can be a pull-out or a pressure bearing and is located on the shaft casing. Pulling bearings are used in Peugeot cars. In some cases, a bearing may have multiple retaining springs.
- Drive and also pedal . If your car has an automatic transmission, then there is only a mechanism.
The principle of operation of the clutch is based on friction between the discs. The drive disk is an integral part of the motor, while the driven disk belongs to the gearbox. The person behind the wheel releases the pedal, at which point the springs compress the discs together. Thanks to the friction surfaces, the discs grind in and continue to rotate at the same angular speed. The force of the spring petals determines the abrasive value of the disc.
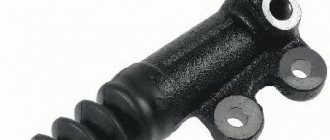
Instructions for replacing the brake controller
- Pump out the liquid.
- Place the vehicle on a support stand and remove the wheel.
- Use a wrench to unscrew the two wheel pins.
- Remove the brake drum.
- Then, using a screwdriver, pull out the hook of the upper tension spring and remove the part. Perform the same manipulation with the lower tension spring.
- Then remove the front pad and spacer bar, while disconnecting the pressure spring and lower the pad.
- Remove the shoe lever from the parking brake hole, straighten the cotter pin and remove it from the parking brake drive.
- Remove the washer and lever.
- Install a new block and assemble the part in the reverse order.
Clutch position sensor malfunctions
The following symptoms may indicate a malfunction of the clutch pedal position sensor:
- car “pecks” when changing gears
- a sharp increase or decrease in engine speed when the clutch is disengaged
Also, if a malfunction occurs in the clutch pedal position sensor, error 0830 “Clutch pedal sensor error” is recorded in the engine controller and the “Check Engine” light in the instrument cluster turns on.
Error 0830 is detected if the engine controller does not receive a signal from the clutch sensor:
- within 2 seconds after changing gear while driving
- after four gear changes at speeds above 10 km/h and engine speeds above 1000 rpm
The main reasons for error 0830:
- malfunction of the clutch sensor itself
- short circuit or open circuit
- Incorrect clutch pedal height
We encountered error 0830 while preparing the material “How to get there without a clutch?” We recorded video instructions on how to change gears without a clutch. After several gear changes without disengaging the clutch, the “Check Engine” light came on on the panel, which went out only after several dozen gear changes in normal mode.
Clutch sensor price
On many VAZ cars with an electronic gas pedal there is a connector for this sensor, but there is no sensor itself. It is not clear whether they forget to install it at the factory, or whether careless dealers remove it. The second option is also quite possible, since this sensor is still in great short supply. It costs an average of 350 rubles, but finding it on sale is almost impossible.
There are two types of clutch pedal position sensors for VAZ cars:
21214-3720020-02 for Lada 4×4 cars with electronic gas pedal
1118-3720015 for Kalina, Grant and Priora cars with an electronic gas pedal.
They are not interchangeable with each other.
It would seem like a simple sensor, but how much it can complicate the life of an ordinary car owner.
Brake light switch VAZ Priora, Kalina
To control the brake signals, Priora and Kalina cars have a brake signal switch (hereinafter referred to as BST). In addition, the BST signal, in systems with electronic throttle control, is used by the ECM. In the event of a violation in the operation of the VST, the controller’s safety system forces the engine into a reduced power mode .
On a car with an automatic transmission, activation of this mode can also occur if the brake light bulb burns out. When the brake pedal is applied, the signal switch analyzes the position of the pedal and closes the contacts, after which the brake signal lamps light up and subsequently turn off. The sensor is used when braking and releasing the brakes of cars. VST is installed on Priors and Kalinas equipped with an electronic gas pedal.
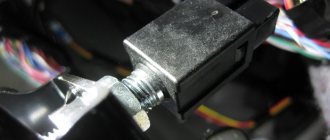
Where is the brake light switch located?
The brake light switch is located on the brake pedal assembly.
Installation location of the VST sensor on Priora and Kalina
What does the brake light switch look like?
Switch design and which one to install
The brake light switch is designed in such a way that it has two groups of contacts. Both groups send their signal to the controller. One group of contacts connects voltage to Cl. 15, and the other with Kl. 30, which supplies power to the brake signal lamps.
On the Priora and Kalina models, a brake signal switch with the original part number 1118-3720010 is installed. Such a switch costs no more than 260 rubles. There is also a good analogue - AVAR (2113720), it is a little cheaper - 190 rubles.
Malfunctions
The most common and initial sign of a faulty VST is a failure to respond to the brake pedal. When you press the pedal, the signal temporarily stops lighting and only after that the “check” light comes on. The malfunction also appears while driving, when the car begins to “stupid”, the traction disappears and it seems as if the car will stall right on the move, and then after 1.5 seconds it immediately starts. It feels like the wrong gear was engaged while driving; there is absolutely not enough traction.
Damaged spring inside the sensor housing
The most common malfunctions of the brake pedal sensor on Kalina and Priora include the following reasons:
- mechanical wear, damage to the pressure spring;
- brake light bulb burns out;
- an error was made in adjusting the gap;
- short circuit or complete open circuit;
- oxides, sticking or burning of sensor contacts;
- loosening of fastenings.
One of the common causes of a faulty sensor is the burnout of a lamp , or several brake signal lamps at once. These lamps have two filaments, one of which lights up when the lights are turned on and continues to burn all the time, and the second turns on only when the brake pedal is pressed. When these filaments in the light bulbs burn out, the ECU analyzes this burnout as simultaneous pressing of the gas and brake pedals while driving.
In cars with automatic transmission (Kalina 2), the control unit immediately reduces the speed and the car cannot accelerate normally. Because the ECU thinks that the driver presses both pedals at the same time (which is strictly prohibited on an automatic transmission). Also, the brake pedal pressure is displayed on the key fob, so the car may not be able to be set to alarm.
An incorrect gap between the switch body and the pusher attachment is also considered a malfunction. This gap must be set in the range from 0.2mm to 0.5mm .
Brake signal switch diagram for Priora and Kalina
The controller monitors the state of the VST. In case of malfunctions, it registers an error code, also stores this code in memory and turns on the signal. Often on Priors and Kalinas with an electronic gas pedal, error P0504 appears during diagnostics, which indicates a mismatch in the brake pedal sensors. This is accompanied by problems in the operation of the engine - it does not start, the speed fluctuates, and the power decreases. This can happen either due to a broken spring and, accordingly, failure of the limit switch rod, or souring of the contact plate inside.
Some motorists also notice the car jerking during acceleration, and then at high speeds the dynamics can be completely restored to normal levels. In addition, the E-Gas pedal may seem to turn off while driving, and by releasing it and pressing it again, its operation is restored.
Error p0504 or problem with the brake pedal sensor
The mileage of the car is 2500 km, and the check is already lighting up with alarming frequency. The pre-installed BC multitronic displays a message that error P0504 is a problem with the brake pedal sensor. I erase it so that it doesn’t become an eyesore, but nevertheless, the error pops up. What to do? How can I adjust/change this button?
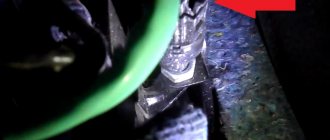
In the photo this bastard is indicated by a red arrow. As people write, you need to play with adjusting it, which is done with two nuts. The most common thing is that people adjust so that the sensor button barely touches the brake pedal pad. In general, let's give it a spin and see. My BC immediately starts yelling as soon as I start the car, saying there is a mistake. I'll go dig around this weekend.
I noticed that the error pops up more often when you stand on the brake with the selector “D” on. I think the problem is deeper than just adjusting the sensor.
Yesterday, April 14, 2020, I was at the dealer for maintenance. In particular, he voiced hemorrhoids with error P0504. The dealer cheerfully undertook to fix everything. But he didn’t fix it, he said that we need to order a brake sensor, they say it’s defective. I drove out of the gate and wasn’t even surprised when the CHECK light came on again. And this morning the car did not start from the remote control, the BRAKES light was displayed on the key fob, which was corrected by pressing the brake a couple of times, then the car simply did not move, became dull, twitched, but after hitting the brake pedal again, everything was corrected, but then again. In general, the morning did not go well. I freaked out, went to the store and bought this damn sensor.
New Lada: 5 hidden options of Lada Vesta that you didn’t know about: settings secrets
Here he is, the bastard, in the photo. I went to the dealer, where they changed it for me in 25 minutes without charging a penny. On my part, the cost is 170 rubles for a purchase in a store. So far nothing lights up or jerks. I want to disassemble the removed sensor at home and see what in such a cheap and simple part for 170 rubles was ruining the life of a car worth 450,000 rubles! The truth is, I don’t know how to assemble it, the upper part is on three clips, which are very hard, I wouldn’t want to break it.
I will continue the epic with the sensor. Today, 04/24/2020, Jackie Chan’s new dachik lit up again - P0504. Yesterday I disassembled the old sensor.
What is immediately visible is that the small spring sitting on the rod is crooked. Contacts (nickels) of different heights. In pair 3-2, contact 2 rings in a dull tone, rang with a beeper, if on all the others it beeps loudly and loudly, then on the 2nd it is dull and quiet.
The crooked spring was replaced by another, equal in stiffness, as far as I could determine, and equal in length. I understand that when the brake pedal is released, the rod goes inward and presses the floating contact to the upper group; when you press the pedal, then to the lower one. The scheme couldn't be simpler. However, it doesn't work as it should! the spots were all set up, as if a small welding was working, on one spot there was a mark from the very edge, therefore the floating contact was pressed crookedly. As I understand it, it could have been welded, which sent a signal to the brain that the car was on the brakes.
Everything leads me to the fact that the sensor is made of bullshit! The lower spring is crooked, the terminals are made of poor steel, the spots are made of metal coated with something yellow, which can be removed by sanding with sandpaper. Small spring is crooked. The floating contact does not sit exactly on the patch; it has a slight play. All together will result in unstable work.
the price is almost three times more. For Foltz. Also four contacts, a leg with the same 12mm diameter and thread. I will buy it and make a terminal adapter, from round to flat, like ours.
I don't see any other way. Or from Toyota, Mazda, they also have four contacts on threaded legs, only they are shorter in themselves and a little more expensive. These are the thoughts.
As of May 12, 2020, I can’t do anything. I went on a long business trip, to a place where there is not even a highway, and only KAMAZ trucks pass on the winter road. That’s why my wife left the car, and I drive around there. Therefore, I will try to work on the sensor only when I have rare opportunities to see my family. Good luck to everyone!
Error P0504 on VAZ cars
There is a problem that ruins the life of pretty good cars from the Kalina-2 series. I have a hatch, automatic. It's a normal car, it runs well, it's quite comfortable, there are no special problems.
But there is a problem that ruins life! This is error P0504 “Mismatched signal from the brake pedal sensors.” What's happening. When you are trudging through a dense and long traffic jam, you almost always drive on the brake pedal. You won't stop, but you won't accelerate either. It is at this moment that the error pops up. AvtoVAZ fights back, saying the driving style is incorrect. Great, but this is nonsense! Why doesn’t Mitsubishi give me such an error in the same situation? Well, okay, if it would just display an error and just reset it and that’s it. But the situation tends to get worse. It is expressed in the fact that the floating contact in the sensor over time begins to hang in a closed state, to become welded, simply put, and when you release the brake pedal, the car does not respond to the gas pedal and only after slamming your foot on the brake pedal, the contact falls off and the car starts to drive. Not only do you turn into a nuisance on the road with this behavior of the car, but also a dangerous nuisance, because the car can simply jerk when the sensor is triggered. As a result, a sensor costing 170-200 rubles makes a car worth 450,000 rubles stupid.
I disassembled the sensor, I categorically did not like how it was built inside, with a crooked spring, with contacts of different sizes, with traces of burning and welding. Moreover, I disassembled the sensor that came from the factory with the car. Over the course of 9,000 km, three of them have already been replaced, and we are planning to install a fourth, because the car again began to feel dull and flash with error P0504. People are starting to put transistors into the sensor circuit in order to reduce the current and voltage, so that the contact does not become welded, and to replace the sensor with sensors from Toyota and Audi. I myself bought a sensor from Audi and will install it. But explain to me what kind of disgusting this is? More precisely, ask AvtoVAZ a question - what kind of disgusting? After all, the problem with the sensor is not only on my car, type the question into Google, go to drive2 and you will see that almost everyone who has a K-2, Grant, etc. I'm struggling with this issue. Is this a design flaw, a bad supplier, etc.? It turns out I'm afraid to use the brakes on my car! Well, isn't it nonsense? What does AvtoVAZ’s answer about the wrong driving style mean? Driving on highways is easy and simple, but the car lives most of its life in the city, and the city means traffic jams! Do you have any driving style in traffic jams?
Causes of sensor malfunction and their symptoms
In most cases, the above error occurs because the sensor (frog) has not been adjusted properly. It is for this reason that the car owner notes the emergence of such problems as:
- instability of the engine: it starts poorly or stalls immediately;
- instability of speed.
The sensor combines two functions: it is both an element of the brake pedal position and a brake light switch. Most often, the malfunction is caused by the sensor misalignment already mentioned above, or by a broken spring. The problem that has arisen manifests itself by the “check” icon lighting up and error P0504 (implying a mismatch in the operation of this part).
So, we found out that error P0504 on Grants is caused by:
- malfunction of the part itself or its wiring;
- the element has not been adjusted properly;
- The ECM may need to be reprogrammed.
New Lada: Decorative cover (screen) with the Ladya nameplate for the 8-valve VAZ engine | find out the price and buy
If problems occur, you can repair the sensor yourself by changing the spring, or change the element itself.
Causes and symptoms of malfunction
Most often, error P0504 worries owners of Lada: Grant, Priora, Kalina and other VAZ cars with an ECU. Often a defect appears on GAZ cars, for example, GAZelle NEXT. But owners of foreign cars are less likely to contact the service to eliminate error p0504 and replace the sensor (frog). Most likely, the quality of foreign spare parts is much better. What symptoms indicate that the brake pedal sensor is faulty:
- The engine begins to work unnaturally: it feels like it either stalls while driving, then immediately starts.
- The traction disappears at around 40 km/h, but after applying the gas, the former agility is restored. Then the defect appears again.
- The brake lights do not light up, or on the contrary they work constantly.
The cause of incorrect operation of the “frog” can be: mechanical damage, oxidation of contacts or wire breakage. Sometimes a failure occurs due to the burnout of both brake light bulbs. Due to the listed defects, an error appears in the system under code p0504. It can be removed, but it will appear again soon.
Carrying out an inspection
To carry out the procedure for checking the brake pedal sensor on a Grant, you will need to turn on the ignition, and then press the brake pedal, while paying attention to the brake lights - have they come on? Then you need to release the pedal, again focusing your attention on the brake lights, which should now go out. If the brake lights do not light up, you should check the sensor itself, and also see if voltage is supplied from the battery to the wiring harness block.
When performing the test, circuit 1-4 should be in the closed position, and circuit 2-3 should be in the open position. Then press the rod, normally circuit 2-3 should close and circuit 1-4 should open.
Similar sensors are installed on other VAZ models: Priora, Kalina and others, so the solution to the problem will be exactly the same for these models.
The article uses photos from the Lada Granta French Platinum logbook.
Adjusting the brake pedal sensor Kalina
If the sensor is in good condition, and incorrect operation of the internal combustion engine continues to bother you, try adjusting the product yourself. Please pay attention to the following features:
- The sensor must be screwed in clockwise until the brake pedal begins to move down. Then you will need to slightly unscrew the product and secure its position using the fastening nut.
- The result should be such that when there is no action on the pedal, the sensor rod is recessed into the housing, and when the pedal is applied, on the contrary, it is completely released from the housing.
- As for the working gap, it is adjusted using two nuts (one at the top, the other at the bottom). The adjustment is carried out using the upper nut, which is tightened, and the lower one, on the contrary, is unscrewed. The entire process is carried out until the button is completely recessed into the body when the brake pedal is applied. However, you should not overdo the adjustment; in other words, you should leave a small gap or travel margin (approximately 2 to 5 millimeters).
Removing and repairing the brake pedal position sensor
1. To diagnose the problem, it is necessary to remove the brake pedal sensor. This is done using the key at “19”. Move the driver's seat back and find the desired sensor. Then loosen the nut, turn off the power and remove the brake pedal sensor.
2. Then we disassemble it. Disassembly is quite simple; the sensor consists of two parts and is held on by latches. There is a spring inside the sensor, which most often causes a malfunction.
3. Replacing a spring with a suitable size and number of turns in most cases solves the problem. Also look at the condition of the contacts; there should be no oxides on them, and they should not be burnt.
4. After repairing the brake pedal position sensor, assemble it in the reverse order. And we install it in place.
5. Next, you need to adjust the sensor; for this there are two nuts on it at the top and bottom. The top one adjusts the gap, which determines the correct stroke of the button. The challenge is to find the “sweet spot” and adjust the gap so that the button moves freely.
6. Now that the Grant brake pedal sensor has been repaired, installed and adjusted, you can check its operation, but before that you should reset the error.
Adjusting the brake pedal for Lada Kalina (VAZ 1118, 117, 1119)
Free play of the brake pedal is the travel of the pedal from its top position until the brake mechanisms begin to operate. It should be 3-5 mm.
Adjustment
1. We prepare the car for work.
2. Measure the free play of the brake pedal. If the free play value does not correspond to the required value, adjust its position.
3. Remove the wire blocks from the brake signal switch terminals.
4.
Using a 19 mm open-end wrench, loosen the locknut of the switch. The brake signal switch also serves as a stop for the brake pedal in its upper position. To reduce the free play, screw the locknut onto the switch and screw the switch into the bracket plate. To increase the free play, unscrew the switch from the plate a few turns and tighten the locknut.
| . |
5. Press the brake pedal several times and check the operation of the brake signals. If necessary, repeat the adjustment.
Adjusting the Toyota Camry brake pedal
Loosen the locknut and remove the brake light switch.
Loosen the stem locknut.
Adjust the pedal height by turning the rod.
Tighten the stem locknut. Tightening torque: 26 Nm.
Install the brake light switch and rotate it until it makes light contact with the pedal stop.
Unscrew the brake light switch one turn.
Check the distance “A” between the brake light switch and the pedal travel limiter (Fig. 2). Distance: 5–10 mm.
Tighten the brake light switch locknut.
Connect the brake light switch connector.
Make sure the brake lights come on when the brake pedal is depressed and go off when the brake pedal is released. After adjusting the pedal height, check its free play.
If the distance "A" between the brake light switch and the brake pedal travel limiter has been adjusted correctly, the pedal free play will correspond to the technical specifications.
CHECKING PEDAL FREE ACTIVITY
Stop the engine and press the pedal several times to eliminate the vacuum in the vacuum booster.
Press the pedal until you feel resistance (Fig. 3).
Pedal free play: 1–6mm
If the pedal free play is not as specified, check the distance “A” between the brake light switch and the brake pedal travel limiter.
If it corresponds to the technical data, then check the brake system for faults.
CHECKING THE PEDAL RESERVE
Release the parking brake lever.
With the engine running, press the pedal and measure the pedal travel (Fig. 4).
Brake pedal travel from the floor covering at a pressing force of 490 N: more than 70 mm
If the brake pedal travel is not within the specified range, look for a fault in the brake system.
CHECKING THE OPERATIONALITY AND TIGHTNESS OF THE VACUUM BOOSTER
Press the brake pedal several times with the engine off and make sure that the pedal travel does not change (Fig. 5).
Press the brake pedal and start the engine.
If the brake pedal goes down smoothly, the vacuum booster is operational.
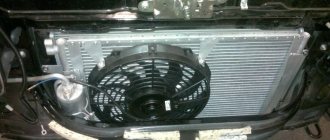
Removal and installation
Replacing the brake pedal sensor on Kalina is carried out using an adjustable wrench set to “19”. The sensor itself is located above the brake pedal under the steering column. Conventionally, the removal stages can be divided into 5 steps:
- Before starting electrical work, it is recommended to disconnect the negative wire (terminal) from the battery.
- Then you need to move into the car interior on the driver’s side. For ease of operation, it is advisable to move the driver's seat in the opposite direction from the dashboard.
- Find the location of the sensor. Find a contact chip with wires. Press and hold the 2 plastic fasteners located on both sides of the chip. Pull the connector out of the sensor connector.
- Take the wrench in your hands and loosen the fastening nut. After which the sensor can be unscrewed freely.
- The installation process is similar to the removal procedure, except that you will need to make adjustments (tuning), the process of which is described in detail in the previous section.