Features of repairing a gas tank for an injection VAZ 2110
The VAZ 2110 car is a small class sedan that is still produced at various factories in several countries around the world. This model is one of the first to have an injector system under the hood. The injection system made it possible to achieve a high maximum speed with a small engine volume and low consumption. The start of serial production of this particular model paved the line between the classic Zhiguli and the new generation of cars from AVTOVAZ.
Gas tank “tens”
The VAZ 2110 injector has a 43-liter gas tank, which is quite enough for long trips. The fuel tank is made of good metal, which can be welded perfectly if something happens. However, the fact is that in the classic series the tank was located in the trunk, and although it occupied a certain place there, it did not succumb to corrosion and other environmental influences. Starting with the 08 model, they decided to place the gas tank in the rear of the car under the bottom. This added aesthetics and space to the trunk, however, the tank now directly interacted with the environment. In addition, if you move when fully loaded, you can mechanically damage the tank, for example, by jumping into a hole and hitting it on the asphalt.
Removing the tank
If it so happens that the injector on your VAZ 2110 is rotten (considering what services sprinkle on the roads in winter, this is no wonder) or was punctured, then you need to start repairs by removing the gas tank correctly. For this we will need a set of tools and an inspection hole or overpass. Next, all the work is analyzed point by point. You can find out where everything is located in the car manual, so we won’t dwell on this.
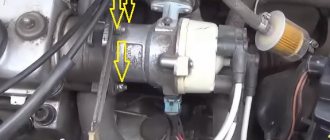
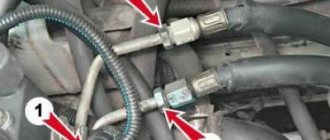
- We disconnect the fuel sensor simply by removing the wires from the connectors.
Fuel tank VAZ 2110
Of course, it is advisable that the tank is completely empty, because you will need to remove it from under the car with outstretched arms, and every liter of gasoline will create an extra burden on you.
Tank repair
First of all, we must assess the condition of the tank, whether it is worth repairing, and whether it is still suitable for repair. It may be much easier and cheaper to just buy a new gas tank. We only consider welding as a repair, since no glue patches will help if the VAZ 2110 injector tank is rotten or completely broken.
First you need to thoroughly rinse the tank and dry it so that there is no gasoline vapor left in it, otherwise there will be an explosion during work. If you do not have experience as a welder, it would be advisable to visit a specialist.
But, if you are familiar with this and have all the tools, then you can cope very quickly. We can only give small recommendations, including the fact that it is necessary to weld the tank only by autogenous welding using argon as a coolant. You need to start and end the seams before and after a few centimeters near the patch. This is necessary so that delamination along the seam does not occur later. In principle, the cooking tank can last as long as the entire machine will last; it will never be any worse because of the presence of a patch.
Important nuances
When replacing the gas tank and the studs on it, we must not forget about several important points:
- Fire safety. Work on the gas tank, as well as on any part of the vehicle’s fuel system, should only be carried out in a well-ventilated area or in the open air. There should be no sources of open fire or flammable materials nearby. And, of course, you should always have a fire extinguisher at hand;
During any work on the VAZ 2110 fuel system, a fire extinguisher must be nearby - If a car owner is going to change the tank on his car, he needs to try to use up as much gasoline as possible. It's simple: the more gasoline is consumed, the less it will remain in the tank and the easier it will be to remove this tank;
- You can change the studs only on a completely dry gas tank. As mentioned above, it takes at least 3 days to completely dry the tank. And this is a situation in which haste is categorically unacceptable. Even if the tank looks dry, this does not mean that it is. We should not forget about gasoline vapors that may remain in the tank. If this is so, then any accidental spark from the file will lead to the ignition of these vapors and the explosion of the gas tank;
- Before screwing new bolts into the gas tank, it is recommended to treat them with anaerobic sealant. The best option for this is the professional sealant THREADLOCKER, which improves the tightness of the threaded connection and reliably protects it from corrosion.
When screwing new studs into a VAZ 2110 tank, it is recommended to treat them with THREADLOCKER sealant
Replacing the tank is not a very complicated procedure. Even a novice car enthusiast can do it. To successfully complete this operation, he will need not so much repair skills as physical strength: removing a large tank with remaining gasoline from under the car is quite difficult. And if the car owner cannot boast of a strong physique, then at this stage he cannot do without an assistant.
Removing the fuel tank VAZ 2110 2111 2112
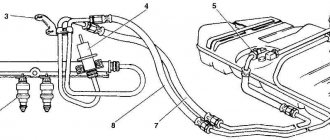
It is more convenient to carry out work with an empty tank. We install the car on an inspection ditch or a lift. We disconnect the pipelines and the electrical connector from the electric fuel pump (see “Removing the electric fuel pump with a fuel level sensor”).
We move the steering knuckle with the stand to the side and remove the drive from the hub. Using a 13mm socket, unscrew the two bolts of the clamping bands.
We hook the clamping bands to the rear axle beam and lower the tank onto them.
Loosen the clamps of the tank ventilation hose.
. and the inlet pipe hose.
We remove one hose.
Loosen the separator hose clamp.
. and remove the hose, holding the metal tube so as not to bend it.
Unhook the tapes and remove the tank. Install the tank in reverse order. After starting the engine, check the tightness of the connections.
Add a comment
Repair of VAZ 2110 (Lada) Replacement of the fuel tank
- Repair manuals
- Repair manual for VAZ 2110 (Lada) 1996+.
- Replacing the fuel tank
2.17.1.5. Replacing the fuel tank
If the fuel pump screen frequently becomes clogged, the tank should be removed and washed.
If a leak is detected along the junction line of the upper and lower parts of the tank, you can solder these places (it is recommended to do this in specialized workshops). To do this, pour out the remaining gasoline, thoroughly rinse and dry the tank. Then seal the leak with soft solder.
You can solder only a thoroughly washed and dried tank that does not contain gasoline vapors, otherwise the vapors may ignite during soldering.
To wash the fuel tank, use detergents: Lobomid, MS or ML. Then, to remove any remaining detergent, rinse and steam the tank with hot water. Dry the tank thoroughly.
| EXECUTION ORDER |
Download information from the page
↓ Comments ↓
1. General data 1.0 General data 1.1. Vehicle Specifications
2. Engine 2.0 Engine 2.1 Possible engine malfunctions. 2.2 Replacing the coolant 2.3 Replacing the engine oil and oil filter 2.4. Installing the piston of the first cylinder to the TDC position of the compression stroke 2.5 Replacing the camshaft drive belt and tension roller 2.6 Adjusting the camshaft drive belt tension 2.7 Removing, troubleshooting and installing the flywheel 2.8. Replacing engine seal parts 2.9 Cylinder head 2.10 Grinding in valves 2.11 Adjusting clearances in valve drive 2.12 Removing and installing engine 2.13. Engine repair 2.14. Lubrication system 2.15. Cooling system 2.16. Exhaust gas system 2.18. Features of VAZ-2112 engine repair
3. Transmission 3.0 Transmission 3.1. Clutch 3.2. Gearbox 3.3. Front wheel drives
4. Chassis 4.0 Chassis 4.1. Checking the technical condition of suspension parts on the car 4.2. Rear suspension
5. Steering 5.0 Steering 5.1 Inspection and check of the steering on the car 5.2. Steering column 5.4. Steering mechanism 5.5 Possible steering malfunctions.
6. Brake system 6.0 Brake system 6.1. Vacuum booster 6.2. Main brake cylinder 6.3. Pressure regulator 6.4. Brake hoses and tubes 6.5 Bleeding the brake system 6.6 Replacing brake fluid 6.7. Front wheel brakes 6.8. Braking mechanisms of the rear wheels 6.9. Parking brake 6.10 Possible malfunctions of the brake system.
7. Electrical equipment 7.0 Electrical equipment 7.1. Mounting block 7.2. Generator 7.3. Starter 7.4. Ignition switch (lock) 7.5. Checking and replacing spark plugs 7.6. Integrated engine management system (fuel injection system) 7.7. Contactless ignition system 7.8. Lighting, light and sound signaling 7.9. Windshield wiper 7.10 Replacing the electric motor of the radiator fan of the cooling system 7.11. Heater electric motor 7.12. Cigarette lighter 7.13. Instrument cluster 7.14 Checking the carburetor solenoid valve control unit 7.15 Possible malfunctions of the EPHH control unit. 7.16 Electrical diagram of a VAZ-21102 car 7.17 Electrical diagram of a car with a carburetor engine 2110 7.18 Engine control diagram 2111 (pin M1.5.4) 7.19 Engine control diagram 2111 (pin MP7.0) 7.20 Control diagram for engines 2111 and 2112 (pin M1) .5.4N, "January-5.1")
8. Body 8.0 Body 8.1 Possible body malfunctions. 8.2. Replacing the buffers 8.3 Removing and installing the radiator trim 8.4 Removing and installing the locker 8.5 Removing and installing the wing 8.6. Hood 8.7 Removing and installing upholstery, trim and windshield frame lining 8.8. Trunk lid 8.9. Side doors 8.10 Removing and installing the front seat 8.11 Removing and installing the upper and lower lining of the floor tunnel 8.12. Seat belts 8.13. Rear view mirrors 8.14. Instrument panel 8.15. Heater 8.16 Anti-corrosion compounds for body treatment 8.17. Features of body repair of models 2111 and 2112 8.18. Body care
9. Appendices 9.0 Appendices 9.1 Fuels, lubricants and operating fluids 9.2 Basic data for adjustments and control 9.3 Filling volumes 9.4 Lamps used in the car
How to change the float in the gas tank of a VAZ 2110
Removing and replacing the gas tank.
Replacing the mesh in the fuel pump.
Replacing the float in the gas tank of a VAZ 2110.
In the lowest position (empty tank), the resistance should be 285–385 O.
gas tank VAZ 2108, 2109, 21099, 2113, 2114.
5.11 Removing the fuel receiver with fuel level sensor VAZ 21213.
VAZ2110 why the ignition coil burns out.
Fuel tank (gas tank) injector VAZ 2110.
2.17.1.5. Replacing the fuel tank.
Fuel hose VAZ 2114.
VAZ 21099 1990-2008 Fuel tank.
VAZ 2109 1987+ Fuel tank.
Power supply system for VAZ 2110, VAZ 2111, VAZ 2112 with reverse drainage of part of the fuel.
Replacing the float in the gas tank of a VAZ 2110.
VAZ-2111 engine. Removing the electric fuel pump with fuel level sensor.
VAZ 2109, VAZ 21099. article about removing, installing and troubleshooting the gas tank.
gas tank float Forum.
The contacts on the fuel pump 2110 are heating up.
How to replace a VAZ fuel pump with your own hands?
and, removing the float from the tank hole, remove the electric fuel pump with sensor.
Prying up the rubber gasket and removing it through the neck of the tank.
Replacing the fuel filter on a VAZ 2114 is a step-by-step process.
Fuel system VAZ 2107 injector (photo and video).
Removing the electric fuel pump VAZ-2112-14.
Engine VAZ-21083. Removing the gas receiver with fuel level sensor.
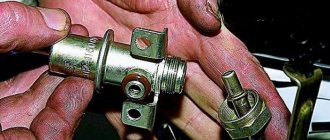
Replacing the Fuel Level Sensor (FLS)
If a leak is detected along the junction line of the upper and lower.
Fuel pump VAZ 2110.
fuel pump mesh, fuel filter for VAZ.
Replacing the float in the gas tank of a VAZ 2110.
diagram of the float in the gas tank.
Tuning the gas tank cap On many foreign-made cars.
Dismantling the gas tank
- So, first we remove the plastic casing under which the gas tank is hidden. It is secured with screws that can be unscrewed with a Phillips screwdriver.
- Now disconnect the power wires from the fuel sensor. You can simply pull them up and remove them from the contacts.
- Next, unscrew the fastening of the fuel hose and pull it out of place using pliers.
- Then unscrew the bolt of the clamping plate securing the VAZ 2107 gas tank with the injector system.
- Now you can unscrew the filler cap and carefully remove the gas tank.
Next, all that remains is to seal the gap in the gas tank. There are many repair methods, from cold welding to sealing the tank with tar. Let's take the simplest and least expensive path.
Gas tank VAZ 2110 injector - photo, description on VAZ-2110.net
Fuel tank VAZ 2110 injector with EBN V-1.6 (made in Tolyatti) photo, price.
Advertisement for the sale of a VAZ 2110 gas tank and fuel pump in the Republic of Bashkortostan.
VAZ 2110 gas tank.
Separately, a gas tank costs RUB 1,000.
Gas tank 2108/2112 injection. (pins D .
Selling fuel tank VAZ 10 family.
Injection gas tank VAZ 2115.
Photo 2. Gas tank VAZ injector 2109 2110 2115 Priora Granta - photographer.
The fuel tank capacity of the Lada 2110 is 43 liters.
Please call with any questions.
Advertisement for the sale of Tank VAZ2110 injector in the Rostov region on Avito.
VAZ 2110 2111 2112 for sale The tank is in excellent condition, removed from a 2002 car.
Advertisement for the sale of petrol tank VAZ 2110.2111.2112 in the Bryansk region on Avit.
Photo of a fuel tank for vases.
Gas tank assembly VAZ 2108-09-10.
Advertisement “Benzabak VAZ 2114-2110-2112-2115” (with photo).
Replacing the carburetor with an injector interior.
Advertisement for the sale of a VAZ 2109 injector gas tank in the Komi Republic on Avito.
Fuel tank (gas tank) injector VAZ 2110.
2.17.1.5. Replacing the fuel tank.
Announcement about the sale of fuel tank VAZ 2110, 2111, 2112 injection in Saratovsko.
Advertisement for the sale of a petrol tank for VAZ 2110, 2115, 2105 in the Ivanovo region.
Gas tank VAZ 2115, 2110, 2109 engineer.
. decided to proceed to Stage 3 - Installation of the fuel line and injection.
fuel tank VAZ 2110.
Gas tank /21082, 10, 12, 15/ EURO /thick. hairpin/VAZ.
More details. tank for VAZ 2108 2109 2114 2110 2111 2112.
Cleaning the gas tank VAZ 2110 - 2112
Solid fractions are constantly deposited in the gas tank of a car. Some of them simply sink to the bottom, others settle and form a kind of hard crust. Both of them clog first the fuel pump filter, and subsequently the fuel filter, which can adversely affect the operation of the carburetor or injector.
Accordingly, the car will not only begin to become “dull,” but parts will also wear out much faster. There are a large number of ways in which you can determine the level of contamination of a gas tank, but any specialist will tell you that it needs to be cleaned periodically.
At the same time, no liquid will help fully, while removing and cleaning the gas tank will help get rid of plaque and the entry of its fractions into the fuel system. Ideally, this entire procedure for cleaning the VAZ 2110-2112 gas tank should be performed with an assistant, but if he is not there, you will have to “tighten up” a little.
First of all, you need to dismantle the tank itself. To do this, you need to remove the rear seat, unscrew the screws securing the fuel pump cover and remove it. After this, we start the engine so that it selects the remaining gasoline from the fuel system (before this, we turn off the contact group that powers the gas pump itself so that fuel from the tank does not enter the fuel system).
Then disconnect the fuel hoses. Unscrew the bolts securing the pressure ring of the VAZ fuel pump and remove it. Now the fuel pump can be removed and set aside. Further work takes place from the bottom of the car.
Near the fuel filter, you need to remove the air hose clamp and remove the hose. In the same way, disconnect the hose coming from the filler neck and the pipe that collects fuel vapors.
On the side of the fuel supply pipe, on which the fine filter is installed, you need to loosen the bolts of the tight-fitting clamps, and then release the clamps themselves. It is now that an assistant will come in handy - he will help support the tank during the following steps.
After the clamps are released, make sure that the gas tank is not connected to any fitting or hose. Now it can be removed. To do this, you need to move the tank towards the pipe that connects the resonator and the muffler, tilt it and bring it under the brake hoses. Then remove the gas tank from behind the exhaust system pipes and remove it.
First of all, you should remove the remaining gasoline and particles that did not have time to settle at the bottom. To do this, you can simply rinse the tank with any detergent, even dishwashing detergent.
After this, it is best to plug all the holes with available materials (rubber plugs, rags, improvised plugs) and pour one of the special tank cleaning products inside (the gas tank should be in the same position as it is on the car).
The liquid needs some time to “acidify,” but you can speed up the process in an old-fashioned way: you can pour a large number of foreign metal objects, such as nuts, bolts, washers, small pieces of fittings, etc. into the tank. After this, shake the gas tank well for at least half an hour.
This way, most of the plaque will simply be erased. Then drain the “spent” suspension, shake out the remaining “working material” and rinse the tank. It is better to wash with gasoline.
After the gas tank is washed, it is best to blow it out with a compressor - a powerful air flow will remove all settled microparticles. If this is not possible, then you can wash it several times, letting it dry completely.
Of course, this process may take 2-3 days, but the result will be obvious - the service life of the fine fuel filter will increase significantly, and the car will respond better to pressing the gas pedal.
After the gas tank is cleaned, it must be installed in the reverse order of dismantling. It is advisable to replace the hose and pipe clamps with new ones, so as not to look under the bottom again.
You should pay attention to the fact that the fitting clamps of the gas tank itself are not the same, so they must be installed in strict accordance with the seats.
Flushing a VAZ gas tank yourself, of course, is a labor-intensive process. But this procedure will help you not only save on the services of specialists and spare parts, such as fuel filters, fuel pump mesh, fuel system hoses, but also significantly improve ride quality.
The fuel tank of any car is a container in which fuel is stored. The tank must ensure safe storage, since fuel belongs to the category of flammable substances that are dangerous to human health and life. If we talk about the VAZ 2110 car, then the gas tank on this model does not always stand the test of time and driving. It is necessary to monitor the condition of the tank in the car, since not only the possibility of operation, but also the life of the driver and passengers depends on it.
Replacing the VAZ 2107 fuel filter (injector): instructions, photos and videos
If your VAZ 2107 suddenly refuses to start, while the starter rotates the engine properly and there is a spark at the spark plugs, there is a high probability that the problem is in the fuel pump. The fuel pump on the VAZ 2107 (injector) is much more reliable than those installed on carburetor models.
However, everything can break. Therefore, you should start by checking the functionality of the fuel pump. Unlike the pump on a carburetor engine, on a VAZ 2107 with an injector the fuel pump works as soon as the ignition key is turned. And it works quite noisily; its operation can be clearly heard when the engine is turned off.
First, let's figure out what the power supply system of the VAZ 2107 injection engine consists of.
VAZ 2107 power supply system (carburetor)
The purpose of the engine power system is to store and purify fuel, mix with air and supply the mixture to the engine. The power system includes:
- Gas tank.
- Fuel pump
- Level sensor.
- Fine fuel filter.
- Coarse fuel filter.
- Fuel lines.
- Fuel rail with injectors.
- Air filter
- Air supply sleeve.
- Throttle valve.
- Fuel vapor recovery system.
A malfunction of any of the elements will cause the engine to stop working.
Checking the VAZ 2107 fuel pump (injector)
The fuel pump on injection VAZ models often stops working due to a malfunction in the power supply circuit. If you can't hear the fuel pump running when the ignition is on, you should start with a simple check of the wiring and pump. In the glove compartment area there are three relays on a special mount. The middle one is responsible for the operation of the fuel pump.
The check should begin with fuse F3, which powers the fuel pump. If the fuse is working, you need to pay attention to the relay, wires and power supply contacts. If not, replace the fuse.
To check the power supply to the fuel pump:
- Remove the relay from the mount.
- Check the presence of a “plus” on the thick pink wire on the fuel pump relay (the ignition must be on).
- If there is a “plus”, connect the pink wire with the gray one going to the fuel pump (relay contacts “30” and “87”).
If, when the gray and pink wires are shorted (if there is a “plus”), the fuel pump does not work, the fault is either in the wiring going to it or in the fuel pump itself. Power connectors located in the trunk especially often fail. This is where you should start checking. There are two of them.
If the fuel pump turns on when the gray and pink wires are shorted, you should check the presence of power at 86 and 85 relay contacts. You also need to check the functionality of the relay. The easiest way to do this is to temporarily install a known working relay.
If the fuel pump makes noise, but does not pump, or does not produce enough pressure, you should try replacing the coarse filter.
The pressure created by the fuel pump in the line can be checked using a conventional pressure gauge. To do this, it is necessary to secure an oil- and gasoline-resistant hose with an internal diameter of 12 mm to the pressure gauge using a clamp and secure the second end of the hose to the fuel pump fitting ramp. Before this, you need to remove the fitting plug and unscrew the spool.
Removing the VAZ 2107 fuel pump (injector), replacing the coarse filter
To replace the filter, you must remove the fuel pump from the car. You will need:
- Key for 7.
- The key is 17.
- Crosshead screwdriver.
- Flathead screwdriver.
- New coarse filter (if necessary),
- New sealing rubber gasket (if necessary).
Installing a fuel pump
Before installing the fuel module (fuel pump with fuel level sensor), you must carefully check the condition of the rubber gasket that ensures the sealing of the connection. At the slightest suspicion, it is better to replace it. It is cheap, but re-installing/removing the fuel pump when a fuel leak occurs is a labor-intensive task.
DETAILS: Headlights for VAZ 2107.Tuning, tinting headlights and taillights Video
When tightening the eight fuel pump mounting nuts, you must be careful not to strip the threads.
Further operations are performed in the reverse order of removing the fuel pump.
After installing the fuel pump and connecting the pipes and power connector to it, you should check the operation of the system. To do this, you need to start the engine and make sure the connections are tight.
semerkavaz.ru
Cases when a VAZ 2107 injector fuel pump needs to be replaced are not that frequent, and its service life depends not only on the quality of the gas pump itself, but also on the condition of the gas tank. The reason I had to change it was because a small speck got into it because the filter came off.
Electric fuel pump device
The design of an injection fuel pump is simple and can be divided into two parts:
- electric motor;
- water pump.
The most important thing is its structure itself. The electric fuel pump itself is hermetically sealed to protect against fuel ingress. The fuel enters the pump through the filter and the intake hole and is supplied to the power system through the outlet hole (sealed from the electric motor).
Here is a diagram you can find. I would like to note that it does not happen that the motor rotor rotates in liquid and even in gasoline. Firstly, a spark forms on the commutator when the engine is running. You understand that this will lead to a fire. Secondly, rotor rotation in liquid is so difficult that gaining speed and creating pressure is simply out of the question.
Therefore, gasoline passes through the engine through a special channel, and the design of the engine itself is hermetically sealed.
Where is the fuel pump on the VAZ 2107 injector?
On carburetor engines, the fuel pump is installed on the right side of the block and is visually accessible. On the injector, it is located in the gas tank and only the output tubes coming from it are visible, and replacement is somewhat more complicated.
Symptoms for replacement
Signs of a malfunction of the VAZ 2107 injector fuel pump appear both when starting the engine and during operation:
- “heavy”, long engine start;
- jerking when moving;
- uneven operation at idle;
- The fuel pump doesn't pump.
Diagnostics
The primary conclusion whether the fuel pump is working or not can be assessed by ear when the ignition is turned on. If you don’t hear a quiet buzzing noise from behind, then you need to check the voltage supply to the gas tank block and then draw a conclusion about its malfunction.
You can check the serviceability of the fuel pump using the MTL-2 pressure gauge; this is the most correct way. You can somewhat roughly estimate the pressure using air pressure gauges to check tire pressure. To do this, screw a rubber hose to the sensor and connect it to the fuel system.
You can do without instruments at all; to do this, unscrew the fuel hose from the filter, place a container and turn on the ignition. In one minute, about 1 liter should be poured into the container.
The pressure of the VAZ 2107 injector fuel pump when the ignition is on should be 4.0 atmospheres, and when the ignition is running 2.8-3.2. In reality, the pump pressure is different and was slightly less, but this may be an error in the pressure gauge.
The carburetor pump is checked by setting the camshaft position by cranking the engine so as to ensure free movement of the pump foot. The hose is unscrewed from the carburetor or filter and the presence of fuel supply is determined by pressing the foot.
How to replace a VAZ injector fuel pump
To replace the fuel pump on an injection vase you will need:
- key to 10;
- 2 keys for 17;
- key to 7;
- crosshead screwdriver;
- a simple screwdriver.
When installing the filter, do not hesitate to give it a good tap, otherwise it may fall off like mine. The fuel pump mesh on the VAZ injector is replaced if the old one is dirty or torn. Its replacement is carried out in the same way. Usually it is sold complete with a fuel pump; if not, you will have to buy it, the price is 25 rubles.
Reassemble in reverse order. We heat the hose again in boiling water; if the mounting location of the old electric fuel pump does not allow the part to be properly secured, then we cut it off.
Check the integrity of the gasket between the flange and the gas tank; if it is torn, there will be a smell of gasoline in the cabin.
Important. When choosing, pay attention to performance and maximum pressure. I had Bosch 0 580 454 456 and replaced it with a close analogue of FR 453-453 from WEBER.
Characteristics:
- OEM part number 21083-1139009-01;
- Installation of VAZ 2108 - 2115;
- Pressure - 580 kPa;
- Productivity - 60 l/min;
- Voltage - 13.5 V.
DETAILS: Nissan Tiida engine oil change
Consumption per 100 km at a speed of 120 is about 8 liters. Very pleased.
A fuel purifier plays a very important role in purifying the fuel that a vehicle runs on. It is necessary to trap all kinds of foreign impurities and protects components and systems from clogging. Refilling a car with fuel offered to domestic consumers makes this procedure extremely important, since it is very often poorly purified.
The need to replace the fuel element is indicated by factors such as deterioration in the traction of the power unit and high fuel consumption. This procedure itself is simple and will not take you more than twenty minutes, but it will save time and money by avoiding a trip to the service station.
Replacement instructions
Filters recommended for replacement in a VAZ 2107 car with a carburetor or injector:
- Alco FF-009;
- DELLO 302010511251G;
- Bosch 0450904058;
- Filtron PS 842131261275;
- Fiaam FT4874.
How the gas tank works on a VAZ 2110
Cars of the VAZ 2110 family are small class sedans. They are still produced today, as they have good performance characteristics coupled with low cost.
The design of the VAZ 2110 includes a gas tank that holds 43 liters of fuel. This volume is quite enough for a trip with a range of 500–600 kilometers. On the VAZ 2110, the tank is made of high-quality metal, due to which damage and rotting of the body occurs quite rarely.
The gas tank itself is located under the bottom of the car, although previously on all VAZs it was located in the trunk. This design move created certain convenience for the driver, as a significant amount of space in the luggage compartment was freed up, however, due to dirt and stone impacts, the gas tank body became more subject to wear.
The tanks are made of durable metal alloys, which ensures the tanks have a long service life
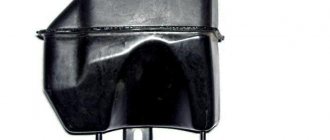
The fuel tank on the VAZ 2110 consists of two stamped halves, carefully welded together. The tank includes:
the container itself for storing gasoline;
filler neck - a pipe through which fuel enters the tank;
rubber filling hose;
neck plug and hatch;
a fuel pump that is built into the cavity of the tank.
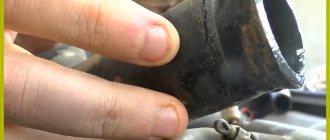
What could be the reason for repairing a gas tank?
For cars of the tenth VAZ family, several factors may serve as reasons for repairing the fuel tank:
aging of the metal - over the course of long-term use, any product begins to perform its functions worse;
mechanical damage - dents and cracks can occur on the gas tank body from impacts on curbs, potholes and large stones while driving;
corrosion is the most common reason to repair a tank, since rust corrodes all its parts and makes further operation impossible.
The gas tank may be punctured while driving on uneven roads or as a result of hitting a large obstacle.
Seal the gas tank
So, first of all, we go to a specialized store; to repair the gas tank we will need:
- Fiberglass.
- Epoxy resin.
- Sanding paper.
- Acetone.
It is very important, before starting to repair a gas tank, to thoroughly dry the fuel container and degrease it; the final result depends on this. Next, cut the fiberglass into pieces so that they are larger than the area of damage. Impregnate the fiberglass with epoxy resin.
Place fiberglass cloth on the surface so that there are no bubbles; excess resin should be removed. Pay special attention to the first layer; the final result depends on its quality.
After the repair is completed, let the patch dry, then be sure to putty and paint the gas tank, this will increase the reliability of the repair.
DETAILS: Replacing the fuel filter for BMW X5 E70 diesel
This way you can inexpensively repair your gas tank. However, even this is not a panacea; such a patch will only last for a few years at most, and besides, it, of course, will not stop the corrosion processes of the fuel tank. Therefore, the ideal solution is to purchase a new gas tank. Moreover, on a VAZ 2107 with an injector system this part today costs no more than 3 thousand rubles.
DIY fuel tank repair
The first step is to assess the current condition of the gas tank. Does it make sense to repair it or is it easier to buy a new one?
Only soldering (if there are microscopic cracks) or welding (if a small hole has formed on the body) can be considered as a repair. If the VAZ 2110 tank is completely rotten or broken, then no restoration methods will help.
Argon welding allows you to eliminate minor defects and holes on the tank
In any case, the repair of the gas tank on the “ten” begins only after it has been dismantled and thoroughly washed.
Selecting tools and accessories
To independently remove, repair and install the gas tank, you will need a standard set of tools and some auxiliary materials:
heads for 8, 10 and 13;
open-end wrench 17;
extension for keys.
Removing the tank
The dismantling of the tank from the VAZ 2110 must be carried out in an inspection pit or overpass. You can, of course, jack up the body, but this option cannot be called convenient.
In large private garages, car enthusiasts usually arrange an inspection pit for servicing their cars.
Removing the gas tank on a VAZ 2110 can be divided into two stages:
Turning off the fuel pump in the car.
Removing the fuel tank.
First stage: turning off the fuel pump in the cabin
Before removing the tank from the “ten”, you will need to relieve the fuel pressure in the system. To do this, you need to open the rear door of the car and fold down the rear passenger seat cushion:
It is recommended to completely remove the pillow and remove it from the passenger compartment.
Under the pillow there is a sheet of sound insulation.
Find a special cutout in the sound insulation, under which the gas tank hatch is located.
Unscrew the hatch fastening screws with a screwdriver.
Open the hatch cover and remove the pump from the tank cavity.
Before removing the pump, you will need to disconnect the two fuel lines - disconnect the connector.
After this, the first stage of work can be considered completed.
Second stage of work: dismantling the tank
After the pressure in the fuel system has been relieved and the fuel pump has been removed from the tank cavity, you can begin the second part of the work, which takes place under the car body:
Disconnect the fuel level sensor (wires go to the tank, you need to pull the wire out of the connector).
Next, remove the hose from the sensor fitting.
Find the tank mounting bolts and unscrew them.
Remove the tank vent pipe.
After this, carefully lower the tank itself to the surface.
If the metal tank mounts cannot be removed, you can spray them with WD-40 lubricant.
To remove the gas tank from the “ten”, you will need to carry out some work both inside the car and under the body. It is important to ensure that all suitable wires and lines are disconnected from each other.
It is not recommended to restore such a product, since the service life of a rotten tank is obviously minimal
Clean and wash the gas tank
You can flush the gas tank only after dismantling it. You will need to remove the tank from the body, disconnect all fuel and electrical lines, and remove the fuel level sensor.
Some car enthusiasts perform flushing without removing the tank from the car: they simply direct a stream of hot water under pressure through the filler pipe. After steaming, about five liters of gasoline are poured into the tank, tightly capped and shaken. After draining this mixture, the container must be thoroughly dried, it is best to use compressed air.
A stream of hot water is directed into the tank lid, after which the dirt and liquid are sucked out by a pump, and the tank cavity itself is dried with air.
For washing, it is recommended to use detergents such as “MS”, “ML” or “Labomid”. If the tank has not been washed for a long time, it is best to pour detergent into it several times and rinse it with water. At the end of the wash, be sure to steam the internal cavities with hot water and then dry the tank.
Rust inside a gas tank can only be removed with special preparations called “rust converters.” To thoroughly clean the tank, you will need about two liters of this substance, which you will need to pour inside and shake well. After 15 minutes, you can drain the converter - the liquid will come out along with remaining rust and dirt.
The rust converter is available in containers of different volumes, due to which you can choose the volume needed to wash the tank of a specific car model
We repair studs
Studs are elements of the fuel system that secure the gas tank hatch located in the car's interior. We are talking about that small hatch that is hidden under the soundproofing sheet and the rear seat cushion.
The first sign that indicates that it is time to change the studs is the appearance of the smell of gasoline in the cabin. The fact is that the gas tank hatch is closed using both bolted connections (nuts and studs) and a gasket. If the gasket is worn, then most likely the threads on the stud have been stripped (or one or more studs have broken). Accordingly, the gas tank loses its seal, which is why a persistent smell of fuel appears in the cabin.
On the VAZ 2110 there are only six studs on the gas tank hatch
To repair the studs, you will need to remove the tank from the body. After which you will need to rinse the tank cavity thoroughly and dry it (you can use compressed air from a tire pump). Then you can start repairing the studs:
Broken studs or those with worn threads must be removed from the edge of the hatch - a grinder is usually used to cut down the studs at the root.
Use a file to file down uneven areas and stumps from old studs - the surface of the hatch should be perfectly flat.
Afterwards, attach the hatch pressure ring (without a gasket) and drill holes in its holes for new studs.
The recommended drill diameter is 4.5 mm.
On the back side of the hatch, insert bolts with M5 threads into these holes (the length of the bolts is determined in random order so that the nuts are tightened to the end).
Tighten the bolts with nuts, closing the gas tank hatch.
Bolts of the same diameter and length are used as new studs - the tightness of the gas tank is not compromised
This method is used to repair fuel tank studs. During use, one or two studs inevitably break. Only those that are severely worn out or broken should be replaced.
At the owner's request, any modification of the product can be used as nuts for studs, for example, a hex nut
How to detect a leaking gas tank
There is no need to worry about noticing a leaking gas tank. If gasoline escapes from the fuel tank, this will be accompanied by the following symptoms:
- Significant increase in fuel consumption. It’s hard not to notice that gas is running out, even if the car is parked.
- There will be a distinct smell of gasoline inside the car.
- Rainbow spots will remain on the asphalt where your VAZ 2107 was parked.
If at least one of the above signs occurs, most likely, your VAZ 2107 with an injector system actually has a leak in the gas tank. There are several options for action in this situation; we will divide them into emergency and planned.
Emergency gas tank repair
If your car’s gas tank leaks on the highway and you can’t get to the nearest car service center without repairs, you can use a few tricks that will help temporarily return the fuel tank to operation.
The simplest and most effective way: seal the gas tank with rubber or plastic. For this we need:
- Superglue or ordinary glue moment.
- A piece of rubber from a tire or a plastic bottle.
So, the first thing you need to do is find the place where the gas tank is damaged, where fuel is escaping. In the case of the VAZ 2107, the injector system is leaking most likely from below; its cause is a hole or corrosion damage. As soon as the damage is detected, we proceed as follows: cut out a piece of rubber or plastic, lubricate it with glue and press firmly against the damage.
After a few minutes you can release the patch, it will finally set in a couple of hours, but in any case you can go. You can easily get to a car service center with such a patch; there are cases when car enthusiasts drove with it for several weeks.
Another way to seal a hole is with a regular self-tapping screw. Suitable if the damage is small in diameter and you have a rubber seal for the screw. This is done as follows:
- First you need to find the location of the damage.
- Then install the seal on it (a regular piece of a car inner tube will do).
- Screw a self-tapping screw into the seal so that it fits into the gap in the gas tank and plugs it.
Scheduled repair of the gas tank
If you notice a leak and decide to fix it with your own hands, the first thing you need to do is dismantle the VAZ 2107 gas tank; the process is similar for both the carburetor and a car with an injector system.
Replacing the fuel tank
Before replacing the tank, it is recommended to protect yourself from possible troubles and remove the wire in the negative terminal of the battery. The work will be completed as quickly and correctly as possible only with the participation of an assistant.
It is recommended to remove the pump immediately after shutting it off to avoid damaging the sensor and fuel lines.
After removing the old gas tank, you will need to perform the following operations to install a new one:
Install a new fuel level sensor gasket and lower the sensor together with it into its place in the tank.
Then lift the tank, first from the rear, then from the front, install it on new clamps, screwing them to the body with new bolts.
Next, connect the fuel hoses, separator and air pipes.
After that, go into the cabin and connect the fuel level sensor and pump to the connectors.
Close the hatch, screw it on and put the seat cushion in place.
After installation, you must make sure that all fuel lines and sensor wires are connected
After replacing the tank, you need to make sure it is working: start the engine, see if there are any problems with the fuel supply or leaks due to poor connections.
Today, you can repair and replace the gas tank on a “ten” at any service station. However, this procedure is not considered difficult to perform independently. Therefore, it is more advisable to remove, repair or change the gas tank yourself.
↑ Design of the carburetor engine power system
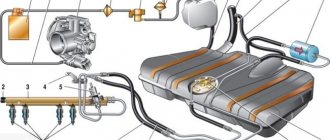
1 – cold air intake; 2 – air duct; 3 – thermostat; 4 – heated air intake; 5 – fuel drain hose from the carburetor; 6 – air filter assembly; 7 – carburetor; 8 – check valve; 9 – fuel pump; 10 – fuel supply hose to the fuel pump; 11 – fine fuel filter; 12 – fuel drain pipe; 13 – fuel supply pipe from the tank; 14 – fuel tank; 15 – flange of the fuel level sensor and fuel intake tube; 16 – filling pipe hose; 17 – filling pipe; 18 – separator hose; 19 – fuel tank plug; 20 – separator; 21 – separator ventilation hose
↑ Fuel tank
The fuel supply is located in the tank located under the bottom in the area of the rear seats. The tank is made of steel and consists of two stamped halves welded together. Through drainage tubes it is connected to a non-separable separator that traps gasoline vapors. The latter communicates with the atmosphere through a double check valve, which prevents excessive increase or decrease in pressure in the fuel tank. The filler neck is connected to the tank with a gas-resistant rubber hose secured with clamps. The plug is sealed.
Through a fuel intake with a mesh filter, gasoline is supplied from the tank through steel fuel lines and rubber gas-resistant hoses to a fine fuel filter, a fuel pump and then to the carburetor. Gasoline is sucked from the tank due to the vacuum created by the gasoline pump.
↑ Fuel pump
The fuel pump is a diaphragm type, mechanically driven by the camshaft eccentric, with a manual pumping lever. It consists of a lower housing with drive levers, an upper housing with valves and pipes, a diaphragm assembly and a cover.
↑ Diaphragm assembly
The diaphragm assembly is installed between the upper and lower housings. Two diaphragms are installed on top (working ones), and one (safety) on the bottom: it prevents gasoline from entering the engine crankcase if the working diaphragms rupture. In this case, leaked gasoline is discharged through holes in the external spacer located between the safety and working diaphragms.
The diaphragms, together with the internal gasket and plates (from the outside), are assembled on the rod and secured with a nut. The rod is inserted into the cavity of the balancer using a T-shaped shank. A spring is installed between the diaphragm assembly and the lower housing. The upper housing is closed with a lid secured with a bolt. Underneath there is a mesh fuel filter.
↑ Pump
The pump is attached to the engine on two studs through a heat-insulating spacer, sealed on both sides with cardboard gaskets. Gaskets are available in thicknesses of 0.30, 0.75 and 1.25 mm. A 0.30 mm gasket is installed between the heat-insulating spacer and the engine, and a 0.75 mm gasket is installed on the outer side of the spacer (facing the fuel pump) and the minimum protrusion of the pusher from the spacer is checked, which should be 0.8-1.3 mm. To do this, slowly turn the engine crankshaft, pressing the pusher with your finger and periodically checking its protrusion above the plane of the gasket. If the minimum protrusion is less than specified, the outer gasket is replaced with a thinner one, if more, with a thicker one.
Part of the gasoline supplied to the carburetor is drained back into the tank through a system of pipelines and hoses - this improves the cooling of the gasoline pump and prevents the formation of vapor locks in the power system. A check valve is embedded in the drain line, allowing fuel to flow in only one direction - from the carburetor to the tank.
↑ Air filter
The air filter housing can receive cold air through an intake near the radiator or hot air from an intake mounted on the exhaust manifold. The flow is switched by a damper controlled by a thermostat. The built-in thermal power element opens the hot air damper when the incoming air temperature is below 25°C and completely closes it if the air is heated above 35°C. Thus, the temperature of the incoming air is automatically maintained within 25-35°C.
The air filter is dry, with a replaceable paper filter element, mounted on the carburetor studs through a rubber gasket and secured with four self-locking nuts through a metal plate.
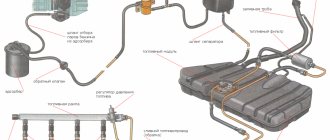
Basic information about the injector circuit
Wiring diagram of VAZ 2110 injector 8 valves
The VAZ injection system is designed quite simply and contains practically no nuances specific to understanding. A novice motorist even knows the general principle of operation of injection systems. Elements of the injection system and their basic functions:
- the fuel regulator is located on the injector, the latter, in turn, is located on the frame to which fuel is supplied using a pump (all the fuel first passes through a specialized filter);
- the fuel pressure should not exceed 300 mPa, therefore, if any excess fuel occurs, it is sent back to the tank using a membrane regulator;
- the bypass valve controls the position of the diaphragm, which in turn is subject to triple pressure: the pressure of the fuel itself, as well as the intake air and the corresponding spring;
- the fuel regulation scheme described above directly depends not only on the current engine load, but also on the throttle position;
Wiring diagram of VAZ 2110 injector 8 valve
- the cylinder is filled with fuel during rotation of the crankshaft, the volume of incoming fuel is determined by the position of the injector (see VAZ 2110 injectors and their cleaning), which is directly controlled by the controller.