The front struts on Lada Granta cars can easily travel more than 100 thousand kilometers without any signs of wear. But there are also exceptions to the rules. Typically, the first symptoms of failure can be considered:
- Leaking shock absorber
- Punctures and knocking noises when driving on uneven surfaces
If you see traces of oil on the rack, this indicates that it needs to be changed. If the stand is collapsible, then replace the cartridge, which will be a little cheaper than buying an assembled stand.
Also, if knocking noises occur when driving over speed bumps, holes or potholes on the road, check the performance of the strut. If there are visible defects in its operation, it is necessary to replace it. To do this you will need the following tool.
- Spring ties
- Jack
- Balloon wrench
- Penetrating lubricant
- 13, 22, 19 and 17 mm wrench
- 9 mm wrench for holding the strut rod (or a special device)
- Pliers
- Pry bar with hammer
How to repair the front strut of a Lada Granta
We remove and repair the shock absorber strut when the upper support, bearing, spring and the telescopic strut itself wear out.
The telescopic stand cannot be repaired - it must be replaced.
For removal and installation you will need keys 13, 17, 19, a head 19.
The work is best done on a lift, but can be done on level ground using a jack and safety stand.
It is advisable to replace the wallpaper on the rack, even if only one is faulty.
Brake the vehicle with the parking brake and place wheel chocks under the rear wheels.
Loosen the front wheel mounting bolts.
Raise the front part of the car with a jack and remove the wheel.
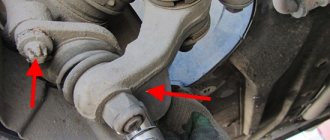
Disconnect the tie rod end from the strut swing arm. For this:
1. — turn the steering wheel all the way in the direction opposite to the detachable tip;
- unbend and remove the cotter pin
2. Using a 19mm spanner, partially unscrew the ball pin fastening nut.
3. Inserting a mounting blade between the swing arm and the tip, press the tip away from the lever and, striking the end of the swing arm with a hammer, press the ball pin out of the lever.
This operation can be performed using a puller.
4. Finally unscrew the nut securing the ball pin.
and remove the ball pin from the hole in the swing arm
6. If you are removing the strut for disassembly, loosen the shock absorber rod nut using a special tool or a 22 mm spanner while holding the rod with a 9 mm spanner.
7. Using a 13 mm spanner, loosen the three nuts securing the upper strut support to the car body.
8. To minimize the violation of the camber angle of the front wheels, use a center punch or paint to mark the bolt of the upper mounting of the steering knuckle and the strut bracket.
9. Using a 17 mm socket wrench, unscrew the nuts of the bolts of the upper and lower fastening of the steering knuckle to the strut, holding the bolts from turning with a 17 mm socket wrench.
10. Remove the washers from the bolts (the washer of the upper bolt is eccentric) and remove the bolts.
11. Using a screwdriver or a mounting spatula, remove the steering knuckle from engagement with the strut bracket.
12. Remove the brake hose from the strut bracket.
13. Unscrew the nuts securing the upper strut support
and remove the stand assembly.
14. We clamp the rack in a vice and install two spring ties diametrically opposite each other, so that they engage the four threads of the spring.
By evenly rotating the tie screws, we compress the spring.
15. After the spring stops pressing on the support cups, use a 22mm wrench to unscrew the rod nut
16. Remove the travel limiter from the engagement of the upper support.
17. Remove the upper support.
18. Remove the bearing protection ring
19. Remove the compression stroke limiter of the upper support
20. Remove the upper spring cup assembly with the bearing and spring gasket
21. Remove the bearing from the upper cup
22. Separate the spring gasket and the upper cup
23. Remove the upper bearing ring.
24. Remove the spring with ties and the compression stroke buffer with a protective cover.
Before assembling the strut, by fully extending and retracting the rod by hand, make sure that the shock absorber is in good condition.
If you feel dips, jerks, or hear strange sounds when moving the rod, replace the shock absorber.
Check the integrity and serviceability of all elements installed on the rack.
Suspension springs are divided into classes. The class of the spring is indicated by paint on the outside of one of its coils.
Springs of the same class must be installed.
25. Install the spring so that the lower coil of the spring rests against the protrusion of the lower spring support.
26. Install the upper spring cup with the gasket so that the upper coil of the spring rests against the protrusion of the spring gasket.
27. When assembling the upper support bearing, add grease to it.
Set the head of the adjusting bolt for the upper mounting of the steering knuckle to the shock absorber strut to its previous position according to the marks.
After assembly, you need to check the toe-in and camber of the front wheels.
Analogs of rear shock absorbers on VAZ 2190 and 2191
The original rear ones are also slightly more expensive than the average price of replacements. Because of this, analogues are also in high demand. The best option would be to purchase rear shock absorber struts in packaging specifically from the manufacturer SAAZ (red box), and not the standard VAZ one (blue), which is true, analogues offer substitutes with slightly better rigidity characteristics and service life.
| Manufacturer | vendor code | price, rub. |
| Sachs | 316763 | 2400 |
| Trialli | AH01510 | 1300 |
| Boge | 30N87A | 2400 |
Which shock absorbers for Lada Granta should I choose? Many foreign analogues for the Lada Granta - VAZ 2190/2191 are superior to standard racks in a number of indicators, such as: rigidity, noise level, anti-corrosion coating, and the presence of reinforced mounting of silent blocks. But not all stands have such characteristics, especially if we are talking about a Chinese counterfeit.
The most popular manufacturer of racks among grant providers is SS20. The company specializes in producing racks specifically for Lada cars, including Grants. Therefore, there are no problems with installation, plus their price and quality are more acceptable, except in those rare cases when there are design flaws.
Of course, you can try to purchase Monroe or other spare parts made in Germany or France. But this will be too expensive an option.
The front pillars of the Lada Granta have a telescopic design. When replacing, it is possible to install both new individual modules and the entire rack assembly. However, before starting repairs, it is necessary to remove the part.
To do this you will need the following tools:
- hex key 6;
- wrenches for 13, 17, 19, 22.
Operations for removing the rear pillar of a Lada Granta
Work can be carried out on a level area; an inspection hole or a lift is not required. You also don't need a spring remover.
1. Fold down the rear seatback.
2. Use a screwdriver to pry off the rubber plug3. ...and remove it.
4. Unscrew the nut of the upper fastening of the shock absorber strut.
5. Place chocks (“shoes”) under the front wheels. Raise the rear of the car as high as possible so that the beam bends as much as possible. The beam can also be bent by hand in order to remove or install the stand. In this position, the beam has limited rigidity and you will be able to rotate it a few more centimeters. 6. Unscrew the nut of the shock absorber strut lower mounting bolt and remove the bolt from the hole.
7. Remove the lower end of the shock absorber strut from the bracket and remove the shock absorber strut with the spring.
Often, even after you have removed the strut from the car, the buffer rubber cushion remains stuck inside the rear strut mudguard body cup. In this case, reach in with your hand and pull it out.
8. Remove the spring from the shock absorber strut.9. Remove the bushing and lower cushion from the shock absorber rod.10. Remove the casing from the shock absorber.
11. ...and remove the compression stroke buffer from the housing.12. Replace the spring if cracks are found or the coils are deformed. It is recommended to replace both rear suspension springs, and they must be of the same group.13. Install the insulating gasket onto the spring so that the end of the spring rests against the protrusion of the gasket. Secure the spacer to the spring with duct tape or thin wire to prevent it from coming off when installing the spring.
14. Install the spring on the shock absorber strut so that its end rests against the protrusion of the lower cup.
15. Install the rear suspension shock absorber strut in the reverse order of removal. The lower end of the spring should face the wheel. When installing a shock absorber, it can be very difficult to get the extended rod of the shock absorber into the car body (into the hole in the cup). To facilitate this installation procedure, the use of a rubber piece of gas hose placed on the shock absorber rod (10-15 cm long) will help, which is easily directed into the body hole due to its flexibility, even if the rod is displaced relative to the hole, and subsequently, when the body is lowered, the rod follows the hose falls into its normal place.
16. Lower the vehicle to the ground. Rock it hard a few times. Finally tighten the nuts of the upper and lower shock absorber mountings.17. After 100 km, check and, if necessary, tighten these threaded connections to the required torques.
Today, dear readers of VAZ Repair, you will learn how to replace the support bearings on a Lada Granta, and not just replace them, but replace them without removing the struts. I wonder how? Then continue reading...
Those who have ever encountered the need to replace support bearings know that to perform this work it is necessary to remove the struts along with the springs, which certainly complicates the task. However, as you know, laziness sometimes works wonders; in addition to being the “engine of progress”, it also often allows you to make your life easier. This photo report will clearly demonstrate to you how to replace the support bearings without removing the strut and you will be able to see that sometimes laziness can work wonders :-). Joke!
- Set of keys: “13, 14, 17, 22”;
- Hexagon (to fix the rod from twisting);
- Two jacks or supports for the car;
- Special spring ties;
- Actually, the support bearings themselves.
Shock absorber strut for Lada Granta: selection and replacement - AutoExpert
The shock absorber strut is the most important element of the suspension of the Lada Granta car. The comfort, controllability and safety of the machine depend on the condition of the unit.
Losing control over the behavior of the vehicle can lead to an emergency.
Therefore, as soon as the first symptoms of a shock absorber strut malfunction appear, it is necessary to carry out diagnostics and, if necessary, replacement.
Article number and approximate price for original front shock absorber struts
The right and left original front shock absorber struts on the Grant are structurally different. They are not interchangeable and have different part numbers. On the left side, units with catalog numbers are used:
- 2190290500205;
- 21928290103110;
- 219002905402;
- 219002905403;
The original shock absorber struts for the right side come with article numbers:
- 21900290103010;
- 21928290103010;
- 21900290103000;
Regardless of the side on which the unit is intended to be mounted, new original racks have a similar cost. The price varies from 6,000 to 9,000 rubles. When purchasing used spare parts from car dismantling yards, the owner can save money.
A supported node costs 1000-2500 rubles. The disadvantage of such a purchase is the inability to accurately determine the remaining life, as a result of which the spare part may fail almost immediately after installation.
Analogs of front shock absorber struts for Lada Granda
Taking into account the high cost of original front shock absorber struts, most car owners do not want to purchase original auto parts. Third-party manufacturers provide the opportunity to purchase an analogue at a more attractive price. The best alternative options that perform well on the Lada Granta are presented in the tables below.
Table - Good analogues of the left front original shock absorber struts
ManufacturerArticle Approximate cost, ruble
| SAAZ | 21902905403 | 2200-2800 |
| Hola | SH21270 | 2400-2900 |
| Master-sport | 2190KR-PCS-MS | 3600-4200 |
Table - The best alternatives to the front right original struts from third-party manufacturers
ManufacturerArticle Approximate cost, ruble
| Pilenga | SH-P 2790-O | 4000-5500 |
| SS20 | SS20194 | 6000-8000 |
| SAAZ | 2190-2905402 | 2200-2800 |
Unlike the front axle, the rear shock absorber struts are identical on the right and left sides. They are completely interchangeable and have article number 21900291500400. The cost of a new unit is 2-4 thousand rubles.
In addition to the new original rack, it is possible to buy original spare parts at auto repair yards. Such a unit costs from 500 rubles. The unknown remaining life discourages many car owners from purchasing used struts.
Article number and cost of good analogues
There are analogs on the market for the original Grant shock absorber struts. Third-party manufacturers produce units of varying quality.
Some of them are frankly low-grade defects, but there are also quite worthy specimens. The table below shows the brands of the best analogues, which perform excellently on Grant.
Overview of the main shock absorber manufacturers
By default, hydraulic ones from SAAZ (Skopovsky Automobile Plant) are installed from the factory. They are not particularly distinguished by their quality, but with moderate use they can last up to 60,000 km.
- Kayaba: Japanese, characterized by high quality, reliability, and long service life. When purchasing, be careful, as some of the products are made in China.
- ASOMI: domestic manufacturer for GAZ, VAZ, LADA models. One year warranty from the date of installation. Judge the quality for yourself.
- SS (SS): also a domestic manufacturer of racks for VAZs. Quality guarantee for two years, according to the owners' reviews, they are not bad, a little harsh.
In general, all shock absorbers are divided into three categories:
The differences in the categories are insignificant and unnoticeable for the average driver. The kit comes with a warranty card and operating instructions.
Removing the shock absorber strut and disassembling it
We remove and disassemble the shock absorber strut when it is necessary to replace the upper support, bearing, spring, and telescopic strut. The telescopic stand is non-removable and cannot be repaired. We carry out the work on an inspection ditch or overpass, but you can get by on a flat platform. There are two options for removing the shock absorber strut. The first allows you to avoid subsequent adjustment of the steering wheel alignment angles, the second method requires less work, but after it requires adjustment of the steering wheel alignment angles. We replace the telescopic stand according to the second option. In the first option, remove the strut together with the steering knuckle, without loosening the nuts of the upper (adjusting) and lower bolts securing the strut to the steering knuckle. At the same time, disconnect the tie rod end from the swing arm of the shock absorber strut (see below). We disconnect the ball joint from the steering knuckle (see “Removing the ball joint”). We remove the outer CV joint from the wheel hub (see “Removing the front wheel drives”), and also remove the pad guide with the caliper and cylinder (see “Replacing the front wheel brake disc”).
We tie the bracket to the brake hose bracket, making sure that the hose is not stretched. If the rack is supposed to be disassembled...
...using a 22mm spanner wrench, loosen the tightening of the rod nut, holding the rod from turning with a 6mm hexagon.
Using a socket or a 13mm wrench, unscrew the three nuts securing the upper strut support to the body...
...and remove the shock absorber strut along with the fist. To remove the shock absorber strut, use the second method to disconnect the tie rod end from the shock absorber strut swing arm. To do this, unscrew the nut securing the ball pin of the tie rod end.
We install an adjustable stop under the finger, press it and, striking the rotary lever with a hammer, press the finger out of the lever. Using a “22” spanner, loosen the tension of the rod nut, holding the rod from turning with a “6” hexagon, and with a “13” socket, unscrew the three nuts securing the upper support of the strut to the body (see above).
We remove the brake hose coupling from the shock absorber strut holder.
Use a chisel or paint to mark the location of the adjusting bolt relative to the rack. With this method, after assembly, the deviation of the wheel camber angle from the original value will be insignificant.
Using a 19mm socket, unscrew the nut of the upper bolt securing the strut to the steering knuckle, holding the bolt from turning with a 17mm wrench.
Remove the top bolt and eccentric washer from the steering knuckle.
Using a 19mm socket, unscrew the nut of the lower bolt securing the strut to the steering knuckle, holding the bolt from turning with a 17mm wrench.
Removing the shock absorber...
...and the upper support plate.
During subsequent assembly, the support plate must be strictly oriented with the arrow towards the front of the car, as well as the arrow on the upper strut support.
Arrow placement on base plate and top support.
We clamp the rack in a vice and install two spring ties diametrically opposite each other, so that they engage the four coils of the spring.
Lada Granta MAGMA › Logbook › Replacement of the front suspension strut support (Granta norm). Part 1.
Good day, dear subscribers!
I recently changed my strut mounts. I would like to share with you the process of replacing supports. I will try to describe everything clearly and competently, so that each of you can replace the strut supports, as well as the front suspension shock absorbers or springs, without any problems, depending on what you need to replace. The process of replacing the above is exactly the same.)
So.
Let's figure out how this can be done. There are two ways to replace support bearings.
The first method
is simpler and faster.
It involves removing the strut without the steering knuckle. In this case, all you need to do is just unscrew the two alignment bolts with nuts securing the strut to the steering knuckle, unscrew the tie rod end nut and disconnect it, and unscrew the three nuts securing the strut support to the body. And after that, you can remove the stand. But after this process, it will be necessary to go to the alignment. At the service station, most likely, this is exactly what they will do to you. Afterwards you will need to fork out more money for the wheel alignment. The second method
is longer and more complex. Using this method, it is necessary to remove the strut assembly with the steering knuckle, the hub, the brake disc and the caliper bracket. The advantage of this method is that after this there will be no need to do a wheel alignment. I did exactly this, and the further description will be about this method. I would also like to note the following - This method is only relevant if you do not need to do a wheel alignment after repairing the front suspension. If you plan to do a wheel alignment after repairing the suspension in any case (for example, when replacing tie rod ends), then all this is unnecessary. In this case, use the first method.
How to change the support bearing on a Grant
To complete the work you will need the following equipment and tools: - any two reliable jacks; — a hexagon made of durable metal (to fix the rod and prevent it from turning); — specialized ties for springs; — keys of various sizes (for “13, 14, 17, 22”); - hammer; - chisel; - center punch; — composition for fighting rust (WD-40); — a “30” key with a long lever; — new bearing assemblies or a separate bearing.
Below are 10 stages of work:
- Place the car on a level surface. Provide comfortable lighting conditions. To avoid troubles during work, place chocks under the rear wheels.
- Before jacking up the vehicle, loosen the four wheel mounting bolts.
- Using a jack, we lift and fix the area of the car body where the work is planned.
- Unscrew the bolts and remove the front wheel.
- We unscrew the bolt that secures the stabilizer link (so that it does not interfere with further work).
- We move to the engine compartment. We take the hexagon in one hand, insert it and hold it in the rod, and with the other hand, using a “22” wrench, loosen the nut securing the shock absorber rod itself.
- We prepare, place a second jack under the ball. We raise the rack to its possible limit.
- In order for the bearing to be freely removed, it is necessary to loosen the shock absorber spring. To do this, we take the previously prepared ties, hook them onto the spring and tighten them until the stand drops lower and thereby releases the support device.
- Unscrew the rod completely (if you haven’t unscrewed it previously). Through the resulting space, remove the support mechanism.
- Reinstallation is similar to the removal process. We hope that if any problems arise in the future, you will no longer have questions regarding how to remove the support bearing on the grant.
Summarize
Now you know which racks are best to install. Replacing the shock absorber strut, as well as disassembling it in order to change specific parts, did not turn out to be a complicated procedure. This work can be done by an ordinary Lada Granta owner who has the desire and the tools. Upon completion of the repair work, do not forget to check and adjust the alignment.
Before you begin actual assembly, make sure that all marks are completely aligned with each other. Also be sure to check the angles at which the front wheels of the Lada Grant are installed. If you are convinced of problems, perform a wheel alignment to ensure more reliable operation of the car.
HONOR 8 - step-by-step instructions for replacing the display
Huawei often makes very good phones, not only in terms of use, but also repair. However, there are also models that are too sophisticated, with characteristic features and minor difficulties. This is exactly the smartphone that came to me for repair - Honor 8, with a broken display.
I don’t know how hard the fall was, but it was enough for the screen to stop showing anything, so on the long-suffering Honor we will replace the display with the entire assembly. And so, let's go.
How to replace the display on HONOR 8
The first difficulty when disassembling is that the back cover is glued to a plastic frame, which in turn is glued to the metal body of the phone. When the back cover is heated for dismantling, the tape on this same plastic frame also loosens so that it will then have to be re-glued.
To avoid this, I used to peel off the back cover using film and a small amount of isopropyl alcohol.
We create the required gap with a regular razor blade or a very thin and flat tool, adding a little alcohol. Next, we place a thin film in the resulting gap and go over all the edges with it, adding alcohol.
We clean the cover from the factory double-sided tape.
Then there are two ways. The first is to unscrew all the screws and peel off the back frame, with the prospect of re-gluing it, etc. The second one, which I follow, is faster: I unscrew the two marked screws and slightly bend the protrusion of the frame to the side, under which is the battery connector I need.
Now you can check the functionality of the new display. We disconnect the old one, connect the new one and return the battery cable to its place. Let's start the device.
In a similar way, we test our display module “on weight”. We set the brightness to maximum, inspect the image for the absence of obvious defects and distortions.
The battery is glued here conscientiously. It is impossible to remove the battery without extreme heat or some other method without damaging it.
Add a small amount of alcohol to the marked places. Don't be afraid to flood the display, since we still have to replace it. We wait a few minutes and without much difficulty lift the battery from the softened tape.
We must remove the remaining tape and subsequently replace it with a new one.
Due to the features of the frame described above, I was unable to carefully peel off the display; I had to constantly check that the display frame remained in place and did not crack. I separated the display from the body using a spatula for disassembly.
Phone assembly
We clean the surface of the plastic from remaining fragments, factory glue, dirt and dust. Don’t forget to transfer the speaker mesh to the new spare part.
Apply glue to the frame, let it dry for 2-3 minutes and glue the display.
Immediately we apply tape to install the battery, return it to its place, connect all the connectors, screw in the screws and glue the back cover with B-7000 glue.
Since we have both the display and the back cover glued, I strongly recommend holding the phone with clothespins or placing it under pressure. This way nothing will come off after drying.
Shock absorbers VAZ 2107
Despite the fact that the VAZ “Seven” is presented as a luxury version of the VAZ 2105, the design of the front and rear suspensions is no different from other classic models. This also applies to shock absorbers, which not all owners are satisfied with their performance.
Purpose and design
The main function that shock absorbers perform in a car’s suspension is to dampen vibrations and shocks that affect the body when driving over uneven surfaces. This part ensures reliable contact of the wheels with the road surface and maintains vehicle controllability regardless of the condition of the road surface. Structurally, the shock absorber consists of two elements - a piston and a cylinder. Depending on the type of damping device, chambers with oil and air or oil and gas are located inside the cylinder. The gas or oil medium exerts resistance during the movement of the piston, converting vibrations into thermal energy.
What are there
There are several types of shock absorbers:
- oil;
- gas;
- gas-oil with constant hardness;
- gas-oil with variable hardness.
Each option has its own advantages and disadvantages.
Table: dimensions of the rear original dampers of the “seven”
| vendor code | Rod diameter, mm | Case diameter, mm | Body height (excluding stem), mm | Rod stroke, mm |
| 21012915402 | 16 | 42 | 310 | 182 |
Oily
The working medium in oil damping elements is oil. The advantage of such products comes down to a simple and reliable design. This type of damper can operate without problems for several years without affecting the vehicle's performance. The downside is the slow response. The fact is that when driving at high speeds, the damper simply does not have time to absorb irregularities and return to its original position, as a result of which the car begins to rock. Shock absorbers of this type are recommended for those motorists who drive at speeds no higher than 90 km/h.
Gas
Gas-type products are the toughest. The design, compared to oil damping elements, has two chambers: oil and gas, which uses compressed gas (nitrogen) under a pressure of 12–30 atm. Such shock absorbers are used in racing cars and on some SUVs.
Gas-oil with constant hardness
The design of this type of damper is two-pipe, i.e. there is an inner pipe in the outer pipe. The product has two pistons with valves and contains gas under a pressure of 4–8 atm. and oil. When the shock absorber rod is compressed, part of the oil remains in the inner tube and works like an oil damper, and part goes into the outer tube, causing the gas to be compressed. When compressed, the gas pushes out the oil, returning it to the inner tube. Due to this work, smoothness is ensured, leading to smoothing out shocks. Such shock absorbers are less rigid compared to gas ones, but not as soft as oil ones.
Gas-oil with variable hardness
On Zhiguli cars, dampers with variable stiffness are practically not used, which is due to the high cost of such products. Structurally, such elements have an electromagnetic valve that automatically adapts to the operating mode of the vehicle. During the adjustment process, the amount of gas in the main damper tube changes, resulting in a change in the rigidity of the mechanism.
Video: types of shock absorbers and their differences
Where are they located?
The shock absorbers of the rear suspension of the “seven” are installed near the wheels. The upper part of the damper is attached to the car body with a pin, and the lower part is fixed to the rear axle by means of a bracket.
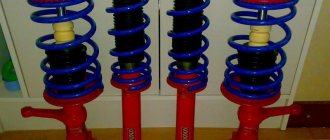
Springs and strut supports for Lada Granta - choose the best
It is better to install original springs. No manufacturer offers the same accuracy as VAZ in this case. There is only one reason for this - no one wants a manufacturer of springs specifically for Grants to do it efficiently and cheaply. Therefore, you have to give preference to stock solutions
As for the upper and ball joints of the Lada Granta struts, it is worth paying attention to the following features:
There is an opinion that factory spare parts are always better than analog ones. But in the case of the Lada Granta this is not at all the case. Sometimes you can find quite adequate spare parts that fit Granta from German and Japanese brands. And then you can buy really wonderful additions and parts that last for years. However, any part has its own service life, and this also needs to be remembered.
Let's sum it up
There are a number of features of operating the Lada Granta on Russian roads. For some reason, a domestic car is not very suitable for our roads; it crashes and fails instantly. Sometimes you come across a well-built car that doesn’t show any character after 100,000 kilometers. But in most cases, the Garnet justifies the title of the cheapest car in the Lada line. And when it comes to racks, the manufacturer saves a lot on these elements. The installation of low-quality suspension elements leads to the fact that more and more people, after purchasing Grants, repair it under warranty.
However, sometimes it is better to cancel the warranty and install normal racks, supports and other parts. In this case, you will ensure the normal service of your car’s suspension and will be able to establish normal operation of each unit. This will take a certain budget, but can provide you with comfortable movement without any particular difficulties or problems. Of course, even the best quality rack will eventually fail. But it can travel far beyond 100 thousand kilometers. What brands of spare parts do you choose to repair the suspension of your Lada Granta?
The rear strut is usually removed to replace the shock absorber or spring. The main reason for the malfunction of the strut shock absorber is leakage of fluids and more intense rocking of the body when going over uneven surfaces. The springs sag noticeably after about 50-70 because, of course, this also depends on the quality of the springs themselves and the operating conditions of the car.
Procedure for replacing the front strut support bearing - Lada Granta
Removing the front pillar
- Before raising the car on a jack, loosen the hub nut with a 30 mm wrench.
- Don’t forget to first straighten the jammed collar at the locknut.
- Next, we also loosen the wheel bolts, only then raise the front of the car.
- We remove the wheels and proceed to dismantling the brake caliper.
- We unscrew the caliper fastenings, before unbending the protective brackets. Immediately remove the brake hoses from the strut.
- If you have an ABS sensor, do not forget to disconnect it by unscrewing the fasteners. We release the caliper from the fastenings, remove it and put it aside. Be sure to remember the position of the pads.
- Then we loosen the fastening of the steering tip with a 19 key, first disconnecting the cotter pin.
- We install a special removable device for tips.
- We press it out, tightening the thread, as shown in the photo.
- Thus, the tip can be easily removed without using a hammer.
- Under the brake disc we find two ball screws.
- First we loosen them and then unscrew them with a ratchet.
- As a result, the rack is disconnected from below. We take out the structure from the CV joint and place a support under it.
- The upper part of the rack holds three 13 nuts, unscrew them.
- Carefully pull out the stand from below. This completes the dismantling.
Hello. Chassis repair is perhaps the most common work that a car owner has to do, or more accurately, “our” car owner has to do. These constant knocks and squeaks seem impossible to completely “defeat”, and after one is put in order, another goes out of order. In general, this is not strange, given the state of the roads in Russia. Constant loads and driving on uneven roads have the most unfavorable effect on the chassis. In principle, it would probably be wrong to blame the roads alone; part of the problem certainly lies with the designers of AvtoVAZ, who, despite problems with the roads, continue to produce cars with flimsy suspension and chassis. Well, enough of the ranting, I think, we need to get to work.
Today, dear readers of VAZ Repair, you will learn how to replace the support bearings on a Lada Granta, and not just replace them, but replace them without removing the struts. I wonder how? Then continue reading.
I’ll say right away that before replacing the support bearings, you need to make sure that they are really faulty. Read about how to check support bearings here.
Those who have ever encountered the need to replace support bearings know that to perform this work it is necessary to remove the struts along with the springs, which certainly complicates the task. However, as you know, laziness sometimes works wonders; in addition to being the “engine of progress”, it also often allows you to make your life easier. This photo report will clearly demonstrate to you how to replace the support bearings without removing the strut and you will be able to see that sometimes laziness can work wonders :-). Joke!
To work you must have:
- Set of keys: “13, 14, 17, 22”;
- Hexagon (to fix the rod from twisting);
- Two jacks or supports for the car;
- Special spring ties;
- Actually, the support bearings themselves.
Replacing support bearings without removing struts on a Lada Granta
Hello. Chassis repair is perhaps the most common work that a car owner has to do, or more accurately, “our” car owner has to do. These constant knocks and squeaks seem impossible to completely “defeat”, and after one is put in order, another goes out of order. In general, this is not strange, given the state of the roads in Russia. Constant loads and driving on uneven roads have the most unfavorable effect on the chassis. In principle, it would probably be wrong to blame the roads alone; part of the problem certainly lies with the designers of AvtoVAZ, who, despite problems with the roads, continue to produce cars with flimsy suspension and chassis. Well, enough of the ranting, I think, we need to get to work.
Today, dear readers of VAZ Repair, you will learn how to replace the support bearings on a Lada Granta, and not just replace them, but replace them without removing the struts. I wonder how? Then continue reading.
I’ll say right away that before replacing the support bearings, you need to make sure that they are really faulty. Read about how to check support bearings here.
Those who have ever encountered the need to replace support bearings know that to perform this work it is necessary to remove the struts along with the springs, which certainly complicates the task. However, as you know, laziness sometimes works wonders; in addition to being the “engine of progress,” it also often allows you to make your life easier. This photo report will clearly demonstrate to you how to replace the support bearings without removing the strut and you will be able to see that sometimes laziness can work wonders :-). Joke!
To work you must have:
- Set of keys: “13, 14, 17, 22”;
- Hexagon (to fix the rod from twisting);
- Two jacks or supports for the car;
- Special spring ties;
- Actually, the support bearings themselves.
What are the best rack supports for Granta?
The main requirements for Granta and Kalina 2 support bearings are endurance and reliability. The support bearing takes the entire load from the car body, as well as from the shock absorber strut, allowing the latter to rotate freely around the longitudinal axis.
Grants support bearing diagram
The dynamic loads of the shock absorber rod are absorbed by a rubber damper. The more reliable it is, the longer the support will last. The spring rests against a support cup with a rubber-coated ball support bearing. However, different manufacturers offer different solutions for support.
Thus, some supports are produced with reinforced bearings (balls of larger diameter), there are supports with a changed caster angle. To do this, the axis of the shock absorber strut is shifted by 6 or 12 mm, which ensures a change in the caster angle to 1°40′ or 2°45′, respectively.
In addition, supports are produced both for Lada Granta and Kalina 2 with electric power steering (article 21900-2902821-10), and for cars without electric power steering (article 21900-2902821-00).
Pillow bearing without support
Standard supports cost about $12 apiece, owner reviews about them are not the most encouraging, so most often you have to buy replacements for the original:
- Pillow bearing SS20 series Master, Gold, Drive, differ in caster angle and damper design. They last quite a long time and are easy to install. The price is about 26 dollars per piece.
- ANVIS 2190 Rack Mounts, $27/pair, 6mm offset. Available for both Granta and Kalina 2 with and without EUR. Compatible with all types of springs (11190 or 11196), as well as the most popular KAYABA or SACHS struts.
- Sevi support bearings, price from $20 per pair. A budget option with the strut tilted by 1 degree and the shock absorber axis shifted back by 6 mm.
- Demfi, article number dff21901 (2190-2902822-12), are sold without a support bearing, which has catalog number 1118-2902840. The price is about 15 dollars. Reviews are contradictory.
- Technologies of the future, article number 2192-2902821, price about 26 dollars per pair. There are few reviews, mostly positive.
- Budget Slovak supports LSA, sold without bearings, price about $10 per pair.
- Trialli supports (SA 0156), complete with bearing, price 10 dollars apiece, run well, good assembly, bearing of standard sizes.
Reviews
| № | Positive |
| 1. | Mikhail, 36 years old: I’ve been using the car for two years now, no complaints. The chassis and suspension work properly, everything is original, nothing has been changed. I've heard some negative things about the racks, but I don't agree. |
| 2. | Kirill, 33 years old: recently carried out maintenance, the master recommended replacing the rear struts. I didn’t invent anything, I bought my native SAAZ. |
| 3. | Vasily, 41 years old: the machine is old, since 2011, I repair it myself. The other day I replaced the suspension - all four shock absorbers and springs. Since the old ones lasted a long time, I bought similar ones from SAAZ. |
| 4. | Gennady, 32 years old: I’m leaving my positive review on the original racks for Grant. Those who spoke negatively may have gotten into trouble, but everything is fine with me. My advice. |
| Negative | |
| 1. | Martin, 39 years old: after the first 50,000 km. The original shock absorbers fell off. I didn’t make a mistake the second time, I bought a HOLA SH22-270G. I ride, enjoy, no problems. |
| 2. | Victor, 34 years old: I don’t trust standard shock absorbers, I replaced them immediately after buying the car. I heard negative things and decided not to try it. Installed Trialli AH01510. |
| 3. | Vitaly, 29 years old: I work as a taxi driver, driving a car day and night. Two months ago I replaced the racks with the same original ones. Already dissatisfied, they began to rattle, no quality. I will change to Pilenga. |
| 4. | Konstantin, 27 years old: on the advice of a friend, I replaced my original shock absorbers with BOSCH ones. I didn’t try my luck; I heard a lot of negative things. |