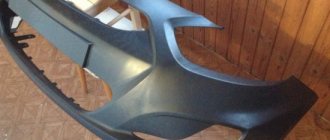
The bumper suffers most often while the car is moving, since it is the first to be damaged when it hits an obstacle or an accident. That is why every car owner should know how to fix a dent on a bumper. Otherwise, he will have to completely change this expensive part, spending additional money and physical effort on it.
In addition, auto repair shops do not always undertake this work, since the design of modern bumpers is complex and, without experience working with products manufactured for cars of certain brands and models, it is very difficult to straighten a dent. That is why many car owners perform this procedure on their own, in their own garage, without involving professional auto repairmen.
Tools and materials
A dent in a plastic bumper can be easily repaired if you use the right quality tools. Moreover, when doing such work with your own hands, it is important that the product being repaired is carefully prepared in advance. As for the complexity of the tools needed to straighten a dent, in many cases you can use simple tools that do not require investing a lot of money.
To repair a plastic bumper, ridding it of dents, you must prepare the following materials and tools in advance:
- hairdryer When selecting it, it is imperative to pay attention to its power, which is why it makes sense to give preference to construction and other industrial devices that can heat up even thick-walled products well;
- boiling water. It is used for the same purposes as a hair dryer, and sometimes instead of it. Boiling water has a gentle effect on plastic products and that is why it is sometimes used to replace an industrial hair dryer. You can prepare it using an ordinary household electric kettle. You can bring it to the work site and prepare boiling water as needed;
- a screwdriver or other metal object with a blunt end;
- household or protective gloves. They are necessary to protect your hands from burns if they are accidentally exposed to hot air or boiling water;
- magnet for straightening metal parts or elements.
Useful tips
When straightening a body element, you should follow some recommendations:
- Minor damage should be repaired by hand, without using straightening tools. On the hood of the car, thin metal is used, after manual straightening, there will be no trace of damage, and the motorist will save time and money (there is no need to buy a spray gun, a can of paint, brushes, primer and degreaser). In addition, the use of grinding wheels and files will not be required.
- After priming and subsequent polishing, you will need to run your hand over the working surface; this step will reveal unevenness. In places where a perfectly even coating is required, use a ruler.
- It is also necessary to remember that excessive heating of the hood can negatively affect the paintwork of the part. To prevent damage to the paint, do not heat the body element to a temperature above 110 degrees Celsius.
Preparing for repairs
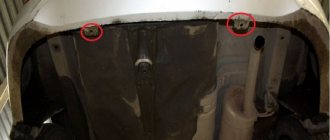
A dent on a bumper can be deep or shallow, with or without damage to the paint layer. That is why, before starting to repair it, you must first inspect the damaged area and decide whether it is possible to carry out the repair in principle. If the bumper has cracks or other significant damage, repairing it is impractical and it would be better to buy a new product to replace the broken one. If the bumper looks slightly dented, it is quite possible to straighten it yourself.
DIY straightening methods
Many car enthusiasts cannot afford to carry out repairs in a specialized service center, since this procedure can be quite expensive. In this regard, the question arises: how to remove a dent with your own hands. There is a list of basic methods for removing dents without painting, and all of them are quite simple, since they are done on their own and do not require the involvement of expensive equipment.
Did you know? The first automobile service shop opened in Boston in 1899.
Via magnet
Straightening, in other words pulling out, dents using the magnetic method is quite simple; it is enough to have a powerful magnet to which a handle is attached. This type of repair is ideal for smoothing out small dents.
The repair proceeds as follows:
- The first step is to clean the surface with a regular rag.
- Next, we attach the magnet to the body.
- Then, using the handle that comes from the magnet, we begin to pull out the dent.
- Be careful to only remove the dent and not retighten it.
Important! Before repairing, it is necessary to place something soft under the magnet so as not to scratch the paintwork.
Lever
This process is much more complicated than the previous one. To straighten a dent, you will need a rather expensive set of tools, namely levers.
This repair is carried out when the damage is voluminous and complicated. The whole process involves tapping out dents from the inside of the body. If necessary, you can dismantle some parts that will prevent you from getting to the damaged parts of the body. Hooks and levers have different lengths and shapes, in addition, they are curved at different angles.
- The work surface should be cleaned.
- Then, using a hair dryer, the part is heated to 40–50 °C.
- The edges of the bends need to be tapped and pressed onto the surface, thereby leveling the dent.
The leveling technology is quite complex. The master selects the lever or hook he needs, uses pressure and tapping to level the surface.
Find out what dent removal kits are available and which one is best to choose.
Via applicator
Dents are retracted using a special kit called “Pops-a-Dent.” The set includes a rocker arm made of plastic, which is curved in a special way. To avoid damaging the surface, it has long legs with a rubberized sponge at their ends.
Hot-melt gun and a set of rods with silicone glue. The kit also includes attachments with different gripping areas, the soles of which are glued to the dent and thus straighten them.
Important! You should definitely see protruding glue through the technological holes; this gives good strength to the fastening itself. Using the above-mentioned device, it is not difficult to cope with the defect:
Using the above-mentioned device, it is not difficult to cope with the defect:
- The first step is to degrease the dent itself and wipe it dry. There should not be a speck of dust left on the surface to be treated.
- Melt the glue and apply it to the nozzle as quickly as possible. Press it against the dent, twisting it a little and pressing it half a turn.
- After 2-3 minutes, you need to thread the handle through the eye of the nozzle.
- Then you need to screw the valve onto the thread.
- Slowly straighten the dent until it is level with the metal.
- After this, you should leave everything in this position for 5–7 minutes.
- We unscrew the valve, removing the arc.
- To separate the nozzle, we heat the plastic using a hair dryer, while turning it around.
If your driving skills are very careful, then you don’t have to buy the whole set. It will be enough to purchase only a glue gun. The arc can be made at home yourself, for example, from wood. Instead of rods, you can use an ordinary bolt, gluing its head to the defect.
We recommend that you familiarize yourself with the operating principle of a magnetic inductor - a device for removing dents without painting.
Thermal
The essence of this method is that the metal begins to level out due to a huge temperature difference. To implement this method you must have:
- construction hair dryer;
- compressed air.
The work algorithm looks like this:
- After the dent area is heated, it is cooled using compressed air.
- If the affected area is large, then it is heated in several places.
Dent removal algorithm
Repairing a dent on a plastic bumper is carried out in accordance with the following algorithm:
- the part is dismantled in order to have equal access to both its outer and inner surfaces;
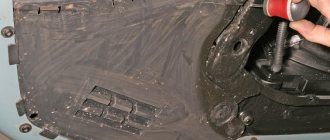
- The dent area is thoroughly washed and dried, ensuring that its entire surface is dry and clean on both sides. Traces of rust, dirt, and fungus that could interfere with the normal course of the restoration process are strictly excluded;
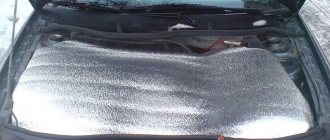
- After preliminary preparation, it is necessary to level the bumper with a hairdryer, gradually warming it up. The entire repaired area must be uniformly heated to a temperature at which the plastic bumper softens, but there is no need to bring it to the melting point and you should press on it carefully during the work process. If this rule is not followed, the bumper will have to be repainted;
- Warming up the product with a hairdryer, or pouring hot water on it, we pull out the dent with gradual circular movements, pressing on it from the side. It would be great if this type of dent straightening is done using a blunt metal object.
- After warming up the bumper, you should wait a few minutes before straightening the dent, since under the influence of high temperatures, it can begin to straighten itself, returning to its previous state;
- after the part has taken on the old or received a new shape, and the dent has been eliminated, the bumper needs to be cooled at the site of damage using a wet rag, as well as a can of compressed air.
Remember that heated plastic is easily deformed, so you can only straighten it evenly on all sides.
Separately, it is worth noting that in the manuals devoted to the topic: how to remove a dent on a bumper, it is specifically stated that some types of plastics have “shape memory.” It lies in the fact that when repairs are carried out a relatively short time after the bumper has received damage, it can return to its previous shape somewhere in 10-15 minutes after the end of heating the product. If the bumper is cooled in time, it will be fixed in a new state and will never return to its previous state. As for putting it back in place, this can only be done when the damper has completely cooled down and is not afraid of serious mechanical impacts.
Surface preparation
Before straightening the bumper, you need to find out exactly what it is made of.
If the bumper material cannot be heated, then squeezing out the defect with your own hands will be problematic, and in this case it is better to seek help from body repair professionals.
For example, you should not heat an existing welded seam on a bumper, nor should you heat a fiberglass part.
To remove a dent, you must first remove the bumper and use a hair dryer to slightly warm the surface. At the same time, the water in the kettle is heated to a temperature of 40 degrees. Heated water is poured over not only the defect itself, but also an area with a radius of 20 cm around it. Then you need to heat the water again to a temperature of 50 degrees and repeat the procedure.
What to do with difficult dents
It is easy to straighten the bumper if it is plastic and does not have serious damage, but if it is metal, it will be more difficult to correct the situation. To do this, you need a magnet that is magnetized to the edge of the dent. After this, it is heated with boiling water, pouring it over the surface of the dent. Next, the magnet is pulled towards itself with force, gradually moving it towards the center of the dent. As a result, it should at some point straighten out, making a characteristic sound. The metal parts on the plastic bumper are aligned in the same way.
If deep dents appear on the plastic bumper, use the original method. To do this, take a powerful hair dryer and use it to heat the area around the damage. Next, the heated dent is cooled using a can of compressed air until frost appears on it. After the frost melts, the dent should disappear, since the plastic should “remember” the shape it previously had.
In the same case, when the dent is located next to a repaired chip or crack, you should not restore the bumper yourself. In this case, it makes sense to contact a specialized workshop that performs body work. Here you will have damage of any severity and complexity repaired, even if it is located in problem areas.
Gluing
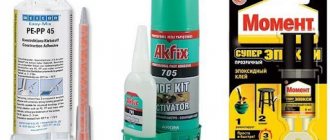
Bonding with fiberglass and epoxy or polyester resin is used to repair fiberglass bumpers, and in some cases, to repair bumpers made of hard, refractory plastics. The disadvantage of repairing a bumper in this way is the low strength and fragility of the repair site.
The bumper is glued using fiberglass and epoxy or polyester resin in the following order:
- Clean the front and back sides of the bumper at the point of damage using fine-grained sandpaper 5 cm from the edge of the crack, chip or hole.
- Cover the damaged area with tape on the front side of the bumper.
- Degrease the edges of the damage on the back of the bumper.
- Cut several patches from fiberglass measuring 5 cm larger than the damaged area.
- In a plastic container, mix the resin and hardener in the proportions specified by the manufacturer, mix thoroughly.
- Apply resin to the damaged area on the inside of the bumper with a brush.
- Place a fiberglass patch over the damaged area and smooth it out.
- Apply resin and apply the next fiberglass patch, repeat until the thickness of the layer reaches the approximate thickness of the bumper.
- After the resin has dried on the inside of the bumper, remove the tape from the front side, smooth the edges around the damage and form a depression.
- Degrease the surface of the repair area on the front side of the bumper.
- Apply the resin with a brush, apply a fiberglass patch, and smooth it out.
- Repeat brushing the resin and applying fiberglass patches until you are level with the bumper surface.
- Dry the bumper completely.
- Thoroughly sand the surface of the bumper with fine-grit sandpaper.
conclusions
The design of modern car bumpers and the technical properties of the materials used for their manufacture make it possible to carry out most repair work yourself. To do this, you need to be careful and careful not to use unnecessary physical force and damage the bumper. However, complex dents should be entrusted to the attention of professionals, since they may be located in inconvenient places, or their independent removal may lead to failure of this element of the car’s structure.
Bumper heating
- To straighten a dent, you need to properly remove all the stress created by the deformation. This can be done by heating the plastic and applying the right amount of force. When heating a dent, you also need to heat 10–15 cm around it. By doing this, you relieve the tension in the area around the dent created by the impact.
- For heating, you can use available means such as a hair dryer or boiling water. Other means that help to more evenly heat the entire deformation zone at the same time are exposure to an infrared lamp (drying), as well as dipping the damaged part into a bath of hot water. We will consider all these means below.
- Consider the thickness of the plastic before applying heat to the dent. On some modern cars, the plastic is very thin and can easily overheat.
- If the plastic is not hot enough, the deformation will not ease and, when straightened, will return. On the other hand, if you overheat the plastic, it will become much more difficult to repair. It will stretch unnecessarily when pressed. When plastic is overheated and on the verge of melting, strength and elasticity deteriorate as it cools. Therefore, it is important to heat the bumper to the correct temperature and not overdo it.
- There are cases when stronger heating of the plastic is necessary in certain places. For example, to remove folds formed during deformation.
- When using a hair dryer, you need to heat the bumper until the surface is hot when touched. The ideal temperature for heating the bumper is between 160–200 degrees. When heating the bumper, you need to hold the hair dryer nozzle close to the surface to control the heat, but no closer than 10 cm. Move the hair dryer evenly at a moderate speed to properly warm up the plastic. Excessive heat may cause the paint to bubble. At this temperature, the plastic can change shape with moderate force. Don't forget that you need to heat not only the dent, but also the area around it. When using a hair dryer, use its highest setting. A hair dryer is best used on medium settings. If the dent is large, then you can use two hair dryers. It is better to have a second person help.
When using hot water to straighten a dent, you need to boil a full kettle or pan of water. Hot water will make the plastic more flexible. Such heating will not last long, so you need to do everything very quickly. You need to get to the other side and press. We will look at dent correction in more detail below.
If a dent has formed on the ribs of the bumper, then after heating you need to press directly on the ribs.
- To straighten the dent, the bumper can be immersed in a bath of hot water (80–90 degrees Celsius) for several minutes. Part of the dent may return on its own, but the rest must be straightened by hand after removal from the bath. To remove any remaining deformation, you can apply local heat with a hairdryer set to the desired temperature.
- Infrared drying can be used to heat the damaged area. Drying can be considered a less accessible heating method, but effective. It is used in body repair and car painting. Drying softens a large area, and the dent becomes pliable and all stress is relieved. No matter how deep the dent is, it will heat up evenly and return easily without significant effort. In addition, if the plastic is well heated, there is less chance of small cracks appearing in the paint after straightening.