upd May 2022:
the standard limit switch turned out to be working, returned the factory circuit.
The reason was in the hood switch - it didn’t open when the hood was closed (I bent it back and everything worked normally). Now I installed a reed switch separately for the backlight instead of a mikrik on the trunk door lock.
I was surprised that the liftback trunk light only works in the dimensions mode. And I discovered that the trunk lock switch was faulty - it was constantly closed. Therefore, the standard alarm system did not work correctly, and in addition to this, the hood switch did not press, so I had to bend the bracket. The hood and trunk ends are on the same line, i.e. This is one signal control zone. I didn’t want to deal with the warranty, so I placed my microphone next to the lock’s shackle. The contact of the standard limit switch was disconnected in the block of the 5th door. I ran +12V power from the fuse box so that the light would always turn on when the trunk was opened. At the same time I installed LED strips on both sides.
The last photo shows a standard electric trunk lock. 2191-6305010-10
The Lada Granta Liftback car in the “Standard” configuration is equipped with only one limit switch at the driver’s door. The remaining three doors have built-in rubber plugs.
The “Norma” configuration has a similar arrangement, but the owner can additionally install limit switches on the Grant Liftback independently. To do this, first remove the decorative inserts on the thresholds. Only the “Lux” configuration provides a full set of functional limit switches for four doors.
The operating principle is as follows:
- when the driver's door is activated, the limit switch contacts open, the indicator on the dashboard lights up, and the interior lighting turns on;
- When the remaining three doors are activated, only the interior lamp lights up.
Review of Manufacturer Prices
| Name/article | Price, rub.) |
| electric lock 2191-5606010-10 | from 1500 |
| 2191-5606452 | |
| 2191-5605789-00 | —/— |
| 2191-5603652 | —/— |
| 2191-5604521 | —/— |
| Vartex 56526454 | from 1700 |
| Apollo 54654 | —/— |
| FX-F 82665/22 | —/— |
| Monado fd515545 | —/— |
*prices are current as of 10/09/18.
The opinions of the service station masters agreed on the choice of manufacturer - there is not much difference. When purchasing original products, the service life of the equipment exceeds 5 years.
Oxygen sensor to Priora converter
Installation in “makeshift” conditions and poor-quality manufacturing only shorten the period of use of the equipment. Often the owner is to blame for the breakdown, violating the vehicle maintenance regulations.
Reviews
| № | Positive |
| 1. | Kirill: I knew about the problem of freezing tips initially when I bought the machine. I immediately bought silicone grease and lubricated it on the inside once a quarter. It's been a year now that I haven't had any problems. |
| 2. | Vasily: after the first winter the sensor jammed several times. I took the cap off, cleaned it, and lubed it. Works properly, no comments. What happened is also my fault, since I did not carry out preventive measures in a timely manner. |
| 3. | Konstantin: I bought Grant at a dealership six months ago, the activation sensor works properly, the light comes on without delay, and an indicator lights up on the dashboard. |
| 4. | Ignat: a year has passed since the purchase, I have not made any investments, there are no comments on the mechanisms. Once there was a malfunction of the sensor. Moisture got inside, after drying the defect was eliminated. |
| 5. | Sergey: I agree with the majority of positive reviews, the limit switch works properly, the workmanship is good. Every month I lubricate the rubber tip with silicone. |
| 6. | Vladimir: It’s been the second year since I bought the car, I haven’t made any investments other than scheduled maintenance. I heard about the “disease” of the sensors on Grant, but I can’t confirm it. |
| 7. | Ivan: once in the winter the limit switch jammed, I didn’t buy a new one, I cleaned the old one. It still works fine. |
| Negative | |
| 1. | Victor: I can’t speak positively about the activation sensor, since this is the second time in a year that I change it at a service station. The doors of the Lada Granta locked themselves twice. |
| 2. | Vyacheslav: after the winter the sensor jammed, the doors were locked, the keys remained in the cabin. I called a service station technician to open it. |
| 3. | Alexey: I can’t recommend factory door activation sensors, as their quality is poor. Comrades advised installing from Opel, they say that the diameter is identical. |
Conclusion Limit switches on a car should always be in good working order. Provided proper maintenance and lubrication, the service life is at least two years. It is necessary to regularly analyze the condition of the limit switches in order to notice and prevent malfunctions in time. You should also adhere to the operating instructions.
Video - Lada Granta - door switches freeze? 3 solutions to the problem.
Article rating:
Installing the trunk limit switch on the Lada GrantaLink to main publication
Related publications
- Replacing the evaporator air conditioner Camry 40
Installation of limit switches on Lada Granta
An activation sensor in all doors will provide additional comfort. To carry out the installation procedure, you will need special equipment and available materials: lubricant, rubber tips, screwdriver, rag.
Step-by-step algorithm of actions:
- Remove the rubber tip.
- Open the housing and remove the limit switch.
- Remove the block with wires and disconnect.
- Install a new sensor.
- Reassemble.
After the basic steps, you need to check the functionality of the device. To connect the limit switch to the power circuit, you will need to connect two terminals: first “+” and then “-”.
Preparatory stage
- impact screwdriver;
- cross bits;
- pliers;
- plastic clips in case of damage to the standard ones;
- liquid for removing rust and corrosion;
- a new lock, the modification is chosen individually by the owner.
Procedure for independently replacing the driver's door lock on a Lada Granta Liftback
- We install the car within the perimeter of the repair area and provide unobstructed access around the perimeter.
- We take priority safety measures when carrying out work. We fix the rear row of wheels with wheel chocks and engage first gear to avoid arbitrary movement.
- Open the driver's door, use an impact screwdriver to unscrew the two screws securing the shackle to the car body, and remove it from its seat. We install a new shackle with soundproofing material.
- Let's start removing the constipation: unscrew the plastic float and remove the stem.
- We unscrew the car door card, two screws, eight plastic clips around the perimeter.
- We disconnect the block with wires from the double-glazed window control unit, speakers, and central locking.
- From the outside, unscrew the three screws that secure the lock body to the door.
- We remove the two rods, having first disconnected them with pliers.
- We carry out preventive maintenance, clean the seat, remove old grease, and apply a thin layer of new one.
- Let's start installing the new lock.
- We assemble the structure in the reverse order, unless there are other breakdowns that require surgical intervention or elimination.
During the installation process, we pay attention to the integrity of the electrical wiring, insulating layer, terminals, and blocks with wires. If there are signs of wear, replace them with new ones.
Do not operate the machine with faulty electrical wiring.
Typical door lock malfunctions
- tightness of locking the door;
- increased noise when opening/closing;
- the central lock does not lock the door and does not respond to signals;
- unlocking is accompanied by a creaking, metallic grinding sound;
- While driving, the door vibrates, cracks are visible in the places of contact with the standard seal.
Common Causes of Premature Wear
- failure to comply with the deadlines for technical inspection, preventative maintenance, lubrication, and replacement of worn elements;
- third-party mechanical damage resulting in deformation of the door or lock;
- manufacturing defects at the factory;
- the lock has become loose due to loosening of the fastening;
- violation of the adjustment algorithm;
- human factor: systematically locking the door with force.
The defect is eliminated by replacing the constipation assembly.
Replacing the rear (passenger) door lock
The procedure for preventing locking of the front/rear passenger door is carried out by analogy. The design and method of fixation are typical.
Installing a trunk lock on Lada Granta Liftback
- We place the car on a level platform and provide access to the trunk lid.
- We take safety measures when carrying out work.
- We unscrew two screws and remove part of the lower plastic trim of the trunk lid.
- Unscrew the two screws securing the lock body to the trunk lid;
- Using pliers, remove the rod from the button to the body.
- We remove the constipation, carry out preventive maintenance, lubricate the threads and the rod end.
- We install a new lock and assemble the structure in the reverse order.
- We unscrew two screws, remove the standard shackle, install a new one with sound-insulating material.
Replacing the hood lock
- Inside the car, under the dashboard, there is a hood release lever. We pull it towards ourselves.
- Release the latch and lift the hood.
- Using a TORX key set to “10”, unscrew the two screws holding the lock body to the body.
- Using pliers, remove the cable eye from the seat.
- We remove the lock, install a new one in its place, and assemble the structure again.
- Lubricate the bow-clamp with silicone grease/solid oil.
Design solution to the problem
Experts recommend going with the first option. Installing a button in the door sill is used on all cars of this class. This path is easier and faster to follow. The driver will only restore the originally designed circuit for connecting the limit switches. With this choice, there is no need to disassemble the locking mechanism. The owner will not have to wander around looking for additional plugs, wires, and insulating materials. He only purchases standard switches for the Lada Granta. Let's look at the most labor-intensive configuration for remodeling - the standard one.
- Open the car hood. Loosen the bolted connections with an open-end wrench. First unscrew the negative terminal, and then the positive one. Carefully disconnect the wires from the battery so as not to accidentally short-circuit the power source.
- Remove the limit switch from the hole. To do this, you need to grab the protruding cap. Pull out the switch, overcoming the resistance of the fixing whiskers.
- Connect two wires to the outermost (used) contacts of the plug.
- Remove the plug from the rear door mounting hole.
- Stretch two wires from the driver's door limit switch to the threshold to the installation site. Bring the ends out through the hole, 10 cm each.
- Strip the wires and connect them to the connector of the new device.
- Set the interior lighting switch to the operating position.
- By analogy, the keys located in the openings of the remaining doors of the Lada Grant are changed.
- The driver's door button is put back last.
When installing each pair of contacts, it is advisable to check their functionality. Measure the circuit resistance with a tester by alternately pressing and releasing the spherical protrusion.
Replacing the trunk lock of a Lada Granta
We remove the trunk lock and its drive for replacement. Opening the trunk lid...
...and, squeezing it out with a screwdriver...
...we disconnect the rod from the ball end of the lever of the cylinder mechanism of the lock.
Using a 10mm socket with an extension, unscrew the nut securing the base of the lock drive to the outer panel of the trunk lid. In order to unscrew the other nut, insert the key into the cylinder mechanism and, turning the lever...
... use the same tool to unscrew the nut located under the lever.
Remove the lock drive from the trunk lid.
...and remove the lock drive from the decorative trim. Install the lock drive in reverse order.
Using a 8mm socket, unscrew the two bolts securing the lock.
Pull the lock out of the hole in the inner panel of the trunk lid.
By pressing the latch, disconnect the wiring harness block from the electric locking drive and remove the lock along with the rod. To remove the drive rod...
...turn it towards the groove in the hole...
...and through it we remove the traction.
Motorized trunk lid lock.
Install the lock in the reverse order without tightening the bolts. Close and then open the trunk lid and, without moving the lock, tighten the bolts securing it
What is important to know about silent locks on the Lada Granta Liftback
Not all car owners are satisfied with the ease and noise level when closing the doors of their car. The defect is caused by excessive wear of parts and design flaws at the manufacturer level.
The principle of noise suppression is implemented by an installed noise absorber. In Lada Granta Liftback models, this is a rubber insert or a plastic polymer.
Silent locks are structurally composed of a pin and a shackle with a noise-absorbing insert. Some car owners practice replacing the arms, while leaving the standard locks unchanged. Already in this case, the noise level will be significantly lower, and locking the door will be easier.
At the same time, systematic use of the door lock leads to rapid wear of the polymer/rubber material. The owner has to come back for preventative maintenance again and again.
Trunk limit for Lada Granta sedan
upd May 2022:
the standard limit switch turned out to be working, returned the factory circuit.
The reason was in the hood switch - it didn’t open when the hood was closed (I bent it back and everything worked normally). Now I installed a reed switch separately for the backlight instead of a mikrik on the trunk door lock.
I was surprised that the liftback trunk light only works in the dimensions mode. And I discovered that the trunk lock switch was faulty - it was constantly closed. Therefore, the standard alarm system did not work correctly, and in addition to this, the hood switch did not press, so I had to bend the bracket. The hood and trunk ends are on the same line, i.e. This is one signal control zone. I didn’t want to deal with the warranty, so I placed my microphone next to the lock’s shackle. The contact of the standard limit switch was disconnected in the block of the 5th door. I ran +12V power from the fuse box so that the light would always turn on when the trunk was opened. At the same time I installed LED strips on both sides.
The last photo shows a standard electric trunk lock. 2191-6305010-10
The Lada Granta Liftback car in the “Standard” configuration is equipped with only one limit switch at the driver’s door. The remaining three doors have built-in rubber plugs.
The “Norma” configuration has a similar arrangement, but the owner can additionally install limit switches on the Grant Liftback independently. To do this, first remove the decorative inserts on the thresholds. Only the “Lux” configuration provides a full set of functional limit switches for four doors.
The operating principle is as follows:
- when the driver's door is activated, the limit switch contacts open, the indicator on the dashboard lights up, and the interior lighting turns on;
- When the remaining three doors are activated, only the interior lamp lights up.
Photo report on connecting a car alarm to a Lada Granta Luxury package
On the ignition switch: +12 - pink starter - red ignition - blue/black
We connect to the central locking in the driver's door according to the figure below.
We connect to the tachometer on the small connector of the electric power steering - brown/red wire.
In the left threshold we connect to the door and trunk limit switches , turns , and handbrake .
We connect to the hood terminal in the harness that goes under the hood behind the mounting block - white/black wire.
To block, you can use the fuel pump - the gray wire on the back of the mounting block.
To remotely unlock the trunk, connect the negative wire to the red/white wire on the trunk release connector.
How to install an electric lock in the trunk lid of a Lada Granta
Electric trunk lock - improving the operation of the Lada Granta
The middle of 2011 is very important in the history of the domestic automotive industry. It was this period that Russian car enthusiasts remembered for the release of a new product from the Volga Automobile Plant - the Lada Granta sedan.
This car successfully fulfilled its purpose, namely replacing the classics of the Samara family.
Created on the basis of the Lada Kalina, Granta today enjoys enormous success among buyers not only in Russia, but also far beyond the borders of our state.
1 What Lada Granta owners missed
Today the car is produced in 3 main trim levels: “standard”, “norm” and “luxury”.
If with the second and third options everything is more or less clear (as they say, we will do everything for your money), then owners of cars with the first configuration were missing such an important detail as the electric drive of the trunk lid and hood lock. At first glance, it seems that such a trifle cannot significantly spoil the mood of a happy car owner
However, given the weather conditions in our country in winter, installing an electric lock for the hood or trunk lid on this car is literally asking
At first glance, it seems that such a trifle cannot significantly spoil the mood of the happy car owner. However, given the weather conditions in our country in winter, installing an electric lock for the hood or trunk lid on this car is literally asking for it.
Judge for yourself, because in 20-degree frosts, the problem of opening the trunk lid and hood becomes the main headache of the car owner: either the key cannot be inserted into the core of the lock, or it can only be pulled out with great effort. One way or another, a lock with an electric drive is needed, and it is very difficult to argue with this fact.
This is evidenced by the presence of wiring for the electric drive, as well as a special button on the key fob.
If you press and hold this button for two seconds, you can hear a click in the electrical package control unit.
2 Installing an electric lock on a Lada Granta
The entire process of installing an electric lock can be considered in the form of a simple algorithm. First, remove the inner trunk trim. To do this, disconnect the 7 pistons and 2 bolts holding the trunk closing handle.
Next we notice the lock mechanism. Insert the key into the lock and turn it in different directions. With this action it will be easier for us to understand the principle of operation of the lock in its various positions.
In the “closed” position, the pusher in the lock moves in vain, and in the “open” position, it presses on the rod, due to which the trunk or hood lids open.
After determining the principle of operation of the lid lock, it is easy to guess that if you connect the pusher to the activator, then the need to insert the key into the lock will disappear on its own.
The size of the first should correspond to the size of the protrusion on the pusher. We will insert the activator rod into the second hole. The first hole in the part should be in the center, the second - in the lower left edge.
In addition to the part with the holes, we will need a thin washer that can be inserted into the hole in the center.
Then we assemble the entire mechanism: our part is put on the plastic pusher. We put a new washer on top. In order to fasten this structure, you can use a retaining ring. We attach the activator to its place provided by the Lada Granta manufacturing plant. Using special rods that were included with the activator, we connect the latter with the part we turned.
https://tuningkod.ru
https://youtube.com/watch?v=tvmukbeNlnE
Door switches: where they are located, connection, checking
Initially, limit switches were installed on the doors to automatically turn on the interior lamp. Their connection scheme was the simplest - everything was connected in parallel, that is, it did not matter which door was open. In budget car configurations, only the driver's door switch was often installed.
Video: Problems with limit switches in Lada Vesta, Grant and Kalina
The weak link of such limit switches was the need to place them in an extremely inconvenient place: the protruding part of the metal sheet of the door in the lower corner pressed on them; less often, designers managed to place the limit switch higher. Because of this, they often failed even despite the sealing cap on the outside. For a car with an alarm, this meant randomly triggering the alarm at the wrong time, or, just as bad, being able to open the door without setting off the alarm.
Subsequently, the connection diagrams for limit switches in doors became more complex - initially to indicate a specific open door on primitive on-board computers. Here, each door had its own signal wire, which complicated the installation of alarms: since the limit switches need to be connected to the only input of the central unit, an attempt to connect it with all the limit switches immediately leads to a violation of the display on the on-board computer screen (shows all doors open at the same time). Because of this, it is necessary to use diode isolation, which allows you to logically combine the outputs of the limit switches without disturbing the operation of the computer.
It works simply: since the diode conducts current only in one direction, when any of the limit switches is closed, the alarm output is connected to ground in any case, but the pressed one is connected to the rest of the limit switch wires through a back-to-back pair of diodes that do not pass current.
The solution to the problem with the reliability of limit switches turned out to be quite simple. It has long become the norm that the door end is located in the lock mechanism itself, that is, it is raised high and well protected from water, if, of course, the glass seal is in good working order. Note that the very principle of operation of the door limit switch has changed. If the door limit switch is installed in the slam, then it is triggered at a certain position of the door, closing the contacts when it begins to open.
If the door switch is in the lock, it is triggered by moving the locking mechanism: often (but not necessarily) it is enough to lift the handle without opening the door itself to close the contacts. This, by the way, makes installing alarms more convenient: you can leave the door open during operation by clicking the lock pawl with a screwdriver, and the alarm will no longer “see” the door open.
It is so good, for example, to adjust the shock sensor by arming the car with the door open, and not repeating the cycle “closed - armed - struck - disarmed - opened the door - changed the setting” for each adjustment.
On modern cars, the driver's door switch has received one more function - it is usually responsible for “falling asleep” and “waking up” of the on-board electronics. For this reason, on alarm systems with auto-start, it is necessary to connect a circuit simulating the opening of the driver’s door: the on-board controller at the end of the auto-start cycle will “see” that after turning off the ignition the door opened and closed, and will normally switch the car into a low-power mode.
In this case, a short-term “ground” pulse often appears on the limit switch wire, which, with a conventional diode isolation circuit, triggers an alarm for opening the door some time after arming. To avoid this, the diode decoupling circuit is complicated.
The difference with the previous diagram is that the diodes also cut into the standard wiring, and the alarm is connected between the diode and the limit switch. In this case, when the limit switch is closed, ground comes to both the standard vehicle on-board circuit control unit and the alarm system. But, when the controller creates a “ground” pulse in the standard wiring, the alarm input is blocked by back-to-back diodes, and no alarm is triggered.
It is important to understand that the duration of such pulses is very short, and the alarm can work correctly even when decoupled with one diode per line: for example, Sherkhans are less sensitive than StarLine, according to the author’s experience. But sometimes random operations are possible, and this is often associated with owner problems, when the limit switches are absolutely in good working order, but the car still sometimes “screams on its own.”
Adjusting the trunk lid of Lada Granta
Tools:
- Ratchet wrench
- 10 mm head
Note:
Check the gaps between the body and the trunk lid; they should be the same throughout. If necessary, adjust the position of the trunk lid of the VAZ 2190.
1. Open the trunk.
2. Loosen the trunk lid and adjust the position of the lid.
Note:
Carefully close the trunk lid and, moving it, adjust its position in the opening. The gaps between the rear fenders and the trunk lid should be uniform and identical. Then finally tighten the trunk nuts.
3. If necessary, adjust (with the trunk lock locked) the height position of the lid relative to the rear wings by rotating the two rubber stops in the desired direction.
Source
Electric trunk lock Granta liftback installation
For work we will need:
1. Liftback)) 2. Opening button with connector or 2 female wires. 3. Electric drive (installed StarLine SL-2). 4. Cable (approximately 30 cm) and 2 clamps. 5. Electrical tape, wire cutters, wires, flat and Phillips screwdrivers, 8 and 7 wrench.
To install the drive, you need to get rid of the lock rod, probably many people know, it is firmly in place and will not allow the drive to open the lock until you insert the key into the lock, so we install a cable instead, this way you can open the trunk from the outside.
Disassembling the trunk door
We pull off the central plastic (2 pistons and on the edges of the latch)
Unscrew the 2 opened screws and pull them off (on two pistons)
A pair of screws have opened again, unscrew them
We will pull off the main casing from these corners, and before that we unscrew the 2 bolts in the front handles
The trim comes off very easily and this is what's underneath
And here is the thrust of the lock (from the cylinder to the lock itself), we will get rid of it.
The drive we will implement
We select a place for it, I found it here, we make notches for the holes
Pulling off the traction from the larva
We drill holes for the self-tapping screws, put the drive together with our rod inward and just attach it to our place to determine the length of the rod. We hooked up the drive, pulled it out to its full length and the door lock should be open. On the top of the lock there is a ring that you need to pull to open it (it will be clear later in the photo), we bring the rod to the ring and make a notch with wire cutters.
Now we take everything out, the electric drive and the lock itself, by unscrewing 2 bolts with a 8 key. We pull out the right corner of the lock and unhook the second end of the rod, then completely pull out the lock and remove the connector.
Here is the drive rod with a notch, at a distance of 2 cm from the notch we chop off the excess tail with a chisel
Along the notch we bend the rod into the letter “G” and insert it into the lock
Troubleshooting
Drivers may encounter various types of malfunctions. Even though the sensor is protected, it is not as reliable as the manufacturers claim. In addition to silicone lubricant, other measures can be used:
- Install the spring under the rubber cover. If this element is elastic, it will protect the mechanism even at very low temperatures.
- Remove the protective caps for the winter, but there is a danger that the element will quickly become clogged with dust and dirt.
- Treat with protective liquid.
Often drivers replace their original limit switch with a part from another manufacturer or install a boot. In this case, the body of the new element is inserted into the standard connector and secured with a self-tapping screw.
How to extend the service life of the door activation sensor using the traditional method
Craftsmen have come up with many ways to resuscitate a rubber cap, prevent it from deforming and freezing. We present the most effective methods:
- insert for the rubber tip of the spring. The diameter of the coil is “6”, the length is 1.0 cm. When the door is opened, the spring pushes the tip to its original position, the contacts close, the interior lighting is activated;
- replacement of standard caps with parts from the second generation Opel Astra. The dimensions are identical, the only difference is in the shape, it is more convex, which contributes to the sensor’s quick response to opening/closing the door;
- systematic application of silicone lubricant to a rubber product to restore elasticity.
What are the characteristics of the trunk?
What is the actual volume in liters? If you fold the rear row of seats, the Granta's trunk volume will reach 770 liters, and in the standard position of the rear passenger row, the trunk volume will be 440 liters. This model is the first ever liftback among the entire AvtoVAZ family. In terms of luggage compartment capacity in its standard state, the Granta managed to outstrip such a popular European hatchback as the Volkswagen Golf. However, with the rear row seats folded, the Golf takes the lead thanks to the trunk volume of 1200 liters, which turned out to be unattainable for the Lada designers. After all, the primary goal was to maintain a single wheelbase and platform similar to a sedan.
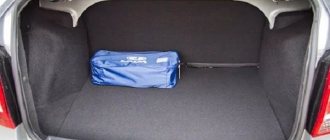
So, what is the real opinion of Granta owners about the capacity and ease of use of the luggage section, because its volume in liters is quite impressive. The Internet is replete with an incredible variety of photographs posted by the owners. Sometimes the Lada Granta liftback can plunge you into amazement - how much useful luggage its luggage compartment is ready to accommodate. However, in reality, not everything becomes as rosy with the amount of space in the trunk as it is positioned in advertising.
The rear seats have the only ability to fold completely when the front seats are moved close to the instrument panel. The inconvenience is that the rear headrest requires preliminary dismantling before folding. The top shelf in the luggage compartment can be removed without any extra effort, which is very convenient when transporting large items. Due to this action, space will not be added, but the luggage will not rest against anything. Niches on the right and left sides are suitable for storing medium-sized bags or a set of essential tools in case of an unexpected breakdown.
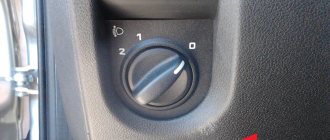
Above these technological recesses there are hangers designed for bags, which eliminates the need to clutter the rear seats with them. There is a light above the left niche, but it turns on when the low beam of the head optics is activated. An excellent solution for cloudy weather or dark periods of the day, however, the inconvenience is that you may forget to turn on the headlights beforehand.
Under the luggage mat you can find a full-fledged spare wheel, to which the manufacturer has added traditional attributes: a jack and a wheel wrench. There is enough space in the niche to accommodate a spare wheel with a large radius (if you wish to install 16-inch wheels). There is still room for the tool. This is easy to verify, you just have to look at the photo.
The wipers do not adhere well to the glass
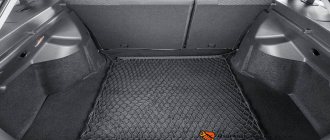
The luggage compartment mat in the LADA Granta liftback made of rubber has not become popular among owners. The quality of the material is a little worse than expected, and it will not be possible to stick a traditional “motorist’s bag” to its surface with Velcro. The option of a rug with a pile covering will not be practical, since it is subject to the risk of contamination from spills of various liquids or dirt.
The rubber cover in the trunk can be easily placed on top of the standard one. If the niche for the spare wheel will be used for other luggage, then you should take into account the fact that one mat will rest against the niches on the sides of the trunk. If you place any object above the spare wheel niche, it will fall into its recess.
Methods for solving problems with door limit switches
We will look at a number of fairly simple ways to solve the problems described above, which every car owner can easily put into practice. Thus, if problems arise caused by the operation of limit switches in the winter months, you can resort to the following methods:
- Remove the anthers from the limit switches. Remember that these rubber caps serve a protective function, and therefore when removing them you will have to be very careful about cleanliness. It is recommended to remove the anthers only for a short time, in frosty weather outside.
- Replace the “original” caps with analogues. Anthers from other end caps, for example, Toprun, which are practically a copy of the original Granta caps, are suitable as analogues. However, these anthers are made from materials that do not lose their elasticity at sub-zero temperatures, which is their undoubted advantage. You do not need to change the end switches themselves, only the caps should be replaced.
- Install a spring under the switch boot. For this purpose, springs with a length of approximately 18-20 mm and a diameter of 12-13 mm with a wire thickness of 1 mm can be used. They need to be installed on the limit switch rod, directly under the anthers. A good spring will not allow the cap to be constantly in a compressed state and will not let you down even at a temperature of -40C.
- Lubricate all rubber surfaces with silicone, this will help in relatively mild frosts (about -10C or less).
- Treat the surface with a water-repellent liquid. This measure works in a fairly wide temperature range (up to -50C), but is purely temporary.
Lada Granta › Logbook › Adjusting the trunk opening force
Good day everyone. Can anyone tell me if on a Grant sedan it is possible to somehow regulate the force of the torsion bars of the trunk opening lid?
You don’t have to write advice like installing struts or springs. After looking at the mechanism, it seemed to me that without additional gadgets you can change the force, I just can’t figure out how.
According to the principle, there is the same mechanism as on the classics, maybe someone regulated it or there is a link to the material, otherwise I don’t come across something, but what I need is on the Internet
For clarification and in case I called something wrong, here is the mechanism for raising the trunk lid and theoretically it is adjustable. question - how?
How to open the trunk on a station wagon, sedan and convertible
Let's start with the simplest thing - these are station wagons. A station wagon is a car body that has a closed design. The luggage compartment in such a car has a common roof with the car interior. This suggests that you can get into the trunk of a car through the interior of the car. To do this, you need to remove the top shelf and the trunk will be within a meter of the driver’s hands.
If dismantling the rear parcel shelf is not provided for by the design of the car, then there are probably locks that hold the back of the rear seat. For example, on a VAZ 2121 Niva, you can unfasten special latches and the back of the rear seat will move forward. This way you can take the keys from the trunk without opening it.
This method becomes relevant for the latest model Niva, since the first SUVs of this series had a special button on the trunk lid designed to open the trunk without the participation of special levers in the cabin or the car key.
In the case of sedans, everything is much more complicated. This is especially true for older cars that do not have a special trunk release button. In the classic VAZ family of the fifth and seventh models, as well as the FIAT 124, opening the trunk is possible without using a key at all. The fact is that the lock of such covers is too simple and can be opened with a regular flat-head screwdriver. In this connection, it is recommended to replace the trunk lock with a more thoughtful one in the future. On other models, it is impossible to lock the trunk without a key.
A separate story is the Soviet car IZH 412 Moskvich. His trunk had neither a button nor a special lock. The trunk was locked using a special metal cable located outside under the trunk lid. To open the trunk, simply pull this cable to the right.
Despite the simplicity of the design, there were situations when this cable was bitten off when the trunk was closed incorrectly. In this case, access was lost not only to the trunk, but also to the car’s gas tank, which created additional difficulties when refueling the car. However, you can also open such a trunk. The whole process is complicated by the fact that between the seat and the trunk there are stiffening ribs that block access to the latter. To gain such access, you need to remove the fastenings of the rear shelf under the glass and remove it. Next, you need to reach with your hands the remains of the cable or locking mechanism and open the trunk manually from the inside.
Opening the trunk of a convertible is even more difficult. This is due to the fact that its trunk does not have any connection with the car’s interior and is made separately. To open it, you need to know the lock structure well enough. But in order not to spoil it, it is still recommended to call a specialist.
The trunk of modern cars can be opened without a key from inside the car using a special button for the electric trunk lock.
General tips for installing alarms
- To supply power to the alarm unit, you should take energy only from the constant positive, which goes directly to the battery, bypassing fuse protection.
- It is best to attach the light indicator not to the dimensions (as recommended by the instructions), but to the turn signal network.
- If possible, the alarm antenna should be connected as close to metal parts as possible, as this will result in a better signal.
- After connecting all the elements, check and adjust the shock sensor to the optimal values.
vote
Article rating
Preparatory stage
- impact screwdriver;
- cross bits;
- pliers;
- plastic clips in case of damage to the standard ones;
- liquid for removing rust and corrosion;
- a new lock, the modification is chosen individually by the owner.
Procedure for independently replacing the driver's door lock on a Lada Granta Liftback
- We install the car within the perimeter of the repair area and provide unobstructed access around the perimeter.
- We take priority safety measures when carrying out work. We fix the rear row of wheels with wheel chocks and engage first gear to avoid arbitrary movement.
- Open the driver's door, use an impact screwdriver to unscrew the two screws securing the shackle to the car body, and remove it from its seat. We install a new shackle with soundproofing material.
- Let's start removing the constipation: unscrew the plastic float and remove the stem.
- We unscrew the car door card, two screws, eight plastic clips around the perimeter.
- We disconnect the block with wires from the double-glazed window control unit, speakers, and central locking.
- From the outside, unscrew the three screws that secure the lock body to the door.
- We remove the two rods, having first disconnected them with pliers.
- We carry out preventive maintenance, clean the seat, remove old grease, and apply a thin layer of new one.
- Let's start installing the new lock.
- We assemble the structure in the reverse order, unless there are other breakdowns that require surgical intervention or elimination.
During the installation process, we pay attention to the integrity of the electrical wiring, insulating layer, terminals, and blocks with wires. If there are signs of wear, replace them with new ones.
Do not operate the machine with faulty electrical wiring.
Typical door lock malfunctions
- tightness of locking the door;
- increased noise when opening/closing;
- the central lock does not lock the door and does not respond to signals;
- unlocking is accompanied by a creaking, metallic grinding sound;
- While driving, the door vibrates, cracks are visible in the places of contact with the standard seal.
Common Causes of Premature Wear
- failure to comply with the deadlines for technical inspection, preventative maintenance, lubrication, and replacement of worn elements;
- third-party mechanical damage resulting in deformation of the door or lock;
- manufacturing defects at the factory;
- the lock has become loose due to loosening of the fastening;
- violation of the adjustment algorithm;
- human factor: systematically locking the door with force.
The defect is eliminated by replacing the constipation assembly.
Replacing the rear (passenger) door lock
The procedure for preventing locking of the front/rear passenger door is carried out by analogy. The design and method of fixation are typical.
Installing a trunk lock on Lada Granta Liftback
- We place the car on a level platform and provide access to the trunk lid.
- We take safety measures when carrying out work.
- We unscrew two screws and remove part of the lower plastic trim of the trunk lid.
- Unscrew the two screws securing the lock body to the trunk lid;
- Using pliers, remove the rod from the button to the body.
- We remove the constipation, carry out preventive maintenance, lubricate the threads and the rod end.
- We install a new lock and assemble the structure in the reverse order.
- We unscrew two screws, remove the standard shackle, install a new one with sound-insulating material.
Replacing the hood lock
- Inside the car, under the dashboard, there is a hood release lever. We pull it towards ourselves.
- Release the latch and lift the hood.
- Using a TORX key set to “10”, unscrew the two screws holding the lock body to the body.
- Using pliers, remove the cable eye from the seat.
- We remove the lock, install a new one in its place, and assemble the structure again.
- Lubricate the bow-clamp with silicone grease/solid oil.
Reviews
| № | Positive |
| 1. | Kirill: I knew about the problem of freezing tips initially when I bought the machine. I immediately bought silicone grease and lubricated it on the inside once a quarter. It's been a year now that I haven't had any problems. |
| 2. | Vasily: after the first winter the sensor jammed several times. I took the cap off, cleaned it, and lubed it. Works properly, no comments. What happened is also my fault, since I did not carry out preventive measures in a timely manner. |
| 3. | Konstantin: I bought Grant at a dealership six months ago, the activation sensor works properly, the light comes on without delay, and an indicator lights up on the dashboard. |
| 4. | Ignat: a year has passed since the purchase, I have not made any investments, there are no comments on the mechanisms. Once there was a malfunction of the sensor. Moisture got inside, after drying the defect was eliminated. |
| 5. | Sergey: I agree with the majority of positive reviews, the limit switch works properly, the workmanship is good. Every month I lubricate the rubber tip with silicone. |
| 6. | Vladimir: It’s been the second year since I bought the car, I haven’t made any investments other than scheduled maintenance. I heard about the “disease” of the sensors on Grant, but I can’t confirm it. |
| 7. | Ivan: once in the winter the limit switch jammed, I didn’t buy a new one, I cleaned the old one. It still works fine. |
| Negative | |
| 1. | Victor: I can’t speak positively about the activation sensor, since this is the second time in a year that I change it at a service station. The doors of the Lada Granta locked themselves twice. |
| 2. | Vyacheslav: after the winter the sensor jammed, the doors were locked, the keys remained in the cabin. I called a service station technician to open it. |
| 3. | Alexey: I can’t recommend factory door activation sensors, as their quality is poor. Comrades advised installing from Opel, they say that the diameter is identical. |
Conclusion Limit switches on a car should always be in good working order. Provided proper maintenance and lubrication, the service life is at least two years. It is necessary to regularly analyze the condition of the limit switches in order to notice and prevent malfunctions in time. You should also adhere to the operating instructions.
| Video – Granta Liftback – Refinement of door switches |
Video - Lada Granta - door switches freeze? 3 solutions to the problem.
Where is the trunk limit switch of the Lada Granta Liftback
The trunk lid activation sensor is located on the left side, closer to the lamp. However, it is installed only in the “Lux” configuration. Rubber plugs are inserted into “Standard” and “Norma”.
In order to prevent sudden activation of the central locking and door locking, owners optionally install sensors. Considering the simplicity of the procedure, you can do this either independently or by contacting a service station for help from specialists. After installing the trunk end switch into the seat, we lay and connect the electrical wiring. “Plus” is powered from the side lights of the lamp, “minus” can be from the body or on the block with wires. Black with a white stripe is “minus”, red is “plus”.
In the Luxury package, the sensor is built into the trunk lid lock by default. When the lid is closed, the sensor automatically turns off the power from the light.
Trunk lock, disassembly, limit switch
Like many others, I encountered the fact that the trunk light stopped working.
The reason is simple - the limit switch in the lock has died. The purpose of the preparation is to clarify the cause and take measurements. Result: 1. Worn limit switch 2. Width between contacts - 10mm I poked the switch, checked it with a tester, put everything back together, the lock worked. Apparently the switch is stuck, or the contact pair has oxidized. I’ll buy an analogue in radio components. Disassembly is hampered by the rivet, which is the axle. Sharpen it. Unclip the housing and move it away from the metal part. Then the pressed cover will come out of the grooves.
The limit switch was re-soldered. I bought one similar in size from radio parts, but with a ski. Because with a long pusher it was not.
Review of Manufacturer Prices
| Lock marking / article number | Price, rub.) |
| left rear 21911-6204986-30 | from 1500 |
| right rear 21911-6204986-30 | —/— |
| thrust 21911-6104986-10 | from 500 |
| handles 21911-6204986-20 | from 270 |
| —/— 21911-6204986-20 | —/— |
| limiters 21920-6104986-00 | from 360 |
| —/— 21911-6204986-00 | |
| Power trunk lid lock 21911-6304986-10 | from 1900 |
| 21911-136800 | from 1500 |
| 21911-6104986-10 | —/— |
| 21911-6104986 | —/— |
| 21911-610504986 | —/— |
| 21911-6104986-10 | —/— |
| thrust 21910511800 | from 150 |
| bracket 2345983790 | from 100 |
| bushing 1118234598 | from 200 |
| —/— 111806105 | —/— |
| lock retainer gasket 34580610 | from 100 |
| clamp housing 5698710800 | from 300 |
| lock pin 63541800 | from 100 |
| front lock 21900610 | from 1400 |
| —/— 219006105 silent | from 2100 |
| 21911-610501310 —/— | —/— |
| 21911-610501300 —/— | —/— |
| 21911-610508426 —/— | —/— |
*prices are current as of 10/08/18.