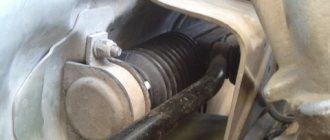
Installation of steering rack Lada Priora
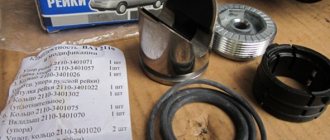
Before installation, check that the rail is installed in the middle position. To do this, using sliding pliers, use the flat on the gear shaft to rotate the shaft in any direction until it stops, then turn the shaft in the opposite direction two full turns and turn the shaft so that the flat on the shaft is located vertically on the right side along the direction of the car. Otherwise, the installation of the rack is carried out in the reverse order. The steering rack of the Lada Priora is the same as the rack of the Kalina or VAZ 2110-2112 of the new model and has a catalog number: 11183-3400010 (rasp inside 21100-3401068). Price approximately 3500 rub.
The Priora steering rack with power steering is no different from the usual one, but the Priora steering rack with power steering has a different catalog number (see interchangeability of VAZ steering racks).
Advantages and disadvantages of amplifiers
| Power steering | Electric power steering |
| Full transmission of the influence of the road surface from the wheels to the steering wheel, which provides good feedback. | Easier to operate and repair. |
| It absorbs part of the engine power, which is why you have to constantly monitor the fluid level in the power steering reservoir and the condition of the pipelines. | Less impact on power. |
| The transfer of influence from the wheels occurs to a much lesser extent, so there is less feedback, which affects the so-called “road feel”. The absence of this feeling, especially in winter, can lead to an incorrect assessment of the situation while driving. |
Lada Priora can be equipped with both a hydraulic booster and an electric booster. Many car enthusiasts increasingly prefer cars with EPS, although it would be more accurate to call it EMUR - electromechanical power steering.
Airbag installation
Installation is carried out in reverse order. While working, stay outside the pillow deployment area. When you first turn on the ignition, stand outside the vehicle and turn on the ignition with your hand under the steering column.
Have you experienced a knocking sound in your steering? Let's solve this problem together.
Good day! Status: Verified
Story
: (Can be skipped). The steering rack was repaired, with removal and partial disassembly (without removing the steering tips, or as they are called “steering rods”). So, after installing the rack back, in order to get the bolt into the slots of the steering wheel with the rack, I had to turn the latter by 30 degrees, which ultimately resulted in an uneven position of the steering wheel.
In fact:
The steering wheel is not level relative to the level position of the wheels. Correction options:1.
Rearranging the steering rack by pulling out the steering wheel mounting with the steering rack from the splines. (I advise you to do this only if you need to re-assemble the rail). Time costs: 2 days .2.
Perform wheel alignment and tell people to set the steering wheel straight. Cost: 1 hour.
1000 rubles 3. Turn the steering wheel 30 degrees.
Costs: 1 hour, +1 neighbor.
I made decision No. 3 and after that go to the alignment. Does anyone think he did the right thing? I’ll add that the car was re-shoeed with summer wheels that were balanced.
Tools:
socket wrench (head) “24”, screwdriver with a flat blade, hex key “5”. Work:
Using the instructions “Removing and installing the steering wheel of Lada Priora, VAZ 2170, VAZ 2171, VAZ 2172” we do this:
1. Take a screwdriver with a 5 mm hex head. We insert it into the hole in the airbag mounting in the steering wheel. Unscrew the 2 bolts (They cannot be removed from the passes).
2. As soon as the bolts are unscrewed, the cushion will move slightly relative to the steering wheel.
3. Carefully turn the pillow sideways. Inspect the connector fastening.
4. Pry up the green clamp of the control wire block (which is in the center).5. Now we pull out the entire connector from the mounting groove.6. The pillow is removed and put aside.
Unpredictable operation of the electric amplifier
It is much more dangerous when the electric amplifier behaves unpredictably. For some car owners, while driving, the amplifier began to work and sharply turn the car to the side, while the driver was driving on a flat road and did not affect the steering wheel. Such situations may be accompanied by jolts to the steering wheel. It turns out that at the most inopportune moment, the electric power steering can knock the steering wheel out of your hands and send the car either into the oncoming lane or to the side of the road.
Steering wheel and dashboard
If such a malfunction occurs, it is absolutely prohibited to continue driving, otherwise, due to this breakdown, you can get into a traffic accident or fly off the road. To continue further movement, just turn off the amplifier. To do this, you need to remove the fuse responsible for power supply to the electric power steering, after which you can continue driving without the amplifier.
The origin of this problem lies in the amplifier itself. Such a malfunction may occur due to the same torque sensor. If the contact group is dirty, this sensor may not correctly perceive the steering position and speed sensor data. In some cases, cleaning the contact group can restore the functionality of the amplifier. But it is quite possible that such an operation will not bring a positive result.
To eliminate the breakdown, most likely, you will have to completely replace the electric amplifier. It is not recommended to carry out replacement in a garage environment. To do this, it is better to contact a specialized service station. After replacing the electric booster, it is advisable to perform adjustment work on all components of the steering mechanism.
How to tighten the steering rack on a Priora
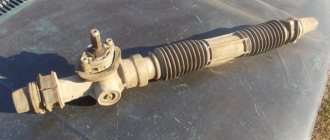
Lada Priora is a Russian-made car that is highly popular among our compatriots due to its low price and attractive appearance. However, even despite this, the Lada Priora has one vulnerability associated with the poor quality of the road surface - the steering rack or, in the language of specialists, the “power steering/power steering gearbox”. Fortunately, you can tighten it with your own hands.
When does the steering rack need to be tightened on a Priora?
The steering rack is a vulnerable point for Lada Priora
The first sign indicating the need to adjust the rack is the appearance of a knocking sound when driving over small uneven surfaces. The knocking will be felt especially clearly when driving on country roads. In this case, the driver will feel shocks and vibrations on the steering wheel, which will also be transmitted to the entire car body.
In addition, if the steering wheel adjustment nut is loosened when driving on the highway, the car will “float” a little, and additional steering will be required from the driver, which will also immediately become noticeable.
Experts also say that a tightening is necessary if the driver begins to notice the appearance of a clearly audible crunching sound in the area of the steering column, as well as an increase in the amplitude of the steering wheel rotation.
When tightening doesn’t help and the mechanism needs to be changed
It’s worth thinking about replacing the rack when tightening it does not in any way affect the car’s behavior on the road, and also does not help get rid of the unpleasant knocking noise. A failed steering rack will cause significant play in the steering wheel. Moreover, it may begin to jam (this happens extremely rarely, but similar cases are known). If the rack begins to jam, then it is better to stop using the car, as this can lead to the most dire consequences.
You cannot do without a replacement even if after tightening it you managed to get rid of knocks and vibrations, but they reappeared later.
: Audi intends to develop another SUV
What is needed for work and how to tighten the steering
To tighten the steering rack you will need special wrenches
To perform the tightening you will need the following tools:
- Slotted screwdriver (in simple terms, a “flat” screwdriver);
- Wrench 13;
- A special 17mm wrench designed to adjust the steering rack.
To make the work more comfortable and faster, it is recommended to drive the car into a special inspection hole or overpass, and also use an assistant, whose role even a child can handle.
The lower rack fastening nut is not easy to unscrew
To get to the rail, you should perform a number of simple steps:
- Disconnect the battery terminals and dismantle it;
- Using a 13mm wrench, unscrew the bolt securing the battery stand, and then remove it;
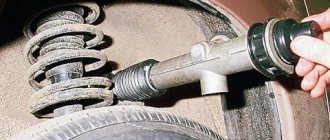
- Directly under the steering rack, using a slotted screwdriver, you need to pull out the small plug of the adjustment system.
After this, you will have access to the nut responsible for adjusting the thermal gap in the rail.
Next, you need to put your hand under the steering rack and try to put the rack wrench on the nut. It is necessary to tighten the nut clockwise, but since the rack itself is located upside down, from the outside it may seem that the nut must be tightened counterclockwise. Experts recommend tightening the nut no more than 25–30 degrees at a time, after which you should try to rotate the steering wheel, which should turn without jerking or biting.
It is also necessary to listen to the sounds coming from the steering wheel - if there are no knocks when turning the steering wheel, and there are no other noises, then the rack is tightened correctly, and you can put the battery and rubber plug in their place.
The nuances of working on a car with EUR and power steering
According to experienced auto mechanics, the process of tightening the steering rack on cars with electric steering and power steering is practically no different, so this guide can be called universal.
: About anti-corrosion treatment of cars
It is worth noting that the complete replacement process is also identical in the case of electric steering and power steering, with the exception of one point - in cars with power steering, before replacing the rack, it is necessary to drain the fluid from the power steering tank, and in cars with electric steering, remove the terminals from the battery.
Possible malfunctions: signs and causes
In what cases is the steering rack, power steering and power steering disassembled and repaired, what is the connection diagram for the amplifier, what functions does the torque sensor perform?
First, let's look at the main malfunctions of the system, why it does not work and how to fix them:
- Incorrect operation or breakdown of the control unit is one of the most difficult reasons for the inoperability of the EUR and power steering in the Lada Priora. If such a problem occurs, a corresponding error message will appear on the on-board computer screen. If you decipher it, you will find out that the computer has detected that the control module is inoperable. Such problems are usually associated with soldering problems. Most likely, the reason is a lack of connection or poor contact between the amplifier circuit and the controller. Such a malfunction can be solved by repair, that is, re-soldering, or replacement if we are talking about a car under warranty. You can find out more accurately about problems by conducting computer diagnostics.
- Failure of the speed controller. If the speed sensor breaks down, the electric booster turns off spontaneously or does not work at all, and an error message about inoperability will appear on the computer display. In this case, you can try to reconfigure the device or change damaged sections of the electrical circuit at the junction of the sensor and the control unit. Sometimes the reason lies in poor contact of the sensor with the on-board network, then the connector will simply need to be corrected. If the malfunction is associated with a non-functioning sensor, the device must be removed and replaced.
- The steering wheel turns with great difficulty. First of all, the reason should be sought in the lack of lubrication. If there is little oil in the system, the steering wheel will be difficult to turn, and uncharacteristic noise or creaking may be heard during rotation. Check the lubricant level and add oil if necessary.
- Prolonged operation of the electric booster without lubrication can lead to pump failure. The malfunction is accompanied by sounds uncharacteristic of the operation of the EUR, as well as difficult rotation of the steering wheel. If the pump can be repaired, then you can consider yourself lucky, but if it can’t, then the device will have to be replaced.
- Malfunctions in the operation of the electric amplifier can also be caused by reduced voltage in the machine's electrical network. If the voltage in the on-board network really jumps, then you should initially check the generator and the electrical circuit for its connection. For diagnostics, it is recommended to use a multimeter or voltmeter (video author - Alexander Loginov).
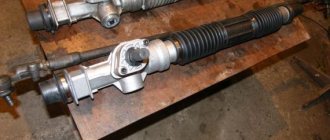
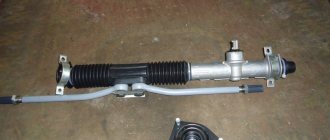
Briefly about the mechanism
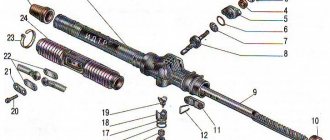
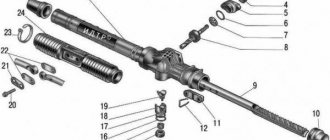
The element is a cylindrical body containing the following parts:
- the gear rack itself, moving inside the bushings;
- drive shaft with helical gear, rotating on 2 bearings (connected to the steering column);
- 2 rods connected to the ends of the rack and pinion mechanism and the steering knuckles of the hubs;
- a system of stops and springs that limit the travel of the rack and select the backlash of the gear transmission;
- rubber covers (anthers) in the form of round “accordions” that protect the mechanism crankcase from dirt;
- the element body is filled with liquid lubricant.
This is the design of a conventional mechanical and so-called electric rack, operating in conjunction with an electric power steering (EPS). If the car is equipped with a hydraulic booster (power steering), then the design of the mechanism is supplemented with cylinders and pistons that help move the gear bar in one direction or another.
The element works on a simple principle: when the steering wheel rotates, the drive shaft moves the rack through a gear in the required direction. The ends of the part connected to the rods cause the front wheels to turn. The power steering or electric power steering reacts to the movement of the steering wheel and “pushes” the rack and pinion mechanism in the desired direction, relieving physical stress from the driver.
Video
This video shows how to repair the steering mechanism on Kalina.
Knock in Kalina steering rack. How to remove.
Installation of Kalina steering rack.
Repair of the steering column gearbox and the RR itself on Priora, Kalina, Grant.
How to install a steering rack from Kalina 2 to Kalina 1.
Steering rack for Lada Kalina Sport with a gear ratio of 3.1 instead of 4.02.
Do-it-yourself repair of the steering rack, but not Kalina, but Daevoo Sens / Daewoo Sens.
Kalina control rack - VAZ 11183 Kalina rack repair
Have you ever had a chance to monitor knocks and noises from the side? Probably it happened. They changed the control tips, changed the ball tips, even changed the springs with support bearings, but does the knocking continue? It's time to tug, make sure there is free play and start sorting out the rack. In this article I will talk about repairing the VAZ 11183 rack, but the development is identical to all other VAZ front-wheel drive racks.
The most interesting thing is that these motherfuckers from AvtoVAZ do not fundamentally change anything except the gearbox housing, I bought a repair kit 2110-2112, the rack is listed in catalogs as 2110, but the splined part is longer than 2110, and the gearbox is slightly different, so just change Unfortunately, 11183 for 2110 will not work, although 2110 costs 2500 in my town, and 11183 5500 costs 6000 rubles. The difference per pocket is very noticeable.
Well, it doesn’t fit and doesn’t fit, so we give the engineers a hard time and start disassembling it. Unfortunately, there won’t be a photo for the article, because I was up to my elbows in mud and didn’t want to wash myself for the sake of pictures, but I’ll try to describe everything carefully.
Removing the steering mechanism.
1. For convenience of work in the future, and so as not to climb into the interior with stains, unscrew the bolt securing the splined connection from inside the cabin (you will see it near the floor of the control shaft).
2. We lift the car on a lift, throw it down, and knock out the control tips from the steering knuckles.
In what cases does a lift not help?
But you will need to think about changing the steering rack on the Priora if the tightening does not bring visible results. If after adjustment the knocking noise does not disappear and the play remains unchanged, you should think about purchasing a new rack. If this element fails, then the first sign of this is a significant increase in the free play of the steering wheel.
Sometimes it happens that the teeth in the mechanism jam. This happens rarely, only in the presence of very serious damage. If the mechanism begins to jam, you need to stop using the car. This may lead to you not making a maneuver at the right time. If the tightening helped for a short period of time, after some time a relapse occurred and extraneous knocks appeared again, it is necessary to install a new rail or carry out a major overhaul.
Steering rack removal and repair
Removal work must be carried out with the necessary tools. Such as:
- Ratchet;
- Head at “13”, “15”, “17”;
- Key to "14";
- Hexagon at "6";
- Screwdriver "-";
- Hammer;
- The beard is blunt;
- Wrench for tightening the steering rack;
- Steering wheel end remover;
- Mount;
- WD-40 lubricant;
- Lubricant "Litol - 24";
- Steering rack repair kit;
Steering wheel removal process
We align the steering wheel exactly in the center.
Raise the left side of the car with a jack
We unscrew and unscrew the steering end nuts, then use a puller to squeeze them out of the strut bipod.
We unscrew the steering cardan in the car with a head on “13”, and forget the screwdriver into the slot of the cardan without damaging the splines. This is necessary for its easy removal from the rack splines.
Remove the steel washer retainer from the tie rod bolts and unscrew the left steering arm from the rack and pull it out into the left window of the tie rods
Unscrew the steering rack mounting brackets with a head on “13”
Using a pry bar, move the rack to the side and remove it into the left window of the steering rods
The withdrawal process is completed
The process of disassembling the rack
We unscrew the steering rods with a head at “15”
We remove the anthers by biting off the plastic clamps with side cutters. We pull out the central steering boot to the right side without damaging it.
We remove the “binoculars” from the rasp.
Place a mark as shown in the picture and unscrew the nut securing the rack pipe using a punch and a hammer
We take out the pipe
We unscrew the steering tightening nut using a special wrench (don’t be afraid to turn it very tightly), take out the rubber ring and the pressure piston.
To remove the pressure piston, you need to hit the back of the rack and the piston will fall out.
We take out the rasp
We unscrew the two bolts with a hexagon “6” and carefully remove the “worm” cover without damaging the oil seal.
We clamp the worm shaft into the yew through a block and remove it by hitting the body of the rack
Next, remove the old plastic sleeve from the pipe using a screwdriver
The rail is disassembled, we proceed to the assembly process using new parts
Assembly
We install rubber rings on the bushing and insert it into the rack pipe
We wash the worm shaft from the old grease, lubricate it with new and insert it into place, put a plastic bearing on it.
Place a disc spring into the worm cover, and then a thrust washer on top. Lubricate well and close the lid.
We lubricate the rasp and insert it into the worm mechanism, and then insert the pipe into the mechanism body and tighten the nut, aligning the previously placed marks.
Centering the steering rack
When assembling the steering wheel, it is necessary to follow a certain rule, which in the future will not lead to the rearrangement of the steering wheel on the splines.
When the rasp is placed in the rack body, it is necessary to set it to “zero”, that is, the position in which the steering wheel will stand exactly in the center. To do this, you need to measure 235 mm from the right end of the case and put a mark with a marker. This will be “zero”. Next, you need to align the center of the rasp with this mark. The center of the rasp will be the recess under. We combine this notch with the previously installed mark.
It should also be noted that when combining these marks, the worm shaft should face the flat to the right side at an angle of 90 degrees to the rack body.
To combine all these parameters, you need to rotate the worm shaft with a key at “14” until all the parameters are combined.
Attention: the rack pressure piston should not be installed when the marks are aligned. After the marks have been set, we continue assembling
After the marks have been set, we continue assembling
We install the pressure piston with the cuff on it into the “worm” body. We insert the cuff into the body, then the pressure spring, the nut and tighten it with a little force.
1 - thrust nut, 2 - thrust piston, 3 - collar, 4 - needle bearing, 5 - left side of the rack housing.
We insert the binoculars onto the rasp, put on the anthers and secure them with clamps
Then we screw the right swing arm to the rack and install the rack in place.
We carry out assembly in reverse order.
It should be noted that the easiest way to install the steering universal joint is by removing it from the steering wheel. Using a key set to “13”, unscrew the nut and remove the bolt, and then the cardan itself.
When installing, make sure that the steering wheel is centered. After the rail is installed, it is necessary to tighten it
To do this, tighten the nut until it stops, and then loosen it 90 degrees.
After the rail is installed, it is necessary to tighten it. To do this, tighten the nut until it stops, and then loosen it 90 degrees.
The steering rack repair process is complete.
How to adjust the gap
Carefully put your hand into the space under the Priora steering rack and try to place a special wrench on the edge of the nut. Tightening is done clockwise. But note that the rack is located in an inverted position, so you may first decide that the tightening should occur in a counterclockwise direction.
It is advisable to tighten the nut by 25-30 degrees, no more. After this, be sure to check how the steering wheel rotates. There should be no biting or jerking. Be sure to listen for knocks and other noises while turning the steering wheel. After making sure that the steering rack is tightened and this is done correctly, you can assemble the unit and install the battery in place. And don’t forget about the plug - if you don’t install it, then foreign objects, dust and water will definitely get inside.
Disassembling the steering column
We begin disassembling the control unit by removing the protective casing by cutting the plastic clamps. After this, use a special key of 17 to unscrew the thrust nut, take out the retaining ring, the spring and knock out the rack stop. Next, remove the boot and drive gear seal, remove the lock washer, and then use a 24mm wrench to unscrew the nut securing the ball bearing. We remove the gear. Now that there is nothing holding the rail in the case, we remove it through the right side of the case. We remove the needle bearing of the drive gear from its seat. To do this you will need a special puller. Check the drive gear bearings for play. If present, the bearings will have to be replaced.
The support sleeve must also be replaced. It has a cylindrical shape and is located inside the steering housing. The bushing is removed by prying it off with a screwdriver.
Features of operation with power steering
The Priors were equipped with electric and hydraulic power steering. But the presence of such units does not affect the repair procedure, so you can safely follow the algorithm described above.
But there is one small nuance - on cars with a hydraulic booster installed, when replacing the rack, you will have to completely drain the fluid from the reservoir. And if a steering rack is installed on a Priora with an electric power steering system, you will need to disconnect the battery. But if you refer to the above procedure, you can see that the battery is completely removed at the first stage of repair.
Complex car radio malfunctions
In this article we will try to answer the questions:
What is a complex fault?
How can error codes help when repairing car radios?
In the practice of repairing car radios, there are often cases when, in order to restore the operation of the car radio, it is necessary to find and eliminate not one specific malfunction, but several. It’s good if the breakdowns are not related to each other or relate to different electronic components of the car radio (for example: no sound - the amplifier chip is faulty; no disk reading - the laser reader lens is dirty).
What if both faults are in the CD drive? With such malfunctions, the process of diagnosis and repair becomes difficult, since, having eliminated one malfunction, we are immediately faced with the manifestation of another. Such a malfunction with several causes can be called complex.
Let's look at troubleshooting a complex problem using the example of repairing a Pioneer DEH-P3500MP car CD receiver. This is a case from real repair practice and its consideration will be useful for those who are interested in the topic of repairing car radios with their own hands.
The Pioneer car radio came to the repair table due to the lack of reading from the CD.
Upon external inspection, it was noticed that when the disk eject button is pressed, the process of ejecting the disk occurs slowly. The car radio was also heavily soiled with dust.
It is no secret that when heavily soiled, the optics are the first to suffer - the surface of the laser reader lens becomes covered with fine dust and this prevents the laser beam from focusing on the surface of the CD. In this case, there may be failures during playback (the sound “hiccups”), failures during the initial loading of the disc (“NO DISK”, “Error”), a long search for a recording when switching to another song. Do not forget that the cause of such a malfunction can be not only contamination of the optics, but also degradation of the laser diode in the optical unit.
For car radios, if any malfunctions occur, an error code appears on the display. Knowing the decoding of the error code, you can more quickly find the faulty unit and not waste time on diagnostics. So, for example, on the Pioneer DEH-P3500MP car radio in question, when turning on and loading a disc, the message “ERROR-11” appeared on the display. At the same time, spinning of the disk was observed - which means the spindle motor is in order.
ERROR-11
If you refer to the service documentation for this car radio model, the code “ERROR-11” stands for: – No beam focusing. Well, everything is quite simple here, as already mentioned, the violation of the focusing of the beam is associated with contamination of the car radio with dust.
In this case, it may be necessary to completely clean all mechanical parts of the car radio and its housing. Cleaning the laser reader lens is made more difficult by the fact that it is necessary to disassemble the CD mechanism and remove the laser reader from it. Read about how to disassemble the CD mechanism here and here (another type of drive).
After the laser unit is cleaned of dust, the operation of the car radio can be completely restored. But we are considering a complex malfunction.
Upon further testing the operation of the car radio on several MP3 discs, it turned out that when switching several songs forward or backward, a failure occurs. After a long and unsuccessful search for the desired track, the ominous inscription “ERROR-30” appeared on the car radio display.
Complete failure of the electric amplifier
Despite the fact that the ESD is considered more reliable than the power steering, it still has malfunctions, and since this directly affects safety, repairs should be made immediately.
There are not so many malfunctions that arise with the EUR on the Priora. The first thing that happens is the amplifier stops working completely. Often, turning off the amplifier is accompanied by a corresponding code, which is displayed on the display of the on-board computer, although there are also cases when its shutdown can only be detected experimentally.
Power steering for modern Lada
To do this you need to do:
- Several turns of the steering wheel in different directions with the engine not running.
- Then you need to carry out the same operation, but with the car running.
- If the force required to apply to the steering wheel has not changed, this means that the power steering is not working.
The movement, of course, can be continued even if the amplifier is not working, but it is not advisable; it needs to be repaired as quickly as possible and restored to functionality.
There are times when the amplifier on a Priora turns off along with the speedometer. The culprit is the speed sensor. The fact is that these three elements are interconnected. This scheme allows you to regulate the operation of the electric power steering depending on the speed limit. Repair in this case comes down to checking the functionality of the speed sensor and the wiring going to it, the speedometer and the power steering. If commutation breaks are detected, it must be restored. And when the fault is in the sensor itself, it is simply replaced.
The electric booster may turn off due to low voltage in the on-board network of the Lada Priora. This indicates that the insulation in the wiring may be damaged, causing a short circuit or problems with the generator's performance so it is not producing the correct voltage. The repair consists of checking and restoring the integrity of the wiring, as well as checking and troubleshooting the generator.
Severe contamination of the contact group of the torque sensor installed on the amplifier can also cause a shutdown. Moreover, the on-board computer, conducting self-diagnosis of the system and identifying problems with the operation of the torque sensor due to contamination, can itself deliberately turn off the amplifier. Repair in this case comes down to removing the EUR from the car, disassembling and thoroughly cleaning the contact group. But since the operations to restore the functionality of the electric booster are complex and incorrect assembly and installation of it on the car can affect the correct operation of the steering mechanism, it is advisable to contact specialists to restore the power steering.
But as already mentioned, completely disabling the electric power steering only leads to the need to make more effort when driving, and such a malfunction does not significantly affect safety while driving.
Assembly
Assembly is performed in the reverse order of disassembly. Before installation, all parts should be lubricated with the oil used in power steering. This is done to avoid scuffing during assembly and adjustment.
PTFE parts should be handled carefully; they are fragile and will burst from impact or excessive load. A socket head and an extension to it will help to carefully press in the bushings.
When inserting a gear rod, it must be centered according to the marks made before disassembly. After this, attach the drive shaft. Insert the pressure sleeve and washers behind it, tighten the adjusting nut to the required number of turns.
Manually turn the mechanism in both directions until it stops (twisting by the drive shaft). The rod should move without difficulty, this means that the assembly is done correctly. After this, the locknut is tightened. Tighten the mechanism rods and install the anthers.
Design and operating features of power steering and power steering
To make steering easier to turn and increase comfort, either hydraulic or electric power steering can be used. Both amplifiers have both pros and cons.
Structurally, power steering is a system of high and low pressure hoses containing oil driven by a pump. Power steering fluid must be poured into the reservoir near the pump. It only works when the engine is running. The driver turns the steering wheel, and at this time the fluid flows through the distributor under pressure created by the pump to the steering mechanism. It enters the working cylinder, puts pressure on the piston, which begins to move, and facilitates the rotation of the steering wheel. When moving in a straight line, the liquid flows back into the system reservoir.
Advantages and disadvantages of power steering
In the case of a hydraulic booster, the main disadvantage is the bulkiness of the entire system. But it is cheaper to produce and maintain, and this affects the price of the car. At the moment, power steering is found mainly on budget class cars, which include Priora. An amplifier of this type is also installed on expensive, powerful SUVs. This is explained by the fact that the power steering is capable of transmitting greater torque transmission power to the steering. In this regard, it outperforms an electric booster, but there are still more disadvantages:
- In a car equipped with a hydraulic booster, it is not recommended to hold the steering wheel in the extreme right or left position for more than 5 seconds. Otherwise, the oil in the power steering on the Priora begins to heat up, which can lead to system failure.
- The mechanism requires constant monitoring of the oil level, inspection and replacement of drives, hoses, and pump.
- The pump depends on the operation of the engine, which means it takes a certain percentage of power from the power plant. If the power steering does not work when driving in a straight line, this percentage of power is wasted.
- Such a system does not imply setting operating modes depending on the speed of movement or the angle of rotation of the steering wheel.
- At low speeds, the steering mechanism provides good sensitivity, but at high speeds it becomes less pronounced.
Engineers compensate for the last drawback by using a steering rack with a variable gear ratio. Power steering has already become an outdated system; designers are no longer involved in improving it.
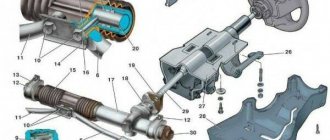
Electric amplifier design
The design of the EUR is simpler than that of the power steering. It consists of an ECU, a torque sensor, a steering angle sensor and an electric motor. There are no hoses or fluids here. The electric motor is mounted directly on the steering rack itself, and torque is transmitted to it via a torsion shaft built into the steering mechanism system.
In the case of power steering, the force is facilitated by liquid, and in the electric booster the current is responsible for this. When the driver turns the steering wheel, force is transmitted to the steering rack. At this time, the torque sensor transmits data to the electronic control unit. The controller calculates how much current needs to be sent to the electric motor to optimally facilitate steering rotation. Since the force must be uniform, the speed of movement and the angle of rotation of the steering wheel are taken into account.
Pros and cons of EUR
The electric booster is a more modern system with high potential for modernization. It is not without its shortcomings, but there are fewer of them than the power steering:
- high price,
- The electric motor cannot provide high power, so it is installed only on passenger cars.
The disadvantages are leveled out, since the design of the electric amplifier is constantly being improved.
The EUR for the Priora has many advantages. The system is easy to maintain due to its simple design. The only part that requires inspection is the rolling bearing. The ESD mechanism has more compact dimensions and can be installed on the steering shaft in the cabin, freeing up space in the engine compartment. Due to this, the durability of the structure increases, since there is no exposure to temperature changes and high humidity.
The electric booster does not take power away from the engine, which saves fuel. The drive only operates when the steering wheel is turned. The ECU is responsible for the operation of the amplifier, with the help of which you can adjust the operating mode of the EUR, taking into account the operating conditions of the vehicle. The electric booster is not afraid of extreme steering positions. Driving at high speed makes the steering wheel with ESD more sensitive.
Mechanical failures of the EUR
Why, exactly, did we remove the EUR? Diagnostics of the electrical part of the device did not reveal any problems, which means that we need to look for the cause of its malfunctions in the mechanics, which may be as follows:
- Worn or clogged drive elements or worm gear;
- Wear of the support bearing of the worm shaft of the electric drive;
- Other signs indicating destruction or wear of ESD parts.
In such cases, it is necessary to replace the worn part, if possible, trying to understand the factors that influenced this result of the amplifier's operation, or, in critical cases, buy a new electric amplifier.
How to keep the EUR in working condition longer?
Despite the fact that you can remove the EUR yourself in a garage, without special tools and special skills, this procedure is not quick, because There is no way to quickly get to this device. Therefore, motorists are interested in a simple question - how to avoid the need to repair or change the EUR. The answer is obvious - you need to extend its service life. To do this you will have to adhere to the following rules:
- Never move away if the steering wheel is in one and the extreme positions. It is also not recommended to leave the steering wheel in this position for a long time, even without moving;
- Do not hold the steering wheel for more than 4-5 seconds in extreme positions, even if parking or turning requires it. It is better to make the necessary maneuvers;
- Pay attention to sounds coming from the electric amplifier;
- Clean contacts and moving mechanisms from dirt;
- Pay attention to the condition of the wiring and terminals if they come into view when checking other technical systems;
- Carry out diagnostics of this node more often.