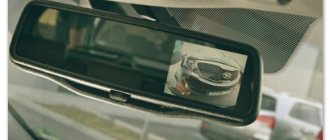
After buying the car, I was puzzled by installing a DVR and a rear view camera, but I didn’t want to cover the windshield with gadgets and wires, and I wasn’t happy with the prospect of removing the DVR and monitor in the parking lot from prying eyes. While combing the Internet, the choice was made on a rear-view mirror with a built-in DVR and the ability to connect video cameras. The mirror is installed on the windshield instead of the standard one. A camera built into the license plate light was also selected. The mirror and rear view camera were purchased on Aliexpress, the sellers sent the packages the next day. Delivery to sunny Karelia took about 20 days. I connected the mirror by soldering one contact to the cigarette lighter fuse, and holding the second under a bolt at the end of the dashboard. The camera is powered from the reversing light wires. I won’t describe the installation of this entire facility, everything is chewed in detail using the links: - connecting the DVR to the fuse box; — laying the cable from the rear view camera; — connecting the DVR to the lampshade; — connecting the DVR to the stove fan; — connecting the DVR to the cigarette lighter; — disassembling the ceiling in KiaRio-3 (how to remove the ceiling light). Also, all videos and text files can be downloaded from the Mail.ru cloud. Before ordering the mirror, I googled the question of the mounting option suitable for the Kia Rio 2013 and settled on Bracket#19 (but to be completely sure, I sent the seller a photo of the mounting of my original mirror, and he confirmed to me that my choice was correct).
The delivery set includes a box, the mirror itself, a power cable (including a video cable), a cover for neatly hidden cable routing from the mirror to the roof trim, an 8 GB microSD memory card (enough for 1.5 hours of recording in 1080p), and also instructions printed on A4 sheet. The mirror is powered by 12V, there is a fuse in the wire. So, about the work of the mirror... Because. the power is taken from the cigarette lighter, the device automatically turns on when the key is turned to the ACC position (DVR recording begins, and the monitor is ready for operation). A lit yellow LED indicates that recording is in progress.
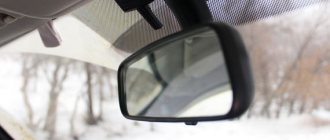
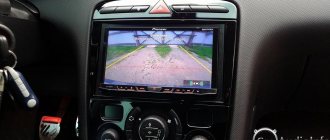
At first, the following point was noticed: when the ignition was turned on, the DVR emitted its standard beep and the LED lit up (actually, I didn’t pay much attention), but a little later I noticed that the recorder was not working (when you turned it on manually, even with the engine running, the recorder worked without interruptions ). Through experience, I came to the conclusion that when starting the car, after setting the key to the ACC position, you need to let the recorder turn on completely, and only after that start the engine, i.e. the mirror should make a BEEP sound (the LED lights up), then after 2-3 seconds it will beep again and the LED will blink. It turns out that at the first BIIP, the device itself turns on and the program begins to load, when the beeping is repeated, the recorder recording is turned on, and then, if the voltage on the devices is lost while starting the car, the battery built into the mirror comes into operation and does not allow the device to turn off (time shutdown after a power failure is configured in the device menu). The picture from the DVR is displayed on the monitor and can be turned off by holding the power button for 1 second. There is a device state memory, i.e. If you leave the image from the recorder turned off, then the next time you turn on the device, the image will also not be displayed (only the LED will light up). The mirror has 2 video inputs, and when a signal appears at the second input, the image is automatically displayed on the monitor (the recorder recording is not interrupted), it was used to connect the rear view camera. The image from the first input is turned on by holding the “Record” button (it can be used both to connect an additional camera and to play video from any device). The quality of the screen for viewing the video recorded by the dash cam is quite tolerable, and for the reversing camera it is more than sufficient. Automatic adjustment of the screen brightness works - during the day the screen has maximum brightness, in the evening it decreases (I checked by covering the light sensor with my hand, while the screen decreased the brightness). When using this device as a regular mirror, nothing in it reveals a built-in monitor; the only thing I note is that the mirror turns out to be slightly tinted.
Read also: Lifan x 60 cigarette lighter fuse
The recording from the DVR, in my opinion, turns out normal (especially considering that this is not a highly specialized device, but a multifunctional one). It seems to me that the recorder produces honest 1080p, the numbers on the still frame are readable no worse and no better than other average recorders.
You can also download the original files from the cloud, because YouTube seems to cut down the video quality a little.
Now let's move on to the rear view camera...
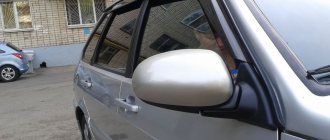
The camera disappointed me (for which it received 3 stars on aliexpress). So, in order: 1. The seller did not send the metal spring that secures the light in the trunk lid (I had to glue it along the contour with double-sided tape). 2. The hole for the lamp is larger than on the original lantern (as a result, the lamp somehow clung to the edges of the hole, but it is not a fact that it will not pop out over time). 3. The markings on the camera do not even closely match the Kia Rio (although the description says that the camera is specifically for this car). 4. Because If the camera is installed in the headlamp, it is offset relative to the center of the car, but this is not corrected in any way in the camera, so the image is limited to approximately the center of the bumper, which leads, firstly, to a limited view, and, secondly, to the inability to drive backwards purely in the camera , because due to the offset relative to the center, it turns out that you are constantly moving the car to the side. Although there are also positive aspects: the camera shows normally and copes with the initial task (parking against curbs, walls, etc.). By the way: the camera is practically invisible unless you specifically look for it. To summarize, we can say that I am definitely satisfied with the mirror and can recommend it for purchase, but it’s worth looking for a better camera, or consider installing it not in the lighting, but in the center of the trunk (but in this case it will become more noticeable to vandals passing by).
Read also: Nissan Leaf battery characteristics
UPD
. Added a video with an example of night shooting.
Another note: it seems that the mirror’s power supply interferes with the radio (in the city it is not noticeable, but in the country, where the reception of the radio signal is uncertain, it is already unpleasant to listen to the radio, with the mirror turned off, in principle, more or less). I googled the topic with modifications, but I’m too lazy to solder the filter into the mirror’s power circuit (I’m in the city 99% of the time).
If the rear view camera in your car does not work, this is not a reason to despair. In most cases, the problem lies in small malfunctions that can be corrected independently. You will learn from the article what to do if the rear view camera in your car does not work and how to fix it.
Typical malfunctions of the rear view camera
Most often, this device is located in three places in the car. This is either a trunk lock (handle), or a frame for the license plate light, or it can be installed in the passenger compartment (in station wagons).
As practice shows, cameras that are installed directly in the cabin suffer the least from any problems. After all, they are not exposed to aggressive environmental influences. This impact primarily refers to moisture entering the device.
Water getting inside the device can lead not only to its complete failure to work. Image defects may occur. Often, car owners complain that the camera does not show an image or the picture looks cloudy. Most likely, the reason for this is moisture getting into the rear view camera.
Troubleshooting methods and dismantling the device
Every car owner has two ways to repair a rear view camera. The first and simplest one is to send it for repair. You can contact your manufacturer's service center. If the car is still under warranty, this must be done. Repairing it yourself will void your warranty.
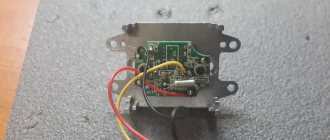
Main board and contacts
But it is often cheaper and easier to carry out simple repairs yourself. If the rear view camera stops working or there are malfunctions, you can try to repair it.
The instructions will be given using KIA cars as an example.
- If the rear view camera does not turn on automatically or at all, to remove it, you need to remove the entire trim.
- To do this, first remove a small panel at the top, under which the bolts are hidden. Remove them to remove the bulk of the trim.
- Underneath you will find four nuts that secure the trunk handle. The camera itself is secured with two self-tapping screws, and two more secure its connector.
- You may encounter traces of corrosion. Remove it first, and then you can disassemble the device.
- The body is secured with four self-tapping screws. When you disassemble the device, be careful - they may oxidize.
- If there is moisture inside the chamber, it will need to be dried. Clean with a brush and then coat the boards with varnish to protect them from moisture.
- There are usually two gaskets in the chamber. One is located on the camera eyepiece, and the other is located at the junction between the plastic parts of the camera and the metal body. Both could become unusable after a certain period of use. Replace them if necessary.
- Reassemble the camera, proceed in the reverse order, having previously treated all joints with sealant. It is better to use butyl rubber.
Read also: There was an accident, the victim has no insurance
How to repair a car's side rear view mirror
Side rear view mirrors come with manual mechanical and electrical adjustment of the position of the mirror element. In a mechanical system, changing the plane of the mirror element is carried out using three cables, and in an electrical system - using two electric motors. The article will discuss the repair of a side mirror with a mechanical method of controlling the mirror element.
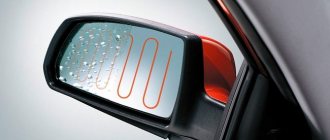
In winter, when snow falls on the mirror element of the side rear view mirror of a car, and then melts and the water freezes again, the mirror element can freeze to the body. In addition, when it is cold, the plastic elements of the mirror become brittle and may crack when trying to adjust it.
This is what happened to my mirror. Randomly, when the mirror was not yet frozen, it changed its angle. And when in the morning I tried to set it so that there was a good view, the adjustment knob, after applying force, began to move freely, without affecting the position of the mirror element. It became obvious that one of the cables had broken out of its fastening.
Since the temperature outside was below zero, it was necessary to remove the side-view mirror for repairs in warm conditions. In some cars, to remove the mirror you have to remove the door trim, but in the Hyundai Getz this issue has been thought out, and it is enough to remove only the decorative panel.
To remove it, just move the panel at the top a little and pull the clip out of the door body. The lower part of the panel is held without fixation by two hooks placed behind the protrusions in the door body.
After removing the decorative panel and inspecting the fastening of the cables to the control knob of the mirror element, it became clear that the fault lies on the opposite side of the fastening of one of the cables, which was slack.
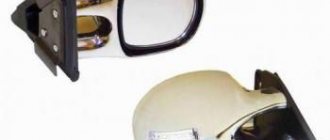
To detach the side mirror from the door, you need to unscrew three screws. If the mirror is electrically controlled, you will also need to disconnect the connector with the wires.
The mirror in the warm workshop has warmed up, and now you can begin to repair it. At negative temperatures, plastic loses its plasticity, becomes brittle, and the latches can break off.
The mirror element in the mirror is usually glued with double-sided tape to a shaped plate, which is attached to the movable element using latches. The photograph shows a view of a mirror element on a plate on which a circle with four latches is visible in the center.
In order to release the latches, you need to lift any of the corners of the mirror element and use a flat-head screwdriver to remove the latch. Repeat this operation with other corners until the mirror element is released.
After removing the mirror element, access to the adjustment device will open. It turned out that all three ends of the cables were securely fixed in their cells. For clear adjustment of the angle of inclination of the mirror element, each cable must be inserted into its own cell.
For the convenience of adjusting the angle of inclination of the mirror element, each cable must be inserted into its own cell. In order not to get confused during assembly, the ends of the cables are marked with paint of different colors and I marked them next to them. There was also a mark indicating the position of the adjustment unit.
The hinge mechanism was attached to the mirror body using three screws. When the screws were unscrewed, it became clear what the problem was. The outer shell of one of the cables pushed through the supporting surface in the stationary half of the hinge joint.
On the bottom left of the photo there is a hole that has the correct shape, and on the right in the middle, it is pressed through by the cable sheath. A large piece of plastic was practically torn out and most likely this was due to a manufacturing defect.
At first glance, it may seem that the fixed part of the hinge needs to be replaced, but plastic parts can be easily repaired in many cases. The most reliable method was chosen - installing a cut nut instead of the void. To do this, a slot was made in the M2.5 brass nut with a width slightly larger than the diameter of the cable.
Next, the nut was screwed onto the screw and, using heating with a soldering iron, fused into the plastic flush so that a cable could be inserted into it.
The nut was fixed quite firmly, but taking into account the fact that the side mirror is used in a wide range of temperatures and vibrations, I decided to strengthen the fastening by installing an additional brass bar, also with a slot for the cable.
I secured the bar to the fixed part of the hinge using two screws. Now the cable mount will definitely not fail.
Assembly is carried out in the reverse order of disassembly. The main thing is to install the cables in the hinge in accordance with the color marking. The test showed that the adjustment system works as well as before the repair.
On the advice of a fellow car enthusiast, I also did a little tuning - I installed plastic visors to protect the mirror elements from precipitation in the form of rain, snow and condensation.
As car operation practice has shown, visors have proven to be a very effective means of protecting mirror elements. When parking the car in moderate rain and even when driving during a downpour, the surface of the side mirrors provided good visibility.
I advise all car enthusiasts who have problems with precipitation getting on their side mirrors to install protective visors. They are cheap, attached with double-sided tape, so if you don’t like them, they can be easily removed.
Before the repair, I tried to find a replacement hinge mechanism on the Internet, but I couldn’t find it; only side-view mirrors are offered as a complete set, costing about 2,000 rubles. And it took me no more than an hour to repair the side mirror myself, including removal and installation.
Instructions for adjusting the device yourself
When you installed the camera, it works fine, the clouding has disappeared, it is important to adjust it correctly. Not all car owners know how to do this. Because of this, they cannot do everything themselves and check the functionality of the device.
The main task is to set up parking lines. This enabled mode makes parking much easier.
- Take an ordinary wooden block, 2 meters long. Its sides should be 2-3 centimeters.
- Place it about a meter away from the center of the rear bumper. The edges of the block should protrude from the sides of the car at approximately the same distance.
- Then, get into the car and go to the service menu. You may need to perform additional steps, such as turning the side lights on and off several times.
- After this, you will need to go to the camera settings and select the car brand.
- When the rear view camera is activated, you will need to turn the steering wheel first to the right all the way, and then to the left - this is done to adjust it. Then click "next". A rectangular outline will appear on the screen.
- Using the up, right, down and left keys you will need to place it so that the block is exactly in the center. Then click on confirm.
This, in fact, is all the steps you need to perform to configure the devices. Now, when you turn it on, yellow lines will begin to appear, making parking easier. Please note that any subsequent disassembly may require subsequent reconfiguration of the device.
Price issue
And yet: repair or replacement?
There are many reasons to resort to car side mirror repair and order this service from the MBS-services car service center:
- Firstly, original spare parts for foreign-made cars are not cheap, and by ordering repair work you can save a lot;
- Secondly, if your car has already been discontinued or is simply a rare model, then you will not be able to purchase a new mirror at all - you will have to order its delivery, which you can wait for months. Of course, driving with a broken mirror is impossible, even if you are ready to wait for a new one;
- Thirdly, having decided to purchase a new part, you may well spend a lot of time first searching for it in stores, then searching for a contractor who will carry out the replacement itself. Moreover: if a paint coating was applied to the mirror, you will have to pay for the selection of paint and the service itself.
Even in the rare case when the mirror cannot be restored, contacting MBS-services will help you out. We have a wide selection of parts in stock in our warehouse, so it is quite possible that you will not have to waste time searching. Replacement will be carried out quickly and efficiently!
Video “Repairing and replacing a rear view camera”
This video shows the disassembly and repair of the device using the example of a standard Kia Sorento camera (by PCAVTO).
I remember about 12 years ago, while riding the L200, I noticed that if you back up, you run the risk of creating an unpleasant situation for any objects, because they are not visible, so a rear-view mirror was purchased - a recorder and a camera for viewing from behind.
I have been driving with such a device in another car for several years now and I see only advantages - it registers and records simultaneously what is happening in front and behind. When reverse gear is engaged, the image from the rear camera is displayed on the entire display. Of course, there are expensive versions with Android, navigation, etc... One thing that didn’t suit me was the not particularly wide viewing angle of the rear view camera, which comes with the recorder, and the fact that the fake flashlights on it light up. Therefore, the camera was purchased separately.
The seller assured that it has a viewing angle of 170 degrees. (manufacturers are a little smarter and say that this is the diagonal viewing angle). In the end I'm upset: