In cars that were assembled before the 90s of the last century, the piston must be aligned with the connecting rod in such a way that the applied mark in the form of the letter P is located on the side of the connecting rod head where the oil outlet is located. In engines produced in a later period, connecting rod holes are completely absent. Moreover, this applies not only to connecting rod engines, but also to their bearings. Also keep in mind when working that the piston and crankshaft connecting rod can be connected in almost any position.
Replacing the crankshaft oil seal
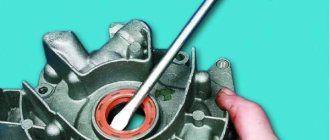
The main sign of the need to replace the oil seal is contamination of the engine compartment. A breakdown occurs when the seal of the unit is broken, causing lubricant mixed with oil to leak through the damaged oil seal. As a result, when it gets on the rotating parts, the mixture is sprayed throughout the engine compartment.
In particular, a signal that an urgent replacement of the front oil seal liners is necessary is the direct contact of oil on the pulley and its further splashing in the front part of the engine. If oil leaks in the rear oil seal, splashing occurs on the flywheel in the clutch housing. Reasons for replacement:
- natural wear and tear;
- skewed installation, which may cause cracks on the body;
- mechanical damage;
- damage to surface integrity as a result of severe engine overheating;
- marriage.
You can replace crankshaft oil seals yourself; this will not only significantly save time and money spent on repairs in the workshop, but also gain invaluable experience. Replacing the crankshaft oil seal is a standard procedure to ensure optimal engine performance.
Oil seals are a type of cuff that acts as seals on moving parts. It would be most correct to call the crankshaft oil seal a reinforced cuff. Its role in the functioning of the engine is very significant, and therefore any failures in the stable operation of the crankshaft oil seal will lead to undesirable consequences. Even if the degree of its displacement from the standard place is insignificant, oil will begin to leak in the car.
According to statistics, the installation of a new oil seal should be done at least once every 3 years. However, oil seal bearings may need to be replaced much sooner. It all depends on the general condition of the parts and the conditions under which the car is used.
Video “Assembling the engine of a classic VAZ car”
This video demonstrates the procedure for assembling an engine on a VAZ classic, including installing the crankshaft.
It is impossible to imagine an internal combustion engine without a crankshaft, since it is this part that allows the vehicle to move. The pistons are characterized only by translational movement, and the transmission requires torque, which can be obtained thanks to the crankshaft. Over time, the mechanism wears out and requires repair work. Therefore, it is important to know what needs to be done and in what order, and what tools to use.
Preparation for replacing bearings and direct installation of the crankshaft
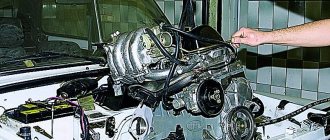
After the hood and battery are removed from the VAZ 2106, you need to carefully drain the oil and coolant. Then remove parts such as the radiator, thermostat, carburetor, fuel pump and ignition distributor. Be sure to note for yourself the order in which they are removed. Next, you need to remove all adjacent hoses and wires from the engine along with the cylinder head.
In addition, disconnect parts such as the generator, starter, coolant pump, upper nuts that secure the engine mount, and bolts that secure the clutch housing to the engine. The order in which disconnection is made must be strictly observed. During operation, the lifting device cables must be secured to the block and carefully lifted.
Why is a crankshaft needed in a VAZ 2106 engine?
The crankshaft (crankshaft) is an important part of the crank mechanism of any engine. The operation of the unit is aimed at converting the energy of combustion gases into mechanical energy.
Description of the VAZ 2106 crankshaft
The crankshaft has a rather complex design, with connecting rod journals located on the same axis, which are connected through special cheeks. The number of connecting rod journals on the VAZ 2106 engine is four, which corresponds to the number of cylinders. Connecting rods provide connection between the journals on the shaft and the pistons, resulting in reciprocating movements.
Let's look at the main elements of the crankshaft:
- Main journals are the supporting part of the shaft and are installed on main bearings (located in the engine crankcase).
- Crankpins. This part is designed to connect the crankshaft to the connecting rods. The connecting rod journals, unlike the main ones, have a constant displacement to the sides.
- Cheeks are a part that provides connection between two types of shaft journals.
- Counterweights are an element that balances the weight of connecting rods and pistons.
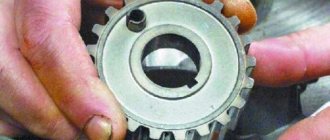
- The front part of the shaft is the part on which the pulley and timing gear are mounted.
- Rear end. The flywheel is attached to it.
Seals are installed in front and behind the crankshaft - oil seals, which prevent oil from escaping out. The entire crankshaft mechanism rotates thanks to special plain bearings (liners). This part is a thin steel plate that is coated with a low-friction material. To prevent the shaft from moving along the axis, a thrust bearing is used. The material used in the manufacture of the crankshaft is carbon or alloy steel, as well as modified cast iron, and the production process itself is carried out by casting or stamping.
The crankshaft of the power unit has a complex structure, but the principle of its operation is quite simple. In the engine cylinders, the fuel-air mixture ignites and burns, resulting in the release of gases. During expansion, the gases exert an impact on the pistons, which leads to translational movements. Mechanical energy from the piston elements is transferred to the connecting rods, which are connected to them through the bushing and piston pin.
An element such as a connecting rod is connected to the crankshaft journal using a liner. As a result, the translational movement of the piston is converted into rotation of the crankshaft. When the shaft makes a half revolution (turns 180˚), the connecting rod journal moves back, thereby ensuring the return of the piston. Subsequently, the cycles are repeated.
No less important in the operation of the crankshaft is the process of lubrication of rubbing surfaces, which include the connecting rod and main journals. It is important to know and remember that lubricant is supplied to the shaft under pressure created by the oil pump. Oil is supplied to each main journal separately from the general lubrication system. Lubricant is supplied to the connecting rod journals through special channels located in the main journals.
Neck sizes
The main and connecting rod journals wear out as the engine operates, which leads to disruption of the proper operation of the power unit. In addition, wear can be associated with various types of engine problems. These include:
The listed nuances lead to damage to the surface of the shaft journals, which indicates the need for repair or replacement of the unit. To assess the wear of the journals, you need to know their dimensions, which are shown in the table.
Table: crankshaft journal diameters
| Connecting rod | Indigenous | ||||||||
| Nominal | Repair | Nominal | Repair | ||||||
| 0,25 | 0,5 | 0,75 | 1 | 0,25 | 0,5 | 0,75 | 1 | ||
| 47,814 | 47,564 | 47,314 | 47,064 | 46,814 | 50,775 | 50,525 | 50,275 | 50,025 | 49,775 |
| 47,834 | 47,584 | 47,334 | 47,084 | 46,834 | 50,795 | 50,545 | 50,295 | 50,045 | 49,795 |
What to do when necks wear out
What are the steps to take if the crankshaft journals are worn out on a VAZ 2106? First, the defectiveness is carried out, measurements are taken using a micrometer, after which the crankshaft journals are polished using special equipment to the repair size. This procedure cannot be done in a garage environment. The necks are ground to the closest size (based on the tables provided). After processing, thickened liners (repair) are installed in accordance with the new size of the necks.
If a major overhaul of the engine is being carried out, it would not be superfluous to inspect the oil pump, blow out the oil passages of the cylinder block, as well as the crankshaft itself. Attention should be paid to the cooling system. If there are signs of wear or damage on the engine elements or its systems, the parts and mechanisms need to be repaired or replaced.
The final stage
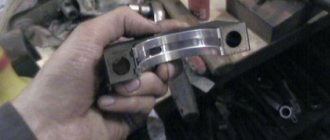
Check the quality of crankshaft rotation: there should not be the slightest braking or play. Be sure to install new metal liners at the bottom of the connecting rod heads and caps. Only then proceed to lubricate all rotating parts with engine oil. The rings themselves will need to be compressed and the piston rotated towards the crankshaft toe.
To secure, apply light blows with the handle of a hammer to the bottom of the piston, thereby pushing it into the cylinder. Screw on the second to fifth main bearing caps so as not to create a significant tightening. After this, purchase an odorless sealant from the store and apply a thin layer of it to the surface of the cylinder block in the place where it will come into contact with the first bearing cap.
To achieve maximum seal protection when installing the cover, attach several metal strips to the seal after lubricating them with engine oil. Now tighten all the fastening bolts and cut off the protruding ends of the seal.
After this, install a new sealing ring on the crankshaft and, after checking the location of the chain on the crankshaft sprocket, install the oil pump and pan. Also screw the removed cylinder head back into place, because only after this the structure can be completely assembled and the crankshaft considered replaced.
Sometimes a car requires very minor repairs, just replacing the liners, but is it really necessary to remove the engine, look for a hoist or several assistants for such a simple procedure? When it comes to such a need, replacing the liners without removing the engine will help. This simple type of repair does not require a large number of tools, but it does require some skill, so you should immediately evaluate your skills.
Inside the engine on the crankshaft, the liners are attached to a tendril, which is responsible for fixing the bearing in the engine bed when it is running. And lubricant is supplied to them through a special groove; a lack of lubrication always leads to the appearance of snags and jamming. Due to such liners, the wear time of the part is reduced, so they must always work at one hundred percent, otherwise major repairs cannot be avoided in the near future. However, during the trip you may find:
- Rotating the liners. If the fastening tendril has jumped out of its place (sometimes due to lack of lubrication), then it begins to rotate. Due to its rotation, scuff marks will appear on the journal, leading to the need to grind the crankshaft.
- Backlash. This breakdown can be easily heard by the knocking sound of the crankshaft. As soon as you hear suspicious knocking noises, repairs should be made immediately, without the need to remove the motor from the mount.
Crankshaft installation process
Before installing the crankshaft on the VAZ 2106, you need to wash, clean and dry the cylinder block. And only after that read the process.
Tools
To complete the installation you will need the following tools:
- a set of keys;
- Screwdriver Set;
- micrometer;
- consumables (liners, seals, half rings);
- torque wrench.
If defects in the form of scratches, burrs, or signs of wear are found on the surface of the liners, they must be replaced. The earbuds cannot be adjusted. When using the removed bearings further, you need to check the gap between them and the main and connecting rod journals of the crankshaft. For main shafts, the permissible size is 0.15 mm, for connecting rods - 0.10 mm. If the dimensions exceed the permissible limits, the liners are changed to a greater thickness after boring the necks. If the journals are properly ground and the appropriate bearings are selected, the crankshaft should rotate freely.
The oil seals that ensure the tightness of the crankshaft are replaced regardless of how long they have been standing. Half rings, like liners, cannot be adjusted. If burrs and scratches are found, the half rings are replaced. They are also changed if the axial clearance of the crankshaft is greater than the maximum permissible, which is 0.35 mm. The selection of new rings is carried out according to the nominal thickness or with a thickness increased by 0.127 so that the axial clearance is in the range of 0.06-0.26 mm.
Why does this happen and how to avoid it?
- The lubricant was too viscous or there was too little of it. Abrasive got into the lubricant and disrupted the smooth running. Lubricant cleanliness is one of the key parameters for preventing any breakdown; it is better to change it regularly every 60-80 thousand km. mileage
- The motor was constantly operating in overload mode. You should not constantly “strain” the engine at high speeds and drive the car for a long time without slowing down.
- When installing previous bearings, the interference was too low. Check everything yourself, tighten the bolts well, it is better to use special equipment.
Functional features of VAZ-2109 valve guides
Experts say that the engine valve guide is a necessary part for every vehicle. Its main function is to provide precise direction in the movement of engine valves when they close and open, which is characterized as reciprocating. These guides form a friction “sleeve-valve” pair, which determines the consumption of engine oil. This part also ensures a tight fit of the valve plate to its seat.
The peculiarity of the mechanism of operation of the engine valves themselves is that they move in a limited space. And the direction for this movement is given by guiding elements. That is why, for their manufacture, wear-resistant material with maximum indicators of this characteristic is used (for example, steel with a large amount of nickel and chromium impurities). Engine valves are constantly exposed to aggressive conditions due to their intense movement, so the bushings are subject to frequent wear.
Experienced motorists claim that if it weren’t for such a small guide part, the entire block with the moving rod would have to be replaced more often.
How to replace bearings without removing the engine?
Many car owners think and write on forums that it is impossible to get to the liners without removing or removing them from the engine hood. However, such operations are carried out by repairmen on ships, where the size of the parts is enormous and too much force is required to remove the engine. And if the technique exists, it can be used for simple cars.
- Park the vehicle on a ramp to gain easy access to the engine. If there is protection installed on it, it should be removed and the lubricant drained.
- Remove the box, front cover and loosen the camshaft chain in advance. If you're not too lazy, it's better to remove it entirely so it doesn't interfere.
- Remove the starter and pan (if the beam does not interfere). If it interferes with operation, you will have to lift the motor and pull out the pan from under it.
- You now have access to the crankshaft. The easiest way is to replace the connecting rod bearings. The old bearings are pulled out after unscrewing the head screws; it’s easy to put new ones in place, just don’t forget to lubricate them well with the same engine oil that is in your engine.
- It is more difficult to replace the main bearings without removing the engine. You will need to lower the crankshaft by loosening its fastening. You don’t need to lower it much, ten, maximum fifteen centimeters.
- Now it will be easier to pull out the earbuds. But you will need an aluminum rivet, which must be inserted into the lubrication hole, so it will push the bearing out. The main thing is that the size of the rivet is suitable and does not scratch the crankshaft.
Directory
Tags
Removing, replacing, installing anti-roll bar
Removing, replacing, installing timing belt
Removing, replacing, installing rear suspension shock absorber spring
Inspection, checking the steering
see also
Comments 22
In what cases do liners need to be changed? Otherwise, my hydraulics are knocking, the oil pressure on the hot 1.5 internal combustion engine in the service department says the liners are this true, can anyone tell me?
Well 1.5 is ok
What then could be the reason for the knocking of the hydraulics?
There are many options, from replacing the hydraulics themselves to replacing the head. Broken pastels for example.
Normally, all liners and half-rings are changed through a tray. Apart from that, you don’t need to remove anything. Just clean the oil pickup and change the rubber ring at the same time. With the connecting rods, everything is simple - unscrew the cap, replace it, screw it on with a speaker. With the indigenous ones, it’s more interesting - you unscrew all 5 covers, half of the inserts are in your hands, if not, then you pick them out with a thin screwdriver. Next, use the same screwdriver to push the second half of the insert and it crawls up the neck into your hands. Install the new ones in the reverse order - anoint them with oil, orient the antennae, apply them to the neck, and push them into place. So all 5, then screw the half rings and covers with a speaker. Look carefully which ones you put where - the grooves and holes on them. Don't even think about going there without a torque wrench! Place the lids only in their places and only the way they were! Good thing you need a new pan gasket and fresh oil. Out of hopelessness, they collected them from old ones. Look like that's it. Good luck!
Just don't necessarily unscrew all the caps at once. We changed one at a time, we just need to find something to use to pry out the top liner.
Functionality check
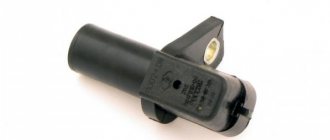
Don't rush to conclusions. You shouldn’t blame DPKV for all the troubles. Sometimes it turns out that the cause of the problem is completely different. Therefore, first you should check whether your DC is working or not.
There are several ways to check.
- Multimeter. Your task is to measure the coil resistance on the induction sensor. If it is working properly, then the indicator will be from 500 to 700 Ohms.
Multifunctional multimeter
- Set the measurement limit on the multimeter to 200 millivolts, connect the probes to the output and pass a metal object around the core several times. If the sensor is working, it will be able to detect this metal and a voltage spike will appear on the display. If there are no surges, the DC must be replaced.
- An oscilloscope. This verification method gives the most objective and accurate result, equal to almost 100%. Connect the device to the engine and read data in different modes. The engine will need to be started at different speeds - from 800 and above, up to 6 thousand. Look at the lines appearing on the screen. If they are of different lengths, you should look for the reason for the malfunction. Sometimes simple cleaning of dirt, checking the pulley for damage and other measures helps.