Replacing the sound signal on a Lada Vesta is a simple procedure that any owner should be able to perform. After all, driving without a properly working horn is a priori unsafe, and taking a car to a service station due to such a breakdown is an unreasonably large amount of time. However, replacement in the event of a malfunction is not the only need. Many people are simply not satisfied with the volume or tone of the sound signal, and they replace the standard Vesta components with alternative ones. Therefore, both of these paths need to be considered in more detail.
TO-1
Once the car has reached a mileage of 15 thousand km or is 1 year old, it is necessary to undergo a TO-1 in the service centers of official dealers with mandatory subsequent marks in the service book, which contains a list of all the work required to be performed, and the car owner only needs to control their actual completion and , depending on the degree of competence, quality. As mentioned above, the car owner first performs work according to the “zero maintenance” list.
The cost of TO-1 Lada Vesta, according to the manufacturer’s official website, is 5,200 rubles.
To assess the cost of this procedure, let’s compare this amount with the cost of servicing some foreign-made cars:
The acceptability of the cost of performing maintenance 1 on Lada Vesta is obvious. To get an idea of the scope of work, here is a brief description of it:
It is easy to see that the list of TO-1 works, taking into account the preliminary “zero” maintenance, includes all the necessary measures to identify a malfunction in a car approximately one year old.
FakeHeader
Comments 39
The lyres fit into the mounting sockets under the contacts - in the empty spaces where you want to install a relay or fuse. I'll draw a diagram later.
The relay has 4 contacts, divided into two pairs. The first pair is “low-current” - for closing and opening the relay. We connect the two wires that went to the signal (pins 85 and 86) in any order. The second pair is power, which will supply current to the signals. The wire from the ring terminal (with +) goes to the fuse contact (4.8 pin is inserted), from the fuse (4.8 pin is inserted) to the relay (4.8 pin is inserted) - any contact for relay 30 or 87, and from the remaining contact to the signal. The principle is that the wires are connected in pairs, two from the previous signal control the relay (85 and 86 on the relay). And the power wire from + to the fuse, from the fuse to the relay (let's say 30), and from the remaining (let's say 87) contact to the signal.
From the signal relay - wires to the relay control, plus from the red screw contact (on the right). The main principle.
I just don’t understand how the standard signal works without an additional relay and fuse? And why can’t you connect the Volgov signal to the standard translation and that’s it? The standard wire already has a plus. Why put a separate plus in the fuse box? Why do we need dances with a tambourine, relays, fuses, additional wiring, etc.?
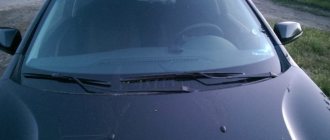
The standard signal on Vesta does not sound at all respectable. Therefore, I decided to change it to a signal from the Volga. It got much better!
It was once 9. On it I limited myself to installing Zhiguli pipes, the red ones. It seemed to be normal. Then there was 10ka. The VAZ tweeter was a little confusing. I went to the electricians, they blew Volga pipes at her. With relay, as expected. There was generally an atmosphere, but there were also problems. The relays and horns were located behind the radiator grille, the horns pointing downwards. The sound was good, but contact was often lost due to water getting on the relay and pipes. The result is oxidation of contacts. Sometimes I had to disassemble, clean, bend... Fortunately, the grille on 10k was removed with two bolts.
I bought Vesta.
And I was a little saddened by the fact that she signaled in a disgustingly squeaky voice, like Oka some kind of thread or shokha. I rode for six months and endured this matter. And he even seemed embarrassed to honk) To prevent accidents, he beeped, of course. But to acquaintances, for example, he only waved his hand). And I also noticed that I’m stopping by our market. Well, there we have a type of “center”, a wide area, parking lots, cars, a market and the main shops ala “Magnit”. And people walk along the road as they please. And then you’re driving after someone, he’s rushing along the road, you honk - zero emotions. Either he doesn’t hear, or he just doesn’t care...
So I bought everything I needed
. Signal from the Volga, two pipes, two tones - high and low) (s302d and s303d, applicability GAZ, PAZ), four-contact relay 75.3777-10 (with screw fastening) (also suitable, it seems, 904.3747-10) and block for it, wires, terminals, corrugation, mounted fuse 25A, heat-shrinkable tubes. I couldn’t find brackets for the pipes, I cut them out myself from several layers of galvanized steel from an old window sill. Everything cost me about 1,500 rubles, of which 1,000 and a few kopecks were the signals themselves.
Started to use chemicals
. First I removed the bumper. I already talked about this www.drive2.ru/l/465834215582205001/ I received this:
Now about the standard signal key
(on the steering wheel). I found on the Internet that it is a minus. On the standard signal tablet the plus is constant, and the minus is from the button. I checked. It's the other way around for me. The plus on the signal appears when the button is pressed. The plus on the standard one is a red wire with a white stripe. In general, I didn’t bother with the wiring, I took both the plus and minus from the standard signal, from the block, and to the light bulb, what exactly comes there. You can also connect a standard one, it will beep along with the Volgov ones, but I didn’t put on the block - it’s of little use. And I didn’t take it off - it’s hanging in reserve. If anything happens to the Volgov ones, I put on a block and the standard one works.
It was mandatory to remove the “-” terminal from the battery.
And he began to look for a place to listen. Found it, you can see it in the video. I liked the places behind the bumper, just below the headlights. Plus there are ready-made bolts for my brackets. It is not recommended to screw signals directly to the body. It will resonate and bounce into the body when the horn blows, so I had to make brackets. Cut it out and drilled holes. Everything is done by tweaking and tweaking)
I did the wiring according to my same diagram.
I cut in a fuse from the battery to the relay, attached the relay to the body (in any convenient place closer to the battery, so as not to pull the power wire too far), and the wires to the pipes themselves. I insulated everything and put on corrugation. I stupidly tied it to the standard signal block and insulated it, I forgot the warranty. Yes, and you can carefully “minus” the battery and...
That's all, good luck everyone. If you have any questions, ask me, I’ll help you in any way I can. Although I am not an auto electrician myself, I did it without any problems. Bye PS Comparison of signals at the end of the video. Regular, then Volgovsky.
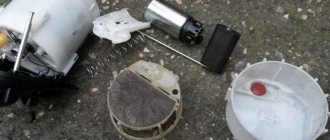
The Lada Vesta has two beeps. One signal is a warning signal, and the other is an alarm signal.
To replace or repair signals, you need to prepare the car for work.
Raise the hood and disconnect the negative terminal from the battery using a 10mm wrench.
In order to remove the signal signal, you need to remove the bumper, as described in the article “Removing and installing bumpers on a Lada Vesta car.”
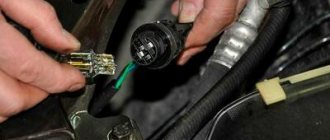
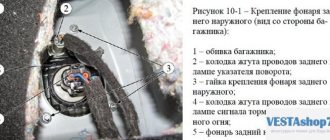
After this, disconnect block 1, Figure 1, of the front wiring harness from sound signal device 2.
Using a 13mm socket, unscrew nut 3 securing the sound warning device to the car body and remove the sound warning device.
Install the sound signal device in the reverse order of removal.
The tightening torque of nut 3, Figure 1, fastening the sound signal device is 20…30 Nm (2…3 kgf.m).
After repairing or replacing the signal, we install the front bumper.
Common results of TO-1 "Lada Vesta"
We list the common problems of the Lada Vesta that appear within a mileage of 15 thousand km:
- scratches on glass - if their configuration is not typical of traces of standard equipment, then they are not subject to warranty replacement;
- play in the lower ball joints;
- knocking of rear stabilizer struts;
- creaking of rubber bushings of stabilizers;
- chafing of the cooling system pipes both under the hood and in the cabin.
- corrosion and burnout of the resonator body;
- not working heated windshield;
- Corrosion of turn signal contacts in side mirrors.
- malfunctions in the multimedia system.
Having familiarized yourself with this list, it is advisable to “try on” these problems for your car before passing TO-1 and, if the assumption is confirmed, draw the attention of the service center workers to them, without relying on identifying faults without the participation of the car owner.
Basic signal malfunctions of the Lada Vesta car
On Vesta’s car the signal does not work due to the following three main faults. This could be due to wiring or vibration:
- A broken sound signal on Vesta is not good. Russian traffic regulations prohibit using a car with a faulty horn. The main symptoms of a part failure are: complete absence of sound and its activation without driver participation. The reason why the horn does not work may be high voltage.
- Vesta snails operate with 12V power. When an oxide film forms on the contacts, the wires can instantly burn out. This type of horn cannot be repaired. To protect it from damage, regularly lubricate the contacts with specialized products. Make sure that the composition contains mineral oils, thickeners and stabilizers. Products based on graphite and finely ground copper powder have good electrical conductivity.
- Vibration from the motor quickly wears out Vesta's sound device. The fuse is the first to suffer. If it burns out, the signal will stop working. Checking the fuse will show whether it is to blame for the problem or whether the electrical circuit has burned out. Both parts can be replaced. Before doing this, find the reason for their combustion so that the replacement does not wear out prematurely.
HOW TO INSTALL THE VOLGA SIGNAL
Remove the front bumper (instructions for XRAY, Vesta, Grant, Priora, Kalina, Largus). If it was decided not to remove the standard sound signal (if necessary, you can return to the initial version), then we are looking for a suitable place to install signals from the Volga. Most often they are placed on the front bumper amplifier (on standard mounting bolts), behind the radiator grille or under the headlights on brackets.
Articles about the Lada X Ray car family
Pneumatic signal
Initially, an electromagnetic horn is installed in the car. Such pipes consist of an electromagnet, a membrane and a core. The sound occurs when the core rod presses on the membrane. This type of horn is most often chosen by manufacturers: they have a simple design. They are divided into:
- Horns. Average sound quality. Outwardly they resemble a forge.
- Snails. Installed with the pipe facing forward. The design is not comfortable for installation; it is used in the production of Lada Vesta cars.
- Disks. Occupies minimal space. Easy to install.
- Pneumatic horns are louder than electromagnetic ones. Their volume reaches one hundred twenty-five decibels. The tonality of the pipe covers more frequencies. In order for the pneumatic signal to work stably, you will need a powerful compressor.
- Klaxons can consist of a large number of horns: up to five pieces. A programmable relay provides detailed melody customization. The resulting tone will be unique in its content.
- The music relay is used for entertainment vehicles only. Installing such a horn for driving around the city is prohibited by Russian law.
HOW TO CONNECT THE VOLGA SIGNAL
Standard sound signals of LADA cars consume no more than 5A, and Volga horns consume 7A each. In this regard, to connect them it is necessary to use a 4-pin relay. The Volga signal connection diagram is universal for all cars:
Before starting work, it is recommended to disconnect the negative terminal from the battery. All wires are laid in corrugation. We place the relay in a place protected from moisture and dirt. The whole process is also shown in the video:
About the guarantee. If you independently modify the car in terms of electrical components, there is a possibility of refusing warranty service for the car. Therefore, the installation of signals from Volga should be carried out at a service center, where after connection they will be ready to provide a document confirming the quality of work. You can also contact an authorized dealer for such modifications.
Any problem associated with a malfunction in electrical equipment should first be resolved by checking the fuses. They, together with the relay, are located in two mounting blocks, one of them is located in the passenger compartment, and the second in the engine compartment.
Below you can find a complete list of all fuses and relays for the Lada Vesta, regardless of configuration. In simpler configurations, some relays and fuses are simply not used.
Replacing the standard sound signal in case of breakdown
First you need to prepare the car for work by putting the parking brake on and turning off the ignition. Then you need to lift the hood and, armed with a “10” key, disconnect the negative terminal from the battery. Then you should dismantle the front bumper, which is best done with an assistant, so as not to damage the paintwork on the bumper itself and on the wings of Vesta.
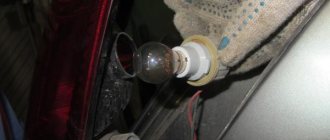
The figure shows the mounting location of the Vesta signal, its plug and the signal itself.
Once this is completed, all that remains is to disconnect the plug with the wires from the signal horn. Then you can dismantle the signal itself, the bracket of which is attached to the body with one nut. For dismantling you will need an extension, a wrench and a 13mm socket.
Removing and installing the front bumper requires an assistant.
Assembly is carried out in the reverse order - you need to secure the signal, inspect its operation, install the bumper with an assistant and tighten the terminal on the Vesta battery.
Mounting block Lada Vesta in the car interior
The location of this mounting block is quite familiar for most modern cars - near the driver’s left foot. In order to gain access to this unit, you need to unscrew the cover fastening handles, remove the lock on the upper right side of the cover and pull the cover down. The mounting block itself also has a cover that can be removed by disconnecting the upper holders.
Fuse box Lada Vesta in the engine compartment
Access to this block is even easier - just open the hood and open the block next to the battery.
Let us remind you that the maximum current on the fuse is determined according to the table below. The fuse number is indicated on the body of the mounting block, and the amperage of the fuse is indicated on its left side.
If, after replacing a failed fuse, it melts again, you must contact your dealer to eliminate the cause of the high current.
Manufacturers and prices of analogues
- Changing the signal on the West is easy. For convenience, it is recommended to remove the bumper. This way it will not interfere with connecting the wires. It is better to remove the bumper with the radiator.
- Remove the numbers and air receiver. The bumper is attached to the body with bolts in tens, twenties and thirty from below (four self-tapping screws). The bumper is secured at the edges with 20 screws (next to the wheels). Unscrew the remaining screws on top while holding the lid.
- Place the part on the floor, first laying it with a soft cloth. Do not place the bumper on the ground: small pebbles can scratch the paint.
It is not necessary to remove the standard Vesta horn. It can work together with the new one. This will increase energy consumption, so most car owners turn it off and leave it inactive in case the replacement breaks down. To connect it, it will be enough to connect the block.
Remove the negative terminal from the battery. Choose a location for new horns. They can be hung on old brackets from original Vesta parts. If the fasteners do not fit, buy new ones. It is better to inspect the fastenings before actual installation. Do not place the horn too close to the body. This will cause resonance: the wear of the part will increase, and the bell will be clearly audible in the cabin. Mark future holes for the brackets. Drill them. Screw the horns tightly. They should not dangle or shake when driving. Place the signal further from the bumper: moisture trapped in the membranes can short-circuit the contacts. If the installation is done correctly, you will not need to remove the bumper to remove the horns in the future.
The disk signal setting is different from the standard one. They can be mounted under the hood or placed next to the headlights. Connecting the signal to the wiring will be noticeably more difficult: it is important to insulate the wires well. They should not get wet. The horns located near the edge of the hood run the risk of burning out during rain.