One of the most important safety elements in a car is its braking system. The life and health of people, as well as the safety of the vehicle itself, depend on the quality of its work. The system's job is to effectively reduce the speed of the car after it accelerates. In this article we will talk about how to replace brake pads on a 2008 Toyota Corolla.
Every driver knows that it is the pads that perform direct braking. This occurs by pressing them against the brake disc of each wheel individually. Constant friction gradually destroys the working brake material of the pads and over time they become unusable, ceasing to perform their function efficiently.
Replacing brake pads on a 2008 Toyota Corolla
Home… Repair and maintenance
One of the most important safety elements in a car is its braking system. The life and health of people, as well as the safety of the vehicle itself, depend on the quality of its work.
The system's job is to effectively reduce the speed of the car after it accelerates.
In this article we will talk about how to replace brake pads on a 2008 Toyota Corolla.
Every driver knows that it is the pads that perform direct braking. This occurs by pressing them against the brake disc of each wheel individually. Constant friction gradually destroys the working brake material of the pads and over time they become unusable, ceasing to perform their function efficiently.
- 1 Which ones to choose?
- 2 Step-by-step instructions for replacing pads
Which ones to choose?
Today there are many different manufacturers. The highest quality pads are produced by Germany, France, Spain and Japan. In addition to the manufacturer, it is important to choose the right size pads for your wheel caliper.
Like any spare part, they are divided into: original and non-original. It's your choice here. The original lasts significantly longer than the non-original. The price of such pads is usually twice as high.
In general, as always, it’s up to you to decide whether to choose the quality or cost of the product.
Read: Replacing brake pads on Fielder.
Step-by-step instructions for replacing pads
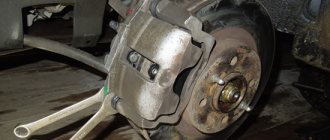
Before starting work, you need to prepare your workplace - this is necessary if you are afraid of getting dirty. We lay a blanket in front of the wheel and wash the disk. After this, you need to jack up the car on the side where we will change the block. We unscrew the wheel we need and begin direct work with the brake system.
First of all, we need to unscrew the bolt holding the caliper using a suitable wrench. The photo clearly shows the location of the bolt that needs to be tightened.
Having unscrewed the bolt holding the caliper, lift it up and, for ease of work, tie it to the body with wire. The photo shows how everything needs to be done.
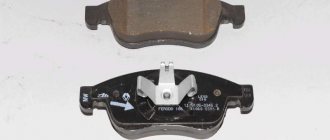
After this, you need to press in the brake piston. This must be done first of all to apply heat-resistant lubricant. For this we used a clamp. In the photo below everything is visible and clear.
After the piston has been pressed in, we need to press out the brackets with a screwdriver. We perform the following actions: press the bracket - pull the block towards you.
So we pulled her out. Let's pay attention to what it looks like and what components it consists of. The photographs will show the general view, as well as the disassembled block. Brackets will also be shown. The photos are signed.
Having disassembled it, let's see how worn it is. The block we pulled out could travel about another 20 thousand km. Below is a photo in which there are two of them - new and old.
After we have compared them, we take a new one, lubricate it with heat-resistant paste - exactly as shown in the picture, and also lubricate the cylinder and brackets.
We put everything back together and put everything in its place. We assemble the caliper and install the wheel in its place. Work with one wheel is finished - you can move on to the next one.
Next: Replacing brake pads on a Toyota Corolla.
Source: https://corollafan.ru/obsluzhivanie/zamena-tormoznyx-kolodok-tojota-korolla-2008.html
Background
It was late autumn, when it was already raining heavily.
After braking again at a traffic light, I noticed that a strange sound appeared on the left front wheel. The car began to accelerate a little worse, as if someone started pushing it from the front in the opposite direction.
Gas to the floor, then slam on the brakes, try to pick up speed again - the problem does not go away. Well, actually, it immediately became clear that the problem was in the brake pads.
After 5-7 minutes of driving, everything fell into place, and after 10 minutes, problems with acceleration began again. Moreover, if earlier it was still possible to somehow accelerate, now it feels like you are driving with the hood up and the hand brake up.
I slowly got home (fortunately, I work not far from home) and decided to immediately scour the Internet to find a solution to the problem. After 20 minutes of reading, my fears were completely confirmed - the brake pads need to be changed.
Do-it-yourself replacement of brake pads on a Toyota Corolla
When replacing a spare part such as brake pads on a Corolla, it is necessary to perform this manipulation on two wheels simultaneously. It is strictly not recommended to replace brake pads on only one wheel.
In addition, when carrying out repair work yourself, you should know that the dust formed as a result of work and wear of brake pads contains asbestos, which is hazardous to health, so you should not blow off such dust with compressed air, nor should you inhale it. So when working on the brakes you will need an air mask.
You will also need a special brake cleaner - gasoline-based solvents are not recommended.
Procedure for replacing brake pads
So, replacing brake pads on a Toyota Corolla should be done in the following sequence:
- you need to remove the brake fluid reservoir cap,
- Unscrew the wheel nuts, lift the front of the car and place it on supports. The rear wheels in this case must be blocked,
- the wheel should be removed. Since the brake pads on a Toyota Corolla should be replaced all at once, you will have to work with each wheel in turn so as not to confuse the parts,
- Also, pads and brake discs need a thorough visual inspection. If the surface of the disc is worn out, but not much, it can be treated, thereby extending its service life,
- the piston should be retracted deeper into the cylinder - this will make room for new brake pads. Use a clamp for this. After the piston is retracted, the level of brake fluid in the reservoir will increase. So you will have to make sure that there is no overflow. To protect yourself from this, you need to pump out some of the liquid from the tank using a clean syringe,
- The cost of brake pads depends primarily on the specific model you purchase. As for calipers, they can be of two types, the differences between which are in the installation of pins,
- The brakes will need to be cleaned before disassembly. However, this applies to all repair work without exception, including automatic transmission repair on Toyota,
- You should unscrew the bolts holding the caliper. There is no need to disconnect the brake hose - but only if no further replacement or repair of the caliper is expected,
- the caliper should be removed and hung on the suspension spring using a wire,
- you need to remove the upper and lower anti-noise springs,
- the spacers located on the inner and outer brake pads should be removed,
- The brake pad mounting plates must be removed. If a visual inspection reveals damage to the components, they must be replaced. Good records must snap into place. The wear indicator must also be replaced if it becomes deformed.
- Mounting pads, front brake pads and gaskets are installed. It is necessary to ensure that the springs are installed correctly on the pads. The same applies to the installation of such parts as rear brake pads - Toyota Corolla,
- a layer of high-temperature grease should be applied to the caliper pins, and then install it,
- Next comes the installation of the caliper. Its fastening bolts must be tightened in compliance with all technical requirements. As a rule, the tightening value is indicated in the technical operating conditions of the vehicle,
- problems may arise when installing the caliper brake pads. Sometimes this operation may require a C-clamp.
After the work on replacing the brake pads is completed, you need to depress the brake pedal several more times. This will allow for final installation of the brake pads. After this, you need to check the brake fluid level and top up if necessary.
After repair work, the functionality of the brake system should be checked. This is a very important step that must be completed before putting the vehicle into operation.
It is for such a check that they turn to authorized service centers, since they have all the necessary professional diagnostic equipment.
It is important to choose the right components. As you know, the best brake pads are original products. If you think that the cost of the original spare part is very high, then look for products from well-known companies operating under license.
You can also order the delivery of the required spare parts to the service station where you will carry out repairs. Naturally, specialists can not only replace brake pads, but also repair the steering rack.
In most cases, turning to specialists requires a lot of money, but it saves you time and nerves.
Replacing brake pads: video
Source: https://autoremka.ru/tormoznaya-sistema/zamena-tormoznyx-kolodok-tojota-korolla-svoimi-rukami.html
When to replace
Replacement is carried out as wear occurs: if the thickness of the lining has reached 2–3 mm or, in some cases, 5 mm. If this indicator decreases even more, then it is worth replacing worn parts. When worn, brake fluid consumption increases, but braking efficiency decreases.
Manufacturers of pads set the maximum possible service life, which is 40–60 thousand kilometers. But you should understand that wear depends on factors such as driving style, type of road surface, frequency of use of the car and even climatic conditions.
If the driver notices signs of deterioration in the braking function or noise in the wheel area, then it is necessary to urgently contact the service center https://diesel-remont78.ru. The company's specialists will carry out diagnostics and professionally replace pads or other components that have worn out.
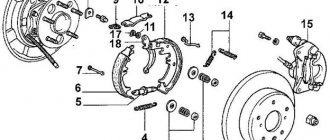
Replacing rear brake pads for Toyota Corolla
Replacing the rear pads on a Toyota Corolla is different in that such manipulation is done on 2 wheels at once. It is strongly not recommended to replace brake pads exclusively on one single wheel.
When carrying out repairs, it is important to consider that the dust that appears during wear and operation of the rear pads contains harmful asbestos. In this regard, blowing it off with compressed air is simply not acceptable, as is inhaling it. Therefore, when repairing Toyota Corolla brakes, you will need an anti-dust mask.
At the same time, you also need a special brake cleaner; using gasoline solvents is not recommended.
Pads are the most important element of the Toyota Corolla braking system. They guarantee a natural slowdown in the rotation of the braked wheel. This is typically accomplished by the brake hydraulic cylinder rod pressing the friction pad against the drum or disc cover.
Experts recommend changing the pads on Toyota Corolla at least 30 - 40 thousand kilometers traveled. To do this you will need the following devices:
- “balloon” key;
- metal brush;
- jack;
- mount;
- a set of standard heads (namely a 12-piece head with a knob).
Replacing rear pads on a Toyota Corolla is performed in the following order:
- Wheel bolts become loose.
- The car is raised using a jack.
- All bolts are unscrewed and the rear wheel is removed.
- Thanks to the 12-point head, the lower guide is unscrewed in the caliper. (To avoid unscrewing two thrusters at once, only the lower one is unscrewed. If you unscrew only the upper one, you will not be able to pull out the pads). The bracket is retracted to the top.
- While supporting it, the obsolete pads are carefully removed.
- They are cleaned of dirt thanks to a special brush. Next, the anti-squeak plates are removed from them. (Manufacturers recommend replacing plates on Toyota Corolla during each pad change. But since it is difficult to find them separately for purchase, you can also use outdated ones).
- The plates are installed on replaceable pads.
- Using a tool of suitable thickness (a simple pry bar will do, as it fits well into the bracket slot), the cylindrical brake rod is recessed. It is important to consider that when the cylindrical rods are recessed, the amount of brake fluid in the expansion tank increases slightly. Before installing other pads, it is necessary to clean the mounting points of its installation from corrosion deposits using a brush.
- Now you can install the pads.
- Then everything is assembled in reverse order.
Thus, replacing rear brake pads on a Toyota Corolla is not very difficult. But those who do not have time to do locksmith work and at the same time who take a responsible approach to Toyota maintenance are recommended to contact a car service center. There, replacement is carried out quickly and using branded spare parts and components.
Replacing the rear pads of a Toyota Corolla Link to main publication
Source: https://CorollaCar.ru/remont/tormoznaya-sistema/zamena-zadnix-kolodok-tojota-korolla.html
Replacing front and rear brake pads of Toyota Corolla
Replacing front and rear brake pads of Toyota Corolla
As soon as you purchase a car, it instantly becomes one with you. And at the slightest breakdown, you are already in a hurry to fix it.
But, alas, it is not always possible to fix a breakdown in the service due to high prices, especially recently, because some things need to be able to be replaced yourself.
For example, replacing brake pads in a reputable, or even the most ordinary, car service center will cost you a pretty penny, as they say, so it’s easier to learn how to change them yourself.
What are brake pads
Brake pads are a very important and necessary part in the braking system of a car; they provide the process of direct braking of the rotating braking wheel.
How does this happen? Braking is carried out by pressing the brake hydraulic cylinder of a car shoe with a torque rod to the surface of the disc or drum.
Throughout the entire period of operation of your iron friend, the friction layer on the pads tends to gradually wear out.
That is why it is necessary to replace the pads on the Corolla immediately after discovering a problem. This work may seem difficult or impossible to you, but it is not so, do not give up and everything will work out for you. Let's start by replacing the rear brake pads ourselves.
Replacing rear brake pads
To get started, prepare properly, you need:
- Jack
- Mount
- Balloon key
- Set of sockets for 12 with collar
- Brush
Now you just need to do the work sequentially:
- First you need to loosen the wheel nuts.
- Next, using a jack, we slowly lift the car.
- With light movements, unscrew absolutely all the nuts and calmly remove the wheel.
- Now we take a 12mm head with a knob and unscrew the lower guide in the caliper and very carefully move the bracket up. Be careful to unscrew only the lower one, and not both guides, and if you unscrew only the upper one, then you will not be able to remove the pads at all.
- We support it and carefully remove the old worn pads.
- Now we will need a metal brush; use it to clean the dirt from the pads and remove the “anti-scream” plates from them. Manufacturers of Toyota Corolla recommend changing them every time you replace brake pads, but if you do not find them on sale, since this is a rare occurrence, you can use old, but cleaned ones.
- We proceed to installing these plates on new purchased pads.
- Now let's start recessing the brake cylinder rod using either a pry bar or any other tool suitable for the slot of the bracket. Pay attention to the following detail! When recessing the brake pad rods, the brake fluid level can increase several times due to the expansion of the reservoir. Therefore, before installing new pads, use a brush to clean the seats for its installation from dirt and rust.
- Now you can do the long-awaited task - install the brake pads.
- After the final touch, all that remains is to assemble all the parts in reverse order.
After reading, you will notice that replacing brake pads on a Toyota Corolla yourself is not difficult. Even if you have problems with locksmithing, if you are diligent and thorough in your work, then your car will be fine.
Replacing front brake pads
In general, front pads wear out quickly due to their thickness; they can squeak when braking and lead to pad wear. To caliper the front pads you will need the following tools:
- 14 mm wrench
- Necessary tools for wheel removal (they have already been discussed above)
So, what does replacing the front brake pads entail:
- Place the car on a jack and remove the wheel.
- The next step is to use a 14mm wrench: take and unscrew the bolts (top and bottom) holding the pad caliper.
- Next, when the caliper no longer holds the bolts, you need to take it out and hang it so that the brake hose is not too tight.
- Finally, press down the upper spring and pull out the brake pads on both sides.
- The last step is to install the brake pads in reverse order.
Based on the foregoing, we can conclude that replacing the pads, both front and rear, is not difficult, the main thing is to be careful and consistent in your actions.
What problems might arise?
If you act strictly according to the instructions, then no nuances should arise. At least, it definitely didn’t happen to me. But, as practice shows, problems can still arise.
Most often, car enthusiasts face the following consequences after their work:
- brake pads are covered in grease:
- the brake disc overheats;
- there is uneven contact with the brake pad;
- there is a brake fluid leak;
- the brake system pipe is clogged;
- air gets into the brake system;
- rapid wear of the brake pedal return spring is observed;
- the return channel of the main brake cylinder is clogged;
- the correct operation of the pressure regulator, etc. is disrupted.
Moreover, often these problems can lead to re-jamming of the wheels, and subsequent replacement of the pads.
How to replace a Toyota Corolla brake disc: do-it-yourself repairs
The ninth generation sedan Toyota Corolla E120 series in a short period of time from 2000 to 2007 was able to become one of the most popular models ever produced by the Japanese company.
Affordable price, excellent driving performance and, most importantly, safety - all this was also appreciated by domestic motorists.
You can already buy the eleventh generation of Corolla in showrooms, but not everyone wants to part with the proven ninth generation cars.
During the entire period of operation of the 120 series, many car enthusiasts were able to master techniques for eliminating simple breakdowns, which do not happen very often, but, unfortunately, do occur. An operation such as replacing a Toyota Corolla brake disc does not pose any particular problems for a driver who knows how to use keys and is interested in the structure of the car.
General information about the Toyota Corolla brake system
The machine is equipped with a hydraulic dual-circuit system, which is divided into front and rear wheels. The main cylinder has two tanks that supply both circuits with liquid; if one of them fails, the second will work. Installed brakes vary and are divided into:
- front – disc;
- rear - drum-disc.
When should brake discs be replaced?
The timing of replacement can be determined while driving; they are expressed in the following signs:
- wheel runout;
- car leaving a straight path when braking;
- extraneous knocking or grinding noise.
The manufacturer recommends installing a new part after replacing the second set of pads. Despite this, you should still carry out a preventive inspection and measure the thickness of the unit so as not to miss replacing faulty Toyota Corolla brake discs and not get into a difficult situation on the road. The company determined the following indicators for these nodes :
- for rear TDs, the minimum thickness is 8 mm;
- for front TDs the minimum thickness is 23 mm.
Algorithm for replacing front brake discs of Toyota Corolla E120
To carry out the work you need to prepare the appropriate tool :
- a set of keys;
- jack and wheel wrench;
- stand;
- thrust shoes;
- special lubricant;
- wire.
Now you can proceed directly to the operation.
So, point by point:
- Pump out the fluid from the brake master cylinder reservoir.
- Secure the vehicle with shoes, jack up the desired side, install a stand and remove the wheel.
- Unscrew the lower caliper bolt, lift it up and tie it with wire.
- Remove the pads and unscrew the second caliper bolt and disconnect it from the bracket.
- Turn the steering wheel in the direction of work and unscrew the two bolts of the caliper bracket and remove it.
- Screw two M8 bolts into the special holes for dismantling until the disk is removed.
- Install a new disc and caliper bracket.
- Lubricate the guide bolt.
- Press in the piston of the brake cylinder and install the caliper.
When replacing brake discs on a Toyota Corolla, some drivers try to save money and not change the pads. This is an extremely frivolous act, because old pads have an uneven surface that matches the profile of the removed disc. Next, it’s easy to guess what will happen to the new part - it will also have uneven production.
Features of changing the rear discs of the Toyota Corolla brake system
This procedure is similar to that described above, with the exception of some points. Here they are:
- Release the handbrake.
- Before dismantling the disc, bring the handbrake pads together with a screwdriver.
- After replacing the pads, first spread them until there is no rotation, and then close them a little until they rotate freely.
After carrying out the work, it is necessary to fill in new fluid and bleed the hydraulic system. And remember, brakes need to be given special attention and kept in working order throughout their entire service life.
Source: https://autoclub.su/zamena-tormoznogo-diska-korola/