The middle-class Kia Spectra car was produced from 2000 to 2004 by the South Korean corporation Kia Motors. In Russia, the release was organized from 2004 to 2009.
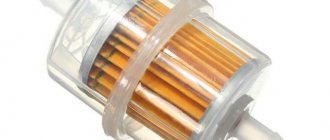
The fuel filter for Spectra is installed on the entire model range of cars and is the same. In addition to it, the fuel pump is also equipped with a coarse filter (mesh).
Filters are produced by Mann and YoungDong. Both factories are located in Korea (although Mann is a German company). The supplier of the Hyundai/Kia filter conveyor is Mobis.
Kia Spectra fuel filter - where it is located, features of choice
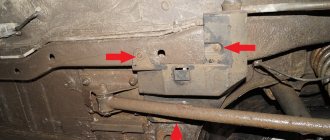
The fine fuel filter on the Kia Spectra is located under the bottom of the car on the right side in the direction of travel, in the area where the rear suspension linkage is attached to the body. The filter is sold separately from the fuel module. The article number of the original filter is 0K2AA20490, suitable for all Spectra 1 cars (installed on engines 1.5,1.6,1.8). There may also be a number with the letter S in front of the number. This number is for cars with post-warranty service and is of worse quality than the original. The fuel filter dimensions are shown in the table below:
| Fuel filter dimensions for Kia Spectra | |||
| Diameter, mm | Height, mm | Diameter of tubes (inlet, outlet), mm | Valve opening pressure, bar |
| 71 | 162 | 8 | 3 |
In order to replace the fuel filter, it is necessary to reduce the pressure to gain access to the fuel pump. The fuel pump on the Kia Spectra is located under the rear seat of the car in the fuel module along with a coarse mesh. In order to get to it, you need to remove the seat and unscrew several bolts on the metal cover.
The manufacturer does not assign an article number for the mesh filter, but car owners install the mesh from a VAZ 2110, 2112 car as an alternative. Its number is 2112-1139200. The article number of the original fuel pump is 0K2NC1335ZA. The fuel filter is also suitable for cars such as: Kia Sephia, Carens, Shuma, Sorento. And the fuel pump fits from a VAZ 2110.
| Analogues of the Kia Spectra fuel filter | ||
| Manufacturer | vendor code | Price, rub. |
| BIG Filter 3 | GB-3154 | 260 |
| Pmc (Parts Mall) 5 | PCB-015 | 300 |
| Mando | EFF00018T | 309 |
see also
Comments 27
Hello! Today I also replaced the fuel filter from the same brand as yours. Compared to the old one, the tips where the hoses are put on were painted black, although in the one removed from the same company they were not painted, because of this it was difficult to put the hoses on the new filter. I had to sand these places with sandpaper and wipe off the paint, then it became easier to put the hoses on the filter. At first the thought of a fake arose, but then I thought about what to produce and decided to save money by leaving the places where the hoses were put on painted. I ordered from Exist.
Did you pull the hose under the bottom too hard or something? Did it fly off your fuel pump? I understand that
It turns out that it was strong, although somehow I didn’t notice that I pulled it out
I saw everything :-) I don’t understand, did you take the original or the deputy?
quote from the text: I bought a new fuel filter BIG Filter GB-3154
(original filter article number 0K2AA20490).
I got it here: www.exist.ru/price.aspx?pcode=GB-3154
fuel filter code, please?
re-read the text again
Did the whistle go away from the noise of the fuel pump?
It didn’t disappear completely, but it became somewhat deaf and much quieter.
One of the important car maintenance activities is replacing the Kia Spectra fuel filter. This part, present on almost all modern cars, serves to remove small contaminants from the fuel and prevent them from entering the engine working space. During transportation, storage of gasoline and operation of the machine, pieces of the coating of tanks and gas tanks, sand and dust can get into the liquid and penetrate the fuel system. Over time, this can cause clogging of engine injectors, mixture delivery systems, and corrosion of some elements. This is especially true when using low-quality fuel. Such situations can lead to serious problems with the car and the need for repairs. Moreover, the failure of various systems develops quite slowly, which is difficult for a non-professional to notice. But all this can be prevented by promptly changing the filter element and using only high-quality substitutes or original parts for replacement.
When to change the fuel filter on a Kia Spectra
Experts recommend a replacement interval of 30 - 50 thousand kilometers, depending on the operating conditions of the vehicle. The more severe the conditions (warm dry climate, dust, city, country roads, regions with traditionally low fuel quality, etc.) the shorter the interval should be. It’s also a good idea to carry out a replacement after purchasing a car on the secondary market in order to protect yourself from possible troubles.
Replacing the fuel filter on a Kia Spectra yourself
The manufacturer (apparently focused on certain general statistical indicators) recommends performing the procedure at least once every 30,000 km.
– in practice, unfortunately, we have to resort to drastic measures much more often.
Replacing the Kia Spectra fuel filter. First of all, we will answer the pressing question of car enthusiasts who use this brand: how to determine the need for replacement. In other words, indicating that this manipulation cannot be done without?
The driver will feel this moment unambiguously (you just need to correctly correlate the signs): the car behaves inappropriately in motion, which manifests itself in jerking
– first in high gears, and then in low gears.
To ensure the first stage, it is necessary to install the machine on an inspection hole or lift.
Then we reduce the pressure in the power system:
- set the gear shift lever to neutral position;
apply the handbrake;
remove the rear seat cushion;
remove the hatch cover from the fuel tank;
disconnect the fuel pump wire block (by pressing the corresponding lock);
we start the engine. Its operation continues until the remaining fuel from the ramp is exhausted;
turn on the starter (for about 3 seconds). This will help equalize the pressure in the pipeline;
- We perform all the above steps in reverse order.
- set the gear shift lever to neutral position;
- apply the handbrake;
- remove the rear seat cushion;
- remove the hatch cover from the fuel tank;
- disconnect the fuel pump wire block (by pressing the corresponding lock);
- we start the engine. Its operation continues until the remaining fuel from the ramp is exhausted;
- turn on the starter (for about 3 seconds). This will help equalize the pressure in the pipeline;
- We perform all the above steps in reverse order.
The filter is removed after compressing the clamps and disconnecting the pipelines. Receiving the fuel filter before removing the clamp (it is necessary to unscrew the corresponding clamp bolt).
It is needless to mention that the operation is carried out with the utmost care; all actions to unscrew the bolts must be proportionate - in order to avoid breaking off the heads (deformation of the latter).
The new fuel filter is installed in exactly the same way - all operations are performed in reverse order. Here, special attention should be paid to the correct connection of the corresponding pipes.
Advice:
when removing the old fuel filter, you need to remember the connection diagram (if this is difficult, you can take a photo on your phone of all the actions, although it is almost impossible to make a mistake).
What should you pay attention to?
In the above manual, it is not without reason that increased attention is paid to reducing the pressure in the power system - without it, the operation is impossible: the design of the fuel circuit of this model is adapted to accept a new part only if installed at low pressure levels. Only in this case can you expect the unit to operate correctly.
For those who want to save time:
you can remove the fuse that controls the operation of the fuel pump and start the engine - after a few seconds it will stall, but the pressure will be reduced to the required level.
Article on the topic: “Why the fuel pump fuse blows.”
“Pumping” of the new filter is performed by briefly turning on the ignition. This simple process allows you to “include” a new part in the vehicle’s fuel supply system. The procedure should not be neglected.
As already mentioned, replacing the Kia Spectra fuel filter is a necessary procedure
. Even those who plan to use the car for a short time will not be able to avoid it. Therefore, it is necessary to study this manual seriously enough to avoid fatal mistakes.
The manufacturer (apparently focused on some general statistical indicators) recommends carrying out the procedure at least once every 30,000 km.
– in practice, unfortunately, we have to resort to drastic measures much more often.
Replacing the Kia Spectra fuel filter. First of all, we will answer the pressing question of car enthusiasts who use this brand: how to determine the need for replacement. In other words, symptoms that indicate that this manipulation cannot be avoided?
The driver will feel this moment unambiguously (you just need to correctly correlate the signs): the car behaves inappropriately in motion, which manifests itself in jerking
- first in high gears, and then in low gears.
Let's start replacing the filter
To ensure the first stage, it is necessary to install the machine on an inspection hole or lift.
Then we reduce the pressure in the power system:
Possible breakdowns and their causes
As practice has shown, in most cases, a car owner may encounter several specific breakdowns. If a motorist encounters a breakdown while replacing the filter, do not immediately panic. As a rule, these breakdowns are quite easily resolved. At the same time, the car owner will not need to spend large sums on repair work.
Breakdowns and ways to fix them:
- Breakage: often when removing the plug of the compartment with filter elements, the fasteners that hold this plug break. This breakdown occurs as a result of wear of the plastic. Solution: To solve this problem, you can resort to the following tricks: Replace the standard plastic cover of the cabin filter element with an analogue Albea 7082302, which is made of metal.
- Purchase a new reinforced plug from Mann Filter. Its difference is that the fasteners are made of metal.
As we have seen, in the Spectra model, a car owner may encounter only a few breakdowns, and even those are easily solvable.
In the end, I would like to note that despite a number of specific diseases of this model, it is still in demand. This is because this model is one of the easiest to maintain.
Changing manual transmission oil, replacing fuel filter — KIA Spectra, l., year on DRIVE2
It is not news to an experienced motorist that for the perfect operation of the car, it is important not only to control the oil in the engine, but also to systematically check and replace the lubricant in the structural components of the transmission.
In this article we will talk about the Kia Spectra, a popular car on domestic roads, specifically about models equipped with a manual transmission, the specifics of selection and frequency of replacement of the lubricant in the transmission.
We’ll also look at how to change the oil in a Kia Spectra manual transmission on your own, without spending money on expensive services from service center employees. Replacement frequency First of all, let's look at the question of how often the oil change procedure is necessary in Kia Spectra transmission units.
According to the manual from the vehicle manufacturer, the Kia Spectra manual transmission requires an oil change after every ninety thousand kilometers traveled by the car. According to the manufacturer's calculations, the time interval between these operations is about seven years.
In practice, this period differs significantly from the interval specified by the manufacturer, and there are specific reasons for this. The duration of effective lubrication service in transmission units is influenced by many factors, which include extreme operating conditions, with sudden changes in climatic conditions, traffic jams and traffic lights, aggressive driving style or poor-quality road surface. Under such conditions, transmission components are subjected to increased loads, as a result of which the lubricant quickly loses its anti-wear and protective qualities.
Based on this, it is important to carry out scheduled oil changes in manual transmissions more often in order to extend the service life of the vehicle. These criteria may indicate that the oil has become unusable, the sliding elements of the system have begun to rub against each other, and the occurrence of scuffing on structural parts is progressing, as a result of which irreversible damage to the gearbox is possible, requiring expensive repairs.
Only timely replacement of the oil with new, high-quality fluid in the transmission units will help prevent such consequences.
Experts recommend regular lubricant changes at least every twenty-five thousand kilometers. Checking the oil level Checking the oil level in the Kia Spectra manual transmission will not be difficult even for novice drivers, since the car is equipped with a standard dipstick.
If the car is used intensively, then the replacement period must be reduced to thousands of km. Thanks to this, the transmission will warm up and the lubricant will acquire a more liquid consistency, which will facilitate rapid leakage.
Specifics of changing the oil yourself in a Kia Spectra manual transmission
Draining of used lubricant is carried out in accordance with the following step-by-step instructions: Installing the car on an overpass or pit. Find the oil level dipstick and pull it out. Here it is: Why are there 2 letters w in the viscosity designation? I haven’t found a clear answer anywhere. Whether this oil is purely “winter”, which I doubt, or whether this is a viscosity designation according to some outdated standard.
And there is a second article. This oil has the word PRIME in its name and its viscosity is already written normally, without the two letters w. This oil costs 2 times more than the previous one, rubles per liter versus rubles.
We found the dipstick - take out what kind of oil to pour into the box of the Kia Spectra, and wipe it with a rag. Fill in new oil. In order to fill in new oil, you will need a funnel and some kind of flexible tube or hose with a diameter of no more than 12mm.
Kia Spectra what oil to fill in the engine
We insert the hose into the hole where the dipstick was and carefully pour the oil through the funnel. We plug the dipstick back. We see that the manual transmission oil level is in the middle of the mark on the dipstick. That's all.
Replacing the fuel filter on a Kia Spectra yourself
The manufacturer (apparently focused on certain general statistical indicators) recommends performing the procedure at least once every 30,000 km.
– in practice, unfortunately, we have to resort to drastic measures much more often.
Replacing the Kia Spectra fuel filter. First of all, we will answer the pressing question of car enthusiasts who use this brand: how to determine the need for replacement. In other words, indicating that this manipulation cannot be done without?
The driver will feel this moment unambiguously (you just need to correctly correlate the signs): the car behaves inappropriately in motion, which manifests itself in jerking
– first in high gears, and then in low gears.
To ensure the first stage, it is necessary to install the machine on an inspection hole or lift.
Then we reduce the pressure in the power system:
set the gear shift lever to neutral position;
apply the handbrake;
remove the rear seat cushion;
remove the hatch cover from the fuel tank;
disconnect the fuel pump wire block (by pressing the corresponding lock);
we start the engine. Its operation continues until the remaining fuel from the ramp is exhausted;
turn on the starter (for about 3 seconds). This will help equalize the pressure in the pipeline;
If the engine power drops, there is increased noise, or periodic “whining” noises are heard when the fuel pump is operating, then most likely the fuel pump has failed.
Pre-check the pressure in the fuel supply system in the following order:
– check the serviceability of the fuel pressure regulator (see “Fuel pressure regulator”);
– if in idling mode the pressure in the system is less than 265 kPa (2.65 kgf/m2), remove the pump and wash the fuel coarse filter mesh;
– if this does not help, replace the fine fuel filter.
If in this case the pressure does not increase, the fuel pump must be replaced.
You will need: an “8” wrench, a flat-blade screwdriver, pliers with thin jaws.
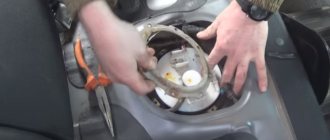
In the process of reducing the pressure in the power system, the hatch cover at the base of the body above the fuel pump was removed and the wiring harness block was disconnected from the fuel module.
1. Reduce the pressure in the fuel supply system (see “Reducing system pressure”).
2. Press the clamps and disconnect the supply pipes from the fuel module fittings.
3. . and fuel drainage.
This is where the fuel module mounting screws are located.
4. Remove the screws securing the fuel module.
5. . lift it up.
6. . and, tilting to the side, remove the fuel module by removing the fuel level sensor float from the hole in the fuel tank.
7. Using a screwdriver, press out the two plastic clips.
8. . and remove the fuel level sensor housing from the fuel module.
9. Use a screwdriver to press the latch and disconnect the fuel level sensor wiring harness block from the fuel module.
10. Remove the wires of the low fuel level warning light sensor from the holders on the end panel.
eleven. . and the side surfaces of the storage cup.
12. Overcoming the resistance of the clamps, disconnect the sensor for the warning lamp of the reserve fuel remaining from the body of the storage cup.
This is what the fuel level sensor looks like: 1 – float; 2 – sensor of the warning lamp for reserve fuel remaining; 3 – sensor rheostat.
13. Use a screwdriver to press out the fastening clamps of the storage cup.
14. . and take him aside.
15. Overcoming the resistance of the rubber sealing ring, remove the fuel pressure regulator.
16. Remove the rubber sealing ring from the pressure regulator. Carefully inspect the ring and if it is torn or compressed, replace it.
17. Remove the coarse fuel filter from the electric fuel pump, wash or replace the filter if it is dirty.
18. Disconnect the wiring harness block from the electric fuel pump.
19. Using a screwdriver, as shown in the photo, press out the plastic holders and remove the electric fuel pump from the fuel module.
20. Assemble and install the fuel module in the reverse order of disassembly and removal.
21. After installing the fuel module, start the engine and check the tightness of the connection to the pump of the fuel hoses.
If the engine power drops, there is increased noise, or periodic “whining” noises are heard when the fuel pump is operating, then most likely the fuel pump has failed.
Pre-check the pressure in the fuel supply system in the following order:
– check the serviceability of the fuel pressure regulator (see “Fuel pressure regulator”);
– if in idling mode the pressure in the system is less than 265 kPa (2.65 kgf/m2), remove the pump and wash the fuel coarse filter mesh;
– if this does not help, replace the fine fuel filter.
If in this case the pressure does not increase, the fuel pump must be replaced.
You will need: an “8” wrench, a flat-blade screwdriver, pliers with thin jaws.
In the process of reducing the pressure in the power system, the hatch cover at the base of the body above the fuel pump was removed and the wiring harness block was disconnected from the fuel module.
1. Reduce the pressure in the fuel supply system (see “Reducing system pressure”).
2. Press the clamps and disconnect the supply pipes from the fuel module fittings.
3. . and fuel drainage.
This is where the fuel module mounting screws are located.
4. Remove the screws securing the fuel module.
5. . lift it up.
6. . and, tilting to the side, remove the fuel module by removing the fuel level sensor float from the hole in the fuel tank.
7. Using a screwdriver, press out the two plastic clips.
8. . and remove the fuel level sensor housing from the fuel module.
9. Use a screwdriver to press the latch and disconnect the fuel level sensor wiring harness block from the fuel module.
10. Remove the wires of the low fuel level warning light sensor from the holders on the end panel.
eleven. . and the side surfaces of the storage cup.
12. Overcoming the resistance of the clamps, disconnect the sensor for the warning lamp of the reserve fuel remaining from the body of the storage cup.
This is what the fuel level sensor looks like: 1 – float; 2 – sensor of the warning lamp for reserve fuel remaining; 3 – sensor rheostat.
13. Use a screwdriver to press out the fastening clamps of the storage cup.
14. . and take him aside.
15. Overcoming the resistance of the rubber sealing ring, remove the fuel pressure regulator.
16. Remove the rubber sealing ring from the pressure regulator. Carefully inspect the ring and if it is torn or compressed, replace it.
17. Remove the coarse fuel filter from the electric fuel pump, wash or replace the filter if it is dirty.
18. Disconnect the wiring harness block from the electric fuel pump.
19. Using a screwdriver, as shown in the photo, press out the plastic holders and remove the electric fuel pump from the fuel module.
20. Assemble and install the fuel module in the reverse order of disassembly and removal.
21. After installing the fuel module, start the engine and check the tightness of the connection to the pump of the fuel hoses.
Changing manual transmission oil, replacing fuel filter — KIA Spectra, l., year on DRIVE2
It is not news to an experienced motorist that for the perfect operation of the car, it is important not only to control the oil in the engine, but also to systematically check and replace the lubricant in the structural components of the transmission.
In this article we will talk about the Kia Spectra, a popular car on domestic roads, specifically about models equipped with a manual transmission, the specifics of selection and frequency of replacement of the lubricant in the transmission.
We’ll also look at how to change the oil in a Kia Spectra manual transmission on your own, without spending money on expensive services from service center employees. Replacement frequency First of all, let's look at the question of how often the oil change procedure is necessary in Kia Spectra transmission units.
According to the manual from the vehicle manufacturer, the Kia Spectra manual transmission requires an oil change after every ninety thousand kilometers traveled by the car. According to the manufacturer's calculations, the time interval between these operations is about seven years.
In practice, this period differs significantly from the interval specified by the manufacturer, and there are specific reasons for this. The duration of effective lubrication service in transmission units is influenced by many factors, which include extreme operating conditions, with sudden changes in climatic conditions, traffic jams and traffic lights, aggressive driving style or poor-quality road surface. Under such conditions, transmission components are subjected to increased loads, as a result of which the lubricant quickly loses its anti-wear and protective qualities.
Based on this, it is important to carry out scheduled oil changes in manual transmissions more often in order to extend the service life of the vehicle. These criteria may indicate that the oil has become unusable, the sliding elements of the system have begun to rub against each other, and the occurrence of scuffing on structural parts is progressing, as a result of which irreversible damage to the gearbox is possible, requiring expensive repairs.
Only timely replacement of the oil with new, high-quality fluid in the transmission units will help prevent such consequences.
Experts recommend regular lubricant changes at least every twenty-five thousand kilometers. Checking the oil level Checking the oil level in the Kia Spectra manual transmission will not be difficult even for novice drivers, since the car is equipped with a standard dipstick.
If the car is used intensively, then the replacement period must be reduced to thousands of km. Thanks to this, the transmission will warm up and the lubricant will acquire a more liquid consistency, which will facilitate rapid leakage.
Specifics of changing the oil yourself in a Kia Spectra manual transmission
Draining of used lubricant is carried out in accordance with the following step-by-step instructions: Installing the car on an overpass or pit. Find the oil level dipstick and pull it out. Here it is: Why are there 2 letters w in the viscosity designation? I haven’t found a clear answer anywhere. Whether this oil is purely “winter”, which I doubt, or whether this is a viscosity designation according to some outdated standard.
And there is a second article. This oil has the word PRIME in its name and its viscosity is already written normally, without the two letters w. This oil costs 2 times more than the previous one, rubles per liter versus rubles.
We found the dipstick - take out what kind of oil to pour into the box of the Kia Spectra, and wipe it with a rag. Fill in new oil. In order to fill in new oil, you will need a funnel and some kind of flexible tube or hose with a diameter of no more than 12mm.
Kia Spectra what oil to fill in the engine
We insert the hose into the hole where the dipstick was and carefully pour the oil through the funnel. We plug the dipstick back. We see that the manual transmission oil level is in the middle of the mark on the dipstick. That's all.
Kia specialized service
The quality of Russian fuel continues to be unsatisfactory. This leads to the need to frequently monitor the condition of the fuel system, in particular the filter. Over the entire period of operation, the machine burns tens of tons of fuel. In order for the car engine to continue to work perfectly in different ranges, it is necessary to promptly replace the fuel filter. But, unfortunately, this procedure is not so easy to perform even by experienced car owners. Therefore, replacing the Kia Spectra fuel filter is a job for the service center.
Varieties
Despite the simplicity of this component, the market offers several types of products. The simplest and most affordable are dust models. They are most often made in the form of a frame in which strips of dense cellulose fibers are made in the form of an accordion. These filters perfectly capture small and large debris, dust, soot, rubber particles, pollen from plants and heavy volatile mixtures. In general, it is quite effective, so it is standard on most foreign cars.
If you need an increased level of filtration, you should take a closer look at carbon models. As a rule, they have a three-layer structure. The first layer traps large debris: leaves, plant seeds, and so on. The second layer fights microparticles of several micrometers. And the third layer is activated carbon. It neutralizes unpleasant odors and toxic substances, and also converts ozone into oxygen. Naturally, such models are more expensive due to the multilayer structure, but for allergy sufferers this is the best solution for protecting the interior.
Electrostatic models are rapidly gaining popularity. They are similar to carbon cabin filters, but the fibers are statically charged. This increases efficiency several times, because dust and other particles stick to the folds of the frame as if under the influence of a magnet. The only important criterion when purchasing a filter for the Kia Spectra is compatibility with the mounting socket. If the dimensions of the filter frame are smaller or larger than the mounting socket, then replacing the cabin filter in the Kia Spectra will not be possible.
Typical faults
In practice, a list of typical faults has been compiled that require a complete filter change.
- Failure of the water sensor. Failures can be electronic or mechanical.
- Broken spiral in the heating system due to problems in the vehicle's on-board electrical wiring.
- Natural clogging of the fine or coarse mesh package due to regular use of fuel of questionable quality.
- The appearance of traces of oxidation on the surface of the contacts responsible for heating the fuel before supply.
- Depressurization of the neck body designed to drain condensed water.
It is important to note that the filter housing cannot be disassembled. Therefore, if the above malfunctions occur, you will have to purchase a new part.
Replacement features
Despite the manufacturer's regulations, the driver needs to reduce the replacement interval. The reason is simple - low quality of fuel in general. Computer diagnostics are not required if the driver clearly understands that a lot of time has passed since the last replacement. Checking with a diagnostic scanner is suitable in situations where the owner notices problems during overclocking.
The fuel system must be under consistently high pressure so that the engine injectors receive a measured amount of fuel. After installation, it is important to ensure that there are no leaks or breakdowns.
DDCAR is ready to replace the fuel filter within the timeframe agreed upon jointly with the car owner. Original components from the catalog are available. After installation we provide an official guarantee. We consult clients over the phone, give useful advice, and answer general questions.
Why does the filter clog quickly?
You can extend the life of this part only if you find out what causes accelerated wear. The first and most important thing is low-quality fuel. In the hope of saving money, drivers buy gasoline or diesel at unknown gas stations or completely secondhand. Naturally, the fuel filter is responsible for your decisions.
The second problem is storing fuel in metal containers with rust. Almost every driver has an “emergency reserve” for an emergency. But over time, this fuel becomes contaminated, so it is recommended to make sure that there are no impurities or pieces of loose rust before use. Also, always keep an eye on the gas filler door. Most of the contaminants enter the fuel tank through it.