Comments: no Published: 12/30/2015
Rating:
Tags:VAZ 2110/2111/2112
If you are one of those drivers who have repeatedly thought about increasing the cargo-carrying capabilities of your vehicle, purchasing a trailer would be a great decision for you. But before you think about purchasing it, you must first install a towbar on the VAZ 2110/2112. You can do this yourself by carefully understanding all the intricacies of choosing and directly installing a traction device.
Tips for use
What facts should you know about towbars and VAZ cars:
- the model of the car in question, called 2110, is not designed to move heavy loads (houses, carriages with two axles), including other passenger cars;
- if you accidentally bought a towbar with an unsuitable socket (thirteen-pin instead of seven-pin), you can use an adapter;
- for the “ten”, a trailer is suitable, the load capacity of which does not exceed half a ton, therefore the towbar should be selected taking into account this safety margin of the vehicle;
- the holes in the purchased towbar may coincide with the technological holes in the car structure, then you will not have to drill them to secure the towbar beam to the VAZ;
- do not forget to cover the surfaces of the new metal device with a special car paint to match the car immediately after assembly.
It is not necessary to buy a more spacious car if your VAZ 2110 is not enough to accommodate all your things when traveling. Simply attach a lightweight trailer to your car using a towbar, which fully transmits all light signals to the trailer's headlights.
Connecting electrical wiring to the Lada Priora trailer hitch socket
The idea of attaching the trailer hitch and connecting the electrical wiring is extremely similar, no matter what type of body the tow bar is installed on. Priora hatchback, station wagon and sedan have similar rear headlight power supply circuits; some differences are associated only with the design of the car trunk. In order to get to the electrical wiring, it is enough to dismantle the decorative trim (in particular the strip in the corner of the trunk), under which the wiring harness going to the headlight is hidden.
All socket contacts are numbered. It is best to lay the electrical wiring under the bumper of the Lada Priora, for which it will have to be removed. Here's a little cheat sheet for connecting the wires in the harness to the tow bar:
- pink - dimensions (pins 5 and 7 on the socket);
- green/blue - left/right turn signals of Lada Priora (pins 1 and 4 in the socket, respectively);
- red (orange) - brake light (pin 6 of the socket);
- black, according to tradition, is ground (“minus”, contact 3);
- contact 2 sockets - optional, +12 V.
voice
Article rating
Electrical connection
After installing the towbar on the VAZ 2110 and attaching it to the body parts using the above method, you need to connect the towbar socket to duplicate important road signals behind the towbar during traffic and stopping the composite vehicle (car + trailer). In order to connect the wires correctly and safely, the car owner should always follow the diagram that comes with the factory-made tow bar. The towbar electrical socket on a VAZ suggests that it has seven places for connecting contacts.
After the wires from the car lights are threaded through the technological hole, which became accessible after removing the bumper, you can start connecting the corresponding wires. Connection diagram with decoding of the meaning of the signals and indicating the color of the wire:
- L — left turn signal, wire color — yellow.
- 54-G — rear fog light 12 V (this option may not be available), color — white.
- “31” – ground (earth, grounding, “—”, minus), wire color – black.
- R - right turn signal, wire color - green-yellow.
- 58 R - rear lights for illuminating the license plate, as well as the right side light, brown wire.
- “54” - stops (brake lights), red wire.
- 58 L - left side marker light, blue wire.
Requirements for the minimum thickness of each core, in square millimeters - from 1.5 mm 2, for the ground wire - from 2.5 mm 2.
Installation of trailer equipment
On the VAZ 2110, trailer equipment is installed relatively simply. We only need:
- Towbar.
- Drill.
- Special socket.
- Wires and hooks for connecting them.
So, as we can see from the list, we can understand that the installation process can be divided into mechanical and electrical stages. This is due to the fact that it is important to correctly install the towed equipment and prepare the trailer, taking into account the Road Traffic Regulations.
The trailer must be equipped with a light alarm that will indicate the further direction of the vehicle's movement. Without this, you cannot operate the car.
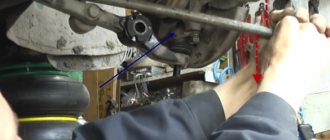
We will assume that you have a ready-made tow bar. For the VAZ 2110 it is quite possible to find a ready-made model that will be specially designed for it. We will need to attach the towbar to the subframe of the car and mark the places where we will then drill holes for fasteners. Next, we better remove the rear bumper. This is important, because the drill may come off, or we ourselves may accidentally lean on it and push through it. The bumper will cost a lot now, so we'll remove it as a precaution. After drilling the holes, we screw the trailer frame to the car. We're done with the mechanical part, let's move on to the electrical part. Here we will need to screw a special socket to the towbar and connect all the signal wires from the stops, turn signals and reverse signal to its connectors. Next, we need to route the wiring along the trailer and connect it to a socket, which, when connected to the socket, will provide duplication of signals from the rear of the car. The main thing here is that it is important not to confuse the connector and the corresponding plug plug so that everything is connected correctly.
How to make a tow bar yourself
If not a single factory towbar fits your VAZ, try making it yourself. To do this you need to prepare:
- square steel pipe (about 1 m in length);
- several sheets of steel of the same thickness (width - 7 cm, length - 20 and 30 cm) or shorter pieces of pipe;
- bolts (M 10 - 2 pcs., M 12 - 6 pcs.), four-centimeter screws with nuts;
- socket;
- file and sandpaper;
- a metal hook, preferably with the same ball (the latter is used as a cap, retainer or towbar plug);
- wires (cores), insulating tape;
- primer and paint.
If you need to make a tow bar for your VAZ yourself so that the product looks beautiful, you should stock up on ready-made drawings or draw at least a simple diagram on paper or in a computer program. The simplest version of a homemade towbar is a horizontal bar, to which a pipe with a hook is firmly attached in the middle. For greater strength, it is also advisable to make sidewalls that are installed strictly perpendicular to the main beam.
How to make a towbar yourself (the example is given for clarity, you can choose the towbar sizes that you like, the main thing is to maintain the proportions and check the preliminary calculations “in kind” several times, that is, by measuring the rear of the car):
- Remove all items and upholstery from the trunk, turn off the power to the car and remove the rear bumper.
- Using metalworking tools and a welding machine, make a shape out of a square pipe that slightly resembles a flattened letter “P” by welding to the main piece of the towbar pipe (length - 110 cm) on the sides two of the same pieces, but shorter (the length of each of the 2 - x side parts - 26 cm).
- Strengthen the weak points formed on the welds of the metal structure by welding or screwing the corners (the width and length of each of the two sides of the strengthening corners is about 12 cm, but the final number depends on the thickness of the piece of pipe you selected).
- Drill holes for mounting to the car frame (two on each side).
When performing metal work (cutting, drilling), do not forget to take safety measures appropriate to the tools used, and immediately process (clean) the edges of metal products with sharp “burrs”.
Take the hook and drill a hole in the middle of the structure that matches the base of the hook in shape and size. Weld or screw this part to the towbar being manufactured.
Lada Priora Hatchback › Logbook › Installing a tow bar
Since I decided that I needed a car for household needs as well, it would be very nice to get hold of a towbar. And I still plan to buy a trailer in the future. As usual, everything is simple: we come to the store and ask for a towbar. We leave about 3-3.5 thousand for it, pick it up, and leave.
The kit includes a rod with five mounting points, a hook with two mounting points, a mounting plate for the socket, a socket body, a socket terminal block, fasteners, and wiring. Connectors, bolts and nuts for securing the socket, and even a pair of nylon clamps (ties) were carefully placed with the wiring. What a sweetheart. The most important thing is the certificate. We, it seems, are making changes to the design of the car. Or not?
In principle, the installation diagram is clear and intuitive, but I checked the paper diagram, since I was working alone and had no one to consult with. So, that's the gist of it. We disassemble the spare tire niche, throw everything out of it, and pull out three plugs from the factory holes on top. Three short bolts will go through these holes. Naturally, self-locking nuts are screwed from below through wide washers.
In addition to the bolts, there are two more mounting points in the spare tire niche - on the sides through the side members. But here there are some nuances with the holes. If it is clear from below where to insert the bolts, then the hole at the top is not coaxial with the bottom one. And all because this is not the hole that is needed. So let's take a drill...
And we fuck from below, right through the desired hole. A hole for 12 is needed, but I didn’t have a drill for 12, so I modified the hole for 10 with a drilling machine. That's not for long. But according to the instructions, the bolt must go through the bushing. So, actually, you need to immediately drill a hole at 18. I didn’t install bushings. And, most likely, in vain. Since when tightening the bolt from below, I did not notice how the spar on top began to deform. There was no one from above to control, there was no one to advise. I was upset, but then I thought that this is not a Bugatti Veyron after all, so
In general, we twist long bolts through the side members, naturally, through wide washers and self-locking nuts.
Next, we screw the hook onto two long bolts, one of which also secures the mounting plate for the socket. That's all, let's move on to the electrics. I took up electrical work the next day, because, to be honest, I was afraid to take it on. I removed the bumper, just in case, and the decorative trunk trim. I found a factory wiring harness underneath. So I laid the towbar wiring along it, attaching it to it with zip ties. And the exit was made through a rubber plug that was located near the rear fog lamp. I first made a hole in the plug.
Well, then we lead the wire to the outlet. The main thing here is not to pinch the wire between the bumper and the towbar when you put the bumper in place, as happened to me at first. After that, all that remains is to cut into the wiring of the lights. Apparently, connectors were included for this purpose. But I remembered another method that my friend, an amateur electrician, showed me a long time ago. Using small male terminals, we connect the wires directly to the connector.
They sit there quite reliably, a short circuit is unlikely, and at the same time we do not touch the factory wiring at all.
Next, we assemble everything, remove the tool, put the head of a rubber doll on the ball of the hook and go to hook up the trailer to check how everything works. But, unfortunately, I don’t have the opportunity to check yet.
Oh, and I forgot to say that I cut the short bolts that secure the towbar through the spare tire niche flush with the nut so that they wouldn’t get caught anywhere, or anything.
Types of towbars
The VAZ 2110 is an ordinary medium-sized Russian-made car that can fully satisfy the needs of the average driver. It is quite powerful, economical and capacious, so that it can be comfortably transported from point A to point B. But we are interested in how the towbar will look on it, right?
In this regard, the car is simply impeccable: a powerful subframe and a fairly low plastic bumper allow you to freely install towed equipment on the car. At the same time, the hardness of the body and the appearance of the car will not be compromised. But more on that later, first we’ll figure out what kind of tow bar we’ll install on our VAZ 2110 car. There are several options for towed equipment in the world, their geographical distribution is such that a model found in one side of the world is not found at all in the other. So, in America, a model of towed equipment that looks like a square is widely found. Theirs can have different sizes, and the maximum carrying capacity of a car with a trailer directly depends on this.
Our tow bar has a slightly different look and its main part is the trailer ball, which acts as a connecting link between the trailer drawbar and the car. In this form, in most cases you can see towed equipment on cars.
Installation of towbar VAZ 2110 / 2112
How to install a tow bar on a VAZ
2110/
2112
: https://okuzove.ru/modifikacii/farkop-na-vaz-2110-2112-svoimi-rukami.html
.
The VAZ 2110 is also equipped with a tow bar of this type. Due to its ideal spherical shape, it became so widespread. After all, earlier, even on Soviet cars, the tow bar looked like a tow hook, and the trailer drawbar simply clung to it. Here everything is different: the trailer drawbar is put on the ball, and due to its perfect smoothness it slides over it. When the car moves, the trailer can move in the horizontal and vertical plane, without the car even feeling it. So, when turning, the trailer moves smoothly and continues the trajectory of the car.
Tow bar for VAZ 2110
DIY tow bar
Among drivers who travel long distances out of town, the question of how to make a tow hitch for a car with your own hands is a very pressing question. On sale you can find ready-made options for “classics” and new generation cars, but there is a category of car owners who prefer to make them themselves.
For a number of reasons, factory products do not always satisfy demanding users. Sometimes it is not possible to find a successful design, in some cases a person has his own ideas that he wants to bring to life, and some prefer to spend time and effort to avoid unnecessary financial expenses.
Installation
Installing a towbar yourself should not be too difficult for you. Although it is better to immediately enlist the help of an assistant, and also have a viewing hole at your disposal.
Prepare a set of tools necessary for the job, which includes:
- A drill on which you can adjust the speed;
- Kern;
- Knife;
- Screwdrivers;
- Drills with a diameter of 12.5, 13 and a countersink of 20 millimeters;
- Keys;
- Hammer;
- Insulation tape;
- Lubricant with anti-corrosion properties.
The installation procedure is as follows.
- Attach the towbar to its future location. Make two holes through the holes in the towbar mounting bracket.
- Using a countersink, all burrs from drilling are removed. Treat the surface with anti-corrosion lubricant so that the surfaces are pressed tightly against each other.
- The towbar amplifier must be secured with two bolts through the plate.
- We go to the next pair of holes in the bracket, through which the spar is drilled from below.
- A hole is drilled from the trunk towards it through the amplifier plate.
- This way the holes made will coincide and the bolts can be installed in them. Be sure to use washers.
- Now we tighten all four bolts that hold our tow bar in place. Remember to control the force, since over-tightening the fasteners will damage the metal of the spar. To improve the effect, take a short sleeve that is passed through the bolt in the spar. This will allow the metal of the body to press tightly against the ends of this bushing, thereby increasing the reliability of the fixation.
- In the area where you removed the bumper, there are three plugs. We pull out the middle one, and the freed hole is useful for starting the wiring to connect the trailer to the power supply.
- Additionally, make a hole in the inner panel so that the hole comes out to the left of the lock. Through these holes, wiring is carried out from the connector to the rear left light. Be sure to seal the wires.
- The connector must be fixed on the platform provided by the tow bar. Before connecting, do not forget to disconnect the negative cable from the battery.
- The connection is made according to the diagram, in accordance with the color of the wiring. The wires must be cut into the desired wiring, insulated and carefully laid in place.
If you correctly install and connect the towbar, you can increase the load-lifting capabilities of your VAZ 2110, use the car to transport your own belongings, or engage in transportation services. This is a completely worthy option for part-time work. Plus, you can always go out into nature with everything you need.
Remember to properly place cargo in the trailer. This should be done evenly, maintaining balance. Do not throw everything to one side so that sudden loads do not act on the towbar while driving. This may cause it to break.
Standard socket connection method
Before connecting the towbar socket, carefully study the vehicle wiring. The best installation method is to connect the socket to the rear light using plugs. Enough for 7 plugs:
- Weight (minus battery).
- Left turn signal.
- Right turn signal.
- Stop signal.
- Parking lights.
And a couple of spare ones wouldn't hurt. In the event of a breakdown, you can quickly transfer the wires from one contact to another. Carefully study the rear light diagram so as not to make mistakes during installation. And you will have to install other fuses. Standard ones installed on a car have a current reserve of about 25% - this is the normal value used in calculating electrical circuits.
As the load increases, the maximum permissible current becomes higher, so you need to replace several fuses, maintaining a margin of about 25%.
Installation
Installing a towbar yourself should not be too difficult for you. Although it is better to immediately enlist the help of an assistant, and also have a viewing hole at your disposal.
Prepare a set of tools necessary for the job, which includes:
- A drill on which you can adjust the speed;
- Kern;
- Knife;
- Screwdrivers;
- Drills with a diameter of 12.5, 13 and a countersink of 20 millimeters;
- Keys;
- Hammer;
- Insulation tape;
- Lubricant with anti-corrosion properties.
Before starting installation, remove the rear bumper and trim from the sill. This will make it more convenient to carry out work, marking, and installation. Plus, you don’t have to make additional holes in the bottom for wiring.
The installation procedure is as follows.
- Attach the towbar to its future location. Make two holes through the holes in the towbar mounting bracket.
- Using a countersink, all burrs from drilling are removed. Treat the surface with anti-corrosion lubricant so that the surfaces are pressed tightly against each other.
- The towbar amplifier must be secured with two bolts through the plate.
- We go to the next pair of holes in the bracket, through which the spar is drilled from below.
- A hole is drilled from the trunk towards it through the amplifier plate.
- This way the holes made will coincide and the bolts can be installed in them. Be sure to use washers.
- Now we tighten all four bolts that hold our tow bar in place. Remember to control the force, since over-tightening the fasteners will damage the metal of the spar. To improve the effect, take a short sleeve that is passed through the bolt in the spar. This will allow the metal of the body to press tightly against the ends of this bushing, thereby increasing the reliability of the fixation.
- In the area where you removed the bumper, there are three plugs. We pull out the middle one, and the freed hole is useful for starting the wiring to connect the trailer to the power supply.
- Additionally, make a hole in the inner panel so that the hole comes out to the left of the lock. Through these holes, wiring is carried out from the connector to the rear left light. Be sure to seal the wires.
- The connector must be fixed on the platform provided by the tow bar. Before connecting, do not forget to disconnect the negative cable from the battery.
- The connection is made according to the diagram, in accordance with the color of the wiring. The wires must be cut into the desired wiring, insulated and carefully laid in place.
If you correctly install and connect the towbar, you can increase the load-lifting capabilities of your VAZ 2110, use the car to transport your own belongings, or engage in transportation services. This is a completely worthy option for part-time work. Plus, you can always go out into nature with everything you need.
Remember to properly place cargo in the trailer. This should be done evenly, maintaining balance. Do not throw everything to one side so that sudden loads do not act on the towbar while driving. This may cause it to break.
The towbar on the VAZ 2110 is indispensable for those car owners who do not have enough trunk space to transport the necessary things. For this reason, a trailer hitch is installed to attach a trailer or carriage, a device for transporting other cars, to your vehicle.
Connecting the towbar socket to the car
Before connecting the towbar socket to the car, you need to make sure that its body, cover and plug are sealed. To do this, pour water over this part and see if there are any leaks. If the structure is not airtight, then the weak points will need to be treated with silicone after the final stage of installing the tow bar.
The outlet itself is connected in two ways:
- Standard. In this case, no changes are expected to the vehicle's electrical system. If the trailer and trailer hitch have the appropriate connectors, then a circuit for such a connection is not required - you just need to insert the socket into the socket.
- Universal. In the case when we are not talking about standard equipment, but about an additionally purchased towbar or trailer, a more complex connection is most often required.
If everything is clear with the standard version, then there are two options for connecting the tow bar to the car wiring using a universal method.
Option 1
This method is suitable for situations where the car does not have a modern control unit, which makes it possible to connect the wires directly to the electrical circuit. This means that the wiring coming from the connector is connected to the wires of the rear light elements.
To do this, you first need to refer to the trailer socket connection diagram, which can be found in the accompanying documents and instructions. Next, the socket itself is connected in the area where the car’s rear light harness block is located. Most often, in this place you can find a special technological window provided by manufacturers in order to simplify the procedure for replacing damaged light bulbs.
Healthy! In this case, you must have an extra wire for the second turn signal.
To connect the outlet this way, you can use crimp clips or simply strip the insulation from the wires, connect them and secure them by soldering. It is also worth considering that in order to connect everything correctly, it is better to arm yourself with a wiring diagram of the machine.
Option 2
If you are the owner of a modern foreign car, then most likely it has complex electronic components installed that will not allow you to connect the trailer using the first method. The fact is that the installed control unit constantly monitors the optics located in the rear of the car. As soon as more current consumption begins in this area, this will be perceived by the system as an error.
To avoid this problem, an additional element is used, which is called a matching block. This device is connected to the car’s standard electrical system, and it becomes a kind of intermediary, allowing the signal to be seamlessly transmitted to the light elements of the trailer.
Healthy! The control unit simply will not “see” the additional element, and accordingly the driver will not receive any error messages.
If you do not want to buy a matching unit, then you can use a little trick - use a relay. By and large, it will serve as a control element that supplies voltage to the side lights of the trailer. The relay can also be installed for brake lights and fog lights (if installed).
We recommend: Boosting the engine - the basics of boosting an internal combustion engine
Once you have connected the trailer and checked that all systems are working properly and the lights are on, be sure to protect the internal components from moisture. Silicone is used for “gaps”, and to protect the contacts from oxidation it is recommended to treat them with graphite lubricant.
Types of towbars for VAZ 2110/2112, advantages of use and differences in installation
Among the variety of towbar devices, that is, towing devices that can be installed on a VAZ model 2110, 2111 or 2112, several main groups can be distinguished: towbars, which can be installed in existing special holes on the car, manufactured by the factory - by the manufacturer, or done independently.
In this case, the first group includes those holes that are provided specifically for installing a traction device or those that were technologically conceived for other purposes, but were adapted for towbar installation by skillful car enthusiasts. Depending on the method of installation/removal of the traction device, the towbar for VAZ 2110, 2111, 2112 is a stationary (not removable) or removable device, monolithic or dismountable (parts are replaceable). Also, the differences between towbars concern their sizes.
Preparatory work
Take the necessary tools and materials:
- adjustable electric drill with drills;
- a set of keys;
- knife;
- punch for marking;
- hammer;
- a rag;
- anti-corrosion lubricant;
- insulating tape;
- reinforcement plates;
- bolts and nuts;
- self-tapping screws;
- washers.
Remove the rear bumper and trim. As practice shows, if you do not remove the bumper, in this case you will have to additionally drill the bottom to wire the trailer-device socket. It is also necessary to de-energize the vehicle by removing the terminal from the battery.
Installation technology
Instructions “How to install a tow bar on a VAZ 2110”:
- Attach the towbar to the lower rear of the car where it is intended to be attached.
- After the towbar for the VAZ 2110-2112 is firmly pressed to the body and centered, drill holes at the level of the finished holes in the upper brackets (you need to make all four upper holes - 12.5 and 13 mm on each side). After treating the notches at the drilling site, do not forget to coat the edges with an anti-corrosion agent.
- Insert the spacer bushings and, with a couple of movements, lightly screw the towbar onto the VAZ 2110/2111/2112.
- In the same way, you need to attach the towbar to the lower brackets to the side member. To do this, press the other two holes located on the tow bar in the middle of the mount to the desired location and drill through the spar from below. In this case, you first need to hold the drill from above, and after that you will also need to go from below, towards the inside of the trunk. Insert the bolts, but tighten them gradually, without applying excessive force, using bushings to avoid deformation of the side member being tightened during this process.
Recommendations for choosing a tow bar
Based on the experience of experienced motorists, the following can be noted:
- When choosing between a monolithic and collapsible trailer hitch, it is better to give preference to a solid one, so that you do not have to constantly monitor the fastening elements of the component parts. But when the welds wear out, the entire tow bar will have to be thrown out;
- It is better to choose towbars for the VAZ 2110/2112 with a removable ball to avoid injuries when approaching the trunk and excess dirt in the garage and clothes;
- if you have chosen a towbar whose ball cannot be removed, purchase a special protective cap for it at any auto store and protect your clothes from stains of dirt and grease;
- do not overload the car (VAZ-2110/2112 can tow a trailer with a total weight of up to 800 kg - with brakes or up to 400 kg - without brakes);
- Remember that a car trailer is a highly dangerous vehicle, so you should not skimp on a trailer for the VAZ 2110 and 2112.
Give preference exclusively to certified models that have passed all necessary tests
By spending about two hours of your time installing the purchased towbar, you will not only turn your car into a universal assistant, suitable for traveling from/to the dacha, large-scale outings for a picnic or fishing, transporting large loads, but also receive additional rear protection. bumpers when parking. The final step in transforming the car will be purchasing a trailer and preparing documents for it.
Step-by-step description of the work
✓ First you need to remove the bumper. ✓ Next – cut off the eyes. ✓ Here you need to take a drill and make holes.
✓ We take a welding machine and weld the fasteners. ✓ Now you need to weld the second tube in the center to make a right angle connection. ✓ You need to take a grinding wheel and coarse sandpaper and clean the seam and edges of the tubes. ✓ The manufactured structure is coated with a primer. ✓ Now the structure is covered with paint.
To strengthen the spar, we install a small angle with nuts. This will create a tow bar with a removable structure. You can use headlights to power the towbar, and use a connector to power the socket. Ready! Now you have a full-fledged homemade tow bar.
When making a homemade towbar, you need to try it on all the time, controlling where it is placed on the car.
How to install a tow bar on a Kalina 2 station wagon and hatchback with your own hands (photos and videos)
Is it easy to choose the right towing device for Kalina-2? Towbars designed for the VAZ-1118 (Kalina-1 station wagon) may not be suitable for station wagons of the second family. We will consider the reasons for this discrepancy further. In general, you can remember the rule: for the Kalina-2 station wagon, the Grants tow bar is suitable, and maybe some other one. There is a clear rule for hatchbacks as well. All towbars designed for Kalina-2 in a hatchback body repeat the design of devices suitable for the VAZ-1119 (hatchback of the first family). We also consider methods for installing towbars. Happy reading.
What exactly do you need to buy for a station wagon?
Let's turn to the official documentation, more precisely, to the catalog of assembly units. In this document, one of the drawings shows the body frame:
All parts, in addition to the 12th, make up the floor frame. A towbar must be attached to parts “14” and “3”, as well as to channel “13”. These parts are provided with holes (their total number is 6).
A universal tow bar will have 4 or 5 holes on the sides:
If the kit comes with threaded strips, then know that they will not be needed. The standard holes in the body are threaded from the factory. In conclusion, here is a photo illustrating all of the above:
When making your choice, do not make mistakes! You can take a ruler with you and measure the distance from the plane of the “ears” (see diagram above) to the first side hole. It should be exactly 145 mm.
Towbar for station wagons and its installation
Let's look at the installation procedure, following the standard instructions. Please note that all towbar mounting screws are metric and have a standard size of M10. You'll need a spanner, but that's not all. Considering the weight of the product, it is better to carry out installation by two people: one mechanic holds the towbar, the second tightens the screws.
First of all, before installation you need to find the standard threaded holes. Using a Phillips screwdriver, they are cleaned of anticorrosion.
The towbar assembly itself is placed under the body so as not to damage the muffler mount. Then, hand screw in the six bolts that should be included in the kit. Don't forget to install the washers supplied by the manufacturer.
Getting to the bolt heads will be difficult. Use a socket wrench to tighten all the screws last.
Depending on the qualifications of the installer, the entire installation operation takes 10-20 minutes. Additionally, you may need to connect an outlet that will power the trailer's electronics. Here it is better to contact an official dealer. You cannot connect the wiring yourself - this may void the warranty. We wish you success.
The result of all efforts may look like this:
What is shown here is not a station wagon, but a crossover, but the body of these cars differs little from the station wagon.
Purchase and installation of towbars on a hatchback
Here is a drawing of a coupling device designed for hatchbacks:
Here the fastening differs from that discussed above. For example, nothing is screwed to the side members. The towbar is attached to the rear channel, and three screws go through the holes in the niche. It, that is, the niche, is intended for a spare wheel, and the holes in it are closed with plugs.
So, we will be guided by the manufacturer's instructions. Installation is easier to perform by driving the car into a pit:
Anyone who decides to drill the rear channel will encounter difficulties: access to the nuts will be blocked by the bumper. This unit, that is, the rear bumper, will have to be dismantled. It makes sense to choose towbars that are secured with five bolts. Then, the bumper will remain in its rightful place.
Tips for choosing a towbar
As for the data related to trailers, the Kalina-2 hatchback is no different from the station wagon:
Based on these numbers, you need to choose a new tow bar. For most devices on the market and suitable for Kalina-2, the rated value is 900 kg. Here we are talking about the traction load, that is, the force applied in the horizontal plane. There is another important parameter - the load on the ball. Typically, for devices that can withstand 1000 kg of traction load, the ball load value is 75 kg. The force with which a trailer can push against a towbar is limited, and 75 kg is approximately 750 Newton.
The question is often asked what category of license is needed to drive a car with a trailer. The mass of the station wagon is 950 kg, and the trailer, as mentioned above, can weigh no more. Plus, the mass of the “hitch” will not exceed 3.6 tons. All together this will entail the following: the driver driving such a “hitch” only needs to have a category B license. This is true even if the trailer weighs 900 kg.
Selection and installation instructions for a towbar on a VAZ 2110
The towbar on the VAZ 2110 is indispensable for those car owners who do not have enough trunk space to transport the necessary things. For this reason, a trailer hitch is installed to attach a trailer or carriage, a device for transporting other cars, to your vehicle.
In this case, the first group includes those holes that are provided specifically for installing a traction device or those that were technologically conceived for other purposes, but were adapted for towbar installation by skillful car enthusiasts. Depending on the method of installation/removal of the traction device, the towbar for VAZ 2110, 2111, 2112 is a stationary (not removable) or removable device, monolithic or dismountable (parts are replaceable). Also, the differences between towbars concern their sizes.
Preparatory work
Take the necessary tools and materials:
- adjustable electric drill with drills,
- a set of keys,
- knife,
- punch for marking,
- hammer,
- rag,
- anti-corrosion lubricant,
- insulating tape,
- reinforcement plates,
- bolts and nuts,
- screws,
- washers.
Remove the rear bumper and trim. As practice shows, if you do not remove the bumper, in this case you will have to additionally drill the bottom to wire the trailer-device socket. It is also necessary to de-energize the vehicle by removing the terminal from the battery.
Installation technology
Instructions “How to install a tow bar on a VAZ 2110”:
- Attach the towbar to the lower rear of the car where it is intended to be attached.
- After the towbar for the VAZ 2110-2112 is firmly pressed to the body and centered, drill holes at the level of the finished holes in the upper brackets (you need to make all four upper holes - 12.5 and 13 mm on each side). After treating the notches at the drilling site, do not forget to coat the edges with an anti-corrosion agent.
- Insert the spacer bushings and, with a couple of movements, lightly screw the towbar onto the VAZ 2110/2111/2112.
- In the same way, you need to attach the towbar to the lower brackets to the side member. To do this, press the other two holes located on the tow bar in the middle of the mount to the desired location and drill through the spar from below. In this case, you first need to hold the drill from above, and after that you will also need to go from below, towards the inside of the trunk. Insert the bolts, but tighten them gradually, without applying excessive force, using bushings to avoid deformation of the side member being tightened during this process.
Installation of towbar (TSU) 2110
Continuation of the story on installing a towbar (tow hitch) on 2110. I will post it in the order of installation with explanatory photographs.
I'll tell you right away. I didn’t take the easy route, the “toad” wouldn’t let me in. I bought a used towbar from 2110 (the car was already halved). While they were removing it, all the bolts were torn off. I had to buy new ones. But the catch is that he was a hodgepodge of everything. The base is from the TSU 2110 (No. 1), and the hook is sawn off and a pedestal from the classic with a removable ball (No. 2) is welded. Only someone twisted the ball (lack of removability).
I found a removable hook. And the ball costs half the cost of a new tow bar, and it’s made to order. I sawed off the hook plates. I redid the pedestal of the classic and welded the hook without a plate exactly like that.
We welded the base of the socket (it was missing - the previous owner probably didn’t need the electrical wiring)
Painted it well, orange primer and black paint on it. It was a hot summer day and an hour later the leisurely installation began. There were holes for attaching the trailer hitch. As I wrote earlier, the car had owners before me. Someone put it on, someone took it off, and I have to put it on again.
The installation of the mechanical part has been completed. I drove like this for about half a month. But you can’t travel around the city without lighting. We need to install electrical wiring.
I found an acceptable scheme:
I found a 6-pin male-female connector to disconnect the trailer hitch wiring from the car's electrical wiring. I was on the safe side, so to speak. If I don’t use the trailer hitch for a long time, I turn it off. Placed it in the trunk, in the side niche.
I collected the wires of the required sections and measured them to the length required for connection.
Insulated with black electrical tape. Put on the silicone hose
And once again wrapped it in duct tape. Now it definitely won’t fray. It looks like a rod and doesn’t really bend. I crimped the wires with terminals and connected them to the car wiring in the rear lights.
I installed the socket in place. I ran the wiring from the trunk to the street. I connected the wires according to the diagram. And I’ll add a photo of the car to the finished result.
We checked. Everything is working.
Lada 2110 2003, petrol engine 1.5 l., 78 l. p., front-wheel drive, manual transmission - do it yourself
Cars for sale
Lada 2110, 2010
Lada 2110, 2005
Lada 2110, 2004
Lada 2110, 2007
Comments 7
now the towbar is prohibited
Half the country travels with him. Why the sudden ban? I'm interested in a specific document.
Here they are laid out))) If it protrudes from the car and you installed it yourself - a fine! If during an accident you first hit the tow bar and then hit the car - a violation of the factory design! Beauty!
There is only one way out - to make a removable trailer hitch hook, so that once the hook is removed, the rest of it is within the framework of the car.
Thank you for the article!
vitalik-volgjsky
For the VAZ 2110, the OTTS provides a towbar, which means this is not a change in the design! The factory provides for towing a trailer weighing up to 800 kg. This is not a change to the FACTORY INTENDED design. There are standard holes for the tow bar, which means it’s provided. You install a CERTIFIED towbar with a passport specifically for your model, in our case, VAZ 2110. You install it in a car service with a mark about the installation and the traffic police will not ask a question. Everything is standard, everything is provided for by design and everything is legal. There won't be any problems. Read more carefully and don't get caught up in the yellow press. Or, like me, find out the exact information at the traffic police department. The article you indicated contains a reference to 12.5 of the Administrative Code. RAVE! Code of Administrative Offenses of the Russian Federation Article 12.5. Driving a vehicle in the presence of malfunctions or conditions under which the operation of vehicles is prohibited, or a vehicle on which the identification sign “Disabled” is illegally installed. The towbar is not included in the list of malfunctions under which operation is prohibited, which once again proves that the article is specifically written for intimidation of the population. I drive with a tow bar and they don’t ask any questions))))
Who produces towbars for Priora?
Nowadays, stores selling spare parts for cars have a huge selection of towbars from various manufacturers. The most successful of them are towbars from the following, the city of Stupino.
"Leader PLUS", Taganrog. AvtoS, Kolomna.
There are also products in stores that cannot be identified, so to speak. Experience shows that it is better not to trust such homemade products. Their reliability is not confirmed by documents. From the above three manufacturers, you can choose any one. But the most popular among Russian car owners is the B-10 towbar from AvtoS.
How to install a tow bar on a Lada Priora with your own hands
As an additional equipment, LADA vehicles can be equipped with a towing device (trailer hitch or towbar). The towing device is designed for articulated coupling of a vehicle with a towed trailer. The design of LADA vehicles provides for the possibility of installing a trailer hitch without additional mechanical influences (drilling holes, welding) on the vehicle body. The following are instructions for installing and connecting a standard towbar on cars of the Lada Priora family.
For each LADA car model, several trailer hitch options are offered for installation, differing in design, but identical in the method of attachment to the car body.
The trailer hitch, regardless of the model and design of the device itself, is attached to the rear power elements (side members) of the car body.
Tightening torques for threaded connections
- M6 – 9.8 Nm (0.98 kgf/m);
- M8 – 24.0 Nm (2.4 kgf/m);
- M10 – 47.0 Nm (4.7 kgf/m);
- M12 – 81.0 Nm (8.1 kgf/m).
Required
- Towing device (without electrical wiring), article number 99999217007216, price about 4100 rubles.
- Electrical wiring kit for connecting the towbar socket, article number 99999000017182, price about 740 rubles.
Installation
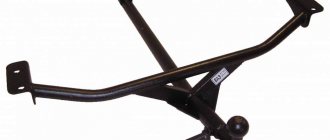
Figure 2-20 shows the main version of the trailer hitch installed on the LADA PRIORA
Figure 2-20 – Design and delivery set of LADA PRIORA trailer hitch: 1 – mounting plate; 2 – rod assembly with brackets; 3 – socket box; 4 – hook
In the right 2, Figure 2-21, and left 1 rear side member, drill out the technological hole 4 to a diameter of 23-25 mm (drill, drill bit).
Through the modified hole, insert the embedded strip from the delivery kit into the spar.
Align the threaded hole of the strip with the rear hole 3 in the spar, screw the bolt from the delivery kit into the strip 2-3 turns.