Xenon is an inert gas with the characteristic feature of becoming a powerful source of light radiation when an electric discharge is passed through it. Car head optics equipped with xenon lamps provide bright light, close in spectrum to daylight. High light output allows the driver to see the road well, resulting in less fatigue when traveling in the dark. You can connect xenon yourself.
Have you ever needed the help of a car lawyer?
Not really
How to choose a good xenon kit?
The selection of a suitable xenon lighting source for a car should be based on two factors: the popularity and reliability of the manufacturer and the required brightness of the lamps.
What should a xenon kit consist of?
The complete set of gas-discharge bulbs for headlights or fog lights includes:
- lighting sources designed for a certain power and with specific markings;
- ignition device;
- a set of wires and elements for connecting and fixing lamps.
The ignition unit is a module designed to supply a certain amount of voltage required for activation to light sources. More expensive units have a more complex design, which allows them to control a larger number of processes. If the device is of high quality, it will be able to ensure long-term and uninterrupted operation of the light elements. This is due to the fact that when igniting the lamps, the basic technical parameters are observed within the required range.
Xenon marking
The marking of gas-discharge devices can be 5000K, 6000K, etc. This parameter determines the color temperature, that is, the brightness and shade of the light bulb. If the device marking is 4300K, then the light will be whiter and have a yellowish tint. The use of such sources is relevant in PTF and head optics. They are more effective when driving on wet roads.
Devices rated at 5000K have a white emission color. Their power is higher, and the light itself is more pleasant to perceive by the human eye. 6000K bulbs have a blue tint and, as a result of their low light output, are inferior in power to previous options. However, this type of device is more popular among our compatriots. As standard, when producing cars, companies install xenon lamps rated at 4200-5000K.
The AvtoGSM channel in the video unpacked and made a brief overview of the xenon equipment from the manufacturer Show-Mi.
Which xenon is better?
It is not a fact that an expensive set of gas-discharge light bulbs will function efficiently and effectively
When purchasing an ignition unit, it is also recommended to pay attention to the cost
It is necessary to choose a device that matches the technical parameters of the machine. For example, if the car is not equipped with a module for monitoring the voltage of light bulbs, then it makes no sense to buy xenon with a “fake”. This will not affect the quality of his work in any way.
It is not advisable to purchase thin ignition units, called “slim”, if there is a lot of space in the engine compartment for installing a standard device. The cost of such “devices” is higher. And if the block is cheap, then, as a rule, it is made of low-quality materials, and the assembly also leaves much to be desired.
The most popular manufacturers of xenon lamps
Manufacturers of gas-discharge lighting sources that have positively proven themselves among consumers:
- Sho-Me (Show-Mi);
- Mitsumi;
- Xenotex;
- Osram;
- Hella;
- Philips;
- Bosh;
- APP Digital Ultra Slim.
The Test Lab channel talked about the nuances that will allow you to distinguish the original Osram xenon from a fake.
What light bulbs do experienced drivers recommend installing?
Important factors are cost, as well as the brand of specific equipment. If possible, you should not save money; it is recommended to purchase xenon/bi-xenon from well-established brands. The most well-known manufacturers in this segment of automotive equipment are:
- MTF-Light is a reliable brand from South Korea (you can purchase lamps with blocks, as well as bulbs from Philips);
- Sho-me is also a Korean manufacturer of budget xenon optics for a relatively low price;
- Matrix is a little-known manufacturer, the cost of products is slightly above average, the quality is at a fairly good level (Taiwan);
- IPF - according to consumer reviews, the company offers the highest quality xenon of all existing ones (Japan);
- Optima - offers high-quality lamps at low prices (China);
- Interpower is a Chinese manufacturer that produces a relatively high-quality product at a low cost.
Product examples (photo report)
Sho-me Optima MTF-Light Matrix IPF Interpower
The optimal solution is to purchase xenon or bi-xenon from the Japanese company IPF. At the same time, there are many budget alternatives. You should avoid purchasing “noname” (“gray”) products. This term means xenon (lamps, etc.) without brand designation, marking, or country of manufacture. Installation of non-standard lighting equipment may result in revocation of rights.
Example of step-by-step installation of bi-xenon lamps
Installing bi-xenon is most relevant for owners of old cars. The installation process on a Lada 2108 export 1.6i turbo is as follows.
- You should unpack the box and check that all the necessary components are present - usually a pair of lamps, two ignition units and connecting wires;
- In accordance with the connection diagram, it is necessary to connect the electrical wiring and the bi-xenon kit itself:
- brown wire - negative;
- white - near;
- blue - distant.
- The process of disassembling and assembling the headlight on the VAZ 2108 is standard - just unscrew the back cover counterclockwise;
- The final result of working with the headlights will look like this:
- The ignition units for the lamps themselves deserve special attention. Almost all bi-xenon kits today are equipped with special mounting brackets. In the center there is a hole for a self-tapping screw or bolt. On a VAZ 2108 they can simply be screwed to the body with ordinary metal screws. On the left side it looks like this:
- At the same time, on the right side everything is somewhat more complicated due to the location of the battery next to it (there is relatively little space). The easiest way is to first disconnect and remove the battery, and then fix the fastening of the ignition unit itself. Everything will look something like this:
- An example of what a bi-xenon installed at home looks like:
It is important to remember to fine-tune the type of lighting in question. If you do not have such experience, you should contact specialists at a car service center.
In most cases, the necessary actions are simply impossible to carry out without special measuring scales. If possible, you should carefully read the video before installation.
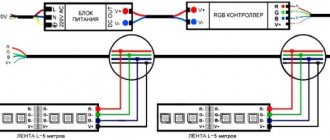
Bi-xenon connection diagram with a common relay for two lamps
Having such a kit, it is advisable to carry out the mechanical part of the installation process for both headlights at once.
Electrical work should be carried out in full accordance with the drawings developed for this option. Analyzing the connection diagram of this bi-xenon kit, it is easy to identify the main element - the common relay. This is where the electrification procedure should begin:
- secure the positive terminal to the battery;
- connect the three-pin connector to one of the standard power sockets for H4 halogen lamps;
- The 12 V voltage supply blocks coming from the relay are connected to the corresponding connectors on the ignition unit.
The following procedures are carried out in relation to each lamp:
- connecting high-voltage contacts coming from the ignition unit;
- connecting the screen position control connector output from the relay;
- securing the negative terminals to ensure the closure of the screen magnet control circuit.
How to install
If you purchased an incomplete kit for xenon light sources, you should postpone installation until you have purchased all the missing parts. For example, without auto-correction, the light spreads at the wrong angle to the roadway, which impairs visibility.
Rules for installing xenon headlights:
- Before work, check each element of the kit for damage. If there are chips or scratches, installation is not possible.
- It is recommended to carry out installation with dry and clean hands.
- Each connection must be isolated and hidden. They require reliable protection from moisture and mechanical stress.
- It is forbidden to look at the light of xenon lamps for a long time - this can damage your eyesight.
- Before installation, disconnect the wire from the positive terminal of the battery.
Before removing halogen lamps, you must remove the headlight protective cover, then disconnect the contact wires from the light source and pull it out.
Xenon installation procedure:
Carefully remove the new lamp from the protective bulb and insert it into the hole. You can't touch the flask itself
If there is a retaining spring that held the halogen light source, it must be pressed down. The wires from the headlight will be pulled through it and brought out into the engine compartment through a plug. Since this will be much easier to do from the battery side, it is better to remove it. After installing the lamp, connect it to the ignition unit. Creating holes in the headlight covers to route the wires through. They are made with a diameter of 25 mm. Select a place to install the ignition device. It is placed closer to the headlights so that the wires are taut. The installation location should be away from heat sources. Secure the block with screws or clamps. Connect the wiring from the xenon lamps and the unit. Each wire is painted a different color, so it is impossible to mix them up.
Installing bi-xenon headlights requires connecting a voltage controller. The element is connected to the power supply of the ignition unit.
Color palette
It is divided according to the warmth of the shades, the temperature of which is expressed in Kelvin:
- 3,500 K has the warmest shade (close to yellow), well suited for installation in fog lights.
- 4300K shines in a white-yellow color, which is the most sought after color because it gives the brightest impression. Automakers install lamps of this exact shade on the assembly line.
- 5,000 K is a neutral white shade.
- 6,000 K - white with a cool bluish tint.
- From 7,000 K and above - darker tones of the blue spectrum. Road visibility deteriorates, especially on wet asphalt.
Manufacturers of xenon lamps have different color palette standards. The same markings may have different colors. Which lamp is better is up to you to decide. Before purchasing a specific model, you should familiarize yourself with the actual color shade.
Equipment
The list of components included in the kit includes two light bulbs, ignition units, a pair of fuses, the necessary fasteners, a set of wires and an installation manual (connection diagram).
To avoid stumbling upon a fake, you should purchase a product with a factory warranty from the manufacturer. Original, high-quality and reliable kits will not be cheap, otherwise there is a high probability of breakdowns and failure of working elements.
Complete set of xenon pairs
The color temperature of the lamp is indicated by special markings. It characterizes the color of the headlight light and the level of brightness. For example:
- 4300K marking – white light with a slight yellow tint;
- 5000K – a shade close to white;
- 6000K – bluish tint.
Leading automobile companies produce cars with xenon lamps, the color temperature of which varies between 4300–6000K.
Color temperature of xenon lamps
Xenon connection technology
To implement xenon optics into the vehicle's on-board network, you will have to spend several hours. But if you carefully study the installation instructions, the installation time will be significantly reduced. In addition, this document usually includes a diagram for connecting xenon to a car.
- The work begins by removing the protective covers from the rear of the headlights (under the hood).
- Then the electrical wiring terminal is removed from the light bulb, the spring is pressed out and the halogen is removed.
- Similar preparatory work is carried out on fog lamps.
- Before installing new optics, it is better to do a fitting, and then mark the places where you will have to make additional holes.
- Using a drill or a screwdriver with a drill, holes are made through which the wiring will pass. But first, rubber seals in the form of a ring are placed in the holes.
- Xenon lamps are installed on the halogen lamp seats. The new lighting fixture must be securely mounted in the base. During the installation process, do not touch the lamp bulb with unprotected hands.
- When installing xenon devices of the D2R or D2S type, you will have to make additional holes in the protective caps to allow the electrical wire to pass through from the D2 unit.
- The ignition unit is installed in the most convenient place under the hood of the car. First, the wire coming from the light bulb is connected to the block. Using the second wire, the old connector and the ignition unit are connected. The motorist should make the connection so that the wires are not too tight. In this case, it will not be superfluous to look again at the electrical connection diagram.
- At this stage, you should check that the installation is correct. To do this, the car engine starts and the headlights turn on. If all the work is done correctly, the headlights will emit an even white-blue glow (there may be a different shade depending on the type of xenon purchased).
- After checking the functionality, the junctions of the wiring are wrapped with electrical tape, protective caps are installed, and the holes made are sealed with polyethylene or sealant.
Legal requirements
And what color should the glass be? On both headlights 1, such a contact is connected using a wire into a circuit, after which it is connected to ground or to metal parts of the car body by screwing it to the body with a bolt. Such areas can be identified by special plugs installed in the area of the front bumper. Fog lights on a car are designed to improve road illumination during fog, snowfall, and heavy rain.
Naturally, this does not affect the range of light in any way, but fog lights will be useful to get a complete picture of the condition of the road surface. They will simply create a white wall, and the brighter the light, the stronger that wall will be. Here you can see the wires that were installed at the factory; they are connected under a nut that can be opened with a key. To make the adjustment, you will need not only a flat surface, but also a place with a solid fence or wall in front of it. We screw the relay to the car body, under the same bolt we secure its mass, having previously cleared the contact area of paint: We connect the power wires to the fog lights, and also connect the ground next to the fog lamp in a convenient place, ensuring reliable contact with the car body: End result: Secure the fog lights You can do this by drilling a hole in the metal insert next to the bumper mounting bolt.
This way you will significantly increase the service life of your headlights and ensure their high safety when driving on rough terrain. They are laid along the left wing, from under the instrument panel, in the same way as the main wiring is laid.
Installing a new module
To carry out legal installation, it is better to purchase a good legal module and install it. For example, headlights from Hella promise to work well, but they must be of the second generation, they have wide lenses. Their designation is Lens G2, they are installed standard on the BMW E60, that is, the quality is excellent.
However, there are slight differences with those installed on the VAZ 2110, so they will need to be slightly modified.
You will need 2 pieces:
- Hella lenses;
- Ignitor;
- Ignition unit;
- Bi-xenon lamps.
The price of this kit, provided that used lenses are used, will be about 3,500 rubles.
Finalization and installation process:
- We change the seat intended for the standard Kirzhach module under Hella;
- We connect the wiring of the bi-xenon lamps to the standard one - everything here fits and matches;
- Install a new module;
- We fix the ignition unit in a way that is convenient for you (there is enough space).
What does a xenon lamp look like?
If you carefully read the previous paragraph, then from the last line you should partially understand the structure of xenon lamps.
Absolutely right, this is a small cylindrical glass flask with an electric tungsten or molybdenum incandescent arc inside, enveloped in a colorless xenon gas, which, with a strong discharge of current, transforms into the so-called “fourth” chemical state - into plasma, thereby causing a bright glow.
Being in a bulb under very high pressure, xenon lighting cannot use ordinary glass (it can easily burst), so such lamps use high-strength quartz glass, less often sapphire or transparent ceramic.
In fact, it is necessary to reveal a small chemical secret. In xenon lamps, the entire light beam is formed by sodium and scandium salts, and xenon itself is only needed to start the reaction and burn out the main elements.
Because of this, a more accurate and correct name for such lamps should be considered metal halide, but it just so happens that they are still called xenon. The power of xenon can vary significantly and starts from 2000 K to 5000 K, which affects the color shade of the glow (where K is the temperature in Kelvin).
In general, calmer and weaker lighting is used by car manufacturers for fog lamps, and completely white and bright lighting for headlights.
Complete set of xenon lamps
Typically, such automotive lighting devices are sold in sets, rather than individually, and are presented in a beautiful box containing:
- A pair of xenon lamps.
- Two blocks for igniting xenon, creating a power discharge of 25,000 V.
- Contact wires.
- Fastening means.
- Assembly and installation instructions.
Replacement and/or installation of xenon (with nuances)
Of course, professionals must replace and/or install such lamps, because there are certain GOST standards and markings (DC, DR, DCR), which not every motorist remembers or knows, and the service center issues certificates stating that the entire reinstallation took place according to the rules and meets standards.
But at their own peril and risk, some motorists still dare to change the lighting with their own hands, which is not always safe, at least from the point of view of the law. For example, the use of non-standard lighting devices in accordance with paragraphs 3 and 3.4 of the traffic rules entails a fine or even deprivation of a driver’s license for up to a year. You don’t need any special skills, and if you can change a regular halogen lamp, then you can install a xenon lamp - you just need to follow the instructions included in the instructions.
- Remove the terminals from the battery.
- Then pull out the headlight (first one, then the other).
- Take out the halogen lamp.
- The wires leading from the xenon lamp must be connected to the ignition unit.
- Attach the blocks themselves so that they do not touch the motor (preferably where moisture cannot reach them).
- Setting up your new xenon headlights.
By the way, this installation can also be carried out in the reversing headlights, so that when parking at night you can see everything as if it were during the day. Just remember that if your car is not designed to use xenon, then it is better not to risk your money or your driver's license.
Preparatory stage
A motorist should make changes to standard optics only after obtaining a basic understanding of the operation of lighting fixtures in a vehicle. And first of all, you should get acquainted with the fashionable devices called xenon. The name of modern popular optics comes from the name of an inert gas, which is easily found in the periodic table of Mendeleev. The lamp uses an inert gas called xenon, which begins to emit light when an electric current passes through it. In Russia, installing xenon yourself is not prohibited, unlike most European countries, where there are a number of restrictions on certain types of optics.
Among the special parameters of xenon, the following properties should be noted.
- Xenon is characterized by high lighting efficiency, so after one trip in a car with such optics, the motorist will not want to get behind the wheel of a car with conventional lighting devices.
- The high power of xenon lamps, when installed correctly, does not harm oncoming drivers. Xenon does not blind if the headlight angle corresponds to the factory settings. If you have headlight range control and cleaners with washer, the road will always be well lit.
- The service life of xenon devices is approximately 10 times longer than that of traditional halogen lamps.
Legal or not
We replaced halogen with xenon. How happy will the traffic police officers be with our know-how? In short, you won’t be happy. Neither the traffic police nor the drivers of oncoming vehicles. And if the former are simply punished, then with the latter everything is much worse - a collision with a blinded oncoming car will have the most dire consequences. And it’s good if it doesn’t come to that, and everything is limited to hitting the headlights with a pry bar.
And it will blind. No wonder this modification is called collective farm xenon. The fact is that xenon requires special headlights, and halogen headlights will not provide the necessary cut-off line and will shine anywhere.
As for the legality, I won’t say much, we’ll just open the Code of Administrative Offenses of the Russian Federation, Article 12.5 part 3:
Let’s open these “Basic Provisions”:
Well, the test, as they say, is in your head. Traffic regulations, “List of faults in which the operation of the vehicle is prohibited”, Chapter 3, paragraph 3.4.
Our bi-xenon falls under all of the above goodness. What is the penalty for this? No, just deprivation of the right to drive a vehicle for a period of 6-12 months. Well, the light bulbs will be taken away, and maybe the ignition units too.
So we figured out what bi-xenon is, how it works and how it differs from bi-xenon lenses. As for installation, it’s up to you to decide, but if the desire is not lost, then after reading the article, you can independently install and connect bi-xenon on your car.
Previous
XenonReview of D2R xenon lamps
Next
XenonDescription and review of D2S xenon ignition units
List of legally permitted headlights for installation
Xenon can be installed in those headlights that are equipped for this type of light source. You can't just install xenon headlights - it's illegal.
The legislation establishes the types of headlights in which xenon can be installed.
They carry special markings:
| DR and DC | means that the car has high and low beam headlights. Installation of xenon is allowed in any of them. Installation in both headlights is also allowed |
| DCR | This marking is found on cars that are equipped with one lamp that works for both low and high beam (so-called dual-mode headlights). Installation of xenon is not prohibited |
| HR and DC | The marking indicates that it is prohibited to install xenon in the high beam, but it is allowed in the low beam |
| HR and HC | This marking is found on the headlights of Japanese cars. In this case, xenon can be installed. If the marking is affixed to a car manufactured in another country, then only halogen headlights are allowed. |
You can remember an easier rule: if the letter D is on the label, then halogen is allowed. Vehicle registration certificate? In other cases, you will have to be content with a halogen or incandescent lamp.
You can obtain information about the possibility of installing xenon headlights from the manufacturer or an official dealer of the brand under which the car is manufactured.
Installation of gas-discharge headlights with the following markings is not allowed:
| HC and HR | means that only halogen lamps can be installed on the car |
| HCR | The marking indicates that the vehicle has one lamp for high and low beam. Xenon is prohibited in such cars |
| CR | cars that can only install incandescent lamps |
Other types of headlights are prohibited.
Many car owners believe that if xenon headlights were purchased from a prestigious company and not from the Chinese market, then their installation is legal.
In fact, the brand and model of xenon does not matter. The possibility of installing such headlights is provided by manufacturers, so any xenons, regardless of cost, are prohibited.
A selection for you!
Download forms and sample documents for motorists to a safe place.
How to adjust xenon headlights with your own hands?
After installing xenon headlights, they need to be adjusted. Then the bright light of gas-discharge lamps will not create discomfort for other drivers and will provide the best illumination of the road. To adjust the headlights you need to:
Select a flat wall and place the car so that the distance between the “screen” and the headlights is 5 m. Measure the distance from the centers of the car headlights to the ground and draw a horizontal line at that height (line 1). Step back 75 mm and draw another line parallel to it (line 2). Draw a vertical line, at the same distance from it, draw two more lines (A and B), indicating the centers of the headlights.
Turn on the headlights (adjustment is made in low beam mode). Cover one headlight with a piece of plywood and adjust the second, then vice versa. To adjust the headlights, the design provides adjusting screws with plastic heads.
To adjust the low beam of car headlights in the vertical plane, you need to tighten screw A, and in the horizontal plane - screw B.
The headlights are considered to be adjusted correctly if the upper boundaries of the light spots coincide with the bottom line, and the bend in the light beam occurs where the vertical line (A or B) passes.
Adjusting the fog lights is done in approximately the same way:
Place the machine at a distance of 5 m from a flat wall. Measure the distance from the centers of the fog lights to the ground and draw a horizontal line at the same height. Step back 50 mm and draw a line.
When you rotate the adjusting screws of the fog lights, the inclination of the light beams will change. Thus, you need to adjust first one and then the other headlight.
You need to ensure that the upper edges of the light spots coincide with the bottom line. In this position, the fog lights will be able to illuminate the roadside well, but will not dazzle other drivers.
Changing the technical characteristics of headlights
Discharge xenon lamps began to be used in automobile headlights in 1992. They have greater light output and lower energy consumption than halogen and incandescent lamps. However, due to the design features of xenon lamps, they cannot be used in headlights designed to install traditional types of lamps.
Therefore, the current legislation of the Russian Federation provides for administrative liability for the use of external lighting devices that do not meet the requirements for the design of the car.
Depending on the consequences of illegal use of xenon lamps, the car owner may also bear criminal liability.
Possible difficulties
Headlights designed to operate xenon lamps are marked with the letters DCDR or DCR. If gas-discharge lighting sources are installed in headlights that are not intended for them, difficulties may arise when traffic police officers stop the car.
Such actions are punishable by a fine or even deprivation of a driver's license. You can avoid administrative liability by installing washer nozzles and a light beam direction corrector on the head optics. It is best to install headlights with appropriate markings; in this case, the traffic inspector will not have a reason to draw up a protocol on the violation.
Xenon in a regular headlight unit
If you decide to install bi-xenon lamps in standard units, then proceed as follows:
- Getting the wires ready. Traditionally, plus is yellow, and minus is brown. We crimp two minuses, as well as two pluses, in turn, carefully insulating them;
- The holes for the lamps should be slightly processed with a file when trying on the lamps, so as not to overdo it;
- Install bi-xenon lamps;
- The wiring from the lamp should be routed into the protective cover. But for this you will need to drill a corresponding hole;
- Install and secure the headlight in the base without reversing the polarity;
- The ignition unit is connected according to the circuit that should come with the lamp;
- Reinstall the lights.
Now you can reconnect the battery and check how the new lighting works. Don't forget about adjustments!
Correction for reverse polarity
Reverse polarity of the base connection is implemented in many cars. The word “reverse” means that “plus” is applied to the common contact of the lamp (see figure).
The "reverse polarity" option is shown on the right
If the car uses reverse polarity, buy a universal bi-xenon kit:
Kit with two connection options
As you can see, the kit is equipped with an inverting jumper, as well as a control diode. When carrying out installation, follow the recommendations:
- If switching between modes does not work, change the polarity of the diode;
- If the switching does not work correctly, install a jumper.
No further explanation is required here. Happy installation!
What does the law say about gas discharge lamps?
HID lamps offer many benefits on the road. This is why replacing headlights with xenon ones is so attractive. What does the law say about changing car lighting equipment?
There are regulatory documents (GOST R 41.99-99, UNECE No. 99) regulating the use of gas-discharge lamps. They state that such devices can be used in headlights that were originally designed for this purpose. Such lighting devices are marked with the letter D. In all other cases, the installation of xenon is prohibited. Moreover, the lamps themselves must have certification allowing their use in the Russian Federation. To summarize, you need to list all the points that allow legal installation:
- Headlight markings.
- The optics must be equipped with an automatic corrector, allowing you to change the lighting angle depending on the vehicle load.
- Headlights must have washers.
If any point is not met, then installation is prohibited. To obtain permission, you need to contact the traffic police, undergo an examination, which will issue a conclusion on the possibility of installation, after which a mark about the conversion is placed in the vehicle passport.
General points
A feature of headlights with lenses is that the flow of light is “cut”, due to which the direction is adjusted.
The rays pass only along the horizon and are not transmitted vertically. The design of headlights with lenses consists of separate blocks. This:
- headlight itself;
- reflector;
- xenon lamp.
The lens is used to focus a beam of light directly onto the road, and this is its main function. Vehicle registration certificate? Using headlights without lenses is considered illegal.
To ensure that the beam of light is cut strictly vertically, special magnetic “curtains” are used. It is possible to install automatic headlight adjustment.
Initial data
Drivers resort to such tricks in order to improve the appearance of the car and its performance, or to achieve high-quality lighting.
Pros of using lensed headlights:
- increasing the factory characteristics of the vehicle;
- improving the appearance, “tuning” the car;
- high functionality and durability.
However, it should be noted that there are also disadvantages. Installing lenses with xenon lamps in artisanal conditions is considered illegal.
After the lamps are installed, they need to be adjusted correctly. You should entrust the work of installing headlights and lenses to an experienced car service technician.
Why is it installed?
Drivers resort to installing xenon lamps for several reasons:
| For vehicle tuning | Xenon headlights look beautiful, and when installing lenses you can get the effect of “angel eyes” - a rim of LEDs is installed around the lens. It should be noted that tuning is possible using halogen lamps |
| Improved luminous flux | Lenses can be installed together with xenon lamps. As a rule, installation is carried out at special repair stations that have a certificate. Xenon lamps are supplied complete with lenses |
| Factory settings and lamp replacement | On some car models, lenses with lamps are installed at the factory as standard. As a rule, these car models are very expensive, as is a separate package for them. Headlights in modern cars are separate computer systems that have many functions - turning lights, changing the angle of illumination |
The main reason why drivers resort to installing lamps is tuning and improving the appearance of the car.
However, if only tuning is required, you can install lenses on the car on halogen lamps. The luminous flux in this case does not improve.
Often, drivers install lenses with “angel eyes”. It should be borne in mind that lensed optics are not only a decoration for a car. It is necessary to install lamps with lenses to improve any characteristics.
Car service technicians offer a choice - installing lenses with halogen or xenon. The second option is the most preferable due to the fact that the glow of xenon lamps is stronger, especially if a headlight with a reflector is used.
In addition, factory cars most often have halogen lamps with lenses, which allows the light beams to be focused.
Installing lenses requires serious equipment. In addition to the lenses themselves, the headlight must contain sensors, the operation of which allows you to automatically adjust the angle of light.
This is a safety requirement, and violating it is comparable to violating the law and traffic rules. This equipment is very expensive, so it is used only in cars with the maximum configuration.
What is regulated
A traffic police officer has the right to remove such headlights, and the driver will have problems when passing a technical inspection.
To obtain permission to install headlights, you should contact a certified organization. Please note that you may need permission from the traffic police and a complete replacement of the headlights.
Regulatory acts:
- UNECE Regulation No. 99.
- Code of Administrative Offenses - Federal Law No. 195. Article 12.5.
- GOST standard R.41.99 - 99.
- Explanations of the Department for Road Safety dated February 20, 2010 “On the use of xenon headlights.”
These regulations are applied by both drivers and traffic police officers who check cars and seize headlights.
What happens if you don't pay the fine on time?
- Firstly, it is better to pay the fine within 20 days from the date of the relevant decision. This will help you save and get a 50% discount. This practice has been in effect in Russia for a long time, and encourages drivers to pay the fines imposed on them on time.
- Secondly, the fine must be paid within 60 days, this period also includes the time limit for appealing the decision.
If this requirement is not met, penalties will be tightened. To begin with, the size of the fine increases, and you will have to pay it double. If this measure does not work, the culprit may face:
- Administrative arrest for up to 15 days.
- Up to 50 hours of mandatory work.
The application of such sanctions does not relieve the need to repay existing debt. In addition, the law provides for forced collection, including at the expense of property owned by the debtor. An additional reason to pay fines on time is the fact that such debtors are not allowed to go abroad, which can ruin a long-planned vacation.
https://youtube.com/watch?v=fuY1AKhAYmo%3F
Design features of lamps
As already mentioned, the operating principle of the two devices (xenon and bi-xenon) is identical. And in both cases, the source of illumination is an inert gas. The only difference is in the design features and the ability of the bi-xenon to switch from low to high beam and back.
The intermediate output is as follows:
- Xenon is a device capable of providing only low beam lighting in headlights. Such products are installed in lanterns that have separate low and high beam systems. In such designs, the low beam is provided by Xenon, and the high beam by a halogen lamp;
- Bi-xenon, unlike its predecessor, is capable of operating in two modes - low and high beam.
Bixenon design may vary. In some devices, switching is carried out due to movable electrodes that move inside the bulb, and in others - using a special curtain (screen). In the latter case, the main operating element is an electromagnet that opens or closes the lamp lobes. Bi-xenon is great for cars that use combined lighting modes.
Field tests
Let's compare the stg of an LED lamp on low beam with the stg of a halogen lamp. We see that the stg is clear. If you look a little lower, you will notice that the LED lamp should better illuminate the near zone in front of the vehicle, however, this point is often a disadvantage of LED lamps, because the near zone is well illuminated, but nothing is visible in the distance, I’ll say more about it later. Let's also look at the high beams. Let me remind you that with this model of lamps the high beam can be directed a little higher or a little lower. I adjusted the lamp so that the high beam slightly overlapped the low beam line. And in the following pictures I showed how the previous model of the LED lamp shone (photo on the right). Both lamps have a clear STG, we don’t pay attention to the difference in the STG level, because When installing a new lamp, the headlight moves slightly. Let's direct the low beam into the distance. On the left is an LED lamp, on the right is a halogen lamp. The illumination of the near zone in front of the vehicle is not as pronounced as with most LED lamps. In the distance you can notice a slight dip in brightness, but in this case it is not so pronounced. As for the stg, it is at a high level, the brightness of the lamps is approximately the same. Now let's look at the high beam. I missed a bit with the halogen lamp, directed the light a little higher than it should have been, for which I apologize, but I think the picture is clear. Here you can clearly see that the LED lamp is brighter. Now let's compare the new LED lamp with its previous model. We see that they are almost identical in the low beam. Both types of lamps have a clear stg. In the high beam it seems that the new lamp is a little brighter, but the difference is not significant.
What is the difference between xenon and bi-xenon for cars
The main difference between xenon and bi-xenon is the operating mode. Xenon works only in one way - low beam, which is why it is not enough. This is especially noticeable when driving at night at high speed on a country road. Bi-xenon operates in two different modes: low beam and high beam.
Switching between low and high beam is carried out by changing the position of the arc. This is achieved by installing special movable electrodes in the lamp. They change their position on command given by a special regulatory component. The design of a xenon lamp involves fixing the arc. It is impossible to change the position.
When choosing between xenon and bi-xenon, the following points should be considered:
- difference in design;
- view of the headlights pre-installed in the vehicle.
In modern cars, bi-xenon is used more often
Vehicle headlights can be divided into two main types:
- when only one lamp is mounted, it operates in the near/far mode;
- Each glow mode has its own light source.
The fundamental difference between the installation process of Bixenon and Xenon lamps
For bi-xenon lamps, the connection diagram is a little more complicated due to the presence of an additional high beam mode. Since the latter is activated not by igniting the second filament, but by moving the metal screen, the lamp control algorithm is slightly adjusted by additional wiring (Note: you can read about the specifics of connecting Xenon lamps here).
Safety precautions when installing xenon
During the installation of xenon, some difficulties may arise, so you should be prepared for complications:
- Work must be stopped immediately in cases where there is obvious damage to lamps, ignition units or wires.
- Before installation, you must wash your hands thoroughly, because greasy, oily or wet fingers can not only render the lamps unusable, but also increase the risk of electric shock.
- All wire connections must be carefully insulated with high-quality electrical tape, because contact with water can lead to a fire.
- It is not recommended to look at working xenon headlights for a long time, as there is a possibility of damaging your eyesight. This can only be done with tinted glasses.
- Before installation, be sure to degrease the lamp bulbs using a cloth and alcohol.
As you can see, installing xenon is not such a difficult undertaking, and you can do it yourself. You just need to take this issue seriously and follow our recommendations step by step.
Preparing tools and materials for work
Before installing xenon on a car, the car enthusiast will have to collect a certain list of tools and materials. This set is easy to find among many motorists. To work you will need:
- purchased xenon kit;
- a pair of relay wires;
- screwdriver or electric drill;
- self-tapping screws with a diameter of 3.5 mm;
- drills for metal with a thickness of 3-3.2 mm;
- electrical tape, plastic clamps, sealant;
- plumbing tools (screwdriver, pliers, wire cutters).