One of the advantages of maximum unification of conveyor production is the similarity of maintenance procedures for different cars of the same manufacturer, down to the smallest detail. For example, having replaced the cabin filter on a Kia Rio of 2-3 generations yourself, you can find that it is changed in a similar way on other Kia passenger cars of the same class.
Considering that this procedure is more than simple, there is no need to resort to the help of a car service: you can simply change the cabin filter yourself even without any experience
Where is the cabin filter located in the Kia Rio?
The cabin filter is located in the Kia Rio, like in Sportage and Cerato, on the passenger side, behind the glove compartment. It is necessary to open the door; behind it there is an air duct outlet, onto which the cleaning element is attached. The air filter is located under the hood on the right side when facing the car.
You can also determine where the cabin filter is located on a gasoline Kia Rio using the technical manual that is included when purchasing the car.
Kia Rio X-Line service
The Kia Rio X Line is a sedan that has received a special off-road style, increased ground clearance and was specially adapted for Russia. Due to its increased off-road performance, the car is usually called a cross-hatchback. The car began to be produced at the Russian Hyundai plant in St. Petersburg. Compared to its predecessor, the Kia Rio, the X-Line has a higher ground clearance, slightly different dimensions (smaller length and slightly larger width) and a slightly changed appearance, mainly due to plastic body kits. The car is equipped with the same 1.4 and 1.6 liter engines, with a power of 100 and 123 horsepower. Maintenance of the Kia Rio X-line, respectively, takes place every 15,000 km or 1 year of car ownership.
List of works
TO-1 15,000 km (12 months)
At the first service of the Kia Rio X-line (which is TO-1, not to be confused with zero TO) it is necessary to replace:
- Engine oil and oil filter
- Cabin ventilation filter
And inspect the following components:
- Body paint and decorative elements
- Computer diagnostics of electronic systems
- Exterior lights and indicators
- Accumulator battery
- Drive belts
- Vacuum tubes and hoses
- Engine crankcase ventilation hoses
- Steering components
- Air conditioning system, compressor
- Engine cooling radiators, air conditioning
- Fastening components and assemblies to the body and suspension
- Front and rear suspension components
- Pipes, hoses and connections of the brake system
- Fuel lines, hoses and connections
- Wheel drive shafts, wheel bearings, CV joints
- Exhaust system
- Tires (not including spare tire)
- Disc brakes, discs and pads
- Engine Coolant
- Brake fluid
- Engine air filter
- Maintenance interval indicator, reset (if equipped)
Note: Mandatory inspection includes cleaning, adjustment and replacement if necessary.
TO-2 30,000 km (24 months)
During the second service, some additional items are added.
Replacement:
- Engine oil and oil filter
- Cabin ventilation filter
- Brake fluid
Inspection and testing:
- Body paint and decorative elements
- Computer diagnostics of electronic systems
- Exterior lights and indicators
- Accumulator battery
- Drive belts
- Vacuum tubes and hoses
- Engine crankcase ventilation hoses
- Steering components
- Air conditioning system, compressor
- Engine cooling radiators, air conditioning
- Fastening components and assemblies to the body and suspension
- Front and rear suspension components
- Pipes, hoses and connections of the brake system
- Fuel lines, hoses and connections
- Brake pedal
- Parking brake
- Fuel tank ventilation system and filler cap
- Drum brakes, drums and shoes (if equipped)
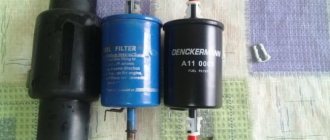
- Fuel filter
- Air filter for fuel tank ventilation system (if equipped)
- Automatic transmission fluid
- Wheel drive shafts, wheel bearings, CV joints
- Exhaust system
- Tires (not including spare tire)
- Disc brakes, discs and pads
- Engine Coolant
- Brake fluid
- Engine air filter
- Maintenance interval indicator, reset (if equipped)
TO-3 45,000 km (36 months)
Replacement:
- Engine oil and oil filter
- Engine air filter
- Cabin ventilation filter
- Battery "ERA-GLONASS" (if necessary)
Inspection, adjustment and testing:
- Body paint and decorative elements
- Computer diagnostics of electronic systems
- Exterior lights and indicators
- Accumulator battery
- Drive belts
- Vacuum tubes and hoses
- Engine crankcase ventilation hoses
- Steering components
- Air conditioning system, compressor
- Engine cooling radiators, air conditioning
- Fastening components and assemblies to the body and suspension
- Front and rear suspension components
- Pipes, hoses and connections of the brake system
- Fuel lines, hoses and connections
- Wheel drive shafts, wheel bearings, CV joints
- Exhaust system
- Tires (not including spare tire)
- Disc brakes, discs and pads
- Engine Coolant
- Brake fluid
- Maintenance interval indicator, reset (if equipped)
TO-4 60,000 km (48 months)
The fourth thing on X-line is more extensive for checks, but not for replacements
Replacement:
- Fuel filter
- Air filter for fuel tank ventilation system (if equipped)
- Brake fluid
- Engine oil and oil filter
- Cabin ventilation filter
Check and inspect the following items:
- Body paint and decorative elements
- Computer diagnostics of electronic systems
- Exterior lights and indicators
- Accumulator battery
- Drive belts
- Vacuum tubes and hoses
- Engine crankcase ventilation hoses
- Steering components
- Brake pedal
- Parking brake
- Air conditioning system, compressor
- Engine cooling radiators, air conditioning
- Fuel tank ventilation system and filler cap
- Fastening components and assemblies to the body and suspension
- Front and rear suspension components
- Pipes, hoses and connections of the brake system
- Fuel lines, hoses and connections
- Wheel drive shafts, wheel bearings, CV joints
- Exhaust system
- Tires (not including spare tire)
- Disc brakes, discs and pads
- Drum brakes, drums and shoes (if equipped)
- Engine Coolant
- Automatic transmission fluid
- Engine air filter
- Maintenance interval indicator, reset (if equipped)
TO-5 75,000 km (60 months)
Replacement:
- Engine oil and oil filter
- Cabin ventilation filter
Inspection and testing:
- Body paint and decorative elements
- Computer diagnostics of electronic systems
- Exterior lights and indicators
- Accumulator battery
- Drive belts
- Vacuum tubes and hoses
- Engine crankcase ventilation hoses
- Steering components
- Air conditioning system, compressor
- Engine cooling radiators, air conditioning
- Fastening components and assemblies to the body and suspension
- Front and rear suspension components
- Pipes, hoses and connections of the brake system
- Fuel lines, hoses and connections
- Wheel drive shafts, wheel bearings, CV joints
- Exhaust system
- Tires (not including spare tire)
- Disc brakes, discs and pads
- Engine Coolant
- Brake fluid
- Engine air filter
- Maintenance interval indicator, reset (if equipped)
TO-6 90,000 km (72 months)
Replacement:
- Brake fluid
- Automatic transmission fluid
- Engine oil and oil filter
- Engine air filter
- Cabin ventilation filter
- Battery "ERA-GLONASS" (if necessary)
Inspection and testing:
- Body paint and decorative elements
- Computer diagnostics of electronic systems
- Exterior lights and indicators
- Accumulator battery
- Drive belts
- Vacuum tubes and hoses
- Engine crankcase ventilation hoses
- Steering components
- Brake pedal
- Parking brake
- Air conditioning system, compressor
- Engine cooling radiators, air conditioning
- Fuel tank ventilation system and filler cap
- Fastening components and assemblies to the body and suspension
- Front and rear suspension components
- Pipes, hoses and connections of the brake system
- Fuel lines, hoses and connections
- Wheel drive shafts, wheel bearings, CV joints
- Exhaust system
- Tires (not including spare tire)
- Disc brakes, discs and pads
- Drum brakes, drums and shoes (if equipped)
- Fuel filter
- Air filter for fuel tank ventilation system (if equipped)
- Engine Coolant
- Maintenance interval indicator, reset (if equipped)
TO-7 105,000 km (84 months)
- Engine oil and oil filter
- Cabin ventilation filter
Examination:
- Body paint and decorative elements
- Computer diagnostics of electronic systems
- Exterior lights and indicators
- Accumulator battery
- Drive belts
- Vacuum tubes and hoses
- Engine crankcase ventilation hoses
- Steering components
- Air conditioning system, compressor
- Engine cooling radiators, air conditioning
- Fastening components and assemblies to the body and suspension
- Front and rear suspension components
- Pipes, hoses and connections of the brake system
- Fuel lines, hoses and connections
- Wheel drive shafts, wheel bearings, CV joints
- Exhaust system
- Tires (not including spare tire)
- Disc brakes, discs and pads
- Engine Coolant
- Brake fluid
- Engine air filter
- Maintenance interval indicator, reset (if equipped)
What types of cabin filters are there for Kia Rio?
In total, two types of cleaning elements can be distinguished:
- For rough cleaning – designed to block coarse dust and dirt. Apart from the price advantage, it has such disadvantages as short service life and fragility.
- For fine cleaning – blocks the smallest particles, prevents the penetration of external odors into the car. Made from synthetic materials.
There are also regular and carbon filters. The latter trap particles of harmful substances more efficiently.
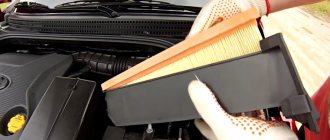
How to replace the cabin filter element of a Kia Rio with your own hands?
The cabin filter is designed to clean the air that enters the cabin through the air intake openings from the street. The task is extremely relevant if you live in a large city. The concentration of exhaust gases on the road is high, and even with the windows closed, a huge amount of harmful substances enters the car. Air from the road contains a lot of substances hazardous to health:
- tire dust;
- small rubber particles;
- asbestos from brake pads;
- bacteria, viruses and plant spores.
If we talk specifically about the exhaust gas from a car, it includes more than 200 different toxic substances. These are oxides of carbon, sulfur and nitrogen, compounds of heavy metals, soot, hydrogen fluoride and much more. Even for a completely healthy person, a high concentration of exhaust gases is dangerous, but what can you say if you have asthma or other diseases of the respiratory system?
All these substances can lead to extremely unpleasant consequences: oxygen starvation, which causes headaches, shortness of breath and even a decrease in reaction speed. Nitrogen oxides lead to damage to the respiratory tract and lungs, while benzene, soot and formaldehyde lead to carcinogens. With constant exposure, chronic development of lung diseases is possible.
Experiments show that cabin filters are capable of trapping up to 99.5% of small and medium particles. However, as it gets dirty, of course, the part loses its effectiveness, which forces drivers to regularly replace it. We recommend not to neglect this, because your health directly depends on the quality of air in the cabin. In addition, replacing the cabin filter in the Kia Rio 3 takes just 5-7 minutes in a garage.
The part is installed on the air duct, which provides air flow into the cabin. Without the air duct, the driver and passengers could suffocate with the windows closed and the engine running.
The problem is that the air coming from the street is polluted and contains abrasive particles, the entry of which into the lungs can lead to asthma and other diseases. A cabin filter will help you avoid these dangers. He is also responsible for the operation of the air conditioner.
Before starting work, you will need to purchase the consumable item itself. The optimal solution would be to purchase a coal version, its catalog number is MS-6307.
From a technical point of view, even an inexperienced technician will not have any problems with how to remove the cabin filter on a Kia Rio and install a new one. The work can be done in your own garage, or just in the parking lot. The filter is located in the cabin, right behind the glove box.
- open the glove compartment and empty it;
- Find two plugs inside the compartment and remove them by first turning them counterclockwise. The glove box lid must be lowered and the right door open to create the space needed for work;
- after removing the plugs, a shelf with a filter secured on both sides with clamps will become visible;
- the latches are pulled towards themselves and carefully pressed out, the cover is removed;
- the old filter element is removed;
- a new part is inserted into the frame. If its linear dimensions are slightly wider than the frame, then the product can be trimmed along the edges. The arrow drawn on the fabric surface should be directed downwards during installation;
- then all the parts are returned to their places in the reverse order; when closing, the plugs are turned until they click.
After watching how to change the cabin filter of a Kia Rio in the video, the driver can easily carry out the replacement operation on his own, without wasting time and nerves on visiting a car repair shop.
Which filter to choose: original or analogue
Before replacing the 4th generation Kia Rio cabin filter, the driver needs to decide between the original and analog spare parts:
- The service life of high-quality products is allowed up to one and a half years. If you plan to do quiet and infrequent driving around the city, then this option is ideal.
- If the issue of replacement does not frighten the car owner, then for the price of an original spare part you can purchase several products of lower quality and replace them every 3-4 months.
Also read: Correct wheel bolt pattern for Kia Serato
Brands of original cleaning elements (some are supplied from the factory): NIPPART, Cangoo.
For pre-restyling models of 2012 (2009, 2010, 2011), only non-original spare parts for large filtration with article numbers MANN CU1828, VALEO 698681, TSN 9.7.117 are suitable.
How much does a filter cost?
Replacing the cabin filter for Kia Rio 2016 and 2022. release is not considered an overhead repair. The price ranges from 250 to 500 rubles for the analog coal version. The cost of a part with deep air purification starts from 600 rubles and reaches 1.5 thousand rubles.
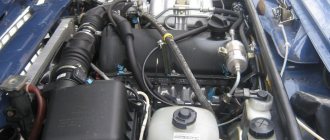
Replacing the Rio 4 air filter
To change the engine air filter on a Kia Rio IV, you will need to unclip two latches, move the air housing cover back, lift it, and pull out the filter.
It is also advisable to plug the air intake hole and blow out the air filter housing with a stream of air.
To replace a new air filter, instead of the original - 28113H8100, you can take, for example, TSN 9.1.1565 (the price difference is 2 times). Everything is simple there, install it in the case, adjust it, and insert it into the guides on both sides and snap the case latches into place.
Signs of a clogged filter on a Kia Rio
You can understand that the Kia Rio 4 or Sportage cabin filter needs to be replaced by the following signs:
- Extraneous unpleasant odors penetrate into the interior of the car, this is especially evident when the air conditioning is turned on: you can feel the soot, your nose itches from the dust.
- The amount of dust on the dashboard and seats increases even with the windows closed.
Also, when the filter is clogged, the amount of air that enters the cabin is reduced. This leads to accelerated fogging of the windshield and side windows.
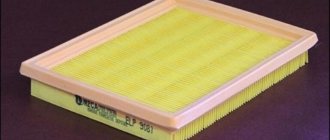
Choosing a cabin for Kia Rio 4
Purifiers targeted at China, not Europe, are supplied to Russia. Article number for cars produced before 2012 97133-D1000 (length - 22.5 cm , width - 20.5 cm , height - 2.8 cm ). The problem is that this cabin filter can only capture coarse dust. Therefore, it makes sense to buy a carbon element.
Carbon filter composition
- ASIN: ASINFC 2753 - regular and ASINFC 2753C - carbon.
- Fortech fs-150c - with coal.
- RU54 CF944C - coal
- KUK 0239 - with coal.
Anti-dust (regular) - base - made of corrugated paper, synthetic or cellulose fibers. Detains small particles, incl. flower pollen is inexpensive. However, it is powerless against unpleasant odors and volatile toxins. The standard replacement period is up to 30,000 km .
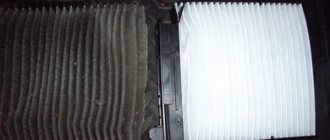
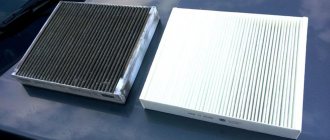
Cabin filters: regular dust filter (left) and carbon filter (right)
Carbon – consists of electrified synthetic fibers that stop the smallest ( up to 1 micron ) dust particles. Neutralizes up to 95% of toxins. Service life - up to 60,000 km , but the price is steep
Each Kia Rio 4 owner chooses a filter element that is compatible with his car and that suits his price.
Cabin filter diagnostics
To understand whether you need to change the cabin filter on a Kia Rio 2022 model or any other, you don’t have to contact hired specialists. The diagnostic process follows from the previously described signs of blockage:
- Start the car and warm up the engine without turning on the heater.
- Turn on the heating system at maximum power.
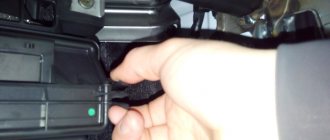
- Place your hand against the air duct in the cabin.
- If the blown air does not correspond to the set temperature, it means that the filter is clogged and it does not allow you to quickly heat the interior of the car.
Also read: Increasing the ground clearance of the Kia Rio 3 - measuring ground clearance, installation instructions
How to choose
In order for replacing the Kia Rio cabin filter to bring you only positive emotions, you need to learn how to select the right parts. The most popular filters for this vehicle have the article number 971334L000.
Filter materials from the Hyundai brand are also suitable for the Kia Rio 3. Naturally, you can find cheaper options - non-original ones. The main criterion for their selection is that they must be suitable in size. But the quality of the work they perform, as well as the length of their service life, are in doubt. As the popular belief goes: “it’s better to pay once...” or “the miser pays twice.” Yes, in fact, it is better to purchase a high-quality spare part than a cheap one, which in three months will again require replacement and at the same time your costs (both financial and time).
How often should it be replaced?
The frequency with which the Kia Rio and Rio X-Line cabin filter changes depends on several factors:
- selected model;
- driving habits;
- vehicle mileage.
If you add up all the nuances, then it is recommended to change the cleaning element once a year, provided that the car travels no more than 30 thousand km during this time and the majority of trips are within the city.
If most of the operation involves driving on dusty country roads, then even the highest quality cleaning element is recommended to be replaced after 15 thousand km.
There are recommendations that replacing the cabin filter for Kia Rio 2014, 2015 and later models should be done twice a year: before winter and before summer. However, it needs to be changed only when there is less dirt on the roads.
When to change, what interior to install
To perform scheduled maintenance operations, there are regulations, as well as manufacturer recommendations. According to them, replacing the cabin filter of the Kia Rio IV (FB) heating and air conditioning system should be done every 15,000 kilometers or once a year.
Considering that the operating conditions of the car in most cases will be far from ideal, experts advise performing this operation approximately twice as often, in spring and autumn.
Characteristic symptoms:
- Windows often fog up;
- the appearance of unpleasant odors in the cabin when the airflow is turned on;
- deterioration of the stove and air conditioner;
They may make you doubt that the filter element is coping with its tasks and an unscheduled replacement will be required. In principle, these symptoms should be relied upon when choosing the correct replacement interval.
Suitable sizes
When choosing a filter element, owners do not always use products recommended by the car manufacturer. Everyone has their own reasons for this, some say that the original is unreasonably expensive. Some people in the region sell only analogues, so there is a need to know the sizes by which you can subsequently make a selection:
- Height: 28 mm
- Width: 200 mm
- Length: 225 mm
As a rule, sometimes analogues for the Kia Rio IV (FB) may be a few millimeters larger or smaller than the original, there is nothing wrong with that. And if the difference is measured in centimeters, then of course it’s worth looking for another option.
Selecting an original cabin filter
The manufacturer recommends using exclusively original consumables, which, in general, is not surprising. They themselves are of good quality and are widely available in car dealerships, but their price may seem overpriced to many car owners.
Regardless of the configuration, on all fourth-generation Kia Rios (including the restyled version), the manufacturer recommends installing a cabin air filter with article number 97133-D1000. You can also use the element under article number 97133-D3000; it is a complete analogue of 97133D1000 in quality and size.
It is worth noting that sometimes consumables and other spare parts may be supplied to dealerships under different part numbers. Which can sometimes confuse those who want to purchase an original product.
When choosing between a dust and carbon product, car owners are advised to use a carbon filter element. This filter is more expensive, but it cleans the air much better.
It is easy to distinguish - the paper filter accordion is impregnated with a carbon composition, and therefore has a dark gray color. The filter cleans the air flow from dust, fine dirt, germs, bacteria and enhances the protection of your lungs.
Which analogues to choose
In addition to simple cabin filters, there are also carbon filters that filter the air more effectively, but they are more expensive. The advantage of coal SF is that it does not allow foreign odors coming from the road (street) to penetrate into the car interior.
But this filter element also has a drawback - air does not pass through it well. GodWill and Corteco carbon filters are of fairly high quality and are a good replacement for the original.
However, in some retail outlets the price of the original fourth-generation Kia Rio cabin filter may be greatly inflated. In this case, it makes sense to purchase a non-original consumable item. In particular, cabin filters are considered quite popular:
Conventional dust cabin filters
- Mann Filter CU23019 – high-tech consumables from a well-known manufacturer
- BIG filter GB-98028 – popular brand, good fine cleaning
- Nevsky filter NF6548 - Russian manufacturer with an affordable price
Carbon cabin filters
- Mann Filter CUK23019/1 – high-quality and thick carbon coating
- BIG filter GB-98028/C – activated carbon
- Nevsky filter NF6548C – normal quality, affordable price
It makes sense to take a closer look at the products of other companies - they also specialize in the production of high-quality consumables for passenger cars:
- Corteco
- Filtron
- SCT
- Sakura
- GoodWill
- Fram
- JS Asakashi
- Champion
- Zekkert
- Masuma
- Nipparts
- Purflux
- Knecht Mahle
It is quite possible that sellers may recommend replacing the Rio IV (FB) cabin filter with non-original cheap substitutes with a much smaller thickness. They are not worth buying, since their filtering characteristics are unlikely to be at the proper level.
Consequences of a faulty filter
If the driver does not have time to change the cabin filter on the Kia Rio in time, every day more and more fuel combustion products, soot, dust, and various reagents that previously settled on the cleaning element will penetrate into the car’s interior. All these microelements will enter the human body, accumulating in the bronchi and lungs.
At first it will manifest itself as a sore throat and nose, but later it can develop into more severe cases, including allergic reactions and chronic diseases.
Replacement process
Can be performed either independently or in specialized centers. The main job is to diagnose the product, and this process is described above. Having removed the filter, install a new one if necessary, then perform the opposite steps to disassembly (described in the “diagnostics” section).
Well, as you yourself have already noticed, replacing the Kia Rio cabin filter is a fairly simple operation that you can do yourself. If you don’t have enough time to replace the filter yourself or you are not confident in yourself, then leave this task to the professionals (they will handle it in 15-30 minutes and no more).
Instructions for replacing the cabin filter on a Kia Rio
The process of dismantling the cleaning element does not require any special skills. Replacing the cabin filter for Kia Rio 2015 and subsequent years begins with preparation:
- Wear gloves and any protective mask on your face to avoid inhaling harmful particles.
- Prepare a flathead screwdriver, a clean damp cloth for wiping, and a new filter element.
Also read: Kia Sportage 3 wheel bolt pattern: how to choose the wheel size and tire diameter
If you have to change the cabin filter near your home in a Kia Rio, make sure that during the work you will not interfere with the movement of passing vehicles. Proceed to work following the instructions:
- Stop the engine and open the glove compartment.
- Use a screwdriver to remove the side door latches.
- Gently press the plastic cover latches and pull it out.
- Take out the old filter element, wipe the place where it is attached with a damp cloth, removing loose dirt and dust.
- Insert the new filter, close it with the plastic panel until it clicks.
- Place the glove compartment door back, securing it with the clips.
At this point, replacing the Kia Rio cabin filter can be considered successful; all that remains is to check the operation of the air conditioner. To facilitate the work process, you can watch the video instructions, which can be found freely available on the Internet.
Cabin filter Kia Rio X-line
I don’t think it’s worth saying that the cabin filter in the modern automotive industry is installed on all cars. The filter cleans the air entering the cabin and prevents unpleasant odors from penetrating. However, its resource is limited. We will tell you below which cabin filter to choose for the Kia Rio X-line.
Selection of cabin filter
Kia filter 97133D1000 is installed from the factory . The cost of the original filter is from 700 rubles. In addition to this filter, you can choose similar filters:
- IBERIS IB772054 from 270 RUR
- BERIS IB772054C from 350 rubles coal
- AMD AMDFC753 from 200 RUR regular
- GOODWILL AG464CFC from 300 rubles coal
- JS ASAKASHI AC0239 from 400 RUR regular
- SAKURA CA28380 from 550 RUR
- GOODWILL AG463CF from 250 RUR
This is not the entire list of analogue filters, but only a part of them. When selecting a cabin filter for X line, we advise you to check with the seller or car service specialist whether this filter is suitable for your car.
How often to change the cabin filter on Rio X line
According to the manufacturer's regulations, the cabin filter should be changed every 15,000 km. However, we recommend replacing the filter based on operating conditions. In the summer, with regular use of the car, replace the filter element every 10,000 km.