Hyundai Solaris Silver Shark › Logbook › Replacing the fuel filter
Well, it's done.
Almost 5 years after leaving the dealership and having run nearly 116,000 km, I finally decided to replace the fuel filter myself and have never regretted it. So to speak, I upgraded my experience (“experience” in Russian speaking). I ordered fuel through autodoc: 1: original fuel filter 311121R000. After talking with people, I realized that I made a little mistake with the choice - I could have taken a “2nd line” filter, it would have been cheaper. 2. coarse fuel filter (mesh) original 311841R000. I also spent too much - I could have bought a non-original one much cheaper. And some people don’t bother at all - they wash it out. that was. I decided to replace. But in order.
So. The fuel filter is located under the seat of the rear sofa, which is mounted on two clamps under the side passengers and in the center in the backrest with a “12” bolt. Under the seat we see a black cover.
I read so much, and it’s written in the “Murzilka”. which is easy to remove. Fuck there. My lid was sitting on black sealant. But by slightly prying it with a flat screwdriver, the lid gave way.
What I saw next is something I haven’t seen in anyone, including in Murzilka.
So everything was covered in a thick layer of dust (no wonder, after all, no one had climbed there in 5 years). I thought this compartment would be sealed. But no, at the bottom I saw a hole underneath the bottom. I wiped off the entire fuel module cover so that no harm would disturb the virgin world of the gas tank.
Before disconnecting the fuel line hoses, it is necessary to release the pressure in the system. To do this, I removed the negative terminal from the battery using the Murzilka. Then I disconnected the fuel module power supply. Now you need to start the engine. When you turn the key for the first time, in test mode, the empty tank indicator on the dashboard starts blinking (this is understandable, because the sensor is disconnected). He didn’t grab the engine right away—he was coughing and choking, but he tried to turn it. At this time, for some reason the oil pressure indicator began blinking on the instrument panel. At first I didn’t understand that everything was done as it should. I started it a second time - the setting was better, but after a couple of seconds the engine stalled - the fuel ran out... In theory... But when one of the hoses was disconnected, it turned out to be nothing. It's not much, but it's not pleasant to be doused with gasoline. Fortunately, after replacing the filter, I planned to clean up the PCB in the cabin. Having disconnected two hoses (one is simply put on the fitting, the other through a special clamp) and removing the third hose from the mount (I did not disconnect it), we unscrew the 8 bolts around the perimeter. I used a large Phillips screwdriver. Before unscrewing the last bolt, we hold the fuel module - its upper part is on springs, which push the structure upward. Having removed the fixing ring, we take out the module. Here you have to be a little clever so as not to tear off the float. And yes, there is another 200 grams of fuel in the bowl, so when we pull it out, we don’t tilt it too much. And voila, the structure is outside
And we begin to remove from it everything that we need. And we will need everything except the old filter.
Just in case, I photographed the position of the module's power terminals so that during assembly I wouldn't confuse which was which. Having disconnected the terminals, remove the upper part, which is springy. To do this, there are clamps at the bottom of the rods, which should be slightly bent and the structure pulled up.
We remove the hoses, for which you need to pull out the bracket on each hose. We don't lose staples.
We disconnect the latches (4 pieces) that secure the filter and pump to the bowl. And take out the filter itself and the pump, which hangs on the filter with latches. . This is the sediment in the bowl
Next we continue to disassemble. We do not remove the hose from the pump. The hose will move along with the pump. From the old filter we will also need to remove the fuel pressure regulator with a retainer, which sit on latches
This is where you need to be as careful as possible. so as not to lose the o-rings. There will be 3 of them - one will be in the lock on the front of the regulator, one will be on the regulator, for a tight fit to the body, and the third - the smallest one will most likely remain in the body of the regulator compartment on the old filter
We remove the coarse filter from the bottom of the pump by prying it with a screwdriver in the area of the retaining washer in the filter housing.
Hyundai Solaris fuel filter
Since 2001, the vast majority of foreign cars have been equipped with an internal coarse fuel filter (hereinafter referred to as PF). External filters are no longer practiced as mandatory standard equipment.
At the same time, such an innovation is both good and bad, since the quality of fuel absorption decreases and the frequency of technical inspection of the machine increases.
TF cleans fuel from all kinds of impurities, debris, and condensation. Contaminated fuel does not burn completely, which contributes to the formation of soot.
Systematic operation of a car with low-quality fuel leads to increased acceleration time, increased gasoline consumption, and unstable operation of the power unit.
Where is the TF located: in the center of the channel under the rear passenger seat. Access for maintenance from inside the car; first remove the diagnostic hatch.
If necessary, replacing the TF on your own is not at all difficult; no special skills are required. If you do not practice independent repairs, then seek help from service center specialists.
Fuel filter for Hyundai Solaris: where is it located, price, originals, analogues, articles
The manufacturer recommends updating the fuel register every 60,000 km - every fourth service. The interval is subject to adjustment towards reduction if the car is systematically refueled with low-quality fuel.
Technical parameters of the TF: outer diameter 80.0 mm, inner diameter 62.0 mm, length 59 mm.
| Serial number/item | Price in rubles | |
| 31112-1R000 original filter, which is installed by default on production models | From 900 – 950 | |
| H70WK13 | LF-993M | From 850 |
| WK 8019 | FS11004 | From 850 |
| 30H11 | ADG02404 | From 850 |
| PP979/2 | 30-H0-011 | From 850 |
| N1330330 | PF3907 | From 850 |
| J1330515 | LF-993M | From 850 |
| FC-H11S | FS11004 | From 850 |
| N1330330 | PF3907 | From 850 |
| H70WK13 | WK 8019 | From 850 |
| 30H11 | FS11004 | From 850 |
| *check the price with the manager at the time of purchase | ||
Characteristic signs of blockage
- unstable start of the power unit at different temperature conditions;
- increased fuel consumption, including under load;
- engine detonation at idle speed;
- acceleration is slower than usual;
- lumbago in the exhaust pipe;
- the car engine chokes as a result of an enriched or lean combustible mixture;
- The “Check Engine” light on the instrument panel is on.
Causes of clogging
- operating the vehicle for longer than the recommended period before undergoing a scheduled technical inspection;
- refueling with low-quality fuel, low-octane mixture for a long time;
- installation of non-original consumables;
- installation of spare parts from other technical equipment that are similar in appearance to factory ones;
- the machine was left idle for a long time, in the “preservation” mode, as a result of which the circuit became clogged and sediment formed.
Self-diagnosis
The diagnostic process is not complicated, it involves the following steps:
- Stop the engine and open the hood.
- Inspect the fuel circuit for damage.
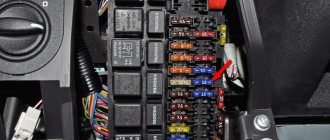
- Check the serviceability of the fuse (No. 17) of the mounting block. It is located in the engine compartment, behind the battery.
- Place the vehicle over the inspection hole, check the tightness of the circuit, and eliminate fuel leakage.
Additionally, check the actual fuel level in the vehicle's fuel tank.
Replacing the fuel filter on a Hyundai Solaris
Step by step guide for replacement:
- We place the vehicle above the inspection hole.
- We turn off the engine and turn off the ignition.
- Open the hood.
- Remove the power terminals from the battery.
- We open the rear doors. We pry up the latches and remove the rear seat.
- Using a key set to “12”, unscrew the nuts of the diagnostic hatch.
- Disconnect the connectors with wires from the fuel pump module.
- We start the engine, let it idle until it stalls.
- Turn off the ignition.
- We remove the fuel pump module from the fuel tank cavity. For ease of work, it is necessary that the fuel level does not exceed the middle.
- Remove the rubber sealing ring.
- We fold back the lower part of the module and remove the coarse filter.
- We carry out troubleshooting of moving elements, replacing them with new ones if defects or damage are detected.
- We install a new cleaning element.
- We assemble the parts and mechanisms in reverse order.
Replacing the fuel filter on a Hyundai Solaris with your own hands is completed. Subsequent maintenance after 15,000 km.
Replacement instructions
For more detailed information about the procedure, it is recommended to additionally watch the corresponding video instructions.
Stage 1 - gaining access
In order to replace a part on a Hyundai Solaris car, you first need to gain access to it.
Step 1
Step 2-3
Step 4-5
Step 6
Stage 7-8
Step 9
- Using a socket with an extension, we twist the bolt on the mounting cushion at the back, access to which is through the backrest and cushion of the last seat.
- We remove the pillow by lifting it from the front and removing both front fasteners from the holders.
- Using a knife, we cut the sealant around the hatch cover on the module, and then move this cover to the side.
- Turn off the ignition and squeeze the clamps on the wiring harness block.
- Disconnect the wire connector from the cover on the module.
- We move the clamp along the hose, after which we use pliers to compress the ends of the clamp, with which the fuel vapor hose is connected to the adsorber, and remove the hose from the cover.
- Remove the tip from the lid fitting. To do this, press the latches located on the gas supply tube.
- Using an eight-millimeter socket, we twist the bolts that secure the pressure plate to the module cover and remove this plate.
- As carefully as possible, trying not to touch the float, remove the fuel level sensor.
Stage 2 - we make a replacement
As a result of these procedures, access is provided to the module in which it is necessary to change the fuel filter. Next, the following procedures are performed.
Stage 1
Stage 2-3
Stage 4
Stage 5
Stage 6
Stage 7
Stage 8 Stage 9
Stage 10-11
Stage 12
Stage 13
Stage 14
Stage 15
Stage 16
- We take out the rubber sealing ring that seals the flange of the hole in the gas tank. We also remove the cover from the fuel module.
- By pressing the wiring lock of the fuel level sensor in the tank, disconnect the block from the connector on the cover. In this case, we remove the sensor wiring from the clamps.
- We slide the sensor along the guides in the modular glass and remove it, after prying it off with a slotted screwdriver.
- Using a screwdriver, pry up and remove the spring retainer.
- Remove the tube tip and the sealing ring from the fittings at the inlet and outlet of the fuel filter.
- Remove the tip from the fuel pump tube.
- We press the clamps on the rod guides and disconnect the fuel module glass from the cover.
- Disconnect the wiring from the pump.
- Using a slotted screwdriver, pry up the latches on the cup body, and then remove the fuel filter complete with pump, strainer and pressure regulator.
- We remove the fuel pump and pipe from the socket inside the filter shell.
- Using a screwdriver, pry off the washer, remove the filter with the mesh from the pipe and remove the washer itself.
- Disconnect the tip of the mass cable and remove the tube through which the fuel is drained.
- Use a slotted screwdriver to pry up the two clamps and remove the clamp.
- We remove the pressure regulator from the fuel filter, and then disconnect the tube from it that serves to drain the fuel.
- We remove the sealing ring of the pressure regulator from the socket in the fuel filter shell.
- We remove the filter, including the sealing rings located on the fittings.
In this way, you can change or repair the fuel filter, carefully examining all non-working parts. Assembling the fuel filter and module and installing them is carried out strictly in the reverse order. Before installing the mesh filter, it is advisable to thoroughly rinse it. The lock washer is straightened or replaced with a new one, with replacement being considered the preferred option.
Upon completion of assembly, start the engine and check the connections for leaks. If leaks are detected, carefully repeat the entire sequence of actions.
When you need to change the fuel filter on a Hyundai Solaris: we identify all the nuances
In accordance with the Hyundai Solaris maintenance regulations, the fuel filter must be replaced after 60 thousand kilometers. Our step-by-step instructions with photos will allow the car owner to do this himself.
If during operation there is a noticeable decrease in power or difficulty starting the engine, the cause may be a clogged fuel filter. In this case, you need to replace the filter regardless of mileage.
The fuel filter is installed in the fuel module.
When to change the filter
For the first time, you need to pay attention to the fuel purifying element when the car has driven 30,000 kilometers or after two years of operation. Diagnostics will be needed. Its essence is to measure the pressure in the fuel rail using a special device.
If the replacement is not made in time, the next serious problem will be the failure of the fuel pump. This can happen at the most inopportune moment. The required part may not be at hand.
If the pressure in the fuel system does not correspond to the nominal pressure, one of the reasons for this may be a clogged fuel filter. In this case, it is recommended to replace the Hyundai Solaris fuel filter without any disassembly and maintenance.
Fuel filter for Solaris
For many years now, new facts have been emerging about the service life of the fuel filter. Some say that it should last for the entire life of the car (just think about it!), some say that it needs to be changed every 50,000 km, while others say that the fuel filter lasts for a maximum of 20-30,000 km. As they say, who knows what. But who to believe and what to do? It’s a pity to change a still good filter every 10,000 km, but you don’t want to bring it to a state of complete unusability with the addition of a malfunction of other, more expensive spare parts.
The fuel filter of a Hyundai Solaris, or any car, is enough for its entire service life only in laboratory conditions. The air is clean, there is no garbage, the fuel is perfect. But in reality, everything is exactly the opposite. The fuel filter needs to be changed, and the period depends on factors: how you drive the car, which roads you travel on the most (dusty rural roads carry a lot more garbage and dirt), and, most importantly, what kind of fuel you use. If you always refuel at only one gas station, where you are absolutely sure of the quality of gasoline, and drive on moderately clean roads, then you can easily replace it after 50-60,000 km. In other cases, it is recommended to change the fuel filter early.
Signs of a malfunctioning Solaris fuel filter
A clogged fuel filter can be easily determined by the following signs:
- loss of engine power;
- increased fuel consumption;
- uneven movement of the car;
- while driving, the car stalls from time to time;
- and finish - the car does not start.
Replacing the Solaris fuel filter
The fuel filter is replaced as follows:
- Using a 12mm socket, unfasten and remove the rear seat cushion;
- Using a screwdriver or knife, remove the fuel compartment hatch cover;
- Disconnect the wiring block and hoses from the fuel compartment cover;
- Remove the cover plate by unscrewing 8 bolts with a 8mm head;
- Carefully remove the fuel module. Be careful not to spray fuel all over the vehicle. It is best to open the doors during replacement for better ventilation. Also be careful that there is no fire nearby. Have a smoke afterwards;
- Remove the filter and replace it;
- Place the fuel module back into the tank.
Fuel filter for Hyundai Solaris
Self-replacement of the Hyundai Solaris fuel filter (photo and video).
Good afternoon. From this article you will learn how to replace the Hyundai Solaris fuel filter. Traditionally for our site, the article is a step-by-step instruction and contains a large number of photos and video materials.
Our instructions are suitable for Hyundai Solaris cars with 1.4-1.6 liter engines, both first and second generation.
When should you change the fuel filter?
The manufacturer has established a regulation - the fuel filter is replaced once every 60,000 km. But, in practice, it is better to change the filter more often, since the quality of fuel at Russian gas stations leaves much to be desired.
A clogged fuel filter manifests itself in the form of a lack of power, failures during acceleration, and a decrease in maximum speed.
If you do not change the fuel filter in a timely manner, problems may occur. One day, a Solaris came to our service with a faulty fuel pump, the reason for the failure was a break in the mesh. Accordingly, dirt got into the pump, and it wore out; the reason for the breakthrough of the mesh was the formation of condensate in the tank and its freezing.
In practice , it is advisable to change the fuel filter every 3 years or 40,000-50,000 km , whichever comes first.
If you live in large cities and drive a lot, the scheduled fuel filter replacement period will suit you quite well.
What is required to replace the fuel filter?
Tools:
- wrench with extension
- 8 socket for unscrewing the fuel module ring.
- 12mm head for unscrewing the seat.
- a stationery or regular knife for cutting sealant.
- pliers for removing clamps.
- flat-head screwdriver for disassembling the fuel module.
Consumables:
- coarse mesh (31184-1R000 - original)
- fine filter (S3111-21R000 - original)
- sealant for gluing the lid (any kind, even Kazan)
The approximate cost of consumables is 1500 rubles.
How is the fuel filter replaced?
If you are too lazy to read, you can watch this video:
If you are more accustomed to reading, below are step-by-step instructions with pictures:
Step 1 - remove the rear seat cushion.
To do this, unscrew the mounting bolt with a 12mm head. It is located in the center and by moving it upward we lift the seat cushion, freeing the front brackets.
Step 2 - remove the cover.
This is done using a stationery or regular knife, cut the sealant and lift it.
Step 3 - remove the dirt.
This is necessary so that after dismantling the fuel module, all this dirt does not get into the tank. This can be done using a rag, brush or compressor.
Step 4 - remove the fuel module.
Carefully disconnect all the wires and unclip the fuel hose clamps. After this, unscrew the 8 bolts by 8, remove the retaining ring and carefully remove the fuel module.
Step 5 - service the fuel module.
We replace the coarse filter (the mesh at the inlet to the fuel pump), and replace the fine filter - a plastic container.
ATTENTION! It is extremely important not to lose the O-rings when changing filters.
A common mistake is the loss of the pressure regulator sealing rings - if you forget to install the sealing rings, the car will not be able to start, since fuel will not flow into the engine.
Step 6 - assemble everything in the reverse order, glue the lid onto the sealant, install the seat and enjoy the money saved.
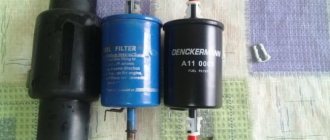
To understand the degree of clogging of the fuel filter after 50,000 km of operation, you can look at two photos (filter paper on one side and the other):
Conclusion.
I hope that after reading this article, you realized that replacing the Hyundai Solaris fuel filter is not difficult.
Unfortunately, it is impossible to do this job without getting your hands dirty and without sniffing gasoline, so it may make sense to turn to professionals.
With the help of the wonderful service “Remontist”, you can find a car service center near your home, study reviews about it and find out the price.
The average price for the service of replacing a fuel filter on Solaris for 2022 is 550 rubles, the average time for providing the service is 30 minutes.
That's all for me today. I hope that the article was useful to you. If you want to supplement it or ask questions, write comments.
Best regards, administrator
Share
Fuel filter replacement process
If you have enough experience, the procedure can be performed in a garage using basic tools. Before you begin, you should find out where the fuel filter is located on the Hyundai Solaris. The location of the module is inside the fuel tank. In order to begin dismantling, you must purchase an original spare part according to the catalog number.
After this, you can begin to remove and disassemble, but first you need to remove the filter from the fuel tank.
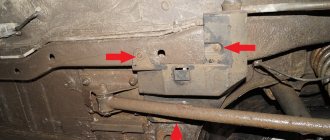
- Remove the rear sofa by pulling it towards you. First, use a socket wrench to unscrew the 12 nut located between the back and the back of the seat.
- The plastic protection, located on the left side of the bottom of the car, is secured with a special sealant. To dismantle it, you need to gently heat the contact area that runs along the perimeter with a hair dryer. Treat the surface with a special spray, since a large amount of dust always accumulates between the tank and the outer part of the body. It is necessary to prevent dirt from getting inside the tank.
- After unscrewing the three bolts, remove the ring holding the fuel filter module.
- Disconnect the electrical connector.
- Disconnect the two fuel lines.
- Prepare a gasoline container in which you can place the fuel module. Drain the remaining fuel and sit comfortably in a bright place. In order to disassemble the fuel filter, the only tool you need is a flat-head screwdriver.
- Disconnect the fuel lines leading from the cover to the filter element by pulling out the retaining metal clips.
- Pry up the plastic clips that hold the two metal pins in place.
- The length of the wires is sufficient to then disconnect the electrical connector from the fuel pump located inside the fuel module.
- Bend the three plastic tabs and disconnect the assembly that houses the fuel pump and filter. Before changing the fuel filter on Solaris, carefully examine the new part. By comparing it with the old unit, you will intuitively understand which elements and in what sequence need to be removed from the old one and installed on the new one.
- From the inside, spread the two plastic tabs and pull out the fuel pump.
- Using a flat-head screwdriver, remove the coarse filter by pulling it off the axis on which it is attached.
It is important not to lose the rubber seals. Leave them on the old parts, and during assembly, install each one on a new filter and only then mount the assembly. - Start the assembly by installing a new coarse filter, which comes with the new filter.
- Install the fuel pump into the new filter by snapping it into place with the plastic clips.
- Transfer all parts from the old filter to the new one.
The developers provide for disassembling and installing a new filter and fuel pump. Therefore, all elements are secured with latches. When dismantling (installing), proceed delicately. Pay special attention to the installation of fuel pipes and rubber seals to prevent loss of pressure in the fuel rail.
Install the fuel module into the vehicle tank in the reverse order, being careful not to mix up the fuel supply and return lines.
Don't rush to start the engine. Turn the key in the ignition switch several times, filling the volume of the fuel module. You can tell by the sound whether it is filled with gasoline. After the sound has become monotonous, you can start the car.
Avoid unstable operation of the fuel pump; change it at the first sign of a malfunction or after a mileage of 60 thousand kilometers (after 3 years of car operation). The time when changing the fuel filter may be lost, then you will need to replace a more expensive part - the fuel pump.
If the material was interesting or useful for you, publish it on your social network page:
Peculiarities
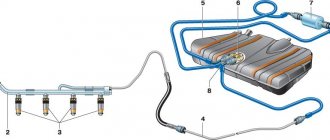
Unlike cabin or air filters, Hyundai Solaris cars use the same fuel filters for all types of engines and car configurations. In these cars, it is lowered into the gas tank, performing the function of a kind of shell in which the fuel pump is located. The filter has an output with contacts used for attaching a gasoline level sensor.
As a result of timely replacement of lubricant and fuel filter, the service life of the engine is significantly extended. From a reliability point of view, it is better to change the part at specialized service stations, but if you have certain knowledge and skills, you can do it yourself.
The cost of an original filter for a Hyundai Solaris can be 600-800 rubles, although cheaper options can be found on the Internet.
Changing a part on a Hyundai Solaris is not so easy. Its replacement must be carried out in strict accordance with the instructions and using the necessary tools and skills. To replace it, you must first remove it. As a result, it becomes possible to perform the following procedures:
- cleaning the fuel pump strainer;
- replacing the fuel pump;
- replacing the gasoline level sensor;
- replacing the entire fuel module.
Fuel filter kit for Hyundai Solaris
How long does it take to change the fuel filter on a Solaris?
Replacing the fuel filter Hyundai Solaris
Regular car maintenance is mandatory. The manufacturer has developed special rules for diagnosing (replacing) main parts. Waypoints are focused on the mileage or lifespan of the vehicle.
Most of the operations listed here can be done without the help of others. This also applies to procedures such as replacing the fuel filter on Solaris
. The introduction of high quality fuels, which must comply with the European standard EN228, is essential. If the discrepancy persists, special additives recommended by Hyundai should be used.
when is the filter changed
For the first time, it is necessary to note the element that cleans the fuel when the car has run 30,000 km or after two years of operation. A diagnosis will be helpful. Its essence is to measure the pressure in the fuel rail using a special device.
If it is not suitable for replacement, the next major problem will be the failure of the fuel pump
. This sometimes happens unexpectedly. The corresponding part may not be displayed nearby.
If the fuel system pressure is not assessed, the main reason for this will be more clogging. fuel
filter
_
In such conditions, replacement is recommended.
Hyundai Solaris fuel filter
How long does it take to change the VAZ 2110 fuel filter?
Fuel filter replacement process
If you are experienced enough, the function can be performed in the garage using a simple tool. Before you begin, you need to find out where the fuel filter is located on the Hyundai Solaris. The location of the module is inside the fuel tank. To start disassembling, you need to purchase an unusual spare part by catalog number.
replacing fuel filter Regardless of Hyundai Solaris
Mileage 61,000 thousand km 1st replacement fuel filter
on
Solaris
. Detailed step-by-step instructions for.
You can then remove and disassemble, but first remove the filter from the fuel tank.
- Remove the rear seat by pulling it towards you. Pre-tighten the 12 nuts between the backrest and seatback using a wrench.
- The plastic protection located at the bottom left of the car is secured with a special sealant. To disassemble it, you need to carefully warm the contact area around the perimeter with a hair dryer. Treat the surface with a special spray, since a large amount of dust always accumulates between the tank and the outer part of the case. This is necessary to prevent dirt from entering the tank.
- With the three bolts removed, remove the ring while holding the fuel filter module.
- Disconnect the electrical connector.
How long did it take to change the fuel filter on the Solaris?
The developers provided for the dismantling and installation of a new filter and fuel pump. Therefore, all elements are attached to latches. When removing (installing) it behaves delicately. Pay special attention to the installation of fuel pipes and gaskets to prevent loss of fuel pressure.
Install the fuel module on the side of the car in reverse order; Do not mix fuel lines and fuel lines.
Don't rush to start the engine. Turn the ignition key several times to increase the volume of the fuel module. The sound can determine whether it has been filled with gasoline. Once the sound becomes monotonous, you can start the car.
Avoid unstable operation of the fuel pump; change it at the first sign of a malfunction or at a mileage of 60 thousand kilometers (after 3 years of vehicle operation). There is a time when the
fuel
filter may be lost, then more expensive parts will need to be replaced -
the fuel pump
.
Step-by-step replacement instructions
Required tools and accessories:
- rags;
- pliers;
- slotted screwdriver;
- knife;
- 8 mm socket wrench;
- sealant.
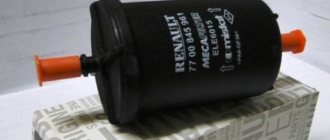
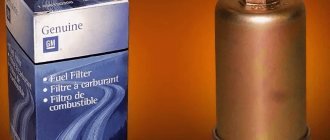
Hyundai Solaris filter article number - 311121R000.
The Hyundai Solaris fuel filter is located under the rear seat of the car and is built into the same housing as the fuel pump.
To remove it, you need to remove the seat cushion by unscrewing the 12 mm nut with a socket wrench (access in the center between the backrest and the lower cushion). Unsnap the two front mounting brackets from the front and lift the pillow. Let's put it aside.
Take a knife and cut the sealant along the contour of the hatch cover. Raise the cover and press the latch of the plug connected to the terminals of the fuel module connector - remove the plug.
Important! The Hyundai Solaris system is under pressure. Before further work, you need to relieve the pressure in the system. To do this, turn the starter, if the car starts, let it run to generate fuel in the system. Then turn the starter 3 times for 7 seconds with breaks. The pressure in the power supply system has been relieved.
We wipe off dust and dirt with a cloth from all parts that will need to be removed in the future.
Use pliers to compress the edges of the clamp and remove the fuel vapor hose from the fitting.
We press the fasteners of the quick-release tip, cover it with a rag (a little gasoline will flow out) and remove it from the module fitting.
Using an 8 mm socket wrench, unscrew the bolts securing the pressure ring to the tank (eight pieces) and remove the plate.
We wipe the dirt under the ring to avoid getting it into the tank.
We remove the fuel module from the hole in the tank, carefully without damaging the fuel level sensor float.
We take out the rubber ring that seals the lid and the tank, wipe it and put it aside.
Place the pump assembly on a clean surface and continue the disassembly procedure.
Disconnect the fuel level sensor plug from the module cover by pressing the latches.
We disconnect the wires from the glass with a slotted screwdriver, press the latch and slide the sensor along the guides.
Let's put it aside.
Now press the latch of the electrical block from the pump and remove it.
It is necessary to remove the spring retainer from the fuel pipe from the filter by prying it with a screwdriver or pulling it with pliers.
We lift the tip, under it there is a rubber ring that seals it - remove it.
In the same way, on the opposite side, disconnect the tip of the gasoline supply to the filter.
The top cover is held on the glass body using two guide rods with springs, which are held in place by latches. Unscrew them with a thin screwdriver.
Disconnect the lid and put it away.
Disconnect the block from the pump.
Use a slotted screwdriver to pry up the two clamps on the cup and disconnect it from the fuel filter. Using a screwdriver, press out the two latches and remove the pump from the mounting hole.
On the pump, near the pipe, pry the locking ring with a thin screwdriver and remove the coarse strainer.
Remove the rubber ring from the gasoline drain fitting. Disconnect the ground wire.
It is necessary to remove the fuel pressure regulator from the housing by prying up the mounting ears of the plastic bracket.
Remove the rubber sealing ring and the plastic thrust ring from the regulator.
Disconnect the fuel drain pipe from the fuel filter housing and use a screwdriver to pry the rubber ring out of the socket.
Assembly is carried out in reverse order.
The Hyundai Solaris mesh filter must be rinsed well with a solvent or replaced with a new one, and its retaining ring must be straightened.
We also check for the presence of water, sand and other contaminants in the tank, and clean the tank if necessary.
At the end of the assembly process, turn on the ignition several times and start the Hyundai Solaris. We check the system for leaks, only after that we close the hatch and coat it with sealant.
Replacing the fuel filter on Hyundai Solaris is complete.
Replacing the fuel filter on Hyundai Solaris 1.4 - 1.6
Every car enthusiast periodically faces the need to repair and maintain his car. Elimination of most faults and carrying out routine maintenance is most often carried out at service stations. In addition, if the machine is purchased new, it has a warranty period, during which everything necessary is carried out at authorized service centers. However, the need for repairs or maintenance by the owner himself arises with enviable regularity. For example, replacing the fuel filter on a Hyundai Solaris. This part is essentially considered a consumable item. However, its service life is considerable. And some motorists generally drive without making replacements and do not complain about engine performance.
Replacing the Hyundai Solaris fuel filter with your own hands
Replacing the Hyundai Solaris fuel filter should be carried out by specialists at a service station. The service fee is low. But if this is not possible, you can change the spare part yourself, following the instructions provided.
Important! Before starting, you need to release the pressure in the gasoline tank. To do this, simply unscrew the filler cap.
Where is the fuel filter located on the Hyundai Solaris?
The fuel filter is a small but important part of the car. The fact is that no matter what fuel is poured into the car, it is not always clean. Both gasoline and diesel fuel travel quite a long way in tanks, and then sit in bunkers at gas stations. Mesh pads can only save you from large debris. This is where a fine filter comes to the rescue.
During operation, all gasoline poured into the car passes through this element. Gradually, the filter becomes clogged and the gasoline passes through worse. This leads to a drop in pressure, the load on the fuel pump increases, and the “traction of the car” decreases. Therefore, technical regulations require changing it every 50 - 60 thousand kilometers.
However, this figure is approximate. It is worth considering that if you drive in difficult road conditions, and often have to refuel in an unfamiliar place, then the replacement period is steadily decreasing and is about 30 thousand km. Conversely, if you drive carefully and use proven gasoline, you can leave this unit without replacement if there are no alarming symptoms.
The fuel filter on Solaris is interlocked with the fuel pump. To get to the latter, you will need to remove the rear seat. It is there, under a special cover, that the fuel pump is located, from the block of which the fuel filter is removed.
High-quality replacement of the Hyundai Solaris fuel filter: price and frequency of work
Only two types of engines are installed on Solaris: 1.4 and 1.6 liters. Both of them are gasoline and almost identical - the increase in the working volume of the second is achieved solely by increasing the piston stroke by one centimeter. However, this difference in design results in an increase in power of approximately 10%, and an increase in fuel consumption by almost the same amount. All this is true for Hyundai Solaris of all years of production and countries of assembly.
It would seem that the difference is insignificant, however, it plays a role in the life of such a component of the fuel system of this car as a gasoline filter. And this is not surprising, because the more fuel it passes through itself, the faster it becomes clogged. However, it is unlikely that anyone waits until it becomes clogged to the point of complete obstruction and only then replaces this unit with a new one. The maintenance schedule implies that this procedure must be carried out at least every 60 thousand km. mileage of the car - whether it has a 1.4-liter or 1.6-liter engine.
Replacing the Hyundai Solaris fuel filter: the price of conscientious work
The price for replacing a Hyundai Solaris fuel filter consists of:
- the cost of the device itself;
- the cost of the procedure to replace it.
The second component can be neglected with a clear conscience, since filter replacement is carried out as planned during every fourth routine maintenance of the machine, which makes this procedure itself almost free. But the price of the filter itself can vary greatly depending on its design and manufacturer.
Gasoline filter design
Let’s agree right away: we don’t consider cheap devices of questionable quality at all.
Most gasoline filters are a device consisting of two components:
- preliminary – coarse cleaning element;
- final – element of fine cleaning.
The first is a thin steel mesh that traps more or less large insoluble particles of contaminants. The second one has a slightly more complex structure. It is made from accordion-folded micro-perforated parchment paper that can hold even the smallest particles.
When to change
Regardless of mileage, replacing the fuel filter may be necessary in the following cases:
- The car loses dynamics, the gas pedal “falls” without causing a noticeable increase in traction.
- After idling, the engine may stall.
- The higher the speed, the more unstable the engine is. Power dips may occur, especially when the tachometer needle crosses the middle of the scale.
- When you turn the key in the ignition, the sound of the fuel pump changes. There are problems starting the engine.
- Fuel consumption inexplicably increases while maintaining normal driving mode.
How often should I replace it?
The manufacturer provides for replacing the Hyundai Solaris fuel filter at intervals of 60 thousand kilometers, that is, at every fourth scheduled maintenance. During actual operation, it is impossible to guess the exact period - the car can go 120 or 30 thousand before symptoms of critical filter clogging appear.
On all cars with a similar fuel system design, diagnosing the condition of the fuel filter is the first thing a diagnostician does when detecting dips in fuel pressure. If a test run with the filter removed eliminates the failures, the fuel filter is considered unusable, otherwise the pump itself, which is part of the fuel module assembly, will have to be replaced.
Is it possible not to change at all?
Opinions differ among car owners about how often the fuel filter needs to be changed. While some reduce the interval between purchasing a new part, others calmly drive hundreds of thousands of kilometers without complaining about anything. However, sooner or later the clogging of the elements will make itself felt.
There are a lot of components and assemblies in a car, and given a certain kind of behavior of the car, it is quite difficult to calculate where exactly the fault lies. When the car has trouble starting or stalls suddenly when switching to neutral (and this could be right in the middle of the street), the first thing to blame is a clogged fuel filter.
A critical drop in the car's acceleration performance indicates that the engine is unable to pull with increased fuel consumption. You'll have to crawl under the back seat. And although critical breakdowns should not occur if routine replacement is ignored, the fuel pump itself will sooner or later fail.
Cleaning old or replacing
The fuel filter is a disposable part that belongs to the category of consumables. Its design has a porous membrane that traps debris, resins, and paraffin. It is impossible to wash it. Moreover, the filter housing is non-separable, so trying to clean it and put it back will result in a headache.
But the coarse filter mesh, which is located at the outlet of the gas tank, can be washed - preferably in acetone, and then blown with a stream of air from the compressor.