If the wiper does not operate intermittently:
- disconnect the positive terminal from the battery;
- remove the decorative panel on the left side of the car, next to the hood release handle. There is a relay under the panel;
- unscrew the two screws securing the relay and disconnect the connector;
- install a new relay;
- putting everything back together;
In this guide, we did not touch on more complex troubleshooting diagrams for the windshield wiper system. Such as replacing the winding and armature of an electric drive or overhauling a windshield wiper gearbox, because this is a more complex task that requires certain special skills. With the modern availability of spare parts, it is easier to replace the entire unit than to repair it.
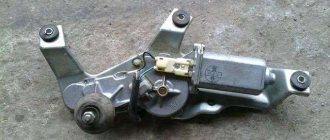
Features of removing the windshield wiper motor and trapezoid on a VAZ 2106
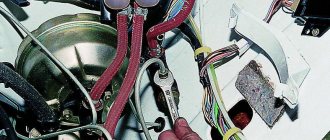
The first step is to disconnect the power plug from the wiper motor. To do this, disconnect it by pulling the ends to the sides with a little force:
Now you need to slightly lift the rubber of the hood seal from one edge, as is clearly shown in the photo below:
And after that we remove the wire with the plug from the slot in the body of the VAZ 2106:
Now you can unscrew the mount of the motor itself by slightly lifting the protective cover:
Then press on the slotted pins so that they fall inward. And we try to remove the windshield wiper motor, turning it from side to side to find the optimal position for removal:
Everything is ready; if necessary, we replace the entire mechanism along with the trapezoid. Again, I repeat, very few VAZ 2106 will have to undergo this procedure, since the entire structure is quite reliable.
Source
VESKO-TRANS.RU
AutoNews / Reviews / Tests
Repair of wiper motor VAZ 2106
Remove and install motor and trapezoid
I’ll say right away that in all the years of owning both myself and my father’s “classics,” I don’t remember the possibility of removing the windshield wiper blades using a motor. Engine repair with the wipers on, excess water is removed. Repair of the windshield wiper drive for the VAZ 2106 is available. It turns out that in my case this mechanism was always quite reliable and never needed repair or replacement. Replacing the furnace motor (fan) | repair of VAZ 2110. Modification of windshield wipers for VAZ 2101, 2106, complete set of windshield wiper blades, classic repair of VAZ VAZ. If you have a little less luck, then using your own VAZ as an example 2106
I'll try to outline the procedure. Replacement, removal and installation of the VAZ 2105 windshield wiper motor. And before that, as always, I will give a list of tools needed for repairs:
- Horn or combination wrench 22
- Head socket 10
- Ratchet handle with extension
The procedure for removing wipers on a “classic”
Unscrew one nut with 10 keys or head with handle wipers
:
Then we remove the levers from the wiper blade, smiling slightly, so that they jump out of their socket:
Repair home janitor
MY TASK AND THE TASK OF THE PARTNERSHIP PROGRAM
VAZ-2106 windshield wipers are slowed down, almost jammed, eliminated (trapezoidal positioning)
Repair
windshield wiper motor included
Vas
-2101-07, extend the service life of the motor.
Now take a 22mm wrench and unscrew the trapezoidal fastening from above:
And remove the plastic washers with washers as shown in the picture below:
Features of removing the windshield wiper motor and trapezoid on a VAZ 2106
First step. unplug the power cord. windshield wiper motor . repair of the brake system of the VAZ 2106 1 part of the VAZ car. VAZ 2101-2107 Repair and maintenance. 207 964. To do this, disconnect it with a little force by turning the sides:
Now you need to slightly lift the hood seal hood from one edge, as seen in the photo below:
And then we remove the wire from the plug from the socket on the back of the VAZ 2106:
Now you can unscrew the motor . Slightly lift the protective cover:
Then press down on the slotted pins so they fall inward. Vas 2106; home »and repair of VAZ windshield wipers for the VAZ 2107. Repair and removal and installation of the VAZ 2105 windshield wiper motor for all AvtoVAZ 2101, VAZ 2106. Their repair and adjustment. And try removing the windshield wiper motor by turning it from side to side to find the optimal removal position:
Everything is ready; if necessary, replace the entire mechanism along with the trapezoid. I repeat once again, this procedure requires very little VAZ-2106, since the entire structure is quite reliable.
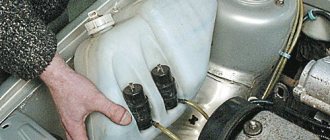
Windshield washer does not work
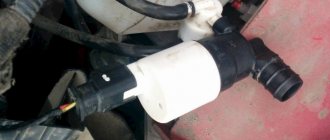
To remove dirt from the windshield, the washer is used together with the windshield wiper. The device sprays water or a special liquid. The main elements of this mechanism are:
- fluid reservoir;
- motor;
- nozzles;
- connecting tubes.
During the operation of a car with a washer, various problems may arise that lead to its inability to work:
- motor failure;
- fuse blown;
- kinking of tubes;
- breakdown of the steering column switch;
- poor contact on the power supply circuit.
Checking the motor
It is easy to check if the washer pump is not working properly. To do this, just open the hood and pull the lever of the steering column switch, which is responsible for the function of supplying fluid to the windshield. At this moment, the operation of the motor will be clearly audible. If this does not happen, then the malfunction may be caused either in the pump itself or in the fuse or other part of the electrical circuit. To make sure that the problem lies in the motor, we use a multimeter to measure the voltage when the washer is turned on. If there is voltage, but the pump does not work, then you need to take care of replacing it.
Video: checking the wiper motor on a “classic”
Injectors
If the motor is running, but liquid is not supplied through the nozzles, then the problem will not be difficult to identify, since there are only a few reasons for this phenomenon:
- clogged injector fittings;
- the supply tube has come off;
- kinking of the tube.
The malfunction can be determined by inspecting the tubes from the motor to the injectors. If there are no areas with kinks and the tube has not fallen off, then the reason lies in clogged nozzles, which can be cleaned with a sewing needle and blown out with a compressor.
Fuse and mounting block
The integrity of the fuse is checked in the same way as for windshield wipers. The same protective element as for the wipers is responsible for the operation of the washer. In addition to the fuse, sometimes the track in the mounting block through which power is supplied to the washer burns out. In this case, you need to disassemble the fuse box and restore the current-carrying element by soldering, having first cleared the varnish from the track.
You should start checking the steering column switch on a VAZ 2107 if the fuse, motor and the entire electrical circuit through which voltage is supplied to the pump are in good condition. In this case, the wiring should not have breaks, melted insulation or other visible damage. To check the steering column switch, only a multimeter will be enough. Having disconnected the connectors from the device in question, we connect the probes of the device in the dialing mode with a two-pin block. If the switch is working properly, then when the washer is turned on, the device will show zero resistance. Otherwise, the mechanism will have to be replaced.
Troubleshooting equipment
A failed washer that does not blow the windshield with a special liquid is restored. Most often, the injection pump needs to be replaced, which occurs in the following sequence:
- The contact group is removed from the device.
- Using a short screwdriver, remove the compressor from the hole.
- In its place we insert a new unit into the tank.
- We put connectors on the contact group, after which you can perform the test.
The engine operates with a characteristic sound when functioning correctly. The glass is blown with a water jet from the nozzles. If the tubes are replaced, you will have to wait a little time for them to fill with liquid. Using this system as intended will allow you to drive in any weather.
Reasons for blown fuses
Even from the school curriculum, many remember Ohm's law, which states that the current must necessarily increase if the resistance in a certain part of the electrical circuit decreases. The result of such a violation is the combustion of a special fuse link, which is located in the fuse block of the VAZ 21053. The circuit can only be opened by interrupting the connection.
It may happen that the fuse is installed incorrectly. In this case, the shell can melt even with the slightest jump in current in the electrical wiring.
The last reason for fuses to malfunction is simple wear. In any case, this will happen over time, since even the best detail does not last forever. The part of the fuse made of plastic is most often susceptible to melting due to heat or overload. Over time, this will cause the formation of a smaller cross section. Many people know that when heated, metal threads increase their resistance. Its increase entails a decrease in current. As a result, the device will burn out due to a sudden voltage surge.
Windshield wiper malfunctions VAZ 2106
Home • VAZ • 2106 • Cleaning windows and headlights
Electrical circuit for switching on the windshield cleaner and washer VAZ 2106
1 – washer motor; 2 – windshield wiper and washer switch; 3 – windshield wiper relay; 4 – purifier gear motor; 5 – fuse block; 6 – ignition switch; 7 – generator; 8 – battery.
Below is a table of the causes of malfunction of the VAZ 2106 wipers and methods for eliminating them:
Cause of malfunction Method of elimination The windshield wiper motor of the VAZ 2106 does not work. The wires are damaged, their tips are oxidized or loose, fuse F2 has blown. Crimp the terminals, replace the faulty wires, fuse
Eliminate the cause of its burnout The brushes are frozen to the glass Turn the ignition key to the “off” position, carefully separate the brushes from the glass, make sure that the rubber scraper is intact, restore the mobility of the brush connections A foreign object has gotten between the moving parts of the crank Check the correct installation of the levers, straighten the deformed levers or replace them windshield wiper The steering column wiper switch is faulty Replace the faulty switch The electric motor brushes are stuck, the commutator is very dirty or burnt Eliminate the stuck brushes, clean the commutator or replace the gear motor Break or short circuit in the armature winding of the electric motor Replace the gear motor The VAZ 2106 wiper motor does not work in intermittent mode The windshield wiper relay is faulty Replace the relay The steering column switch is faulty Replace the faulty switch The wiper motor of the VAZ 2106 does not stop intermittently The windshield wiper relay is faulty Clean the breaker contacts, replace the relay if necessary The contact plate of the gearmotor limit switch does not bend when the cam passes Disassemble the gearmotor and bend the contact plate or replace the gearmotor The limit switch contacts are oxidized Clean ite contacts or replace the windshield wiper motor The wiper blades of the VAZ 2106 stop in an arbitrary position The limit switch contacts are poorly pressed or oxidized Clean the contacts, if necessary, bend the switch plate or replace the gear motor The nut securing the crank on the shaft of the gear motor is loose Having installed the crank correctly, tighten the nut (pre-apply paint to the threads or anaerobic sealant) The electric motor of the VAZ 2106 windshield wiper is working, but the blades do not move. The nut securing the crank on the shaft of the gearmotor is loose. Having correctly installed the crank, tighten the nut (first apply paint or anaerobic sealant to the threads). The gear teeth of the gearmotor are chipped. Replace the gear or gearmotor.
Electrical equipment
The connection between power sources (battery, generator) and consumers is made using a single-wire circuit. The function of the second wire is performed by the body (“ground”), to which the negative terminals are connected. Electrical circuit diagrams for cars are presented in the Appendices. To switch the main circuits of the car, a combined ignition switch is used, consisting of a contact part and a mechanical anti-theft device with a lock. Switches for exterior lighting, fog lights, and rear window heating (on some vehicles) are installed in the instrument panel. The hazard warning switch, low brake fluid level indicator, instrument lighting switch, and cigarette lighter are located on the radio panel insert. The switches for the headlights, direction indicators, windshield wiper and washer are combined into a block of steering column switches. High-power electrical consumers (headlights, windshield wipers, etc.) are switched on via electromagnetic relays. The radiator of the cooling system is blown by an electric fan. The fan motor is turned on automatically through a sensor switch (previously, power was supplied to it through a relay based on a signal from a temperature sensor). A luggage compartment light is mounted on the rear panel (in the trunk).
ATTENTION! The circuits of the sound signals, the cigarette lighter, the brake signal power supply, the interior lamps, the plug socket for a portable lamp, and the alarm power supply are always energized. Fuse box. Fuse box
Fuse box
| The vehicle's on-board network circuits (except for the starter power circuit) are protected by fuses that are installed in the main and additional units. They are located under the instrument panel on the driver's side. |
The circuits protected by fuses are shown in the table.
| 1. When repairing electrical equipment, disconnect the negative terminal of the battery (with the ignition off). 2. Before installing a new fuse to replace the blown one, find out and eliminate the cause of the burnout. 3. Do not use oversized fuses or homemade fuses - this can lead to electrical wiring burnout and even cause a fire. |
Electrical circuits protected by fuses
| Fuse No. (rated current) | Names of equipment of protected electrical circuits |
| F 1 (16 A) | Sound signal. Plug socket for portable lamp. Cigarette lighter. Brake light bulbs. Watch. Body interior lamps |
| F 2 (8 A) | Windshield wiper relay. Heater electric motor. Windshield wiper and washer motors |
| F 3 (8 A) | High beam (left headlights). High beam warning lamp |
| F 4 (8 A) | High beam (right headlights) |
| F 5 (8 A) | Low beam (left headlight) |
| F 6 (8 A) | Low beam (right headlight). Rear fog light |
| F 7 (8 A) | Side light (left sidelight, right rear light). Trunk light. Right license plate light. Instrument lighting lamps. Cigarette lighter lamp |
| F 8 (8 A) | Side light (right sidelight, left rear light). Left license plate light. Engine compartment lamp. Side light warning lamp |
| F 9 (8 A) | Oil pressure gauge with warning lamp. Coolant temperature gauge. Fuel level indicator Battery charge indicator lamp. Direction indicators and corresponding indicator lamp. Indicator for carburetor choke opening. Rear window heating relay coil |
| F 10 (8 A) | Voltage regulator. Generator field winding |
| F 11 (8 A) | Spare |
| F 12 (8 A) | Spare |
| F 13 (8 A) | Spare |
| F 14 (16 A) | Rear window heating element |
| F 15 (16 A) | Cooling fan motor |
| F 16 (8 A) | Direction indicators in hazard warning mode |
| previous page15.18. Removing components and adjusting the parking brake system | next page 16.1. Checking electrical circuits |
Replacing the VAZ 2107 crosspiece is divided into the following stages:
So, the first thing that is necessary before dismantling the driveshaft is to put marks on the parts, this is done with a hammer and chisel, this is necessary in order to then install them in the appropriate places during reassembly.
If you do not do this, the following malfunctions are possible: vibration and beating when moving, this, of course, does not always happen, but still occurs, and it will be quite difficult to eliminate the cause yourself later.
Now you can begin to remove the driveshaft; to do this, unscrew the two thirteen nuts that secure the driveshaft to the car body.
Then you need to unscrew the rear part of the cardan, which is attached to the gearbox shank with four bolts.
Next we proceed to removing the crosspieces, to do this we thoroughly clean everything with a metal brush. We take special pliers for removing retaining rings and remove them photo 1.
If there are none, use a screwdriver to pry up the ring and use pliers to pull it out; even if it bends, it’s no big deal, we’ll still install a new one.
After which, once all the rings have been removed, we begin to knock out the cups of the cross. To do this we need a hammer and a drift or some kind of mandrel of the appropriate diameter.
If this whole process will take place on the floor, then we put something under the cardan eye so that when knocked out, the lower cup of the cross, and it is correctly called a needle bearing, does not rest on the floor.
Now we take a drift and place it on the upper bearing and hit it with a hammer, the lower one will fly down due to this, we also do the same from different sides (Photo 2).
After everything has been disassembled, we thoroughly clean the seats for the retaining rings, so that later there will be no problems with their installation.
Do-it-yourself modification and replacement of wipers
The wipers are modified if you are not satisfied with how they work. The modification consists of increasing their speed and improving the pressing of the rubber bands to the glass.
Photo gallery “Replacing windshield wiper blades”
1. Click on the plug.
2. Remove the brushes from the hook.
3. We attach a new element. The replacement procedure is carried out in stages: First, the lower arm is removed from the glass. Next, we find the plug that holds the blade. By pressing it, remove the used brush. When replacing rubber bands, make sure that the holders do not hit the glass and break it. You can wrap them with rags or a towel. The next step is to install the brush
It is inserted into the holder, carefully turning the part so that the hook fits into place. Next, you need to secure the hook and return the lever to its base position.
Wipers on VAZ do not work
The serviceability of windshield wipers directly affects traffic safety. It happens that the wipers refuse to work in some mode or do not turn on at all. Why? Windshield wipers of all cars have at least two operating modes - intermittent and constant. For convenience, this list also includes additional options, for example, a slow speed of a constant mode, one stroke for quickly cleaning the glass, and so on, right down to adjusting the pause between strokes. Technically, this is all quite easy to implement: the intermittent mode creates an electronic or mechanical relay paired with a switch inside the electric motor, and with the constant movement of the brushes, voltage is constantly supplied to the same electric motor. Let's look at typical windshield wiper malfunctions and methods for finding them.
Wipers do not work intermittently
As mentioned above, the breaker relay is responsible for the intermittent operation of the wipers. It can be mechanical (on older cars) or electronic. Accordingly, if the wipers work in constant mode (which is created by bypassing this relay) and do not work in intermittent mode, there is a reason to check the relay.
However, before starting the test, you need to make sure that the relay is receiving voltage from the steering column switch set to the intermittent mode position. It may well be that the malfunction lies in it, and not in the relay. In the steering column switch, in particular, the corresponding contact may oxidize or the wire connecting it to the relay may break.
Based on this, you need to find a wiring diagram for the wipers on your car and check whether current flows from the switch to the relay. If not, look at the switch. If there is current, check the relay.
Wipers do not work constantly
When the windshield wipers work great in intermittent mode, but refuse to move constantly, you can immediately talk about a malfunction in the same steering column switch or problems in the area between it and the wiper motor. Simply put, the voltage from the switch is not supplied to the motor. You also need to check this electrical circuit with a multimeter or a test light to make sure that all terminals are clean and securely fastened.
The wipers don't turn on at all
If the windshield wipers do not react at all to the steering column switch, you should start with a classic check - make sure the fuse is intact. If it is intact, you need to check the steering column switch for voltage supply to it and correct closure of the contacts inside. Most likely, there will be no voltage on it.
A special case of complete failure of the wipers is when they are blocked by something. This could be a wrench left under the hood, a rag, or frozen wiper blades (read what to do if your wiper blades are frozen). For such situations, a special fuse is usually installed in windshield wiper systems. This device saves the wiper motor from overheating and failure by turning off the power. In the simplest case, such a fuse is a heat-sensitive plate that, when heated, changes shape and opens the contact. After turning off the voltage, it returns to its previous position and you can use the device (in this case, the wipers) again.
When the wipers are blocked, they usually still move at least a little from their “parking” position. Therefore, if there is still a slight reaction to switching on, check the freedom of movement of the brushes and trapezoid. Most importantly, do this with the wipers off.
! Accidental activation of the windshield wiper can cause serious injury!
The pause between strokes is not adjustable
If your car has the ability to adjust the pause between wiper sweeps and this function stops working, the adjusting resistor is most likely to blame. This part, depending on the rotation of the knob (or wheel), changes the resistance value in the wiper relay circuit, due to which it is possible to adjust the pause. This resistor should be replaced.
Repair of windshield wiper VAZ 2106
Wiring diagram for windshield wiper and washer
| 1 – washer motor; 2 – windshield wiper and washer switch; 3 – windshield wiper relay; 4 – purifier gear motor; | 5 – fuse block; 6 – ignition switch; 7 – generator; 8 – battery. |
Execution order
Repairing a windshield wiper mainly comes down to straightening deformed parts of the lever drive or replacing them with new ones. We recommend replacing a faulty gearmotor with a new one. To check the condition of the gearmotor contacts, removing the windshield wiper is not required.
We remove the cover, opening access to the gearbox.
Unscrew the screws...
...and remove the cover.
We unscrew the screw of the bracket securing the wiring harness...
...and remove the panel with the gasket.
We inspect the contacts and conductive paths. We replace broken and worn elements in the assembly.
To remove the windshield wiper, disconnect the connecting block...
...and, having removed the left edge of the hood seal, remove the wiring harness from the panel slot.
Using a 10mm wrench, unscrew the nut securing the brush lever.
Using a 17mm wrench, pull the lever off the axle splines.
Use a 22mm wrench to unscrew the nut...
...and remove the bushing with the rubber gasket.
We also disassemble the drive of the second brush.
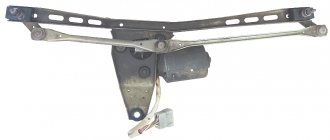
Using a 10mm wrench, unscrew the two nuts securing the windshield wiper to the body.
Carefully remove the cleaner, trying not to bend the drive rods.
Using a screwdriver, remove the short rod from the ball pin of the crank.
Using a 10mm wrench, unscrew the nut and remove the crank.
Use a 10mm wrench to unscrew the three bolts...
...and remove the purifier bracket.
To disassemble the gearmotor, remove the cover and panel with wires (as indicated above).
Using a screwdriver, remove the retaining ring...
...protective cap, steel and textolite washers.
After removing the seal and pressing on the axle, we push the gear out of the gearbox.
We remove the textolite and steel washers from its axis.
Using a screwdriver, unscrew the two screws securing the gearbox...
...remove the plates...
...and remove the motor housing, holding the armature by the worm with a screwdriver.
We remove the armature from the gearbox with the adjusting washer placed on its axis.
A spring and a thrust bearing installed at the end of the channel remain in the cover.
Remove the brushes from the brush holder. To remove dust from the electric motor, blow it with compressed air. We check the condition of the brushes, commutator and armature winding. The brushes must move freely in the brush holders without jamming, and the springs must remain elastic and not be damaged. We clean the collector with fine-grained sandpaper, then wipe it with solvent or gasoline
If the commutator is badly burned or worn out, it is better to replace the electric motor. We begin assembling the windshield wiper by installing the armature in the electric motor cover, for which...
...using a thin screwdriver we bend the end walls of the brush holders...
...and insert the brushes into them, recessing them completely, as far as the slots for the wires allow.
We install an anchor in the lid.
At the ends of the brush holder we insert the springs into place and bend the bent walls of the brush holders.
Having coated the gear and other rubbing joints with Litol-24 lubricant, we carry out further assembly in the reverse order of disassembly.
ATTENTION! To ensure proper operation of the wiper blades (so that the wiper blades stop in the correct position):
...before installing the gearmotor on the bracket, turn it on for a short time, connecting it to the vehicle’s on-board network via a connector.
Only after the electric motor has completely stopped do we disconnect the block and continue further assembly.
We install the crank parallel to the short drive rod.
Injection engine control unit diagram
Electrical connection diagram for the injection engine control system:
1. — Controller connector. 2. — Mass air flow sensor. 3. — Coolant temperature sensor. 4. — Crankshaft position sensor. 5. — Throttle position sensor. 6. — Oxygen concentration sensor. 7. — Speed sensor. 8. — Ignition module. 9. — Electromagnetic valve for purge of the adsorber. 10. — Electric fan relay. 11. — Electric fuel pump relay. 12. — Main relay. 13. — Fuse protecting the power circuit of the electric fuel pump relay. 14. — Fuse protecting the power circuits of the main relay. 15. — Fuse link. 16 - Fuse protecting the constant power supply circuit of the controller. 17. — Diode. 18. — Idle speed regulator. 19. — Injectors. X1. — Diagnostic block. X2. — Connection block to the vehicle electrical system.
Transmission oil change
To carry out the work you will need the following tools:
Changing the oil in a VAZ 2105 gearbox is carried out as follows.
The process of changing the oil in the rear axle gearbox of this vehicle is carried out in a similar way. First, the drain plug is removed, then a similar part of the gearbox is unscrewed. Transmission oil is filled to the lower level.
If the fluid in the gearbox or gearbox is dirty, it is necessary to flush the gearbox or gearbox housing. For these purposes, the oil is mixed with a diesel analogue, and the diesel content must be at least 30%. Lubricant is poured into the gearbox or gearbox. Next, the rear wheel of the VAZ 2105 is lifted onto a jack. The engine starts and first gear is engaged. In this position the car runs for 3-4 minutes. Then the oil is drained and fresh transmission fluid is added. The process of flushing the crankcase is carried out both independently and with the help of professionals. In any case, you must adhere to the above recommendations.
https://youtube.com/watch?v=CYtzF4p9KBU
Sources
- https://remont-vaz2106.ru/vaz-2105-kak-snyat-korobku-peredach
- https://avtovazlada.ru/index.php?page=2989
- https://expertvaz.ru/2105/remont-korobki-peredach.html
Signs and possible causes
Here are the most common signs that indicate a malfunctioning element, as well as their main causes.
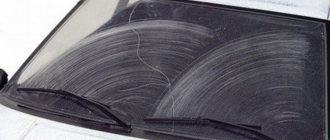
Streaks appeared on the glass.
A similar effect usually occurs when cracks form in the edge of the tape. Cracks can occur due to brushes running on dry, dirty glass, ice crust or insects stuck to the glass. To prevent this problem, you should remove any dirt or ice from the windshield before turning on your windshield wipers. This can be done with a napkin, and during frosts you need to use a special scraper that will remove ice from the surface. Cracks can also form due to the natural aging of the part. Under the influence of ultraviolet rays, rubber loses elasticity and other performance properties.
In this case, repair is impossible, and the correct solution would be to replace the brushes.
Cloudy glass.
The wipers are working, but the glass remains cloudy:
- there is resin or some viscous chemical compound on the surface;
- there was a longitudinal rupture of the rubber band.
In the first case, the glass must be thoroughly washed; for this you can use special chemical compounds. The second situation occurs when the cleaning element of the brushes does not maintain the specified operating angle; the wipers should be replaced.
Uncleared areas.
Such areas appear on the windshield due to deformation of the rubber tape. As a rule, one of the factors leads to this:
- contamination of frame brushes;
- change in shape under the influence of temperature.
Fixing the first type of problem is quite simple - you just need to remove the wipers and wash them with warm water. In the second case, when high temperature is applied to the element for a long time, the rubber band becomes deformed. Therefore, you should not leave your car in direct sunlight for more than one day. Or at least raise the brushes so they don't touch the glass.
Such deformation is usually irreversible, so replacement is necessary.
Wipers "jumping" on the glass.
This problem appears in such a way that the brush begins to jump on the glass, leaving streaks. The VAZ 2103 car is equipped with classic windshield wipers, in which the mechanism of the rocker arms, mounting unit or system leads can become loose. In this case, the play of the drivers and rocker arms is usually checked, as well as the correct attachment of the brush to the driver. Most likely it will need replacement.
There is another reason, which lies in the curved wiper leash, and the usual situation is when one side is cleaned well, while the other remains dirty. Most likely the leash is a little twisted and needs to be fixed or replaced.
This is what the main malfunctions of windshield wiper blades look like and their possible causes. To repair the windshield wipers of your VAZ 2103, you can contact Expo Car Service, a specialized auto service center that provides any restoration services for domestic and foreign cars.
We guarantee that our clients will not face large markups on work and will be able to benefit from high-quality and affordable service.
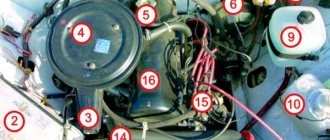
Main components of VAZ
I’ll say right away that in all the years of ownership of the “classic” by both me and my father, I don’t remember a time when I had to remove the windshield wiper trapezoid together with the motor. It turns out that in my case this mechanism was always quite reliable and never needed repair or replacement. If you are a little less fortunate, then using my VAZ 2106 as an example, I will try to describe the procedure for performing the procedure. And before that, as usual, I will give a list of necessary tools for repairs:
- Open-end or combination wrench 22
- 10mm socket
- Ratchet handle with extension
Wipers do not work on VAZ 2106
VAZ-2106 windshield wipers are driven by an electric motor that transmits torque through a gearbox to a mechanism that drives the blades. The easiest malfunction of this device to troubleshoot is the weakening of the crank fastening, which occurs due to the loosening of the fastening nut under the influence of vibration. Once you tighten it, everything returns to normal.
Another malfunction that leads to the fact that the blades, after turning off the wipers, do not return to the lower edge of the windshield, occurs due to an increase in the gap between the contacts of the limit switch, or due to their burning. In this case, you will have to either bend or clean these contacts.
If the wipers refuse to work in a mode called intermittent, then the culprit for this malfunction will be the windshield wiper relay. It most likely has stuck contacts or a burnt out winding. The contacts can be cleaned and then the relay will work, but if the winding is at fault, the relay will have to be replaced.
In the cold season, at subzero temperatures, the wiper blades may freeze to the windshield and will not be able to move when the windshield wiper is turned on. In this case, warm water will help to warm them up.
The remaining malfunctions can be divided into two groups: the wiper motor works, but the brushes do not move and when the electric motor does not work. In the first case, the culprit may be a gearbox whose plastic gear teeth have been cut off. In the second case, when the noise of the windshield wiper motor is not heard, there may be many more reasons. This could be a blown fuse or a malfunction in the wiper switch located on the steering column, as well as wear on the commutator brushes.
Windshield wiper device
In order to repair non-working wipers of a VAZ 2107, you need to know the structure of the windshield wiper (the author of the video is Avtoelektika VC).
Schematic diagram of a glass cleaner
On sevens, a windshield wiper of the SL-193 type is installed. It is located in the engine compartment in the heater air plenum box. Its electrical circuit is similar to the electrical circuit of the glass wipers on the VAZ 2106.
Electrical circuit of the purifier
- fuse;
- electric motor of the unit;
- fuse box;
- a switch that supplies water to the glass;
- a switch that changes the speed of movement;
- relay;
- egnition lock.
The windshield wiper consists of a lever mechanism, brushes, levers and an electric motor with a gearbox. The mechanism is turned on using a switch on the steering column, which also turns on the washer motor. Thanks to the motor and gearbox, a rotational movement is created that drives the trapezoid.
VAZ cleaner gearbox
The shafts are connected to the gearbox by rods and transmit oscillatory movements. As a result, the brushes move across the surface and clean it of dirt.
A washer is installed to remove dirt. The design of the VAZ washer includes: a motor, a pump, nozzles and a reservoir. The motor starts the washer pump, which pumps up the fluid in the washer reservoir. It sprays onto the glass through the nozzles.
Technical side of the issue
How to modify the wiper relay?
Let's start with why this is needed at all. In heavy rain, the classic wipers cope very well, and the speed is quite decent. But when the rain is lightly drizzling, thousands of “classic” drivers scold the plant for the fact that it is impossible to select the required frequency of operation of the windshield wipers. And so, it turns out that they work on dry glass for a long time, which is not good. To avoid this unpleasant phenomenon, you have to turn the wipers on and off manually.
Many will say that there is nothing complicated there - turn it on/off, yes, I agree, but if you drive at least 100 kilometers, your opinion will change.
Lighting repair
Possible causes of malfunction
So, if the low beam on a VAZ 2106 in one of the headlights has disappeared, then, as mentioned above, most likely the light bulb has burned out.
If replacing the lamp does not produce results, then the following malfunctions may occur:
- The contacts in the block are oxidized or burnt;
- The fuse has blown;
- The relay has failed;
- The switch is faulty;
- There is a break in the circuit.
Below we will take a closer look at how to diagnose and fix the problem.
H4 standard double filament bulb
Replacing a light bulb
First of all, it should be said that the low beam lamp on the VAZ 2106 complies with the H4 standard, i.e. it has two threads, which allows the headlight to operate in two modes. Currently, such light bulbs are produced by different companies, both well-known brands and little-known companies.
It should be noted that domestic light bulbs are very popular among car owners. Their price is significantly lower than their imported counterparts, but at the same time they are not inferior in quality.
Advice!
It is advisable to change the bulbs in two headlights at the same time, since their service life is approximately the same. In addition, different lamp models may differ in glow.
Instructions for doing this work look like this:
First of all, you need to use a flat-head screwdriver to dismantle the plastic panel that frames the headlights.
The photo shows the dismantling of the plastic panel
- Then use a Phillips screwdriver to loosen the clamps that hold the headlight.
- Next, you need to slightly turn the metal hoop and dismantle it.
Headlight fixing screws
Now you can pull out the headlight with your own hands and disconnect it from the block
At this stage, you need to pay attention to the connector contacts. If necessary, they need to be cleaned. Then you need to unfasten the lock and remove the light bulb. Next, the work is performed in the reverse order - a new lamp is installed, which is pressed with a clamp, and the block is connected to the contacts
The headlight assembly must be installed in place and secured with a hoop. To complete the work, a plastic panel is inserted, on which you need to press lightly until you hear a characteristic click.
Note!
When replacing a lamp, do not touch its glass bulb with your fingers, otherwise it may quickly burn out. If you do touch glass, you should wipe the surface with a cotton swab soaked in alcohol.
This completes the process of replacing the light bulb.
Replacing fuses
If after replacing the light bulb the low beam headlight on 2106 still does not light, you should check the fuses. They are located under the instrument panel.
Fuse box location
In this case, you need to pay attention to two fuses:
- No. 5 – protects the left headlight from short circuit;
- No. 6 – protects the right headlight.
It must be said that the low beam on the VAZ 2106 often does not work due to the fuse contacts being bent or oxidized. In this case, they need to be bent and cleaned. If the protective element has melted, it must be replaced.
Fuse diagram
Note!
The contacts in the fuse box cannot be closed directly, since the protective element could burn out due to the failure of the electrical equipment; accordingly, this could lead to more serious damage or even a fire in the VAZ wiring.
https://youtube.com/watch?v=Sp-9eKkz-IQ
https://youtube.com/watch?v=6VxE8x8KVaQ
How to repair a windshield wiper yourself
The essence of how to repair wipers on a VAZ 2110 is to fix the levers or deformed wiper rods. Often the reason is due to contamination of parts. If it is impossible to repair the wipers, then they must be completely replaced. Often the cause of the breakdown can be the gear motor, and if you replace the gears in it, clean the contacts of the commutator or limit switch, everything will work. If it is not possible to repair the gearmotor, it will have to be replaced with a new one.
Step-by-step process for repairing a gearmotor
All work must be done in order and nothing should be missed:
- remove the windshield wiper (on the VAZ 2110 it is completely removable);
- unscrew the nut securing the leash;
- remove the leash itself.
removing the arm from the windshield wiper
Let's go further and continue repairing the VAZ 2110 wipers:
- it’s the turn of the gearmotor (it is sometimes wrapped in a thin leather film that needs to be removed);
- unscrew the three gearmotor bolts, marked with arrows in the top photo;
- remove the black plastic cover by unscrewing two screws;
- After removing the cover, unscrew the following screws.
Removing the windshield wiper motor gearbox VAZ 2110
We continue and by the way, it is also possible to repair wipers on the VAZ 2107:
- take out the plate with 3 contacts located on it;
- then remove the brown gasket;
- we see the design of gears and rollers;
- remove the largest gear together with the roller, revealing a plastic washer underneath it;
- We remove two small gears, which must be marked before removal (this is done so as not to confuse their original location, because they do not have the same inclination of the teeth).
Removing the gear motor gear of the VAZ 2110 windshield wiper
Let's move on:
- disconnect the gearbox from the electric motor by unscrewing two screws located oppositely;
- remove the armature from the metal housing of the electric motor;
- At this stage, you should thoroughly clean all parts from dirt and old grease (use a rag soaked in acetone).
Cleaning the wipers of the VAZ 2107, the repair of which can also be carried out according to this scheme, requires care and a detailed inspection:
- press with your fingers on the three brushes located in special holders (they must move freely, and if they go down tightly, then there are defects or cracks and they need to be completely replaced);
- We check three springs, which should be straight, without stretching or breaking.
gearmotor springs
We continue the repair of VAZ 2107 or 2110 wipers by inspecting the collector. For this:
- inspect it for damage, scratches or dirt;
- in case of severe contamination, it is recommended to go over with fine sandpaper (if this does not give any results or it is already clear that the collector is very worn, the entire armature or the entire gearmotor will need to be replaced);
- We inspect the gear teeth of the gearbox and replace them if gross scratches or other defects are found;
- if defects are found on the threads of the lever rollers or brushes, then the complete set of rods must be replaced;
- inspect the limit switch plate and, if necessary, rub sandpaper along it;
- we inspect the fastening of the leash, or rather its black rubber pads (if they have lost their elasticity or burst, you need to replace them with new ones - replacement is carried out by removing the internal steel spacer sleeve);
On the VAZ 2109, windshield wiper repairs are carried out in the same way, that is, they start with the gear motor. So, let's continue:
we assemble the windshield wiper, having first lubricated all the parts well (you should especially pay attention to the shaft worm of the armature and gears - use Litol-24 lubricant, and put the marked gears in place exactly); install an anchor by tying the brushes with wire to the contacts (this stage of work is carried out in order not to bend the brushes and therefore they must be folded); we mount the anchor into the gearbox housing very carefully; We install the electric motor housing on the gearbox, holding the armature shaft; untie or bite off the wire holding the brushes and knock on the gearmotor with a wooden hammer to center the bearings; We install the leash back on the axle, which must be in a horizontal position and proportional to the central rod.
So:
- shaft rotation speed, if the voltage is supplied to 14 V is low - thirty or forty;
- shaft rotation speed of a higher value - seventy;
- current consumed at first speed – 3.5 A;
- at second speed – 5 A.
Problems when paying with bank cards
Sometimes difficulties may arise when paying with Visa/MasterCard bank cards. The most common of them:
- There is a restriction on the card for paying for online purchases
- A plastic card is not intended for making payments online.
- The plastic card is not activated for making payments online.
- There are not enough funds on the plastic card.
In order to solve these problems, you need to call or write to the technical support of the bank where you are served. Bank specialists will help you resolve them and make payments.
That's basically it. The entire process of paying for a book in PDF format on car repair on our website takes 1-2 minutes.