Symptoms of a faulty crankshaft position sensor
How does the engine crankshaft position sensor (CPS) work?
The crankshaft position sensor (CPS) of the vehicle's electronic injection engine control system (ECM) (also known as a synchronization sensor) sends pulses to its control unit (ECU), based on the presence and frequency of which it determines the position of the piston in the cylinder (stroke) and the crankshaft speed. .
Based on the data received, the ECU determines the moment and volume of fuel injection, the moment and force of sparking. That is, it synchronizes engine operation with the operation of the ignition and fuel injection system depending on the load at a particular time.
You can accurately determine the malfunction of the crankshaft position sensor using diagnostic equipment. But you can check the DPKV yourself, without special diagnostic devices. There are several signs that directly or indirectly indicate a problem with it.
Signs of a malfunctioning crankshaft position sensor (CPS)
When a malfunction of the DPKV occurs on the instrument panel, in most cases the CHECK ENGINE warning lamp lights up.
— The car engine does not start
The starter turns the engine, but it does not start, there is not even any spark in the cylinders. DPKV is the only sensor of the engine management system, if it fails, the car engine does not start at all.
A similar situation is also possible if the timing belt breaks.
— The car engine is difficult to start
The engine starts after several starting attempts, but is unstable at idle and tries to stall.
Similar symptoms may occur if other ECM sensors fail. For example, idle air control. If the start occurs after pressing the gas pedal, then the idle speed control is most likely to blame.
— The engine “troits” at idle
The engine has difficulty maintaining idle speed and tries to stall.
Similar symptoms may occur if other ECM sensors fail. For example, idle air control.
— Dips and jerks when pressing the gas pedal
When you press the gas pedal while the engine is idling or while the car is moving, you feel a dip or a series of dips (jerks).
When independently determining the malfunction of the position sensor, it should be taken into account that the sensor itself may fail, or its wiring may be faulty, or there are problems with its fixation on the engine or contamination. Therefore, first of all, we carry out a visual inspection for the presence of contamination and reliability of the sensor fastening. We check the connector of the wiring harness going to it. If necessary, replace the sensor with a known good one and check engine operation.
Notes and additions
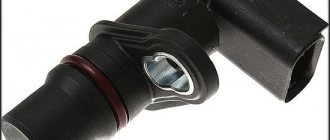
— The principle of operation of the DPKV is based on the Hall effect - when the flywheel teeth sensor or the crankshaft pulley drive disk (depending on where the sensor is located) passes through the electromagnetic field, pulses of a certain frequency are sent to the ECU. When a missing tooth or slot passes through the sensor field, the pulse changes, which serves as a signal that the pistons have reached top dead center and, accordingly, the moment of fuel injection and ignition.
The Renault Megane 2 crankshaft position sensor, depending on the type of instruction or catalog, can have several names: DPKV - crankshaft position sensor, synchronization sensor. Sometimes you can find the name DVMT. The main purpose of the part is to synchronize the injectors and the ignition system. If it is faulty, then problems begin with the fuel injection system.
During operation, the device receives signals transmitted by the Renault Megane 2 crankshaft pulley. The principle of its operation may be different, depending on the engine design. There are 3 main models:
- Electromagnetic
- Hall Sensor
- Optic
The crankshaft position sensor generates pulses that are processed by the electronic control unit. The signals received by it are generated by teeth located on the flywheel. Two of them have an increased interval, which, when combined with the sensor, transmits a modified signal processed by the ECU.
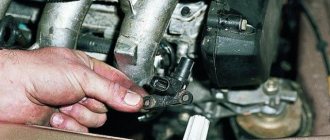
The element is located to the left of the cylinder block, in the clutch housing. In cars with an automatic transmission it is located in the crankcase. A long wire is used to connect the DPKV so that it can be secured close to the generator. Installation is carried out using washers and gaskets. During operation, malfunctions may sometimes occur, which are accompanied by the appearance of the “CHECK ENGINE” signal. In this case, further operation of the vehicle is prohibited. The DPKV cannot be repaired, so it needs to be replaced.
Replacement occurs in the following sequence:
Using a slotted screwdriver, the latch is disconnected and the wire block is removed.
Use a 10-mm wrench to unscrew the fastening bolts.
If you cannot disconnect the wiring block in place, it is better to unscrew the bolts securing the device and disconnect the wires on the removed one.
In the photo below you can see the device in operation. A large amount of dirt remains on it.
If the error occurs intermittently, then the problem may be accumulated dirt and the part needs to be cleaned to restore operation.
To replace the required part, you need to look at the exact catalog number of the part, which is printed on the body.
Symptoms of a faulty crankshaft position sensor
How does the engine crankshaft position sensor (CPS) work?
The crankshaft position sensor (CPS) of the vehicle's electronic injection engine control system (ECM) (also known as a synchronization sensor) sends pulses to its control unit (ECU), based on the presence and frequency of which it determines the position of the piston in the cylinder (stroke) and the crankshaft speed. .
Based on the data received, the ECU determines the moment and volume of fuel injection, the moment and force of sparking. That is, it synchronizes engine operation with the operation of the ignition and fuel injection system depending on the load at a particular time.
You can accurately determine the malfunction of the crankshaft position sensor using diagnostic equipment. But you can check the DPKV yourself, without special diagnostic devices. There are several signs that directly or indirectly indicate a problem with it.
Signs of a malfunctioning crankshaft position sensor (CPS)
When a malfunction of the DPKV occurs on the instrument panel, in most cases the CHECK ENGINE warning lamp lights up.
— The car engine does not start
The starter turns the engine, but it does not start, there is not even any spark in the cylinders. DPKV is the only sensor of the engine management system, if it fails, the car engine does not start at all.
A similar situation is also possible if the timing belt breaks.
— The car engine is difficult to start
The engine starts after several starting attempts, but is unstable at idle and tries to stall.
Similar symptoms may occur if other ECM sensors fail. For example, idle air control. If the start occurs after pressing the gas pedal, then the idle speed control is most likely to blame.
— The engine “troits” at idle
The engine has difficulty maintaining idle speed and tries to stall.
Similar symptoms may occur if other ECM sensors fail. For example, idle air control.
— Dips and jerks when pressing the gas pedal
When you press the gas pedal while the engine is idling or while the car is moving, you feel a dip or a series of dips (jerks).
When independently determining the malfunction of the position sensor, it should be taken into account that the sensor itself may fail, or its wiring may be faulty, or there are problems with its fixation on the engine or contamination. Therefore, first of all, we carry out a visual inspection for the presence of contamination and reliability of the sensor fastening. We check the connector of the wiring harness going to it. If necessary, replace the sensor with a known good one and check engine operation.
Notes and additions
— The principle of operation of the DPKV is based on the Hall effect - when the flywheel teeth sensor or the crankshaft pulley drive disk (depending on where the sensor is located) passes through the electromagnetic field, pulses of a certain frequency are sent to the ECU. When a missing tooth or slot passes through the sensor field, the pulse changes, which serves as a signal that the pistons have reached top dead center and, accordingly, the moment of fuel injection and ignition.
More and more of our compatriots prefer French-made cars. Despite the loud statements of many car enthusiasts, cars such as Citroen, Peugeot and Renault have proven themselves to be reliable vehicles. Like any other cars, these vehicles are equipped with various regulators to ensure normal operation of the car. For more information about what the Renault Megane 2 reverse sensor is and what other controllers are responsible for, read this article.
Idle mode of an injection engine
The ECM (electronic engine management system) is responsible for maintaining idle speed at the required level. The ECM control unit (ECU), based on data received from various sensors, determines the amount and duration of fuel injection by injectors at idle, controls the idle speed regulator, and also sets the desired ignition timing required to maintain a certain crankshaft speed.
The order of operation of an injection engine in idle mode using the example of engine 2111 of VAZ 21083, 21093, 21099 cars
— Before turning on the ignition, the idle air control rod (IAC) is extended to its maximum and completely covers the cross-section of the bypass (air) channel in the throttle assembly.
— After turning the key in the ignition switch, the ECU determines the temperature of the coolant (signal from the temperature sensor - DT), determines that the throttle valve is completely closed (signal from the throttle position sensor TPS), the car is standing or driving (signal from the speed sensor - DS) .
Based on the data obtained, the position of the idle speed control rod is calculated at which it slightly opens the bypass channel to a certain clearance, which ensures the flow of air necessary for the engine to idle.
— After starting the engine, the control unit receives information from the crankshaft position sensor (CPS) about its rotation, from the temperature sensor about the coolant temperature, from the throttle position sensor that the damper is closed, from the mass air flow sensor (MAF) about the volume of incoming air into the engine, from the speed sensor about whether the car is standing or moving.
Based on the data received, the control unit sets the IAC rod to a position that provides optimal clearance of the air channel under the throttle valve. This ensures the flow of air into the engine cylinders necessary to maintain minimum stable speeds. In addition, it determines the duration and amount of fuel injection through the injectors, and determines the ignition timing.
As the engine warms up, the temperature of the engine increases, the temperature sensor signals this to the control unit and it moves the idle speed control rod, reducing the clearance of the air channel. The magnitude and duration of injection are reduced, and the ignition timing changes. The crankshaft speed gradually drops to 650-750 rpm.
If a warm engine starts and idles, then in the same way, based on the data received from the sensors, the control unit sets the regulator rod to the desired position.
In systems with feedback, the magnitude and duration of injection, and the ignition timing are calculated taking into account the readings of the oxygen sensor (poor-rich mixture). On a cold engine, the oxygen sensor does not work; readings from it begin to be taken as the engine warms up.
When you press the gas pedal, the throttle valve opens slightly, and the TPS signal about this is sent to the control unit. The engine idle mode stops. The regulator rod is set in such a position that when the throttle valve is suddenly closed, it quickly ensures the flow of additional air into the engine through the air duct and prevents “failure” in its operation.
If the car is moving with the gear engaged and the throttle completely closed (downhill, on a flat area, when braking with the engine, while changing gears), the ECU switches the system to forced idle mode (FIL) (fuel does not flow into the engine, it operates by inertia ).
Notes and additions
— Idle speed of a car engine is operation at low speeds (650-750 for injection VAZ 21083, 21093, 21099) with the throttle valve fully closed.
— In the event of a malfunction of the IAC, it is worth checking its electrical part.
Source
Signs of DC failure
Sensor malfunctions can be identified by the following symptoms:
- Gear shifting is difficult. The car seems to lack power (traction).
- Inconsistent engine operation at idle and while driving. Vibrations and extraneous sounds are recorded.
- Ignition of fuel fluid in the cylinders. A dangerous phenomenon that can cause the entire vehicle to catch fire.
- Problems with starting the engine after a long period of inactivity, as well as in warm and cold seasons.
How does the sensor work?
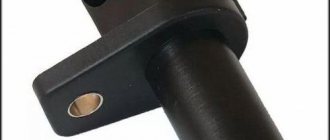
To learn how to troubleshoot the specified device, you need to understand its design and understand the principle of operation. The sensor design is simple and includes the following elements:
- multi-turn coil;
- magnetic core;
- the coil leads are soldered to the connector contacts;
- non-separable plastic case with a hole for fastening.
The meter is installed in close proximity to the toothed pulley attached to the crankshaft on the timing gear side. Through conductors, the sensor is connected to the main electronic unit that controls the operation of the motor.
The magnetic core is brought out through the end part of the plastic case and is as close as possible to the teeth of the rotating pulley. The gap between the parts does not exceed 1 mm.
The operating principle of the device is based on the phenomenon of electromagnetic induction. When a significant mass of metal passes in close proximity to the core, the coil generates a short-term electrical impulse. The teeth of the rotating pulley cause a series of such impulses, transmitted through the wires to the controller. Thanks to this, the electronic unit always “knows” the position of the crankshaft, determines the top dead centers of all pistons and promptly sends a command to the injectors to inject fuel.
This is where the second name of the device came from – crankshaft speed sensor. It must be understood that impulses are generated only under the dynamic influence of the metal mass, that is, when the pulley rotates. If the crankshaft has stopped, no current occurs in the element circuit.
Why do you need a recreation center?
The sensor is required to determine the following engine performance readings:
- recording the moment when the pistons pass the top and bottom dead centers in cylinders 1 and 4;
- fixing the position of the crankshaft;
- fixing the crankshaft speed;
When data is recorded, the measuring device transmits it to the electronic control unit. In turn, the electronic control unit processes the information and synchronizes with the working strokes of the engine.
We replace the sensor in the following sequence:
1. Remove the decorative trim of the engine (if there is one).
2. Using a slotted screwdriver, carefully lift the latch and remove the connector from the sensor.
3. CAREFULLY prying with a slotted screwdriver from different sides, gradually remove and remove the sensor.
4. Install the new sensor in reverse order.
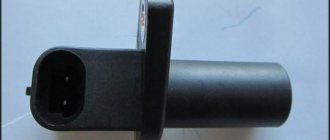
Next, for comparison, I am posting photographs showing the original sensor and the NP51106141 sensor.
As you can see, the sensors are identical. I don’t think that the vacuum supply pipe on the original sensor is completely broken off. It’s just that when removing the sensor from the receiver, I had to break it off completely, otherwise there was no way to remove it.
I hope this information will be useful for you!!! Thank you for your attention!
Crankshaft sensor for Renault Megane II LM0/1 Sedan 1.6 113 HP id17726
Manufacturer: BOSCH Germany
Article number:0 986 280 410
- Manufacturer: FAE Spain
- Article:79298
- Number of poles:3
- Sensor type: hall sensor
Manufacturer: FACET Italy
Article number:9.0543K
- Manufacturer: ERAItaly
- Article:550537
- Resistance [Ohm]:230
- Height [mm]:24
- For article no.:550537
- Number of connections:2
Manufacturer: BOSCH Germany
Article number:0 986 280 433
- Manufacturer:MOBILETRONTaiwan
- Article:CS-E013
- Number of poles:2
Manufacturer: FAE Spain
Article:79028
- Manufacturer:HOFFERItaly
- Article:7517401
- Additional article / Add. information 2:no cable
- Sensor type: hall sensor
- Number of poles:3
- Height [mm]:28
Manufacturer: FACET Italy
Article:9.0543
- Manufacturer:MOBILETRONTaiwan
- Article:CS-E003
- Number of poles:2
- Manufacturer: OPTIMALGermany
- Article:07-S034
- Sensor type:passive sensor
- Additional article / Add. Information 2: Without vehicle-specific adapter
- Equipment/equipment: for vehicles with automatic transmission
- Number of poles:2
Manufacturer: DELPHIUSA
Article:SS10803
Pages:
Search, removal and installation
According to the functionality, the crankshaft sensor is located near the connection between the automatic transmission box and the car engine. To get to it, you need to remove the air conditioner inlet and filter housing. The position of the device at a dead center indicates the need for cleaning or replacement.
Although it is worth noting that on Renault Megane II with an engine capacity of 2.0 rather than 1.6, the crankshaft and sensor are located in a slightly different place - under the battery. And its removal and replacement are carried out using a pit or a lift, i.e. from below the car. To remove the sensor you will need the following tools:
- extension cords;
- cardan coupling;
- a wrench with a head of at least 10, but preferably 11 mm, and ideally about 1 meter long;
- if necessary, carrying for better lighting.
First of all, we remove the battery pad. Next, using a thin slotted screwdriver, separate the connector retainer and the wire block. If difficulties arise, then simply move the block as long as the length of the wires is enough, then the process of removing the block will not be difficult
Now you need to unscrew the two mounting bolts and remove the device. It is important not to lose the rubber gasket and make a note of where it was installed. If necessary, clean or replace the sensor
Cleaning it is not difficult, you just need to wipe it with a clean rag soaked in gasoline. Often this helps and the problem can be solved in this simple way. However, in any case, be careful when cleaning - this is a rather fragile element.
After installing the device, it is necessary to configure the programming of the toothed section of the flywheel. This is done by decelerating twice in sequence in third gear at a maximum speed of 4,000 rpm. Until the fuel is supplied again, which indicates normal operation of the ECU.
If malfunctions are found, they must be eliminated according to the instructions and make sure that the machine is fully operational.
Replacing the sensor is not problematic; even a novice car enthusiast can do this after reading the instructions. The difficulty, as was said at the beginning of the article, is the differences in engine models on Megan and also the differences in models and locations of the crankshaft sensor itself. Although since 1985 it has been available in the only current form: 8200673202 and 8200647554.
Required Tools
To replace the crankshaft position sensor on Megan 2 with your own hands, you need the tools from the list given in the table below.
Table - Tools required to replace the crankshaft sensor
| Name | Note |
| Spanner | Set |
| Head | "on 10" |
| Screwdriver | Medium size, flat blade |
| Vorotok | With ratchet and extension |
| Penetrating lubricant | For releasing rusted threaded connections |
| Rags and wire brush | For cleaning work surfaces from dirt |
Signs of sensor problems
The crankshaft speed meter is considered a fairly reliable device, functioning properly for 100 thousand km or more. There are often cases when an element lasts the entire service life of the car. A crankshaft sensor malfunction may occur for the following reasons:
- An internal break or short circuit of the coil winding occurs due to prolonged exposure to vibration transmitted from the engine. Such a breakdown is very rare.
- Open circuit between the device and the controller. The reasons are the same vibration, melting of conductors from contact with hot parts of the engine, or accidental damage by a car enthusiast.
- Mechanical destruction of the body occurs during repairs carried out in the engine compartment. For example, being hit by a broken wrench.
- Loss of contact in the connector due to oxidation or loosening.
- Contamination of the working surface interacting with the toothed pulley.
The last item on the list requires a separate explanation. It is common knowledge that electromagnetic fields penetrate dielectric materials, including dust and dirt. But at the location of the sensor, small metal particles and chips flying from gears are added to traditional contaminants. When they hit the end of the core, they shield the magnetic field, causing the electrical pulse to gradually weaken.
How a car owner can identify the symptoms of a sensor malfunction:
- When the element completely fails, the engine stalls and does not show signs of “life” during subsequent attempts to start, since the controller does not “see” the position of the crankshaft. A broken electrical circuit gives a similar result.
- Unstable operation at idle. The engine speed “jumps” and vibration of the power unit is observed.
- Loss of power from the power unit, failures during acceleration.
- Increased consumption of gasoline or diesel fuel.
As strange as it may sound, the first sign is the most favorable. It is much easier to revive a “dead” motor - just check the circuit or change the sensor itself. In case of unreliable contact and other minor troubles, the engine does not fail, but behaves unstable. The problem is that if other sensors fail and the ignition system malfunctions, the power unit behaves in the same way and identifying the real malfunction is much more difficult.
When the air flow sensor, throttle position sensor or lambda probe is faulty, the control unit switches to emergency mode, supplying fuel according to average indicators. This results in unstable operation and increased consumption. The same symptoms are observed when there is a problem in the crankshaft speed meter circuit.
Characteristics and features of replacing determinants
Due to the fact that Megan 2 models are equipped with many different devices, the car owner may have difficulties if it is necessary to find and replace the regulator. Below we suggest that you familiarize yourself with the location and purpose of the controllers.
Oil level
Many car owners believe that the oil pressure sensor and the oil level sensor are identical devices, but this is fundamentally wrong. The oil level sensor is designed to monitor the volume of consumable fluid in the engine, while the pressure controller is used directly to determine the pressure in the system. If the on-board computer does not display information on the screen about how much motor fluid is in the internal combustion engine, then most likely the oil level sensor has failed. This device is located on the rear of the internal combustion engine, behind the right axle shaft. To change it, you just need to disconnect the power contact of the device and unscrew it with a wrench.
Oil level controller for Megan 2
The DTOZH on the second Megane is installed in the thermostat housing. It is used to control the level of coolant temperature; according to its readings, the degree of engine heating can be determined. If the corresponding arrow on the dashboard constantly jumps, then most likely the device is not working correctly.
There are two ways to solve the problem:
- cleaning contacts from oxidation to ensure better connection with the on-board network;
- replacement of the device, which is done by unscrewing the device and installing a new DTOZH.
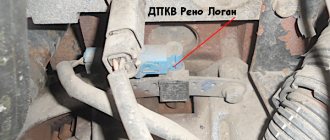
Crankshaft
The crankshaft sensor is located just below the thermostat housing. If the DPKV fails, the engine as a whole will operate less stable, especially when cold, until it warms up.
If the crankshaft position controller completely fails, the engine may stall completely; signs of a malfunctioning regulator are as follows:
- The internal combustion engine is functioning unstable;
- the car may suddenly stall;
- the car may stall and immediately suddenly “grab”, that is, the internal combustion engine will start, practically turning off;
- The engine starts every other time (the author of the video is the IZO channel)))LENTA).
- it may be possible to simply clean the connection contacts;
- in case of a circuit break, the wire is replaced;
- there are metal shavings collected on the reading element of the device that need to be removed;
- The device is completely out of order.
Renault Megane is equipped with passive type ABS sensors; its operating principle is based on the Hall effect. The anti-lock braking system controller is designed to sense wheel rotation. In accordance with the readings received from four devices (one sensor for each wheel), the control unit calculates the brake force on an individual wheel. If the device fails, the corresponding indicator on the device will light up, as well as the inscription SERV.
Regarding malfunctions and their elimination:
- Electrical wiring fault. You need to test the electrical circuit and clean the contacts if necessary.
- If there are problems with the winding, they can only be solved by rewinding the coil.
- If the valve breaks or the regulator simply does not work, then to solve such a malfunction you only need to change it.
ABS sensor for Renault Megane 2
Camshaft
The camshaft or phase sensor is installed only on 1.6-liter engines - its purpose is to generate an impulse, according to which the ECU sets the operating order of the cylinders. The phase controller is installed on the cylinder head cover, directly under the intake manifold receiver, next to the ignition coil of cylinder 1.
To replace the phase regulator, do the following:
- Disconnect the battery from the power supply.
- Disconnect the wires connected to the regulator.
- Using a size 8 wrench, unscrew the controller and replace it with a new one.
Oxygen
Renault Megane cars are equipped with two oxygen sensors. One lambda probe is mounted in front of the catalytic component; it is used to regulate the quality of the combustible mixture of air and fuel. It should be noted that its readings directly determine the fuel consumption of the engine. As for the second controller, it is installed after the catalytic element; the purpose of this device is to assess the condition of the converter.
The following symptoms may indicate a device malfunction:
- Fuel consumption has increased.
- The power unit began to generally not work correctly.
- The operation of the catalyst is impaired, the exhaust gases will be more toxic.
Fuel level
The fuel level sensor is designed to measure the volume of fuel in the gas tank. This controller is installed in the fuel pump module. The main symptom of the malfunction is either the inability to display information on the device about the state of the fuel volume, or the incorrect operation of the needle. The arrow on the sensor can fall or rise arbitrarily. To restore the functionality of the device, you can try to bend the tabs on the float contact.
If the problem is in the wiring, then you need to look for a break. It is also necessary to clean the contacts from time to time, since due to the low quality of the fuel they can oxidize.
Engine Variations
Replacing the crankshaft sensor on cars differs only in engine models. Let's look at engines for Renault Megane 1 and 2.
- Type E, engine E7J, fuel – gasoline, 1.4 liters. In operation since 1988, i.e. most often found on Megane I. Designation “Energie-Motor”. The main difference is the V-shaped distribution of the intake and exhaust valves, as well as the designed cylinder block, with different directions of inlet and outlet of fuel-air mixture and exhaust gases - which ensures rapid gas exchange. The crankshaft is located at the bottom of the engine. It is connected by connecting rods to the pistons.
- Engine Renault Megane type F, petrol F3R/F4R or diesel F8Q/F9Q 2.0 liters. This is an earlier engine model that has been in service since the early 80's. Just like in the E engine, the crankshaft is located at the bottom. A more powerful engine, but has difficulties in repairing and installing its elements.
- Gasoline engine Renault Megane type K 1.6 liters. An improved version of the E-modification, where the dimensions for the pistons are increased and, accordingly, the volume is increased from 1.4 to 1.6 liters, without changing the engine dimensions. Designed for Renault Megane second generation. Both Megan models, both 1.4 and 1.6 liters, are 16-valve. The electronic ignition system is automated and does not require maintenance from you during use. The presence of separate coils for each cylinder in the corresponding spark plug, without a wire connecting them.
- Renault Megane 1.9 liter dCi diesel engine with direct fuel injection. A distinctive feature is the adjustment for different moments of movement of fuel injection into the combustion chambers.
Although different engine models can be used in a car, their essence is always the same. If the car does not start, there may be several reasons for this, and one of the main ones may be contamination or damage to the sensor.
According to statistics, the crankshaft sensor fails quite rarely, but this is a clear reason for the inability to use any car, including the Renault Megane. The cause is often corrosion of the wiring, rather than damage to mechanical moving parts, since they simply are not there.
But it is still susceptible to mechanical damage, for example, the body of the device may crack or it may “move” a little from the desired position.
Its functional purpose is to read the dynamics of crankshaft torsion and create alternating current pulses with the transmission of information to the vehicle control unit (ECU).
Video “How to diagnose and replace the FLS in a Renault car”
For more information on how to check the fuel level controller in a Renault car with your own hands, see the video below (the author of the video is the Renault Repair channel).
| Manufacturer | EPS |
| Original number | 8200647556 |
| vendor code | 1953545 |
The Renault SHOP spare parts store invites you to buy the auto spare part RENAULT MEGANE 2 1953545 crankshaft sensor in stock in Belgorod.
The RENAULT MEGANE 2 crankshaft sensor belongs to the Sensors category, because in our online spare parts store the Sensors category contains many related spare parts for the RENAULT MEGANE 2 crankshaft sensor product.
Also in our auto store you can find analogues of the spare part RENAULT MEGANE 2 crankshaft sensor in stock with the original number 8200647556.
Reviews of the RENAULT MEGANE 2 1953545 crankshaft sensor can be found on our website of the Renault SHOP online store in Belgorod.
Applicability of the spare part: 1953545 RENAULT MEGANE 2 crankshaft sensor is used on the following cars: Logan 1.6 16v Scenic II Sandero 1.6 16v Megane 2 Symbol 1.6 16v Clio 1.6 16v
Parts manufacturer EPS has manufactured the RENAULT MEGANE 2 Crankshaft Sensor to meet all requirements.
The auto spare part RENAULT MEGANE 2 crankshaft sensor with original number 8200647556 is an example of high quality, despite the fact that the EPS manufacturer has set its internal article number 1953545 for it.
By purchasing the spare part RENAULT MEGANE 2 1953545 crankshaft sensor in Belgorod, from the EPS manufacturer, you can be sure that your Renault will serve you for a long time.
Theme Options
- print version
- Subscribe to this topic...
Why the valve jams and how to clean it
As mentioned above, contamination of the phase shifter valve can cause it to jam, which affects engine performance, vehicle dynamics and fuel consumption. The cause of blockage is most often dirt that penetrates into the device through a damaged oil seal. Dust mixed with engine oil gets into the gap between the housing and the rod, causing the latter to begin to jam. In addition, damage or wear to the plastic vanes of the phase regulator can contribute to jamming. In this case, soft chips are guaranteed to get into the channels of the device and with a high degree of probability can cause it to jam.
Cleaning the phasor valve is easy - you don’t even have to disassemble the device to do this. First of all, remove the protective mesh that is installed on the inlet channel. It is made in the form of a spring ring, which is easily unclenched and removed from the body. Using any suitable spray cleaner (carburetor, brake, injector, etc.), wash the valve body and internal passages. Then you need to dry the parts with compressed air - it is best supplied through the outlet channel. Next, the solenoid terminal is connected to a power source and, using the method described above, the accuracy of operation and complete opening of the valve are checked.
In particularly advanced cases, flushing may not help. Then you will have to flare the housing, disassemble the device and thoroughly clean the Renault Megane 2 phase regulator valve.
After washing and checking the functionality of the valve, it is necessary to install a protective mesh in the groove. Experts recommend carefully melting the edges of its joint with a soldering iron - this will protect the filter ring from moving. All that remains is to return the oil seal to its place and install the valve on the engine.
As you can see, there is no reason to be afraid of error DF080 - even a beginner can cope with the problem. As for malfunctions such as valve jamming or wear of phase shifter parts, it is much easier to prevent them than to eliminate them
Attention to little things like an oil stain around the valve will allow you to restore its tightness in time, which will certainly affect the health of the engine and help save the family budget
Other main functions of the device
Another function of the DPKV is the calculation of the average number of revolutions that the ECU needs for formulas for calculating various data, as well as for the operation of other vehicle sensors, for example, displaying the engine speed on the instrument panel.
The next purpose is to determine with what acceleration the crankshaft needs to be twisted after igniting the mixture in each cylinder.
The fact is that when the combustible mixture ignites, the pressure in the cylinders increases and the crankshaft, under gas pressure, accelerates, and in order for the piston in the next cylinder to approach top dead center at normal speed, the rotation of the crankshaft slows down.
It is by the acceleration of the twist that the ECU evaluates the operating efficiency of each cylinder and, to ensure uniform operation, the twist is aligned for each cylinder by changing the injection duration for each injector.
The next function is performed simultaneously with the camshaft sensor and determines the synchronization of the crankshaft and camshaft by comparing the signals from the two sensors.
Methods of checking in garage conditions
The simplest and least labor-intensive way to check for a unit malfunction is diagnostics using diagnostic equipment. Diagnostic time takes no more than 5 minutes, and there is no need to go into the engine compartment. The range of diagnostic devices on the market is huge, both in functionality and pricing. Among budget devices, we can recommend a car diagnostic scanner, made in Korea – Scan Tool Pro Black Edition.
According to our personal experience, this device, despite its low price in the region of 1950 - 2500 rubles. is able to diagnose the general condition of the car by displaying error codes with their descriptions, as well as the operation of various sensors in real time. The auto scanner has a compact size and is connected via the OBD-2 diagnostic connector. Data transfer is carried out to any modern device - smartphones, tablets, PCs running Android, iOS and Windows OS.
If you do not have such adapters, then you need to remove the sensor and perform the diagnostics described below:
Thoroughly clean the device body with a rag moistened with an organic solvent - white spirit, turpentine or other degreaser.
Pay special attention to the end facing the toothed pulley. Make sure the fastening is secure. Due to a loose screw, the sensor may move away from the metal teeth, as a result, the gap will increase and the generated pulse will weaken. Clean the connector contacts from oxidation. Inspect the wiring for melting or breakage.
If the above actions do not produce results, the crankshaft sensor is dismantled and checked with a multimeter in 2 stages. At the first, the resistance between the terminals of the device is measured, which makes it possible to verify the integrity of the induction winding. Clean the contacts, turn on the ohmmeter and check the resistance between them. Normal readings are in the range of 500–700 Ohms; if the turns are shorted, you will get a zero or reduced value; if there is a break, you will get infinity.
At the second stage, the performance of the element is tested according to step-by-step instructions:
- Switch the multimeter to voltage measurement mode, the maximum threshold is 200 millivolts.
- Securely attach the wires to the contacts of the sensor block (for example, with alligator clips).
- Take any metal tool - a wrench, a large screwdriver or something similar. Apply and tear it sharply from the magnetic core of the element, holding the body with your hand. The voltmeter should show voltage surges.
Further actions are as follows: the broken crankshaft speed meter is replaced with a new one; the part cannot be repaired. The working sensor is installed back, maintaining the gap, and the troubleshooting continues in another place.
A few words about how to check the crankshaft sensor on the road when you don’t have a multimeter or other diagnostic tools. You will need 2 wires and an LED light bulb from any car lamp (for example, an interior lamp). For convenience, unscrew the element and connect the lamp to the connector, then apply a wrench to the magnet, as described above. A working sensor will cause the LED to flash.
https://youtube.com/watch?v=zRlOqO1pK24
How to check if a measuring device is working correctly
First of all, the motorist must inspect the unit. There should be no corrosion, metal peeling, or rust on the surface. Next, an instrumental test is carried out, which consists of using a multimeter to determine the resistance:
- It is enough to switch the multimeter to resistance mode.
- Using the red and black probe, touch the induction coil leads to the crankshaft sensors.
- On Renault Megane 2, the resistance should be in the range from 550 to 750 Ohms.
- If the readings are less than the specified range, you need to change the device.
It is worth noting that the crankshaft sensor on Renault Megane 2 cannot be repaired. If the controller does not work correctly, then the entire device must be replaced.
Diagnostics of the Renault Megane 2 engine management system
04/05/2017 ENGINE
The engine management system on the Renault Megane 2 has a self-diagnosis mode. During operation, the electronic control unit (ECU) monitors the serviceability of all elements and circuits of the engine control system. Having detected a malfunction, the ECU switches the engine management system to standby mode and turns on the corresponding malfunction indicator lamp located on the instrument panel.
In most cases, the engine will be able to continue working, which allows you to get to the repair site under your own power, but with a deterioration in the vehicle’s operational parameters. Detected fault codes are stored in the memory of the engine management ECU.
To read fault codes, the system has a diagnostic connector installed in the lower part of the center console and closed with a cover.
Diagnostic connector standard OBD II.
You can read fault codes using a special scanner at a service center or yourself, if you have the appropriate equipment.
Diagnostic connector contacts for Renault Megane 2
| Contact number | Symbol | Assigning contacts |
| 1 | AP46 | Supply voltage +12 V (from ignition switch) |
| 4 | MAM | "Weight" |
| 5 | NAM | "Weight" |
| 6 | 133B | Signal (CAN H bus) |
| 7 | H.K. | Diagnostic signal K |
| 14 | 133C | Signal (CAN L bus) |
| 16 | BP32 | Supply voltage +12 V (from battery) |
Note: Via the diagnostic connector, you can read fault codes for other systems of the Renault Megane 2 (transmission, ABS, electric power steering).
How to replace a crankshaft position sensor in 20 minutes
A faulty crankshaft sensor will cause the engine to stall.
The crankshaft angle sensor is designed to detect the rotation of the crankshaft when the engine is running and is responsible for starting the fuel injection and ignition system through the PCM main computer. This crank sensor will be located at the bottom of the block and can be at the front, rear or middle of the engine at crankshaft level.
What's going wrong?
Due to motor vibration, heat, and the constant generation of electromagnetic energy generated, the internal windings can become brittle and break, causing a direct or intermittent short circuit of the sensor that will cause the engine to stall. This fault may or may not cause the check engine light to come on and set the trouble code for this problem.
SPONSORED LINKS
How much does it cost?
When taking your car into the garage to replace the crankshaft position sensor depends on the make, model, and location of the sensor. Some sensors are exposed, while others may be buried under the starter or in a hard-to-reach location, such as the top of the transmission housing. The sensor itself will cost between $8 and $49. (USA) on Amazon. Labor costs will range from $60 to $180 depending on the location of the sensor.
let's start
Start by locating the sensor, which can be done by checking the engine and looking for any sensor on the lower level that matches the new sensor you have just bought. You can also check Google images or use an online repair manual. service like Mitchell1. You will also need to jack up the car and support it on jacks. Wear protective gloves and goggles.
There is a video and at the bottom of this article it shows how it is made.
1. Disconnect the battery
Any time you work on the internal workings of the engine, it is a good idea to disconnect the battery to avoid shorting the vehicle's electrical system. For hybrid vehicles, also remove the main battery disarm plug. package. Refer to the owner's manual for location.
SPONSORED LINKS
2. Free access to the sensor
This crank sensor is located behind the starter, which must be removed to access the sensor. Use a shop light to better see what you are doing when working under the car.
3.Inspect the location of the sensor
SPONSORED LINKS
This sensor is difficult to see due to the transmission cooling lines. but is it located on the side of the block with the electrical connector attached. If the crankshaft angle sensor is oily, now is a good time to use a small amount of carburetor cleaner to remove the oil to get a fresh start.
4. Release the electrical connector
The electrical connector will be attached to the sensor using a plastic clip. which you push down hard or pull outward to release. Once this is done, gently remove the connector from the sensor. Sometimes this connector can be a little sticky due to the airtight seal, which helps keep out water that can corrode the sensor terminals. After removing the connector, check for rust and clean or replace the pigtail if necessary. This problem alone will cause the engine to stall.
5. Unscrew the sensor mounting bolt
SPONSORED LINKS
Most crankshaft sensors only have one mounting bolt, which is usually a 10mm diameter bolt. Use a small wrench or socket to remove the bolt by turning it counterclockwise. and set aside for safe keeping.
6. Remove the sensor
Removing the crank sensor can be a little difficult because they have a long stem and can get stuck in the block. Use a small pick or standard screwdriver to wedge under the sensor mounting tab to free it. Be careful not to apply a lot of pressure because these sensors have been known to break, leaving a piece of the sensor inside the block. When this happens, sometimes you will be able to push the broken piece in and have it fall into the oil pan, where it will remain or you can remove the oil pan to remove the broken piece.
Once the sensor is free, grasp it firmly and remove the engine block with a rotating motion. There will be an O-ring on the sensor that needs to be replaced with a new sensor. Most new sensors come with a new O-ring.
7. Select a new crankshaft sensor
SPONSORED LINKS
Wipe off the oil from the old sensor so that any pattern is clearly visible. changes that a new sensor may have. Minor design changes are common when installing new sensors, such as mounting loops. One thing that can be different is the length of the sensor rod, because if the rod is too long, it will contact the crankshaft, and if it is too short, it will not read correctly.
8. Installing a new crankshaft position sensor
Before installing a new sensor, wipe it with a work towel. sensor port hole to ensure a proper seal for the new sensor O-ring. Engine oil will be present in this port, so do not spray carburetor cleaner inside the port. You can spray the cleaner on the towel to make the cleaning process easier.
Place the new crank sensor at a right angle into the sensor port hole and press it firmly into place, aligning the mounting plate hole with the bolt hole in the block. Then insert the mounting bolt and screw it in by hand, turning it clockwise to avoid cross threads. Use a small amount of clean motor oil or WD40 to lubricate the O-ring to avoid seal damage caused by oil leakage. Once the sensor is installed, screw the mounting bolt into place and tighten to approximately 2-3 ft lbs.
SPONSORED LINKS
Insert the electrical connector into place, listening for a click indicating the connector has been successfully installed and is ready for use.
9. Connect the battery.
Now that the job is complete, remove the car from the jack stands and reconnect the negative battery cable and you're done. Watch the video below!
Watch the video!
Watch the following video to see how one of our mechanics does this job.
SPONSORED LINKS
Here is a video of how to work with the sensor at the rear of the engine.
If you have questions about the crankshaft sensor, ask on our forum. If you need car repair advice, please ask, our community of mechanics will be happy to help and it's always 100% free.
We hope you enjoyed this tutorial and video. We create a complete set of car repair manuals. please subscribe to our 2CarPros YouTube Channel and check back often for new videos that are almost uploaded daily.
Article published 05/30/2018
.
Debugg
If the sensor does not detect the crankshaft position at all, the only solution is to replace it. If you cannot change it, try to repair it.
Do the following:
- Clean the device to remove any dirt that adheres to and covers the touch mechanism. Dust, sand and metal shavings appear on top, which interferes with the operation of the device. To solve the problem, you need to take out the DPKV, clean it of dirt and put it in place.
- Eliminate the break. A common situation when a wire is damaged. This type of malfunction is most often characteristic of the chip. This is where wires often become bent, causing damage. It is not always possible to determine the problem externally, because the insulation remains intact. To repair, you need to remove the connector, find the damage, strip the insulation and restore contact. If you have a soldering iron, you must perform soldering.
- Clean the contacts. There is a seal on top of the DPKV, which becomes more rigid over time and allows moisture, dirt and dust to pass through. As a result, rust appears, which negatively affects the contact. As a result, the sensor stops working normally and the engine stalls. To resolve the problem, clean the contact group using sandpaper or a file. At the same time, remove the dust, restore contact and try to start the internal combustion engine.
- Check the gap between the sensor and the drive disc with teeth, as a rule, it should be 0.5 mm.