Today we are undergoing repairs on a well-known Chevrolet Niva 4x4, produced in 2005, on which the heater radiator needs to be replaced. The mileage of the car is 139 thousand km. A problem arose: antifreeze from the heater radiator began to pour out under the front passenger’s feet. The owner drove for some time simply adding coolant, but soon the pressure became stronger and stronger, and a replacement was necessary. We will show you a detailed photo and video tutorial on how to do it yourself.
Where is the heater radiator located on the Chevrolet Niva?
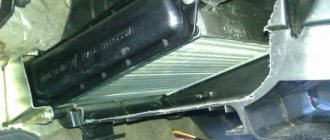
The heating system of a car consists of a number of elements, without which its normal functioning is impossible. One of these is the stove radiator. Sometimes problems occur with the heat exchanger, to eliminate which it is necessary to dismantle the unit. The radiator is located in the cabin behind the heater control unit. In addition to heating and ventilation devices, the car can be equipped with an air conditioning system. If in the first case you can dismantle the radiator without much difficulty, then in the second case you will need to put in a lot of effort.
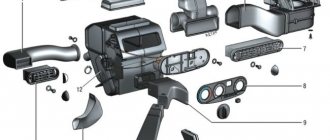
Body interior heating system: 1 — ventilation duct; 2 — air duct for heating the windshield; 3 — intermediate body; 4 - intermediate air duct; 5 — air intake filter housing; 6 — heating system fan; 7 — central cabin ventilation nozzle; 8 — facing of the control lever panel; 9 — front air duct for heating the interior; 10 — rear air duct for heating the interior; 11 — air duct for heating legs; 12 — heater assembly; 13 - side nozzle (heater radiator is located inside box 12)
When the radiator needs replacement
When using a vehicle for a long time, the following problems arise with the heat exchanger:
- the appearance of a leak, as evidenced by puddles under the carpet on the driver’s side, the formation of a greasy coating on the glass;
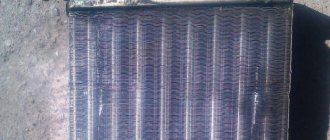
- clogging, which affects poor throughput and deterioration of heat transfer.
Signs of a leak
Unlike the VAZ 21214, the heater radiator on the Chevrolet Niva is not equipped with a tap and coolant circulates through it year-round. This does not mean that the heating works constantly; with the help of a plastic damper, the flow is switched past the stove, causing cold air to blow into the feet of the driver and passenger. But the stove itself is always hot, which can be felt by the slight heating of the side plastic panels of the center console.
It is impossible to know that a car’s heating system is leaking by external signs. There are no stains under the car, all connections between pipes and fittings are dry, and the liquid goes somewhere. Because of this, the electric fan that cools the engine may turn on even on cold days.
Replacing the radiator of a Chevrolet Niva stove with air conditioning is quite a difficult job, but at the same time it can be done independently. Just first you need to determine whether the cause is really in the heater radiator. Symptoms of malfunction are as follows:
- Poor operation of the stove;
- Regular lack of fluid in the heating system;
- The appearance of an antifreeze smell in the cabin (not always);
- A puddle of greasy liquid under the driver's mat (at the same time, read the article on how to dry it).
Just in case, before you climb to the stove, check the hoses and pipes supplying liquid to it. If they are wet, then that's the reason.
Tool. This work does not require any special tools; almost everything you need can be found in a regular set of keys. You will also need 2 screwdrivers (slotted and Phillips) and pliers. And also a box for screws. In addition, you can stock up on markers.
The causes of the malfunction can be listed in a small list:
- A breakdown of the control unit has occurred.
- Mechanical or operational damage to the radiator surface.
- Failed additional resistor.
- Radiator pipes damaged by external factors or worn out by prolonged use.
- Faulty heater valve.
How to determine what kind of breakdown occurred? Let's look at several different signs by which you can determine the cause of the malfunction and understand where to start repairing the stove.
How to replace the heater radiator on a Chevrolet Niva without air conditioning
Before you begin dismantling the radiator, you will need to drain the antifreeze from the cooling system. To do this, unscrew the bolt on the cylinder block and remove the expansion tank cap. Another option is also possible, in which you open the tank lid and disconnect the cooling tube of the throttle assembly. Instead of this tube, another hose is inserted, through which the liquid is removed. To speed up the process, you can carefully blow out the tank to drain any remaining antifreeze. In addition, it is recommended to disconnect the negative terminal from the battery.
To replace the heater radiator, you need to unscrew the bolt on the cylinder block and the expansion tank plug to drain the coolant
Tools for work
To dismantle the radiator you will need:
- screwdrivers (flat, Phillips);
- pliers;
- wire cutters;
- socket heads of different sizes (8, 10, 14).
How to remove a stove radiator
It is worth taking into account that the manufacturer’s recommendations for car repair are not always the simplest and most accessible for the average motorist. Therefore, quite often you have to rely on the experience of owners who carry out repairs with their own hands using improvised means and tools, resorting to various tricks. Let's start the disassembly procedure:
- We dismantle the glove compartment, for which we unscrew the corresponding fasteners. We unscrew the screws securing the trim on the right and left sides in the passenger's feet, and remove the terminals of the lighting bulbs.
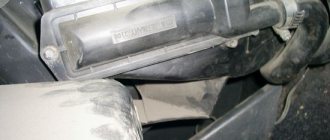
To remove the glove compartment, you will need to unscrew the corresponding screws and remove the side decorative trim in the legs - We loosen the clamps of the rubber pipes from the radiator and carefully tighten them, pouring the remaining antifreeze into the prepared container.
After removing the hoses from the radiator, drain the remaining antifreeze into a prepared container. - After removing the hoses, unscrew the fasteners of the heat exchanger itself and push the part towards you until it rests against the air duct.
- We unscrew the nut securing the relay cover with the “8” head and remove the element. It will be seen that the subsequent dismantling of the radiator is hampered by a corner of the frame. To solve this problem, use pliers to remove the interfering part of the plastic and remove the heat exchanger itself.
To remove the radiator from the seat, you will need to cut off a piece of plastic - On a new radiator, it is recommended to glue the outer edges with foam rubber to avoid air penetration due to leaky connections.
- We also cut off a piece of plastic on the frame of the new heat exchanger, and then insert the part into its seat.
On a new stove radiator, it is necessary to cut off the corner of the frame, which will allow the part to be installed in place - We perform assembly in reverse order.
This is interesting: Preliminary diagnosis
Video: removing and installing the heater radiator on a Chevrolet Niva without air conditioning
Problems of choosing a new radiator
For the Chevrolet Niva car, you can find aluminum and copper radiators on the market, differing both in performance characteristics and in price.
Aluminum radiators
The main advantages of aluminum radiators:
- low price (from 700 rub.);
- short heating time;
- light weight.
The disadvantages of such radiators include:
- low heat saving rates (heats up quickly and cools down quickly);
- low maintainability (impossible to solder holes and holes);
- the presence of steel inserts that are subject to corrosion and significantly reduce the service life of the radiator.
In Russia, aluminum radiators are produced by LUZAR and.
LUZAR radiators are low cost
Copper radiators
Copper radiators have a number of advantages, the main of which are:
- high heat saving rates;
- longer service life than aluminum radiators;
- possibility of repairing holes and holes using soldering.
Disadvantages of copper radiators:
- high cost (from 1700 rubles);
- slow heating;
- heavy weight making installation difficult.
DAAZ copper radiators retain heat well
Copper radiators produced by DAAZ and SHAAZ are in greatest demand among car owners.
Thus, replacing the heater radiator of a Niva Chevrolet car is quite simple. You will need a new radiator, a standard set of plumbing tools and no more than two hours of free time.
How to replace the heater radiator on a Chevrolet Niva with air conditioning
When a car is equipped with an air conditioning system, replacing the heater radiator at home is much more difficult, but still possible.
What tools will you need?
For dismantling you will need:
- Screwdriver Set;
- keys (heads) at “8”, “10”, “19”, “24”;
- cross bits and Torex T20;
- knife;
- Head Torch;
- sealant.
To dismantle the radiator, you will need to prepare a certain list of tools
How to remove the evaporator and fan
Before removing the radiator, you will need to provide access to it. To do this, you need to remove the air conditioner evaporator. We carry out the procedure step by step:
- We remove the glove compartment, for which we unscrew all the fasteners.
- We dismantle the airbag (if the car is equipped with one). We remove the negative terminal from the battery, then look for the red airbag connector and remove it. Using a suitable tool, unscrew the pillow mounting bolts. Using a flat-head screwdriver, pry up the plug on the panel, press the latches at the bottom and pull the pillow up.
Using a wrench or socket of a suitable size, unscrew the two airbag mounting bolts - Remove the air duct from the passenger side. Use a flat screwdriver to pry up the ventilation grille plugs, unscrew the screws and remove the grille. Remove the tape and remove the air duct.
To remove the air duct on the passenger side, you will need to remove the ventilation grille and remove the tape. - We dismantle the pipe in the passenger's feet. Unscrew the hose fastener and pull it towards you.
At the passenger's feet you need to remove the pipe, for which we unscrew the hose fastener - To remove the air conditioner evaporator you will need to remove the fuse box and control unit. There is no need to completely dismantle them; you can simply leave the devices hanging. We unscrew the cover of the control unit using a “10” socket, and use a Phillips screwdriver to unscrew the fastening bolts.
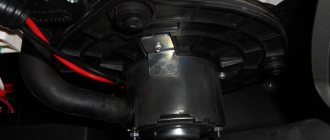
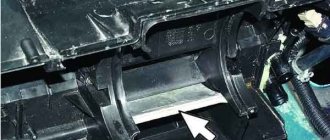
Before dismantling the air conditioner evaporator, you will need to remove the control unit and fuse box - To dismantle the fan, remove the air filter and unscrew the 4 screws that secure the electric motor.
To remove the heater fan, you need to remove the cabin filter and unscrew 4 screws - At the bottom of the stove, unscrew the screw with a bat to “7”.
We insert the bit on “7” into a key of a suitable size and wrap it with electrical tape - We bend the metal brackets.
To ensure that nothing interferes with the removal of the evaporator, you need to bend the metal brackets - Carefully remove the cable responsible for adjusting the damper so as not to lose the latch. We remove the structure itself to the right.
- To disassemble the fan into two parts, remove the latches (6 pieces) by prying them off with a screwdriver. After this, the housing can be separated and pulled down.
To separate the fan parts, it is necessary to remove the latches, after which the elements are removed - The next step is to remove the air conditioner evaporator. To do this, unscrew the air conditioning pipes under the hood. Since freon will begin to leave the system, it is better to avoid getting it into the respiratory system.
- Unscrew the nuts from the nearby studs.
In the engine compartment you will need to unscrew the nuts from the studs and remove the evaporator tubes - Carefully unscrew the bolts securing the evaporator housing so as not to tear off the nuts, and one self-tapping screw located near the radiator pipes.
In the cabin, carefully unscrew the evaporator mounting bolts, as well as the self-tapping screw - We move the evaporator nozzle to the right until it is free, but you will have to apply some force. The left front bracket will interfere with the removal of the assembly; it must be tightened and removed from under the panel fastening. In addition, the clamps of the radiator pipes will prevent removal. It is better to loosen them and pull them down. After this, remove the evaporator itself.
To remove the evaporator, it is necessary to apply some force to remove the bracket on the left side from under the panel mounting
How to remove a radiator
Dismantling the evaporator is one of the preparatory activities before removing the stove radiator. First, perform the following step-by-step actions:
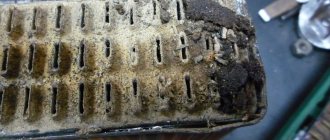
- To prevent antifreeze from leaking onto the floor, we place a plastic film under the heat exchanger itself to allow the liquid to drain into a suitable container. To drain the antifreeze from the radiator and prevent it from getting on the floor, we drill a hole in the lower part of the element. If this is not done, then the probability of filling the floor with antifreeze through the pipe is quite high.
You need to drain the remaining antifreeze from the old radiator, for which a hole is drilled in it from below - We loosen the fastening of the clamps and unscrew the screws of the heating radiator. We take out the heat exchanger and tighten the pipes.
To remove the heater radiator from its seat, loosen the clamps, unscrew the heat exchanger mount and remove the part itself
This completes the dismantling process. Assembly is carried out in reverse order. It is recommended to use new pipes during installation, since rubber elements lose their elasticity over time. If desired, the hoses can be sealed with sealant. Upon completion of all procedures, coolant is poured into the system to the required level in the expansion tank.
This is interesting: Classes of passenger cars of the USSR
Replacement process
Because replacing a heater core is not an easy process, it should be started when there are compelling reasons and you observe signs that clearly indicate problems in the heating system. Experienced technicians share recommendations based on which you can make a “diagnosis” for your car, indicating that it is time to replace the radiator. If the stove begins to heat poorly, so you constantly feel chills in the cabin of your vehicle, then there is a problem with the heating. If, in addition, you smell antifreeze, then your fears are even more confirmed. You should be even more concerned if you begin to notice that the level of coolant used is constantly decreasing, and under the carpet in the cabin you suddenly find a “swamp” of greasy liquid.
First, of course, check all the pipes and hoses that are part of the heating and cooling system. Make sure they are intact. If this is so, it means that the culprit of such troubles is, after all, your stove radiator, the resource of which has already been exhausted. Even if you don’t have the knowledge of how to change a radiator, don’t give in to the problem. We are ready to help you and give specific recommendations, based on which you will skillfully replace the heater radiator on a Chevrolet Niva with and without air conditioning.
There are two ways to replace the radiator. The first method involves carrying out work that does not require removing the torpedo. However, this method is accompanied by a clear disadvantage, namely that during the task the air conditioner will depressurize, so upon completion it will have to be refilled with refrigerant. The second method can be done by removing the dashboard. Unfortunately, such a replacement of the heater radiator on your Chevrolet Niva will be accompanied by a greater expenditure of physical and time resources. Decide which method will be preferable for you, study the recommendations we offer and get started.
First way
This method is suitable for those who are used to performing all actions at lightning speed, since they cannot allow their vehicle to simply sit idle in the garage. The main disadvantage of this method is that at the very beginning of the action you must release all the freon from the air conditioner. If you want to make the reassembly process easier for yourself, take care of this before disassembling, arm yourself with a marker and mark all the removed bolts, screws and other components.
First, unscrew all the bolts and remove the glove compartment. Next, refocus your efforts on the airbag, if you have one. Remove the passenger air duct by unscrewing the bolts and disconnecting the plugs. Don't be afraid that even when you apply force, the air duct won't give way to you. The manufacturer sometimes glues them together with tape, so increase your pressure and you will succeed.
Remove the pipe located at the bottom, where the passenger's feet are usually located. Next, dismantle the control unit by disconnecting the wires from it. To keep these wires out of your way, you can temporarily tie them together with electrical tape. The next step is to remove the cochlea. You will again have to unscrew several screws, then disconnect the cables and freely pull out the snail. Now go from the hood side, find the air conditioning pipes and unscrew them.
Now we get to the radiator. However, it cannot be dismantled immediately. Initially, you should cut a hole in it, substitute a previously prepared container and drain all the antifreeze remaining in it. Such actions are quite important, because if you ignore them, as soon as you disconnect the pipes and hoses, all the antifreeze will begin to splash in different directions, polluting everything around, including the interior. It will be difficult to continue the process.
Once the antifreeze is drained, you can safely remove the radiator and install a new one. Of course, you can immediately begin the assembly process. Do not forget to visually inspect the outer surface of the pipes and hoses to ensure they are unusable. Otherwise, you will have to repeat this procedure again if you install back the pipe that causes the leak.
Second way
You can also use the second method. First, disconnect the battery, then drain the radiator to the last drop of coolant. It wouldn’t be superfluous to even blow out the expansion tank. Now unscrew the four bolts and remove the radio with its guides. Let's move on to the crucial moment - you have to remove the instrument panel. Press the latch and pull the panel towards you. To make it easier for her to “obey” you, pull her not only forward, but also slightly to the right.
We suggest that you now use a marker and label all connecting parts. In this case, when assembling, it will be easier for you to complete all the necessary actions, and you won’t have to strain your memory. Next, unscrew the bolts and remove the dashboard. The next step involves removing the stove control unit. First, remove its side panel, then slightly pull it towards you, then disconnect the cables and backlight terminals. Next, remove the steering column. On the side of the panel you will see a spacer, which is also important to remove. Direct your efforts to removing the panel amplifier and fan mounts. Now you have managed to get to the stove and air conditioner. These two devices are fastened with four screws, three of them can be easily unscrewed, but the fourth, “the most stubborn” one, will only give in if you bend the edge of the amplifier. Remove the stove tee and its casing. Now nothing will hinder you; you can safely replace not only the radiator, but also, if necessary, even the entire stove. Next, you will need to perform reverse assembly. Take your time, perform all steps in reverse order carefully. In this case, you will be able to complete the replacement in such a way that even the most experienced craftsmen will simply gasp and envy your effective work.
So, the process of replacing a stove radiator is labor-intensive and responsible, but any car owner who is ready to set such a goal can cope with it. Based on our recommendations, it will be easier to understand the sequence of actions, carry them out and get the maximum result.
About removing other elements
The device is replaced in stages:
- Remove the glove box and disconnect the air duct.
- To simplify the process of removing the rubber tube to drain the remaining liquid, loosen the bolts.
- The structure is attached using two screws.
- Using a side cutter, remove a piece of plastic that interferes with the dismantling of the structure.
- Then a new radiator is prepared. To prevent air from passing through the cracks, glue is applied around the perimeter.
And also interesting: Niva tuning for off-road from a professional “
This procedure is based on the experience of a large number of drivers who have already replaced a part without the complex dismantling of the instrument panel. The work can be divided into several stages:
- We remove the glove box and disconnect the air duct leading to the front passenger's feet.
- Loosen the clamps so that you can remove the rubber tube to drain the remaining liquid. To do this you need to prepare a small container.
- To carry out this procedure more carefully, you can cover the interior with cloth or film so as not to accidentally spill antifreeze.
- The radiator is additionally secured with 2 screws. After removing them, you need to pull it towards you a little until its movement is limited to the air duct.
- Remove the relay cover fastener to remove it. This must be done so that the corner of the plastic frame on the heat exchanger does not interfere.
- Using a side cutter, you can bite off a piece of plastic that interferes with dismantling
- Then you need to prepare the new radiator for installation. To do this, use glue to apply thin strips of foam rubber around the perimeter of the part. This must be done so that the air does not pass through the cracks and warms up as efficiently as possible.
- Then the part is installed in its standard place
Heating system components
The heating system of the Niva Chevrolet car is based on heat exchange between the coolant, which is the coolant, and the supply air.
We can highlight the main key elements that make up the system:
- Heater unit;
- Side deflector;
- Air ducts (intermediate, front, rear, side);
- Central deflector;
- Motor and fan;
- Installation location of the cabin filter;
- Intermediate air duct;
- Intermediate duct;
- Air duct on the windshield;
- Controller panel.
The heater unit is a complex device that is considered the main component of the heating system. It consists of the following elements:
- Heater radiator;
- Damper lever system;
- Distribution flaps;
- Control damper;
- Stove pipes.
Comparison of manufacturers
In stores you can find spare parts produced by several companies. Products differ in two parameters: price and workmanship. Let's look at a few of the most popular brands.
Hola is a trademark of the Dutch company H{amp}amp;H Group. 15 European factories produce radiators, belts, shock absorbers and other auto parts. Inexpensive products of this brand are of good quality. According to customer reviews, spare parts of this brand at a comparable price are superior in quality to Chinese products. Price - 2000 rubles.
DAAZ - Dmitrov Automotive Assembly Plant, part of the United Automotive Technologies concern, was founded back in 1967. In addition to radiators, the company produces filters, brake pads and other spare parts for Russian and foreign cars. The products of this brand are used in cars that come off the AvtoVAZ assembly line. Price - 2500 rubles.
Luzar is a Russian company that was founded in 2003 on the basis of the Lugansk Radiator Plant. Products of this brand comply with GOST-R and the manufacturer gives them a 2-year warranty. Price - from 2100 rubles.
Bautler is a British company that produces, among other things, spare parts for the Chevrolet Niva. Price - from 2200 rubles.
Reviews from car owners vary. Some consider DAAZ radiators to be the most reliable, others consider Bautler, Hola or Luzar.
Taking into account the fact that replacing a part takes a lot of time and effort, it is worth taking the sports version of Luzar. It is designed to withstand heavy loads and is therefore more reliable.
Hola products are distinguished by the fact that each tube has its own rubber seal, rather than being fixed with a single seal. In Luzar-Sport, the honeycomb is soldered to a base that is attached to the tanks.
Possible breakdowns
Car owners often encounter heater malfunctions. And if in the summer you can guess about these problems by indirect signs, then at subzero temperatures everyone will notice a breakdown. But it is necessary to accurately diagnose problems in order to eliminate them effectively.
- Warm air does not flow under your feet. If the air flow in other directions is satisfactory, then the reason lies in the condition of the distribution damper. Simple jamming is also possible, which will be eliminated after periodically changing modes.
- The stove is not blowing hot enough air. Here it is necessary to check the system for leaks. Insufficient coolant level can cause low air temperature. Another option is the incorrect position of the main damper, as a result of which most of the air goes past the radiator.
- The stove does not work in the first three modes. If the stove turns on at maximum speed, then the thermistor is the cause of the malfunction. If the heater motor is silent even at speed 4, then you need to check it, as well as check the control unit itself and the entire supply circuit, including the fuse.
Operating principle
In a Chevrolet Niva car, coolant circulates not only in the engine block and cooling radiator, but also in the heater radiator. As a result, the process of heat transfer to the forced air flow is possible. The air is pumped through the operation of a fan, which is driven by an electric motor.
In early versions of cars of the VAZ family, the circuit containing the heater radiator was powered from a large circulation circle. This meant that while the thermostat was closed, only cold air entered the cabin. The stove began to warm up after the thermostat was opened. From inside the car it was possible to turn off the main tap, turning off the stove. In modern cars, including the Chevrolet Niva, the circuit with the heater radiator is powered from a small circle. Warm air begins to enter the cabin immediately after the engine begins to warm up. From the control panel you can adjust the temperature of the incoming air. However, it was decided to abandon the traditional tap, since it constantly broke down (leakage occurred, became clogged with deposits and salts). Now control is carried out by turning the damper, which directs the air flow through the radiator or bypassing it.
The principle of operation of the stove on a Chevrolet Niva car is as follows.
- The circuit is heated by the coolant.
- The fan forces air through the intake, directing it first to the cabin filter and then into the intermediate air duct. The fan has 4 operating modes, which determine the rotation speed and, consequently, the intensity of air supply.
- The main damper regulates the proportion of air flowing through the radiator.
- Control flaps redistribute the flow to the feet of the driver and passenger, to the front deflector or to the glass.
The driver controls the intensity of the air supply by setting the fan speed, air temperature (damper control) and air distribution. There is also a recirculation switch on the panel.
It provides air intake from the car interior. This mode is considered temporary and is turned on when the interior is quickly warmed up, as well as when the smell of smoke, burning from passing cars or dust spreads outside.
It is not recommended to turn on the recirculation mode for a long time, as this leads to a gradual increase in air humidity in the cabin. Over time, the glass will begin to fog up.
Installation.
First you need to prepare a new radiator. To do this, we remove the rubber feet from the old one and put them on the new part, since new radiators are not equipped with them. Next, we reassemble in reverse order. During installation, it is best to position the clamps so that access to them is as convenient as possible in case of the next replacement.
When assembling the power steering system, there is no need to pump fluid; if a small amount of air gets inside, it will escape after a while into the expansion tank. Therefore, after replacement, it is necessary to monitor the fluid level for some time and, if necessary, add it to the maximum mark.
After assembling the system, it is necessary to fill in new coolant. It must be filled through the expansion tank. After filling, it is important to start the engine so that the pump works and wait until the engine warms up to operating temperature and the thermostat opens. At this moment, the large circle will be open and you will need to add antifreeze to the system to the required level.