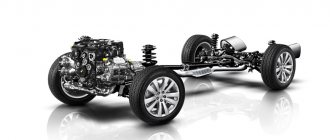
The chassis of any vehicle is needed to move along the road surface. It smoothes out the effect of various vibrations and shaking. The chassis is primarily the suspension at the rear and front, as well as the wheels. With the help of the chassis components, the wheels on two axles are connected to the body parts, vibrations are dampened and various forces that arise during movement are transmitted.
Car suspension device
Description of design
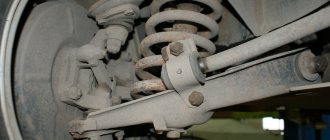
Rear suspension elements : 1 - beam;
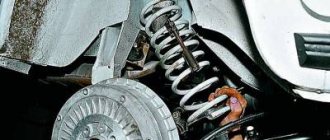
2 — anti-roll bar; 3 — silent block; 4 — bracket for attaching the lever to the body; 5 - trailing arm of the beam; 6 — brake drum; 7 — shock absorber; 8 — bracket for attaching the shock absorber to the lever; 9 - spring; 10 — shock absorber cover; 11 — spring gasket; 12 — compression stroke buffer; 13 — rear wheel hub; 14 - rear wheel brake mechanism Rear suspension - semi-independent, with an elastic beam, with helical coil springs and double-acting hydraulic telescopic shock absorbers. The longitudinal arms are welded to the beam through reinforcements. To increase lateral stability and reduce vehicle roll, a stabilizer bar made of 14 mm steel rod runs inside the beam. The ends of the rod are welded to the levers.
Rear suspension: 1 — rear suspension beam; 2 — shock absorber; 3 - spring; 4 — bracket for fastening the beam arm to the body
A rubber cushion is installed in the middle part of the stabilizer bar
Bushings are welded to the front of the levers, into which silent blocks are pressed. At the rear, brackets with eyes for attaching shock absorbers and flanges for attaching the axles (axles) of the rear wheels and brake shields are welded to the suspension arms. The elastic elements of the suspension are coil springs. The lower coil of the spring rests on a cup welded to the shock absorber reservoir, and the upper coil, through a rubber gasket, rests on a support welded from the inside to the wheel arch.
Bolt 1 passes through the inner race of the silent block, connecting the lever to the body bracket. The bracket is attached to the welded studs of the body with three nuts 2
A rubber-metal hinge (silent block) is pressed into the lower eye of the shock absorber, through the central bushing of which a bolt passes, securing the shock absorber to the suspension arm bracket. The shock absorber rod is attached to the body through two rubber pads (one at the bottom of the support, the other at the top) and a support washer (under the nut). The chrome-plated surface of the rod is protected from dirt by a rubber corrugated cover, inside of which a compression stroke buffer is installed.
A cylindrical collar made on the axle is designed to center it in the hole in the lever flange and center the brake shield on the axle
The hub has a non-adjustable double-row tapered roller bearing. During operation, the bearing does not require replenishment of lubricant. The outer bearing ring is pressed into the hub and secured with a retaining ring. The fit of the inner rings of the bearing on the journal is transitional (with a slight interference fit or a small gap). The inner rings of the bearing are tightened in the axial direction with a nut, tightened with a large torque and secured by indenting the nut flange into the groove of the journal.
Shock absorber parts and spring : 1 - shock absorber; 2 - spring; 3 — compression stroke buffer; 4 — rod cushions; 5 — spacer sleeve; 6 — support washer; 7 - spring washer; 8 - nut; 9 — cover; 10 - cover cup; 11 — spring gasket
Rear wheel bearing assembly: 1 - axle;
2 - hub; 3 - bearing; 4 - retaining ring; 5 — washer; 6 — bearing nut; 7 — sealing ring of the hub cap; 8 — hub cap The angles of the rear wheels are set structurally by the geometry of the beam and are not subject to adjustment in operation. The angles can only be checked on a special stand and compared with control values (camber angle - 0°30'±30', wheel toe - 0°10'±5'). If the rear wheel alignment angles do not correspond to the control values, it is necessary to check the condition of the rear suspension elements.
Types and characteristics of racks
At the moment, several types of racks are installed on Priora.
| Type | Description |
| Oily | Their action is based on the force of hydraulic oil. As a rule, such devices are two-pipe, although sometimes single-pipe ones are also found, but they are less efficient and difficult to operate. Oil racks are easy to install and are wear-resistant and durable. The only disadvantage of this device is that it does not cool well, which ultimately leads to deformation. But with proper care of the car, deformation may not occur soon. But oil parts are cheaper than gas-oil parts. |
| Gas-oil | They are in many ways similar to oil ones, but here we have a completely different type of liquid, which means a different operating principle. Here, a part called a gas boost regulates the oxygen pressure, replacing it with nitrogen, which sets the entire system in motion. Such racks are often presented in a single-pipe version, unlike oil single-pipe ones; gas-oil ones are good in everything. The most significant advantage of the system is good heat transfer. The downside is less wear resistance than oil struts, as well as high sensitivity to external factors of various properties. |
Rear suspension design of the Lada Priora
The rear suspension of the car is semi-independent, made on an elastic beam with trailing arms, coil springs and double-acting telescopic shock absorbers.
The rear suspension beam consists of two longitudinal arms connected by a U-shaped cross member.
This cross-section provides the connector (cross member) with greater bending rigidity and less torsional rigidity.
The connector allows the levers to move relative to each other within small limits.
The levers are made of pipes of variable cross-section, which gives them the necessary rigidity.
Brackets for attaching the shock absorber, rear brake shield and wheel hub axle are welded to the rear end of each lever.
At the front, the beam arms are bolted to removable brackets for the body side members.
The mobility of the levers is ensured by rubber-metal hinges (silent blocks) pressed into the front ends of the levers.
The lower shock absorber eye is attached to the beam arm bracket.
The shock absorber is attached to the body by a rod with a nut.
The elasticity of the upper and lower connections of the shock absorber is provided by rod cushions and a rubber-metal bushing pressed into the eye.
The shock absorber rod is covered with a corrugated casing that protects it from dirt and moisture.
In the event of suspension breakdowns, the stroke of the shock absorber rod is limited by a compression stroke buffer made of elastic plastic.
The suspension spring with its lower coil rests on the support cup (a stamped steel plate welded to the shock absorber body), and with its upper coil it rests against the body through a rubber gasket.
The rear wheel hub axle is installed on the flange of the beam arm (it is secured with four bolts). The hub with a double-row roller bearing pressed into it is held on the axle by a special nut.
The nut has an annular collar that securely locks the nut by jamming it into the groove of the axle. The hub bearing is a closed type and does not require adjustment or lubrication during vehicle operation.
Rear suspension springs are divided into two classes: A - more rigid, B - less rigid. Springs of class A are marked with brown paint, class B - blue.
Springs of the same class must be installed on the right and left sides of the car.
Springs of the same class are installed in the front and rear suspension.
In exceptional cases, it is allowed to install class B in the rear suspension if class A . Installing class A on the rear suspension is not allowed if class B .
Rear suspension beam - replacing silent block
To replace the silent block, removing the beam from the car is not required. We change the silent blocks one by one: first at one, then at the other beam lever.
To complete the work you will need:
- car stand;
- universal cup puller.
1. We prepare the car for work.
2. Place the car on a reliable stand and remove the rear left wheel.
3. On cars without ABS, disconnect the elastic lever of the pressure regulator from the earring. On vehicles equipped with ABS, remove the wheel speed sensor wire from the bracket on the lever.
4. Release the left parking brake cable from the two brackets securing the cable to the left rear suspension arm.
5. Using a 19 mm socket wrench, unscrew the nut of the bolt securing the lever to the body bracket, holding the bolt with a 19 mm socket wrench.
6. Remove the bolt. Pull the lever down (without pulling the brake hose) and install the puller cup on the outside, and a special washer on the inside of the lever.
7. Rotating the nut of the puller bolt, press the silent block into the cup.
The silent block has a stop on one edge, so it should only be pressed out towards the car threshold.
8. Apply silicone grease or soap solution to the cylindrical surface of the new silent block.
9. Install the puller cup on the inside of the lever.
10. Rotating the nut of the puller bolt, press the new silent block into the lever until it stops.
11. Install the lever into the body bracket and fix it with a bolt and nut without tightening it.
The lever fastening bolt is inserted into the body bracket from the side of the car threshold.
12. On cars without ABS, insert the elastic lever of the pressure regulator into the earring and secure it with a stopper.
13. We fix it in the bracket; handbrake cable and wheel speed sensor wire.
14. Install the wheel and remove the car from the stands.
15. Press n several times; rear part of the car for self-installation of the suspension.
16. Finally tighten the nut of the lever mounting bolt to a torque of 66.6–82.3 Nm (6.8–8.4 kgcm).
17. We replace the silent block of the second lever in the same way.
Rear suspension shock absorber and spring - removal and installation
It is convenient to carry out the work in an inspection ditch. The work is shown on a car with a hatchback body. On a station wagon, the work is performed in the same way. On a sedan car, access to the upper shock absorber mount is through the luggage compartment.
Replace shock absorbers and springs in pairs.
To complete the work you will need:
— inspection ditch or overpass;
— a device for disassembling suspension struts.
We carry out the work with an assistant.
Removal
1. Prepare the car for work and hang the rear of the car on stands.
If there is no inspection ditch or overpass, remove the rear wheel of the car from the side of the shock absorber being replaced.
2. Remove the luggage compartment shelf.
3. Fold down the back seat.
4. In the luggage compartment, use a Phillips screwdriver to remove the four screws securing the upholstery.
5. Use a screwdriver to pry off the trim of the seat back lock.
6. Using a 19 mm wrench, unscrew the lock and remove it.
7. Using a Phillips screwdriver, unscrew the screw securing the luggage compartment lining.
8. Bend down the luggage compartment upholstery.
9. Use a Phillips screwdriver to unscrew the top screw securing the cladding.
10. Using a Phillips screwdriver, unscrew the two lower screws securing the cladding.
11. Move down the luggage compartment lining.
12. Using a 13 mm socket wrench, unscrew the two nuts securing the seat back clamp bracket.13. Remove the clamp bracket.
14. Using a slotted screwdriver, remove the plug.
15. While holding the shock absorber rod from turning with a 6 mm wrench, unscrew its nut with a 17 mm wrench.
16. Use a magnet to remove the spring washer and the upper support washer from the shock absorber rod.
17. Remove the upper rod mounting pad from the shock absorber rod.
18. Using two 19 mm wrenches, unscrew the nut of the bolt securing the lower end of the shock absorber to the rear axle beam and remove the bolt.
19. Move the lower end of the shock absorber towards the rear of the car and remove the shock absorber.
20. Remove the spring and its gasket from the shock absorber, and also, if necessary, remove the lower cushion and spacer from the shock absorber rod.
Installation
Springs of the same class (with the same color marks) should be installed in the rear suspension of the car.
1. Before installing the shock absorber, secure the rubber gasket 4 to the spring 2 with insulating tape or tape.
2. Install the spring on the shock absorber and fully extend the rod. We put a buffer 1, a protective casing 3 with a cover, a spacer sleeve 5 and a lower cushion 6 (if they are not on the rod) onto the shock absorber rod.
When installing, the shock absorber must be oriented so that the end of the lower coil of the spring faces the wheel.
3. We insert the shock absorber rod into the hole in the body cup, at the same time an assistant puts the upper cushion and support washer on the rod and tightens the rod nut a few turns.
4. Raise the lever until the holes in the shock absorber and beam bracket align. Install the lower shock absorber mounting bolt and tighten its nut (without tightening).
If you don't have an assistant, you can first attach the shock absorber to the rear suspension beam. Then, placing a stop under the rear lever, smoothly lower the car on the jack, making sure that the shock absorber rod enters the hole in the body, and after that, put on the upper cushion with the support washer and tighten the nut.
5. Install the removed wheel (if the work was carried out without an inspection ditch) and lower the car onto the wheels. We press the rear of the car several times to self-install the suspension elements.
6. Tighten the shock absorber rod mounting nut to a torque of 50-61.7 Nm (5.1-6.3 kgcm).
7. Tighten the nut of the shock absorber lower mounting bolt to a torque of 66.6–82.3 Nm (6.8–8.4 kgcm).
Installing spacers on the Priora
Lada Priora - everything you need to know about increasing ground clearance. Part 9
Installing spacers yourself is not difficult for anyone who has at least minimal experience in car repairs. In this article we will talk about the sequence of actions that are performed when installing spacers, as well as the most common mistakes made during the work process.
How to install spacers
In one of the previous articles, we talked about the main activities that need to be carried out before installing spacers. If you have replaced sagging springs, changed struts and silent blocks if necessary, and also bought spacers of the required size, then you will need ordinary driver's tools - a jack, a support, wheel chocks, a set of keys, and a steering pin puller. The exception is a spring puller, but this can be purchased at your local auto parts store.
Installing spacers on the front suspension
To replace spacers on the front suspension, chock the rear wheels, raise either side with a jack, and install stands. Do not perform any work under a car that is on a jack, it is deadly. With one of the front sides of the car hanging, remove the wheel and unscrew the hub nut. To do this, you will have to engage first gear with the engine off. If that doesn't work, have someone press and hold the brake pedal. Often you have to use a powerful wrench to unscrew this nut. Then loosen and unscrew the steering pin nut and ball joint bolts. Using a puller, remove the steering pin from the strut.
If you do not have such a puller, visit your local auto parts store. Using a crowbar, press the lower suspension arm so that the ball joint comes off the steering knuckle. Pull the brake disc towards you so that the hub comes off the constant velocity joint shaft (grenade) and support the strut with something
Unscrew the three nuts that secure the support bearing to the body and carefully lower the rack down. Replace the bearing bolts with longer ones, then put a spacer on it and install the strut in place, then reassemble the suspension in reverse order. Don't forget to adjust the camber and toe
Don't forget to adjust the camber and toe.
Installing spacers on the rear suspension
Support the front wheels with chocks, engage first gear, support either rear side with a jack and support it. Remove the wheel. To install the lower spacer, unscrew the lower bolt of the shock absorber, pull it out of the mount, insert the spacer into the mount and secure it with the same bolt and nut. Insert the shock absorber into the spacer and secure with a new bolt and nut in the desired hole. To install the upper spacer, compress the springs using a puller, then hold the shock absorber rod and unscrew the fastening nut. Remove the standard gasket and install a spacer instead. Do not place a spacer on the gasket; it will pop out over time. If necessary, attach an extension to the rod and install the shock absorber, securing it with a nut. Loosen the puller so that the spring takes its place. Put the wheel on and tighten the wheel bolts.
Or you can combine both by buying a small car and then making it suitable for crossing bad roads. You can create such a universal car by simply increasing the ground clearance of your existing car. In the conditions of Russian roads, such fraud will always be relevant. So, for example, by increasing the ground clearance on a car like a Priora, you will save a lot of money on its repairs. After all, you won’t have to repair the suspension in vain after encountering a couple of holes.
Rear suspension of the Lada Priora car
The rear suspension of the Lada Priora is semi-independent, made on an “elastic” beam with trailing arms, coil springs and double-acting telescopic shock absorbers.
The rear suspension beam consists of two trailing arms connected by a U-shaped cross member. This cross-section provides the connector (cross member) with greater bending rigidity and less torsional rigidity. The connector allows the levers to move relative to each other within small limits. The levers are made of pipes of variable cross-section, which gives them the necessary rigidity. Brackets for attaching the shock absorber, rear brake shield and wheel hub axle are welded to the rear end of each lever. At the front, the beam arms are bolted to removable brackets for the body side members. The mobility of the levers is ensured by rubber-metal hinges (silent blocks) pressed into the front ends of the levers.
The lower shock absorber eye is attached to the beam arm bracket. The shock absorber is attached to the body by a rod with a nut. The elasticity of the upper and lower connections of the shock absorber is provided by a rod cushion and a rubber-metal bushing pressed into the eye. The shock absorber rod is covered with a corrugated casing that protects it from dirt and moisture. In the event of suspension breakdowns, the shock absorber rod stroke is limited by a compression stroke buffer made of elastic plastic.
The lower coil of the suspension spring rests on the support cup (a stamped steel plate welded to the shock absorber body), and the upper coil rests against the body through a rubber gasket.
Spring and shock absorber parts of the rear suspension: 1 - spring; 2 — rubber gasket; 3 — casing cover; 4, 10 — shock absorber rod cushion; 5 — spacer sleeve; 6 — shock absorber casing; 7 — rod nut; 8 — spring washer; 9 — support washer; 11 — shock absorber rod; 12 — shock absorber body; 13 — lower spring support cup; 14 — nut of the shock absorber lower mounting bolt; 15 - eye; 16 — bolt of the lower shock absorber mounting; 17 - compression progress buffer.
The rear wheel hub axle is installed on the flange of the beam arm bracket (it is secured with four bolts). The hub with a double-row roller bearing pressed into it is held on the axle by a special nut. The nut has an annular collar that securely locks the nut by jamming it into the groove of the axle. The hub bearing is a closed type and does not require adjustment or lubrication during vehicle operation.
The car pulls to the side
Settlement or breakage of one of the rear suspension springs Replace the rear spring Displacement of the rear axle of the vehicle due to wear of the rear suspension arm bushings Replace the rear suspension arm bushings Deformation of the rear suspension arms Replace the rear suspension armsLet us remind you that on modern Lada Priora, extraneous noise can come from the gearbox.
Key words: rear suspension of Lada Priora
0 0 0 0 0 1
Share on social networks:
Life hack: front suspension of a Priora car - how to disassemble it, diagram
The chassis is an important parameter for comfort - not everyone will agree to a gear crusher machine. The front and rear suspension of a Priora car is, in fact, its foundation, which consists of several systems, each of which is responsible for a specific task. Some provide “swallowing” of bumps, some provide confident braking, and other systems ensure that the wheels move evenly, with the correct trajectory. The rear suspension on the Priora car is a beam. These are found on all budget cars. Lada Priora is still a budget car, if you dig deeper. Especially the interior, the handles, the paint.
The front suspension of the VAZ 2170 Priora is an independent MacPherson system, in many ways it is a modified copy of the models of the tenth “family”. Its design is simple and even, in my opinion, needs some improvement, for example in the levers. I still like the Priora chassis for its relative softness - few cars in this class are able to show a cushion that could withstand Russian off-road conditions. If you put a front suspension arm on both sides, coupled with braces, it will be a different car both in handling and in swallowing potholes.
Some spare parts are replaced almost immediately after purchase with analog ones - more expensive, but reliable. The strut rod, of course, holds all the components and mechanisms around it, but in serious off-road conditions it cannot cope with this. The rack breaks and it leaks. The chassis mechanism at the front of a vehicle is more often repaired than the rear, but on subsequent AvtoVAZ models it was made a little stronger.
Racks, what are they and why are they needed?
Struts are a mechanism whose task is to filter the shocks coming to the car when driving on a bad road. If the racks are of poor quality and not well-designed, then movement becomes a nightmare. This is why driving an expensive foreign car and a budget domestic car, which is sensitive to every bump, are so strikingly different.
The struts have a complex design, but the basis is a hollow piston system. The piston system is equipped with multiple parts that secure the racks to the car body, and inside it is filled with either gas-oil liquid or oil. The principle of operation of the struts is that the piston, when it starts to move, seems to break the impacts falling on it, reducing their force.
Front and rear struts, depending on the manufacturer, can last a different amount of time, for example, standard Saaz rear struts installed on Lada Kalina and Lada Priora can last 75,000 - 85,000 km, after which they require replacement. If you put new ones on a Lada or Priora, of better quality, then they will last 120,000 - 125,000 km, which is already an achievement.
On the Priora, as on other cars, problems with struts are expressed in oil leakage, insufficient adhesion of the tires to the road surface, and deterioration in maneuverability. Another sign of problems with the rear strut is a sudden, sharp increase in braking distance. According to professionals, if it is necessary to replace one rear strut, then it is wiser to change both at once, since otherwise there may be a mismatch of parts, which will lead to a significant deterioration in the operation of the entire system and a decrease in the dynamics, maneuverability and controllability of the car.
Chassis of the Lada Priora car
When selecting a car, the chassis is checked almost from the first minutes, which is due to the complexity of repairing each component. It is better to know the device yourself in order to determine the wear of mechanisms and components, understanding which of them produce a sound that is unnatural for your favorite car.
Finally, such knowledge will save you from the fact that dishonest mechanics at a car service center will advise you to change unnecessary parts, although they are only half worn out. You need to be especially careful with the front suspension of the VAZ-2170 - if we talk about those components that wear out quickly, in order to save your time you can replace them with analogues.
Independent front suspension on Priora - what it consists of, diagram
The diagram of the front suspension of a Priora car with digital symbols is shown in the figure.
The numbers indicate the following details:
- fist turns;
- eccentric bolt;
- strut;
- lever arm;
- stabilizer;
- fastening;
- rack;
- crossbar;
- spherical bearing;
- stretching.
There is another drawing: the suspension of the Priora car - a diagram with symbols
- “Groups” of parts are responsible for individual tasks. The stabilizer, together with its struts, makes sure that the car turns smoothly, the wheels rotate synchronously, according to the force that the driver applies to turning the steering wheel. The damper “absorbs” shocks from all bumps through which the car passes, swaying, reducing the amplitude of movement.
- The hub is the “mounting socket” for the wheel of a car. Together with the caliper, it holds it in one plane, preventing it from moving in a figure eight. The brake disc fits tightly against this structure, pressing flush only when the driver presses the brake pedal. Rotary components build the correct angle of rotation, the stabilizer limits their action.
- The independent MacPherson system allows you to drive over potholes, swaying slightly - for example, when the driver drives the right wheel on a flat surface and the left one skids over a speed bump, passengers feel the tilt of the body only because the left side is raised. The suspension seems to “bend”, leaving the right side of the body practically motionless, and the wheels lying close to the road.
- The chassis system at the front of the VAZ Lada turned out to be quite successful; its structure is not difficult to study if you treat it with due understanding. When something knocks in it, it’s quite easy to figure out the cause of the malfunction, but you still have to get dirty during the diagnostic process.
What to do and is it possible to drive?
Of course you can drive, in general you can “drive” without shock absorbers - but how? Of course, if you have one strut leaking, then you may not notice it, but if there are two at once, or as my friend had three (two in front and one in the back), then the car will “swing” like on a roller coaster. Even low speed and reaction to small irregularities caused the car to sway, I’m already silent about some sharp maneuvers (turns, for example), the car was simply drifting!
What to do - change it urgently, the sooner - the better, otherwise, due to your incorrect savings on racks - then you will pay more.
Is it possible to ride:
- If one rack is leaking, then it’s possible, but you need to change it quickly (you’ll understand why later).
- If there are several leaks, say two or three, then it is not advisable to drive, but if necessary, we do it very carefully, at low speeds. Do not make sudden maneuvers, braking, overtaking or entering turns - this can lead to accidents with inoperative shock absorbers.
Guys, I understand that original shock absorbers are expensive, but they need to be changed! YES, and you can find quite sane originals, for example KAYABA, very sane quality and more or less prices.
Lada Priora suspension malfunctions
A lot of words have been said about the need to “sort out” the chassis. Every noise or knock can cause concern even for an experienced car enthusiast, because he knows that there are several valuable components and mechanisms below - no one wants them to break. But over time, having learned to determine the causes of a malfunction based on the primary signs of “disease,” you can roughly estimate the cost of repairs.
Noise or knocking in the front suspension of Lada Priora
It is extraneous sounds that cause more concern about the chassis - as if some important part was “exposed”, having lost its protection, and is now being mercilessly beaten to the point of complete wear. There are several reasons why strange noises may be coming from the front:
- the shock absorber is broken;
- the fastening of the stabilizer or its cushion has become loose, mechanical damage has occurred;
- the place where the upper support is attached to the body has become loose;
- the support gasket has worn out;
- silent blocks collapsed;
- stub stretches;
- the ball joint of the lever “walks” or creaks;
- the damper spring is mechanically damaged or stretched;
- The compression stroke buffer has decreased;
- Wheel balancing is off.
The following signs of malfunction are also found in the front part of the chassis:
- fluid is leaking from the shock absorber strut;
- the shock absorber does not work effectively;
- shock absorbers break;
- the car pulls to the right or left when driving straight;
- tires wear out too quickly;
- tires wear unevenly.
Replacing struts on a Priora: when is it necessary to repair a car?
Before determining which racks on the Priora are better and more reliable, you should make sure that the elements need to be replaced. There are several main reasons why repair work is required. The best decision would be to visit a car repair shop and examine the spare parts by specialists. You can independently determine the need for installation based on the following phenomena:
1. The car holds the road worse.
2. When turning, vehicles are subject to strong roll.
3. There is a knocking or clicking sound in the area of the racks.
4. Shocks when hitting small holes lead to “jumping” of the car and are transmitted to the cabin.
5. When the body rocked, strong vibration appeared.
Bleeding a car is easy and allows you to accurately identify problems. To perform it, the owner needs to swing the body at the corner front point. The next time you lower the car down, you should release it.
If, after lifting to its original position, the body stops swaying, then the condition of the racks is normal. Otherwise, you need to think about what racks to install on the Priora, and start work as soon as possible.
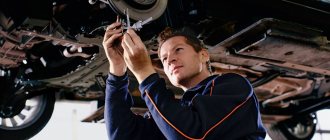
How to disassemble the front and rear suspension
The chassis consists of 41 parts, so disassembly takes longer and assembly may require additional adjustments. The process looks like this:
- Using a wheel wrench, loosen the bolts on the wheel one by one and pull the car onto an inspection hole or overpass. Be sure to tighten the handbrake - this will lock the rear ones, now remove the front ones.
- Unscrew the nuts from the hubs, now you can remove the steel ball joint rod from the damper strut.
- Disconnect the stabilizer from the lever. Unfasten the ball joints from the steering knuckle and remove them.
- Disconnect the bracket from the body, and then remove the extension. At the same time, loosen the pad holders.
- Tie the brake caliper, leaving it attached to the hose. Removing it is not so difficult, but installing it is much more difficult, so it is easier to leave it hanging.
- Unscrew the nuts from the damper, remove it, and then the protective fist.
- Using socket wrenches, remove the fastenings of the ball joint and steering knuckle. Be careful not to damage the protective cover of the hinge.
- Analysis of the rear chassis looks like this:
- Place the car on the pit (it is better, of course, to use a lift);
- Open the trunk, under the trim (which covers the wheel arches) loosen the shock absorber bolts.
- Gradually loosen the wheel bolts and remove them.
- Unscrew the brackets securing the handbrake cables, then remove them - otherwise they will get in the way. Unscrew the drum mechanisms, cable ends, flanges.
- Remove the brake pipes. Unscrew the drive lever washer, then remove the drive itself.
- Remove the damper supports.
- remove the stand.
- Unscrew the fasteners of the beam (from below), and smoothly lower it to the ground.