Judging by the official recommendations of the manufacturer, it is necessary to replace the coolant on the Lada Kalina:
- Or after 2 years of operation
- Or after 60,000 km (whichever comes first)
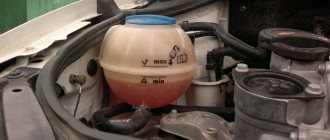
The mileage of my Kalina has not yet approached the recommended one, but in terms of time, it was necessary to carry out this procedure last year. I delayed this a little, but I think it’s okay, since the antifreeze in the expansion tank is pure red - a little darker than new.
Below is a list of necessary items that will be needed to perform this type of maintenance:
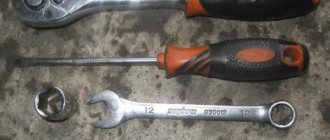
- Socket wrench or open-end wrench 13
- Head for 13
- Driver or ratchet handle
- crosshead screwdriver
- 17 socket or wrench for unscrewing the ignition module housing
DS555555555
If the engine is hot, you need to let it cool and then relieve excess pressure in the cooling system by unscrewing the expansion tank cap.
To access the drain holes from below, you must remove the middle mudguard of the engine compartment. How to perform this operation can be found in the article “Changing the oil and oil filter of Lada Kalina”.
We place a wide container with a volume of at least 6 liters under the drain hole made in the lower part of the right radiator tank. To reduce the intensity of liquid drainage at the initial moment, the cap of the expansion tank should be tightly screwed on.
How to replace coolant on a VAZ 1117-1119
Lada Kalina Hatchback Blueberry Logbook FAQ
Note!
At engine operating temperature, the fluid heats up to 100 degrees - you can get burned. Sometimes you urgently need to cool the liquid - unscrew the cap of the expansion tank. Act carefully and smoothly, and completely remove the lid only if the hissing sound disappears, otherwise the air inside the tank will knock out the lid and the liquid will flow out in a column - everything around will get dirty, and you can get burned. It is best to work with a cold engine.
Remember! The liquid is highly toxic, pour it into a tightly closed container and throw it away not in a bucket, but in a landfill!
Merging
Drive the car into the inspection hole and ensure that it stands level. If this is not possible, park the car so that the front is higher than the rear.
Note! Securely secure the car using the handbrake, set it to speed, and place stones under the rear wheels. Remove the mudguard from it (the article will be useful for you: “Replacing the engine mudguard”) and, if present, the crankcase protection. If you are 100% sure that the liquid will not get on the mudguard and protection, then you can not remove them from the car!
Unscrew the nut securing the minus terminal to the battery (For more details, see the article: “Replacing the battery in a car”, point 1)
Note! After removing the terminal, remove the ignition module from the car by unscrewing the hex bolts (described in detail in the article: “Replacing the ignition module on a VAZ”!). Applies to 8 valve cars; for 16 valve cars we do not remove the module.
Unscrew the cap of the expansion tank and place some container under the drain plug of the cylinder block (indicated by the arrow). Remove it using a spanner and drain all the liquid from the block into a substitute container. Now repeat the steps for the radiator fluid; there is a plug on it that can be unscrewed by hand.
Note! Liquid from the drain hole will stain the cylinder block. Take a cloth and wipe dry the places where it got in!
Close both plugs and move to the throttle assembly. You will find a hose that goes to drain the coolant (see photo). Loosen the clamp on the hose and disconnect it by hand from the throttle assembly fitting (the fitting is indicated by the arrow).
Note! This operation will help avoid air locks: air entering the pipes does not allow fluid to escape into the expansion tank; instead of the required fluid level, there will be air, which means the engine will overheat. By the way, because of the traffic jams, the stove heats very poorly!
Pouring
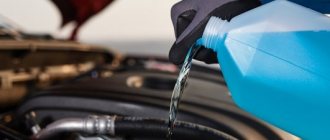
Start by yourself or ask an assistant to pour liquid into the expansion tank while holding the drain hose (we disconnected it from the throttle body). As soon as liquid begins to flow out of it, connect it to its place and tighten the fastening clamp thoroughly.
Note! Continue adding fluid until it reaches the MAX mark on the reservoir. Screw the tank cap tightly, the main thing is not to break the thread - we observe the measure everywhere. See the video below for more details, keep in mind that it’s not Kalina!
Reinstall the previously removed parts, connect the battery, get into the car, start it and wait until it warms up to operating temperature. When you hear the fan turn on, turn off the car and see how much fluid is in the tank. If necessary, bring the level to normal.
Note! Check to see if an air lock has formed - turn on the heater on a warm car and check what kind of air comes out of it. Cold - most likely a plug has formed, hot - everything is fine, you replaced the fluid correctly. Watch the color of the liquid. A quick change in color indicates a fake - we replace it urgently.
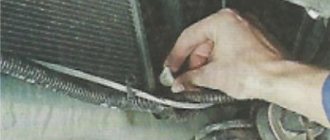
If a plug forms, squeeze the hoses of the cooling system (the photo shows the Kalina cooling system, you don’t need to touch each hose, just feel the thickest pipes) - as a rule, it helps. As a last resort, let the car cool down completely and unscrew the expansion tank cap, then start and let the car run for a few minutes (about 3-4 minutes). Plug it, tighten the plug and recheck the formation of air pockets in the cooling system.
Additional video
The video shows the process of replacing the fluid on a VAZ 2110. On Kalina, it’s basically the same, the shape of the radiator drain plug is different. The drain hose connecting to the throttle assembly is located closer to the front of the car on Kalina than on the 2110 model (closer to the rear).
1449657996_2279_4_9b_03_kopirovat
The connection is sealed with a rubber ring.
To increase the intensity of liquid drainage, unscrew the cap of the expansion tank.
Next, you need to drain the fluid from the cylinder block.
To drain the coolant from the cooling jacket of an 8-valve engine equipped with a traction drive gearbox, place a container under the drain hole located on the front side of the cylinder block below the ignition coil.
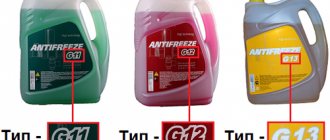
Antifreeze and its volume
To fill the cooling circuit in the Lada Kalina with new fluid, a volume of approximately 8 liters will be required. Initially, the manufacturing plant uses the substance “Felix” with a red color. In order to practically replace the fluid, you will need to purchase a 10-liter container with the specified antifreeze or, as an alternative, two 5-liter canisters.
1449660640_2279_4_9a_02
On a vehicle with a 16-valve engine equipped with a cable-driven gearbox, access to the drain hole in the cylinder block is prevented by the starter. In addition, the leaking liquid will inevitably get inside the starter.
Therefore, the starter needs to be removed. Disconnect the wire terminal from the negative terminal of the battery. By pressing the latch of the wire block, disconnect the block from the traction relay connector. Remove the protective cap from the nut securing the tip of the wire connected to the positive cable of the battery.
How to remove a plug from the cooling system of a Lada Kalina
There are at least three ways to remove an air lock and each of them has its own advantages and disadvantages. In such cases, many drivers recommend not to rush into radical actions and take a closer look at the expansion tank cap. It is possible (and this happens very often) that due to a poor-quality compensation valve built into the plug, air gets in exactly in this place. The plug from the VAZ 2110 and even from the Gazelle fits Kalina, so there is a wide choice of plugs. After replacing the plug and warming up the engine, the air may bleed out on its own.
One of the non-original expansion tank plugs, Luzar
If this option does not give anything, proceed to removal in other ways:
The most reliable way is to expel air from the highest point of the cooling system, from the throttle heating hose. To do this, warm up the engine, leave it idling and carefully remove the hose through which antifreeze is supplied to the throttle assembly. In this case, we will lose a little antifreeze, but we are guaranteed to release air from the system
And here you need to be careful, the liquid is hot.
A relatively simple way to remove a plug. We drive the car onto a hill so that the front is raised
An overpass is perfect. After this, open the expansion tank and carefully crush the pipes and hoses of the cooling system. At this time, the stove should operate at maximum speed and be completely open (we move the regulator to the right all the way), the engine runs at idle, after warming up to normal operating temperature, we raise the speed to 3-3.5 thousand. The air should escape through the expansion tank.
Well, a very simple method, which, however, works quite often. We also drive the car onto a hill with the front end, warm up the engine, and rev it up to the red zone of the tachometer. We get down from the elevation and check the antifreeze level in the tank. If the air has escaped, then the level should drop.
After removing the air lock on the Lada Kalina, add fluid to the normal level and in the future monitor the tightness of the system, and also try not to use bad antifreeze.
1449660639_2279_4_9a_01zh
We remove the starter.
We unscrew the plug and drain the coolant from the cylinder block.
We tighten the drain plugs of the radiator and cylinder block. The connection between the plug and the cylinder block uses a conical thread that does not require additional sealing. Tighten the drain plug of the cylinder block to a torque of 25–30 Nm. We pour the fluid recommended by the manufacturer into the engine cooling system through the expansion tank until it is full. Let's start the engine. With the engine running, vigorously compress all the hoses of the cooling system several times in turn - this will help the fluid fill the system and displace air from it. As the coolant level in the expansion tank drops, bring it to normal and screw on the tank cap. When the engine warms up, the outlet (lower) radiator hose should be cold for some time, and then quickly heat up, which will indicate the beginning of fluid circulation in a large circle. After waiting for the cooling system fan to turn on, stop the engine. After the engine has cooled, check the coolant level again and, if necessary, replenish the system.
Lada Kalina: instructions for replacing coolant
How to drain antifreeze from a Lada Kalina carefully for reuse?
The need to drain the coolant may arise when replacing a water pump, thermostat, radiator or expansion tank, while the antifreeze itself does not necessarily need to be changed, provided that it has recently been changed. In this article you will learn how to carefully drain antifreeze from a Lada Kalina engine to reuse it.
How to drain antifreeze on Kalina - step-by-step instructions
- The first thing you need to do is drive into the inspection hole and let the engine cool down if it has warmed up to operating temperature.
- Then you should dismantle the plastic engine boot by unscrewing the six screws marked in the photo. Then you need to unscrew the hidden fasteners, which are located in the niches of the fog lights (PTF). If you have PTFs, you will have to dismantle them, but if you have plugs, then all you need to do is remove the plugs and unscrew the self-tapping screw marked in the photo. When everything is unscrewed, remove the plastic boot.
- We place a clean container under the radiator to drain the coolant and unscrew the plastic plug on the radiator. We drain the antifreeze or antifreeze and move on to the second stage.
- Now you need to think about how to drain antifreeze from the engine. This is done simply, we find such a bolt-plug on the engine, substitute a container and carefully unscrew the bolt. We wait until the liquid drains into the container.
That's all! This way you can carefully drain the antifreeze or antifreeze with minimal losses, after which the coolant can be reused. I recommend letting the drained liquid sit for several hours, so all the impurities and dirt particles will settle to the bottom. When filling, I advise you to filter the antifreeze through a fine sieve, this way you will achieve maximum cleaning of the coolant.
After completing all work, check the antifreeze level in the system and add if necessary. Be careful and after some time check the coolant level again, because after the engine has fully warmed up and the “large circle” of circulation has opened, the level may drop and eventually you will need to refill. Also, do not allow air locks to appear; just in case, I recommend reading this article on how to remove an air lock.
Thank you for your attention, that’s all, see you again at VAZ Repair. Bye!
We change it to a 16-valve modification
As noted, to complete the procedure in full, you will need to dismantle the starter unit
If this important manipulation is neglected, spilled liquid may penetrate into the starter unit through the open hole, causing its breakdown.
- We turn off the power supply to the LADA Kalina starter by disconnecting the block with cables from the solenoid relay on the unit body.
- On the positive terminal of the unit, remove the protective cap, then use a “13” key to unscrew the fixing nut, remove the terminal with the wire and move it to the side.
- Now you can use the same key to unscrew the 3 bolts that hold the unit to the block. We take out the starter.
- Next we move on to unscrewing the plug and dumping the refrigerant into the container.
- Having completed this stage of the process, screw the plug into its original place. The torque should not exceed 30 Nm.
- Using the previously indicated method, we drain the liquid from the radiator assembly.
After installing the plugs, we proceed to filling the system with the indicated liquid. We perform this action through the neck of the expansion tank. After this, we install the starter, start the power plant and, by pressing on the pipes, help the fluid begin circulating in the circuit faster. At the same time, we check the level using the marks on the tank. It should be located between the “Min” and “Max” marks. The antifreeze replacement has been successfully completed.
conclusions
As you can see for yourself, there is nothing difficult about changing antifreeze yourself; even the driver who is far from car repair can perform such work.
Coolant must be poured into the Lada Kalina car in order for it to perform several of its functions, such as maintaining the temperature (temperature sensor), cooling the engine, and it must also eliminate the unpleasant odor that enters the cabin from the street. For all these “moments” to work 100%, Kalina antifreeze must be replaced on time.
Several additional functions that coolant performs:
- Maintains normal temperature (temperature sensor) during engine operation.
- Maintains low temperature (temperature sensor) in PC operation. Using hydraulic fluid, which must be poured into the automatic transmission.
- The interior is heated in winter. Due to the fact that antifreeze passes through the heater, it provides warmth in the car. The liquid heated by the motor is inflated by a fan. And thus, the interior warms up in winter.
- Eliminates unpleasant odor in the driver's cabin (passenger compartment).
Adding liquid to the tank
So if you smell any of these signs, even a fleeting, incomprehensible odor, then you need to think about it and replace the liquid substance. Also, Lada Kalina cars should be replaced every two years or every 45,000 km, see whichever comes first. Because over time, the quality deteriorates and the element may succumb to corrosion.
[Hide]
How to drain all antifreeze from Lada Kalina yourself
Current models
The car is presented on the modern market in three main body styles:
Despite the wide range of existing advantages of such a vehicle, owners often have a question: how to drain antifreeze from Lada Kalina? Is it possible to carry out such an event on your own?
Advantages of the Lada Kalina vehicle
Before you start replacing antifreeze in vehicles, you need to find out what advantages such a unit has
The creators of Lada Kalina paid close attention to various features of the car. This made it possible to create a high-quality unit, equipped with the following options:
- electric power steering;
- centralized lock;
- airbags;
- increased level of vehicle rigidity;
- modernized interior ventilation system;
- wide viewing angle.
The advantage of the Lada Kalina is also considered to be the presence of specialized belts equipped with pretensioners, since such an element complies with existing norms and standards of the highest quality.
Replacing antifreeze Lada Kalina
Western experts at service centers recommend replacing antifreeze in a car at least after every 50 thousand kilometers. Often, before replacing the fluid, the car owner is faced with problems associated with replacing the radiator expansion tank, water pump or thermostat.
Of course, to carry out such actions, it is necessary to drain the coolant. That is why a fairly reasonable question arises: how to drain the antifreeze in a car yourself, without turning to experienced professionals?
Step-by-step instruction
Owners of a LADA kalina car should be aware that before starting to replace antifreeze, you need to know what it is.
Antifreeze, better known as antifreeze, is a coolant for the optimal functioning of all vehicle systems and mechanisms. This liquid does not freeze at extreme temperatures and is diatomic. Professionals recommend replacing antifreeze or antifreeze if the temperature changes.
That is why car owners know that, in principle, water can be used for the summer period
In winter, it is important to pay attention to such a criterion as increased resistance to frost. Professional experts have created step-by-step instructions that will help every car owner change the antifreeze on their own
- Place the unit on the inspection hole;
- Cool the engine;
- Remove the plastic motor boot. This action can be carried out if you use specialized tools;
Remove the hidden plugs for the fog lights;
Unscrew the hidden screw;
- Place a specialized container under the vehicle radiator;
- Unscrew the specialized plug located at the bottom of the radiator;
- Drain the coolant;
Pay close attention to the car engine to drain the fluids from it;
- Place another container under the engine;
- Unscrew the specialized bolt, which is also called a plug;
Drain off the remaining liquid.
After such measures are completed, the drainage of the liquid is considered complete. Now you can start cleaning the system, replacing faulty components, or simply adding fresh antifreeze.
Source