| Year | Engine | Type | Color | Lifetime | Recommended Manufacturers |
| 2004 | for all | G12 | red | 5 years | MOTUL Ultra, MOTUL Ultra, G-Energy |
| 2005 | for all | G12+ | red | 5 years | Chevron, AWM, G-Energy, Lukoil Ultra, GlasElf |
| 2006 | for all | G12+ | red | 5 years | Chevron, G-Energy, Freecor |
| 2007 | for all | G12+ | red | 5 years | Havoline, MOTUL Ultra, Lukoil Ultra, GlasElf |
| 2008 | for all | G12+ | red | 5 years | Havoline, AWM, G-Energy |
| 2009 | for all | G12+ | red | 5 years | Havoline, MOTUL Ultra, Freecor, AWM |
| 2010 | for all | G12+ | red | 5 years | Havoline, AWM, G-Energy, Freecor |
| 2011 | for all | G12+ | red | 5 years | Frostschutzmittel A, VAG, FEBI, Zerex G |
| 2012 | for all | G12++ | red | from 5 to 7 years | Freecor QR, Freecor DSC, Glysantin G 40, FEBI |
| 2013 | for all | G12++ | red | from 5 to 7 years | FEBI, VAG, Castrol Radicool Si OAT |
For diesel and gasoline engines the parameters will be the same!
When purchasing, you need to know the shade - Color and Type of antifreeze allowed for the year of manufacture of your Kalina 1119. Select the manufacturer at your discretion. Do not forget - each type of liquid has its own service life.
For VAZ Kalina (Body 1119) 2004, with any type of engine, it is suitable for carboxylate class antifreeze, type G12 with shades of red. The approximate period of the next replacement will be 5 years.
If possible, check the selected fluid against the vehicle manufacturer's specifications and service intervals.
Each type of liquid has its own color. There are rare cases when the type is tinted with a different color. The color of red antifreeze can be from purple to light pink (green and yellow have the same principles).
It is possible to mix liquids from different manufacturers if their types meet the mixing conditions.
- G11 can be mixed with G11 analogues
- G11 cannot be mixed with G12
- G11 can be mixed G12+
- G11 can be mixed G12++
- G11 can be mixed G13
- G12 can be mixed with G12 analogues
- G12 cannot be mixed with G11
- G12 can be mixed with G12+
- G12 cannot be mixed with G12++
- G12 cannot be mixed with G13
- G12+, G12++ and G13 can be mixed with each other
- Mixing antifreeze with antifreeze (traditional class coolant, type TL) is not allowed. No way!
- Before completely changing the type, rinse the radiator with plain water
- At the end of its service life, the liquid becomes discolored or becomes very dull.
- Antifreeze and antifreeze - very different in quality
- Antifreeze is the trade name for the traditional type (TL) of old-style coolant
What's worse: antifreeze or antifreeze?
Antifreeze plays the role of a heat insulator. ... Antifreeze, unlike antifreeze, forms a protective layer directly at the corrosion sites. Moreover, the thickness of its layer is only 0.0006 mm. Accordingly, heat transfer is not reduced, which significantly increases the efficiency of the engine cooling system.
Interesting materials:
When should you sow petunia? When should you sow rye? When should you sow spinach? When should you sow sorghum? When should you mow potato tops? When should you pick chestnuts? When should you pick redcurrants? When should you harvest oregano? When should you pick peppers? When should you pick currants?
conclusions
As you can see for yourself, there is nothing difficult about changing antifreeze yourself; even the driver who is far from car repair can perform such work.
According to the maintenance regulations for Lada cars, the coolant (antifreeze, antifreeze) should be changed every 75 thousand km. mileage or after 5 years, whichever comes first. At this moment, it is important to choose the right liquid correctly, then there will be no comments about it for the same amount of time.
Kalina 2 what kind of antifreeze is filled from the factory
The coolant level must be constantly monitored, since engine overheating can result in a major overhaul. But under no circumstances should you mix antifreeze and antifreeze of different brands.
The manufacturer's plant in Kalina supplies the following brands of coolants:
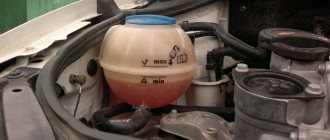
In order to determine what brand is filled in your car, you need to open the hood and look at the expansion barrel located on the right side of the engine compartment. A sticker with the brand of coolant filled will be affixed to this tank.
If you are not the first owner of the car or the sticker is lost, then I advise you to completely replace all the coolant.
Volume (quantity) of coolant:
The volume of liquid in the Kalina cooling system takes up 7.8 liters, but when replacing, sometimes it is not possible to drain all the residues and less liquid gets in. After replacing the fluid, it is advisable to monitor the level for the first time, as air pockets could remain and as the level goes down, top up to the maximum mark.
| Type | Color | Lifetime | Recommended Manufacturers | ||
| 2012 | for all | G12++ | red | from 5 to 7 years | Freecor QR, Freecor DSC, Glysantin G 40, FEBI |
| 2013 | for all | G12++ | red | from 5 to 7 years | FEBI, VAG, Castrol Radicool Si OAT |
| 2014 | for all | G12++ | red | from 5 to 7 years | Frostschutzmittel A, FEBI, VAG |
For diesel and gasoline engines the parameters will be the same!
When purchasing, you need to know the shade - Color and Type of antifreeze allowed for the year of manufacture of your Kalina 2. Select the manufacturer at your discretion. Do not forget - each type of liquid has its own service life.
For VAZ Kalina (2nd generation) 2012, with any type of engine, it is suitable for lobrid class antifreeze, type G12++ with shades of red. The approximate period of the next replacement will be 7 years.
If possible, check the selected fluid against the vehicle manufacturer's specifications and service intervals.
Each type of liquid has its own color. There are rare cases when the type is tinted with a different color. The color of red antifreeze can be from purple to light pink (green and yellow have the same principles).
From this moment a number of difficulties begin and a question arises for Kalina 2 experts about what antifreeze is filled in from the factory, because often the user does not understand where to look for the answer. Instructions and videos are available in international format for citizens of any country over 18 years of age.
Video quality: WEB-DL
The video was uploaded to the admin from user Adam: for immediate viewing on the portal.
To give the correct answer to the question you need to watch the video. After viewing, you will not need to seek help from specialists. Detailed instructions will help you solve your problems. Enjoy watching.
Humor on the topic: Women are divided into two types: 1. So what if he sold his kidney for me, anyway, I’m somehow not sure that he likes me.2. Did you hear that guy at the other end of the hall sneeze?! Wants me!
Recommendations
Comments 26
Hello everyone! I was in an accident and the CO was injured. Naturally, the radiator needs to be replaced, along with the antifreeze. I decided to change the radiator at a familiar service center; after all, finding one is not so difficult, but the cooler is a bit of a mess. I want to fill the original, but I can’t find any information about what kind of antifreeze is poured into it. I drive a 2016 Kalina
Why does it have to be native? there are plenty of others. I chose Felix
Hello everyone! I was in an accident and the CO was injured. Naturally, the radiator needs to be replaced, along with the antifreeze. I decided to change the radiator at a familiar service center; after all, finding one is not so difficult, but the cooler is a bit of a mess. I want to fill the original, but I can’t find any information about what kind of antifreeze is poured into it. I drive a 2016 Kalina
Don't break your head, just buy antifreeze of the same color that was filled in earlier
Apparently, you are not aware that antifreezes can have the same color and completely different composition. There are also reverse cases, when the same antifreeze is sold under different colors. In general, remember! You can’t choose antifreeze by color! Color is nothing more than a dye and it does not have the slightest effect on the properties of antifreeze Always! Absolutely always choose antifreeze approved by the car manufacturer. The approval is a guarantee that the antifreeze is fully compatible with your engine. In general, it is strange that you did not find information about the original antifreeze for your viburnum, because a lot is known about the fact that coolstream nrc is poured into viburnums. You understand that the plant won’t fix it, because the car is under warranty and it’s not eager to fix your car. And in general, coolstream is poured into most car factories in the Russian Federation. And from my own experience I can say that in 4 years he has never let me down.
By the way, yes, apparently some kind of incorrect query was entered. Now I tried it on Google and it immediately showed that the factory was pouring coolstream. Actually, I’ll fill it in) Thanks for the advice!
Isn't there a special drain bolt to drain the coolant from the block? I have it under the ignition module (8 cells). The cooler I bought was complete bullshit. My brother also got excited, bought a cheap one, after 2 weeks the RB turned brown - I had to wash it and buy normal antifreeze
There is a plug on the block, there have been no problems with it, so I’m keeping quiet about it. The rinse is used to remove scale and contains a weak acid, which is quite sufficient for my purpose.
I remember changing the antifreeze on my previous car... I filled it up and forgot about it. After 3 weeks the radiator leaked, I thought it was due to age. I made an appointment at the service station a couple of days in advance. During these couple of days the pump leaked and the thermostat died. When I went to the service center, the technicians drained the liquid and went nuts. It was slightly thick, brownish-orange in color. While the craftsmen were making the car, this liquid in the aluminum basin reacted) Little by little bubbles began to appear. In general, everything was thoroughly washed, new glands were installed, Felix Carbox was added and everything was fine. A couple of years have passed, the flight is normal.
How to change the thermostat Lada Kalina
Instructions from the repair, operation and maintenance manual.
Replacing the thermostat actuator element Lada Kalina
- Drain the coolant - coolant.
- Remove the air filter housing.
- Loosen the clamps securing the hoses to the thermostat pipes using a Phillips screwdriver.
- Disconnect the hoses from the connections.
- Unscrew the three thermostat bolts with a 5mm hex key.
- Open the thermostat housing and remove the sealing ring.
Replacing the Lada Kalina thermostat assembly
- Disconnect the hoses from the pipes on the thermostat cover (repeat steps 1-4 of the previous instructions).
- Disconnect three more hoses in the same way.
- Disconnect the wire connector from the coolant temperature sensor.
- Using a 13 mm socket wrench, unscrew the nut securing the wire to ground.
- Use it to unscrew a couple of nuts securing the thermostat to the cylinder head.
- Remove the thermostat and remove the rubber gasket.
- Unscrew the coolant temperature sensor, if necessary.
- Installation is in reverse order; the gasket must be replaced.
- Pour new coolant into the system.
- Check for leaks; if there are, tighten the clamps on the hoses.
This is what the new thermostat looks like.
First of all, drain the coolant. Next, you need to remove the air filter. To do this, you need to unscrew the 2 bolts on top.
And one nut from the engine compartment.
A recirculation valve is attached to the filter body itself - you need to remove the connector from it, and move the recirculation valve itself up and take it to the side along with the tubes.
Next, remove the connector from the mass air flow sensor and, loosening the clamp, pull off the air supply hose.
After the work has been done, loosening and at the same time turning the housing of the filter itself, pull it up and put it in a convenient direction.
Next you need to clean the seat. After cleaning, apply a thin layer of approximately 1-2 mm of sealant. Instead of sealant, you can use a paper gasket.
Next, use a 12mm wrench to unscrew the nut that is located on the top of the thermostat, then remove the ground wires. Next, use a 13mm wrench to unscrew the pin at the top and the nut located at the bottom of the thermostat. Shaking a little, we pull off the thermostat.
After 5-10 minutes, put everything back together in reverse order. The main thing is not to forget to put the ground wire in place.
1449657996_2279_4_9b_03_kopirovat
The connection is sealed with a rubber ring.
To increase the intensity of liquid drainage, unscrew the cap of the expansion tank.
Next, you need to drain the fluid from the cylinder block.
To drain the coolant from the cooling jacket of an 8-valve engine equipped with a traction drive gearbox, place a container under the drain hole located on the front side of the cylinder block below the ignition coil.
Lada Kalina: instructions for replacing coolant
Car: Lada Kalina. Asks: Istimov Sergey. The essence of the question: How much oil should I pour into the Lada Kalina engine?
Hello, could you please tell me how much oil should be poured into the Lada Kalina engine? I can’t figure out the exact answer to this question, since I bought my car quite recently, and the sellers don’t know what to say!
Which antifreeze to choose and what volume is needed
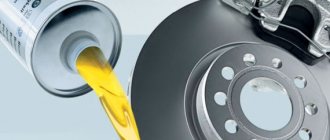
To completely change the cooling water in a 2nd generation Lada Kalina/Kalina car, you need 7.8 liters of antifreeze or antifreeze, depending on what you choose. Reddish Felix antifreeze is poured from the factory.
To completely replace the coolant (cooling water), we will need to purchase either one 10-liter canister, or two 5-liter containers.
Choosing antifreeze to replace
If reddish antifreeze was poured from the factory, then we recommend creating a replacement with reddish one.
- AGA 003Z (-40*) reddish 10l cost from 1000 rub.
- Professional Premium G-12 reddish 10 l cost from 700 rub.
- SINTEC LUX G-12 reddish 10l cost from 1000 rub.
- FELIX Carbox-40 (10 l) red price from 950 rub.
- NIAGARA G12 (10 l) red price from 800 rub.
- Arctic Circle G12 (10 l) red price from 700 rub.
All of the manufacturers mentioned above have proven themselves, so antifreeze from these manufacturers can be used for replacement.
What is needed for replacement
- Container for draining old antifreeze for 6-8 liters.
- 16mm head
- 13mm socket wrench for removing the starter on the 16 valve version of Kalina
It is better to create a replacement for a cool engine. Before replacement, you should release the pressure in the system by unscrewing the cap of the expansion tank. In order to freely access the drain plug, you need to remove the middle mud flap.
We select consumable fluids for Kalina-2. Factory recommendations
A car manufacturing plant always recommends the use of fuels and lubricants of certain brands. As for gasoline, Kalina-2 owners are advised to refuel their cars with the following brand of fuel: “Premium Euro-95” (GOST R-51866). In fact, any gasoline with an octane rating of 95 will do, but the instructions state that the fuel must not contain metal additives (lead, iron, manganese). Such additives are the basis of anti-knock mixtures.
Instructions for replacing Coolant
On Kalinas with 8 and 16 valve engines, the coolant replacement is different. Old fluid can be drained from a radiator without any problems, but from a block on a 16-valve engine it is more difficult. You will have to unscrew the starter.
Replacing the coolant. Kalina
The time has come to change the coolant and the question arose whether to fill in Antifreeze or Tosol
, and how did you do it...
Read:
Features of replacing antifreeze on a Lada Kalina car
Replacing antifreeze
produced after 5 years.
Replacing antifreeze on an 8-valve Lada Kalina engine
So, we relieve the pressure in the system by unscrewing the cap of the expansion tank. Then we remove the motor protection to get to the drain plug.
We take a container with a volume of 6-8 liters. and place it under the drain hole located at the bottom right of the radiator. To make the pressure weaker, screw the expansion tank cap back.
Features of front and rear wheel brakes
The bolts are placed in the passages of the guide blocks, pressed by the guide spring grooves. A piston with a sealing ring of rectangular cross-section is placed inside the cylinder. This ring provides the most rational distance between the disc and the brake pads. This organization of Kalina's braking system contributes to its efficient functioning.
In addition to the head system, the developers equipped the Lada with a mechanical parking brake, which is driven by the brake mechanisms of the rear wheels.
- adjusting rod;
- lever arm;
- two cables;
- equalizer;
- spacer bars;
- pad drive levers.
Useful expert advice
If the expansion tank cap leaks and does not hold pressure, it should be replaced
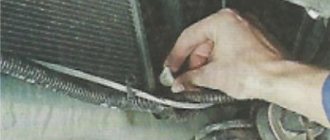
After replacing the antifreeze, check all pipes for signs of leakage. If necessary, replace the pipe clamps.
AVTOVAZ recommends replacing the fluid in the cooling system of the Lada Kalina every 75 thousand km of the vehicle or after five years, whichever comes first. Our illustrated step-by-step instructions will help you complete this procedure yourself.
LADA > Kalina
It is more convenient to replace the coolant when the car is installed on an inspection ditch or overpass.
Manual transmission oil
Transmission oils, just like motor oils, are classified according to quality level. According to API designations, all performance properties are characterized by one number (from 1 to 6). The following consumables are suitable for the manual transmission of Kalina-2 cars:
| Brand | Viscosity SAE | API class |
| Lukoil TM-4 transmission | 75W80, 75W85, 75W90, 80W85, 80W90 | GL-4 |
| Rosneft KINETIC (Angarsk, Novokuibyshevsk) | 80W85 | GL-4 |
| Rosneft KINETIC (Novokuibyshevsk) | 75W90 | GL-4/5 |
| Tatneft TRANSLUX TM4-12 | 75W85 | GL-4 |
| TNK TRANS KP | 80W85 | GL-4 |
| TNK TRANS KP SUPER | 75W90 | GL-4 |
| G-BOX EXPERT GL-4 | 75W90, 80W85 | GL-4 |
| Gazpromneft GL-4 | 80W85, 80W90 | GL-4 |
| SHELL SPIRAX S5 ATE | 75W90 | GL-4/5 |
In an automatic transmission, the oil cannot be changed. When changing manual transmission oil, it is preferable to use material with a viscosity of 75W85, 75W90.
How to add transmission oil
By unscrewing the dipstick plug from the gearbox housing, you can check the transmission oil level. Topping up is done through the hole in the casing in small portions.
The main thing is that the dipstick plug should always be screwed in as far as possible. The volume of transmission fluid in a manual transmission is 2200 ml, but, according to reviews, it is about 3 liters. The material used is from the factory manufactured (see table above).
1449660639_2279_4_9a_01zh
We unscrew the plug and drain the coolant from the cylinder block.
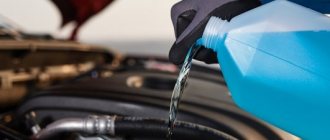
We tighten the drain plugs of the radiator and cylinder block. The connection between the plug and the cylinder block uses a conical thread that does not require additional sealing. Tighten the drain plug of the cylinder block to a torque of 25–30 Nm. We pour the fluid recommended by the manufacturer into the engine cooling system through the expansion tank until it is full. Let's start the engine. With the engine running, vigorously compress all the hoses of the cooling system several times in turn - this will help the fluid fill the system and displace air from it. As the coolant level in the expansion tank drops, bring it to normal and screw on the tank cap. When the engine warms up, the outlet (lower) radiator hose should be cold for some time, and then quickly heat up, which will indicate the beginning of fluid circulation in a large circle. After waiting for the cooling system fan to turn on, stop the engine. After the engine has cooled, check the coolant level again and, if necessary, replenish the system.
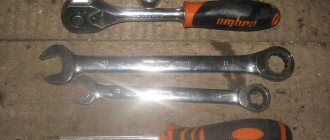
Note! You will need the following tools: a repair kit, socket wrenches, hex wrenches, wrenches and screwdrivers, a clean rag to remove traces of spilled liquid on the car engine.
Summary:
When to change the fluid?
There are several opinions: some complain about the replacement according to the regulations, others - that it can take longer, who to believe? Recently, many fakes have been produced for auto parts and components, and liquid is no exception. Therefore, when choosing a new liquid, be extremely careful. (The article will help you recognize a fake and buy a quality product: “Detailed information about Antifreeze and Antifreeze”)
The factory recommends changing the fluid every 75 thousand km or 3 years from the moment of filling. Keep in mind, these are deadlines. If possible, replace more often, do not let the additives wear out, because thanks to them the cooling system is protected from premature corrosion and other unfavorable things.
Note! So, we change the fluid either according to the factory’s recommendation or according to its appearance. To do this, unscrew the cap of the expansion tank (indicated by the arrow) and look inside. If the color of the liquid changes - it has acquired shades of rust, has become red-brown, then it is time to change it. An oil film on the surface is also an alarm bell for replacement.
How to determine if the thermostat is working
The first sign that the water pump on a car has started to work incorrectly can be considered extraneous noise in the engine compartment while driving. However, in some cases, the pump may fail before the stated time. You can check the functionality of the water pump in the simplest way:
- Warm up the engine to the optimal temperature. After warming up, use a gloved hand to pinch the upper pipe that comes from the radiator.
- If the pump is working properly, you will immediately feel the fluid pressure in the nozzle. Accordingly, the pump works as coolant circulates through the system.
- If pressure is felt, but weak, or not at all, it will be necessary to proceed to a detailed inspection of the pump.
- You will have to remove the timing case and visually assess the external condition of the pump.
- If there is a leak of antifreeze at the landing site, it means that the oil seal (seal) has failed.
- If a roar is heard while driving, we can conclude that the pump shaft bearing has worn out. You can pump the drive part of the pump gear by hand. If there is play, the pump will not work correctly.
Loss of pump tightness leads to disruption of fluid circulation in the system
Thus, it is possible to identify pump malfunctions without removing it from the car. The procedure is quite simple and accessible even to a novice driver.
When drivers talk about lubricating the pump, they mean lubricating the water pump bearings. There are two bearings installed on the shaft, which require a small amount of lubricant to operate correctly. Experienced drivers lubricate the pump without removing it from the car:
- Remove the gas distribution casing.
- Clean the pump mounting area and the pump housing itself from deposits, dust and dirt.
- Apply Litol-24 or VNIINP-207 with your finger to the joints of the housing.
When the engine warms up, touch the lower outlet pipe. It will be cold, and then should quickly heat up, which indicates that the coolant has begun to circulate in a large circle. Keep an eye on the fan, as soon as it turns on and brings down the temperature, turn off the engine and check the coolant level in the expansion tank.
This completes the antifreeze replacement.
How to replace coolant on a VAZ 1117-1119?
Note!
At engine operating temperature, the fluid heats up to 100 degrees - you can get burned. Sometimes you urgently need to cool the liquid - unscrew the cap of the expansion tank. Act carefully and smoothly, and completely remove the lid only if the hissing sound disappears, otherwise the air inside the tank will knock out the lid and the liquid will flow out in a column - everything around will get dirty, and you can get burned. It is best to work with a cold engine.
Remember! The liquid is highly toxic, pour it into a tightly closed container and throw it away not in a bucket, but in a landfill!
Merging
Drive the car into the inspection hole and ensure that it stands level. If this is not possible, park the car so that the front is higher than the rear.
Note! Securely secure the car using the handbrake, set it to speed, and place stones under the rear wheels. Remove the mudguard from it (the article will be useful for you: “Replacing the engine mudguard”) and, if present, the crankcase protection. If you are 100% sure that the liquid will not get on the mudguard and protection, then you can not remove them from the car!
First of all, during replacement, the old fluid is drained. It is performed as follows:
- The lid of the tank needs to be unscrewed. It contains brake fluid. The lid can be put aside, but it is better to place a rag under it, since the composition is in excellent contact with surrounding surfaces, without affecting them very well.
- The next step is to unlock the pressure regulator on the rear wheels, if necessary. To unlock this design, you will need to install a screwdriver between the plate and the piston.
- After this, you should prepare a hose and a container to drain the old fluid. It is best to use an empty bottle if you don’t have a container at hand. Before draining, it is necessary to clean the fitting from dirt using a brush. Subsequently, a hose will be attached to the fitting.
- Once the fitting is cleaned, you will need to remove the cap from it and insert one end of the hose into the hole, and the other should go into a container or bottle. Then you will need the help of a second person. He will need to get into the car and press the brake pedal several times. This must be done sharply so that the liquid can be drained, but between each press it is necessary to maintain a short break.
- As soon as the liquid stops flowing, you need to pull the hose out of the hole, wipe the fitting with a rag and close it with a lid. In this case, it is important to tighten the cap correctly. So, for example, if during the process of unscrewing it was loosened by 3/4, then it should be tightened by the same amount.
- The final action will be to begin pouring the new compound while tightening the fitting. As soon as new liquid begins to flow out of the existing hole, you can screw the cap on completely.
This fluid drain diagram is for rear brakes. As for the front ones, the procedure is practically no different. The main difference is only in the location of the fittings, but this will not be a problem if you familiarize yourself with the structure of the car and the brake system in advance.
Thus, the brake fluid is drained from both the front and rear brakes, after which it will be possible to begin filling in new fluid.
DS555555555
If the engine is hot, you need to let it cool and then relieve excess pressure in the cooling system by unscrewing the expansion tank cap.
To access the drain holes from below, you must remove the middle mudguard of the engine compartment. How to perform this operation can be found in the article “Changing the oil and oil filter of Lada Kalina”.
We place a wide container with a volume of at least 6 liters under the drain hole made in the lower part of the right radiator tank. To reduce the intensity of liquid drainage at the initial moment, the cap of the expansion tank should be tightly screwed on.