Characteristics of the VAZ starter of the ninth model
Every driver knows that if the car does not start, the reason may be a faulty starter. In order to diagnose and repair a mechanism, you need to know its structure.
Location and purpose
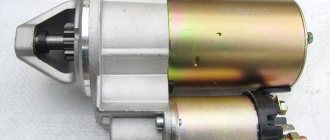
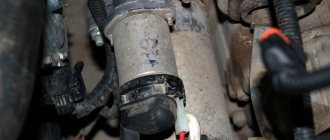
The main purpose of the starter is to spin the crankshaft, thanks to which the engine starts. Naturally, it is located close to the engine. It is usually located in the engine compartment on the driver's side under the power unit. Depending on the location, when dismantling the unit, you will need to remove either the engine protection or the air filter. Finding a starter is not difficult. It has the shape of a cylinder, and wires are connected to it, which are secured with a nut.
Design and principle of operation of the unit
This unit is a small electric motor. Its design consists of a bendix with brushes, two windings and a movable rotor. Magnetic fields of opposite values are created on two windings - starter and rotor. The mechanism is supplied with voltage, which is transmitted to the rotor using graphite brushes. Thanks to Bendix, rotational movements are transmitted to the flywheel.
The device includes:
- a sleeve that connects to the solenoid relay;
- overrunning clutch, which ensures movement in only one direction;
- gears.
Over time, the parts of the Bendix wear out and it begins to slip. In this case, it needs to be replaced. The cause of the malfunction is contamination of the mechanism, but cleaning does not help restore functionality. Mechanism parts wear unevenly; after washing, they cannot fully perform their functions.
The principle of operation of the starter mechanism is to convert the electrical energy it receives from the battery into rotational movement of the drive gear. An electric current is applied to the poles of the electric motor using a brush assembly. At the same time, the clutch extends and the flywheel crown is connected to the gear. The starter rotates the crankshaft and thus helps start the engine. When the engine is started, the clutch takes its original position (video author - Mikhail Nesterov).
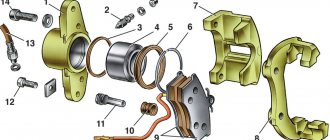
Starter repair for VAZ 2108-VAZ 21099
Note! On cars of the Samara family, different starters were used depending on the time and year of their existence. The first one is marked “426.3708” (we’ll look at it in this article), the second one “5712.3708”, and the third one “29.3708”. The first and third starters are similar to each other and they are disassembled almost similarly, only their commutators and drive levers are different. The second starter is different: it is more compact, consists of almost the same parts, but repairs by analogy with the 1st and 2nd ones may not be possible without understanding the operating principle of this mechanism.
Disassembly
1) At the beginning of the operation, remove it directly from the car, and the instructions we prepared from the article will help you cope with the task without any problems: “Replacing the starter on a VAZ” - the process is described in detail.
Note! The starters are removed identically regardless of the markings!
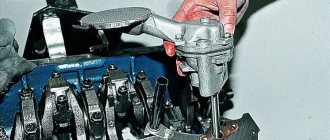
2) Take a wrench or a socket with a wrench and unscrew the nut of the stator winding output terminal (it is located closer to the housing and is indicated by a red arrow in the first photo below, and the blue arrow shows the former location). Then remove the stator winding output terminal, then on the reverse side, turning the starter, unscrew the two screws securing the solenoid relay and pull. Carefully remove from the hole (photo 3) and unhook the end part (called the anchor and indicated by the red arrow) from the lever into which the anchor fits. The anchor may also not come out, because if it does not come out of engagement with the lever, and you pull the relay, the relay will disconnect itself, and the anchor will remain inside. In such a situation, grab it with your hand and remove it, disengaging it. If the armature still comes out along with the relay, then pull it with your hand and disconnect it. Remove the spring and o-ring (photo 4). If there are deformations and torn parts, this ring is replaced with a new one.
3) Find a piece of pipe of a suitable diameter to knock the restrictive ring off the retaining ring. Place the pipe against the restrictive ring (photo 1) and knock it down with hammer blows (the arrow in photo 2 indicates the knocked down one, and under it there is a locking ring, indicated by a red arrow). Remove the retaining and restrictive rings by sliding along the shaft (photo 3). Next, remove the protective shaft cover by unscrewing the two fastening screws with a screwdriver (photo 4).
4) Remove the retaining ring by prying it with a screwdriver or using sharp pliers, as shown in photo 1. Now you will find the necessary shims, so put them aside immediately and do not lose them. Unscrew the two nuts securing the cover (the cover is with a blue arrow in photo 2, and the nuts are red) and remove it. Then, taking a screwdriver in your hands, use it to squeeze out the springs of both insulated brushes (one of the springs is indicated by an arrow and its visual squeezing is shown in Photo 3) and remove the insulated brushes from the brush holder. Remove the brush holder from the starter (photo 4).
Note! There are 2 insulated brushes soldered to the terminals of the stator windings (indicated by the letter “A”), so it is necessary to press and disconnect two springs from them. Otherwise, you will simply tear off the brushes. The brush holders also contain non-insulated brushes, marked with the letter “B”.
5) Next, grab the stator housing with your hand (photo 1 with a red pointer) and remove it. Use your hand to remove the lever stop (photo 2), which is of the plastic type (be careful - it's quite fragile). Remove the anchor along the cover by pulling it out by hand as in photo 3. Remove the intermediate support from the shaft (photo 4) by pulling it.
6) The starter drive has been removed along with the armature - put it aside and take the drive separately. Remove the upper retaining ring with pliers (photo 1), then remove the Belleville washer (photo 2), thrust washer (see photo 3) and the coupling together with the lever (photo 4) from the drive. All that remains is to remove the thrust ring.
7) We proceed to disassembling the solenoid relay. If you are sure that it is working properly, then you should not disassemble it. However, in most cases the problem lies precisely there (the starter clicks). ,Unscrew at the beginning two screws (photo 1 with red arrows) and two nuts (blue arrow). Take a soldering iron and use it to disconnect both winding terminals from the relay terminals (otherwise do not remove the cover). Remove the cover (photo 3) and remove the contact plate (photo 4).
Geared vs conventional: which starter should you prefer?
A conventional starter does not have a gearbox; the rotational motion is transmitted directly to the crankshaft. Therefore, its design is simple and allows you to carry out repairs at home. Due to the fact that the electric current supplied to the device instantly engages the flywheel crown and gear, the engine starts, which is called “half-turn”. Classic units, due to their simple design, are reliable devices that can withstand electrical influences, but can fail when exposed to low temperatures.
The principle of operation of the gear unit is the same as that of the classic unit - the conversion of electrical energy into mechanical energy.
The difference is in the design - a gearbox is included, which is located between the armature and the bendix. In addition, the windings are equipped with permanent magnets, which increased the reliability of the mechanism. Geared devices are increasingly conquering the car market. In order to figure out which starter is better, you should find out the advantages and disadvantages of each of them.
Advantages of the classic version:
- simplicity of design;
- high maintainability;
- availability of spare parts;
- low cost.
The disadvantages include the following:
- the need for high starting current;
- rapid wear of parts;
- unstable operation at low temperatures;
- large weight and dimensions.
In general, an ordinary unit can be assessed as a reliable device when used correctly.
The gear unit has the following advantages:
- light weight and small size;
- can operate in a wide temperature range;
- long service life;
- economical energy consumption (40% less than usual).
Thanks to the presence of a gearbox, starting reliability at low temperatures has increased. Since a small current is required to start the power unit, the likelihood of a successful start increases in winter.
The starter device on the VAZ 2109, how it works
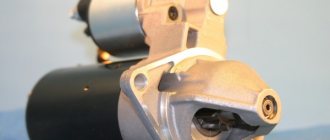
Starters on the VAZ 2109 are DC motors, with a maximum consumption of 500 A to 700 A. During normal operation, 260 A is consumed, with a power of about 1.3 W. They differ from other starting devices in that there is no support at the end of the anchor shaft, instead there is a bushing pressed into the clutch housing.
Starter device: 1. Armature shaft; 2. Drive gear; 3. Gear bushing; 4. Freewheel roller; 5. Clutch housing; 6. Gear drive lever axis; 7. Starter cover on the drive side; 8. Gear drive lever; 9. Traction relay anchor; 10. Traction relay housing; 11. Solenoid coil of traction relay; 12. Holding winding of the traction relay; 13. Traction relay rod; 14. Traction relay core; 15. Contact plate; 16. Traction relay cover; 17. Contact bolts; 18. End manifold;19. Brush; 20. Brush spring; 21. Starter cover bushing; 22. Casing; 23. Pinch bolt; 24. Starter cover from the collector side; 25. Armature winding; 26. Armature core; 27. Stator winding; 28. Stator pole; 29. Starter housing; 30. Limit disc; 31. Lead ring; 32. Centering disk; 33. Buffer spring; 34. Freewheel outer ring; 35. Freewheel hub; 36. Gear travel limiting ring; 37. Guide rod; 38. Plunger; 39. Starter; 40. Auxiliary starter relay; 41. Mounting block; 42. Ignition switch; 43. Generator; 44. Battery; 45. I. Scheme of operation of the overrunning clutch.
The main elements that make up the design of the VAZ 2109 starter are:
- Front cover with plain bearing;
- Engagement drive or bendix mechanism (roller overrunning clutch so that the mechanism rotates in only one direction). The cylinders block rotation in the opposite direction, the fork connects the element to the retractor relay, and the gear to the flywheel. Through the ring gear, torque is transmitted to the engine crankshaft. The coupling on the armature shaft moves along a screw thread made in its front part;
- Model No. 5712 has a planetary gearbox located further on the axis. With such a starter, the bendix shaft and armatures are located in parallel. The rotation speed of the clutch is lower, but the torque on the flywheel is much higher. As a result, trouble-free starting is guaranteed even at low air temperatures, and the voltage does not drop when spinning up the flywheel, and the starting current on the armature windings is much less;
- The moving part of the device, the rotor with the collector, is located behind the bendix or behind the gearbox;
- Stator, in a metal case. It has four poles, which are secured by a screw connection along with the winding coils inside the housing. Of these, 3 coils are connected in series to the armature winding (serial coils). One of the coils is connected in parallel (shunt coil), so the starter is a mixed-excitation electric motor. This gives a large torque when braked and not too high an armature speed at idle.
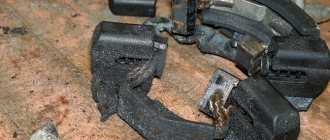
- Brush holder, four copper-graphite brushes, a positive pair and a negative pair, are attached to it. Together the entire structure makes up the brush assembly. With the help of brushes, current is transmitted to the armature;
- From the rear, the starter is closed by another, rear cover on a plain bearing;
- A retractor electromagnetic relay is located on top. It engages the roller overrunning clutch, and the voltage from it is transmitted to the relay armature. Inside the relay is a coil with an insulated copper wire and a metal rod (core). It moves the contact rod, which is located at the rear, as well as the overrunning clutch lever;
- An anchor composed of a shaft on which electrical steel plates are strung and pressed, with slots. They contain a copper tape winding with cardboard insulation. The ends of the armature winding are connected by caulked soldering to the collector plates. The shaft rotates in metal-ceramic bushings. Of these, the front one is in the clutch housing, where the front part of the shaft is placed when the starter is installed. The rear one is pressed into the starter cover;
- Drive lever.
The entire structure is connected to the flywheel ring gear through the drive gear. When voltage is applied, an electromagnetic field appears on the relay coil. The electrical circuits of the stator and armature windings close, and an EMF occurs. It sets the armature into rotation. The latter, using a lever, moves the clutch forward. The transmission gear meshes with the ring teeth and transmits torque to the motor flywheel.
The armature moves to its extreme point of movement, closing the relay contacts on the opposite side. In this case, the current no longer flows through the 1st winding, because its ends are closed to the “plus” of the battery. The retracted armature is held by a relatively weak magnetic flux created by the magnetic field on the holding winding. Additionally, current is supplied to the corresponding elements of the starter motor. In starter No. 5712, torque is transmitted through a converter (gearbox) to the 2nd shaft. In other models, force is transmitted through the splines to the hub, directly, in both cases, triggering the rotational movement of the overrunning clutch. The roller overrunning clutch has 2 rings in its design, internal and external. At the same time, the inner ring is put on and secured to the shaft, with which it turns. The outer one is connected to a transmission gear connected through a ring gear to the engine flywheel.
The rings are flat, and the steel cylinders located between them block rotation in the opposite direction. These cylinders are located on the inside of the outer ring of the clutch. Since the niches for them are cut out in the form of half-drops, when turning in one direction the cylinders move freely. When changing the direction of movement of one of the rings, their rotation is impossible. In this case, the coupling turns into a single, motionless whole.
After the engine has reached operating speed, the rotation speed of the flywheel significantly exceeds the speed of the starter. Then, due to the design feature of the bendix, its rings are disconnected. The gear is thrown back, and the starter motor loses contact with the running engine of the car. Turning the ignition key back stops the supply of voltage to the solenoid relay. The current flows from the “plus” contacts of the battery to the relay contacts (which are closed), passes through the pull-in winding, then the holding winding and the last stage – the “case”.
The fact is that in a car, all its metal (conductive) parts of the body in the wiring play the role of a wire, a negative pole. So, the machines have a single-wire electrical network, which is de-energized when connected in this way. In this case, the movement of current through the windings is multidirectional. The magnetic fluxes are mutually compensated, and the core is demagnetized.
The armature returns, braking due to the friction of the brushes and commutator. In this case, the contacts of the starter motor are open. The lever moves the clutch back and the starter is turned off.
Video “Replacing a classic mechanism with a device with a gearbox”
This video talks about replacing a conventional starter with a gear starter (the author of the video is Auto overhaul).
Technical progress does not stand still and is constantly evolving. Every year new technologies emerge, allowing engineers to improve or create completely new parts. This also applies to mechanical engineering. Hundreds of thousands of modern cars are sold in Russia every year. Each of them contains the latest technologies. We will talk about such a small unit as a starter, and we will figure out which starter is better: a gearbox or a regular one.
Starter repair for VAZ 2108, VAZ 2109, VAZ 21099
A starter is an integral part in a car that allows the car to start. Otherwise, you would have to constantly push the car to start it. Unfortunately, like any other part, the starter sooner or later fails. Someone immediately runs to a car store and buys a new one, but often this is a waste of money, because... The starter does not always wear out completely, but partially. For example, most of the problems are with the solenoid relay, which will not be difficult to replace and will save you money. There is even a free option for repairing the relay; you will need some sandpaper and a screwdriver. You disassemble the relay, clean the nickels, reassemble and put back. This method helps with oxidation - you have cleaned them and allowed the current to flow normally without interruption. In today's article we will look in detail at the procedure for disassembling and assembling the starter, talk about checking, and we will definitely look into cleaning the contacts and preventing burning.
Note! The following tools will help you make repairs: sockets, wrench (extension), screwdrivers, a set of wrenches, fine-grained sandpaper.
Summary:
Starter location
General information
The first starter used on a car had a number of significant shortcomings. Over time, the design was gradually improved and significantly transformed. The starter is a 4-band electric motor, which is necessary to rotate the crankshaft when starting the engine. It takes energy from the battery and increases the starting current several times. Due to this, any internal combustion engine starts. The principle of operation of the starter has not changed over the years.
Nevertheless, its design has been constantly improved. The weight of the part was reduced, the service life was increased due to the use of higher quality and new materials, etc. All this led to the fact that the starter was transformed quite significantly and even a new type appeared - gearbox. This is exactly what we will talk about now.
Classic starter: operating principle and design
The key feature of such a device is that there is no such intermediate unit as a gearbox. This allows rotation to be transmitted directly from the starter to the crankshaft. Consequently, the device is simpler to manufacture and much easier to repair. Another feature of such a starter is that the electric current supplied to the switch allows you to instantly engage the gear and flywheel. This helps the car to start, as drivers say, in a snap.
Currently, they are trying to replace such starters with reduction ones. However, most cars used to have a classic starter. The operating principle and design made this unit extremely durable. Such units almost never fail due to electrical influence, but much more often they need to be repaired due to low temperatures.
Construction and something else
During operation, the internal combustion engine produces a fairly large amount of energy. It is enough for lighting devices, music, wipers, etc. In general, while driving, the main load goes to the generator. In a static position, the motor does not produce anything, so it needs to be started somehow. For this purpose, various types of starters are used along with batteries.
Most often, it is the starter solenoid relay that fails. Its price is fortunately affordable and starts from 500 rubles and ends in several thousand. In addition, the design includes a bendix with a drive gear and brushes.
How to repair a starter yourself
Repairing the VAZ 2109 starter is not particularly difficult for an experienced driver who has become familiar with this part in old models of classic Zhiguli cars. This part is quite simple in its design, like most cars of this family. The part consists of:
- a direct current electric motor, which has 4 poles equipped with an electromagnetic switch;
- there are also freewheels;
- traction relay.
Starter malfunctions
Malfunctions of this part are easy to distinguish. The overall design of the “nine” starter has not undergone absolutely any changes, although the developers have modernized some elements. So:
- The main difference from previous starter models is the shaft sleeve, which is no longer installed in the starter, but in the clutch system. And this element is often forgotten when carrying out repair work by people who have not received special technical education and have not studied the “nine” scheme. To replace the starter bushing on a VAZ 2109, you need to have some skills. If you have not done this work before, then you may find yourself face to face with various difficulties.
- Another malfunction that I would like to highlight is the VAZ 2109 starter solenoid relay. This part also becomes the culprit of V9 starter malfunction quite often. Its breakdown can be considered empty repeated operation, not holding the gear in the required mesh.
Otherwise, defects associated with the VAZ 2109 modification starter are as follows:
- the starter shaft does not rotate or does so very slowly;
- the gear slips, this happens when there is poor engagement with the flywheel ring, although the shaft rotates;
- During operation, the starter makes knocking noises or an uncharacteristic sound.
If you notice one of the above malfunctions, you must immediately proceed to repair. If you do not do this work right away, then you risk permanently damaging the part and being unable to repair it.
Starter operation stages
This node works as follows:
- connection of the gear to the flywheel;
- starting the starter;
- disconnecting the gear and flywheel.
Naturally, the starter only works when the engine starts, and then turns off. If this does not happen, then one of the mechanisms is faulty.
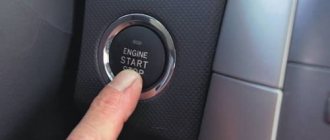
After the driver inserts the key into the ignition and turns it to the operating position, current is supplied from the battery to the traction relay. Thanks to this, the bendix of the gear starter engages the gears, at the same time, due to the supply of voltage to the electric motor, the circuit is closed and the car starts. Once the engine speed exceeds the speed of our starter, it turns off. It turns on only the next time the engine is started. Well, now let's look at how a gear starter differs from a regular one. There are some interesting details here.
Direct repair
You should not think that before removing the starter, you need to lift the VAZ 2109 car into the inspection hole. We begin to repair the starter after it has been completely removed. So let's begin:
- we check the relay by applying a voltage of 12 V to the output, do not forget that the minus should be short-circuited to the body;
- At the same time as this procedure, we attach an ohmmeter to the contact bolts (if the relay is working normally, the coupling should move into the hole when current is received, and the bolts should close - if this does not happen, then the relay should be replaced).
checking the starter relay VAZ 2109
- check the brushes;
- the starter cover is removed, after which the screw securing the fastening of all wires is unscrewed;
- the spring is removed;
- the brush is removed (as a rule, its minimum height should be 12 mm - otherwise, this means its erasing and mandatory replacement).
We continue to work with the VAZ 2109. The starter, the repair of which is carried out by hand, must be carefully inspected. At this stage, you can even arm yourself with a magnifying glass in order to see everything better. Let's move on to the next action:
- we check the winding of the starter itself (as mentioned above, this device is not particularly different from other VAZ 2109 models, and do-it-yourself repair of the starter must be carried out skillfully and you need to know all the basics of the circuit);
- take an ohmmeter and check for a short circuit between the turns and on the body;
- inspect the collector and other windings (to do this, you need to carefully remove the ring so that it does not fly off, and pull it out);
- remove the washer from the axle;
- unscrew several bolts;
- we disconnect the tubes that serve to insulate the coupling bolts and pull them out;
- carefully inspect the collector and winding (there should be no soot or surf on them);
- Use sandpaper to wipe away minor changes on the surface.
Repairing the starter on a VAZ 2109 with your own hands also involves a thorough check of the armature winding.
- take a 220 W test lamp;
- we check the insulation for rupture, determine the runout of the shaft (which should be 0.08 mm, the insulation resistance should be at least 10 kOhm;
- we connect the armature collector with one wire with a current of 220 V;
- We connect the second wire through a 220 W 100 W lamp to the power housing (if the lamp lights up, then there is a breakdown in the armature and it needs to be replaced.
On a VAZ 21099 car, repairing a starter, where the armature is in order, also involves inspecting and checking the collector. Some important tips:
- if burning of the plates in two places is detected on the collector, then the coil is broken;
- if the plates turn blue, then a turn short circuit has occurred (this happens rarely, but it does occur):
- an interturn short circuit is detected on visible sections of the armature wire or bus bar (usually the turns are wrinkled or bent);
- Short circuits can be eliminated and tire bruises can be corrected by checking for the presence of foreign bodies;
- if the short circuit is not found, all that remains is to rewind the anchor.
On a VAZ 21093 car, repairing a starter, as well as on a VAZ 21099 and 2109, after checking the windings, involves inspecting the couplings and gears. To do this, we carry out the following type of operations:
- remove the washer from the armature axis;
- pull out the anchor assembly with the drive;
- remove the clutch drive lever;
- We begin to rotate the gear (there should be no chips or nicks; if there are any, it is advisable to replace the device).
A video can certainly help in this matter, but first of all you should understand what you are doing and how it works.
Attention: When assembling the starter in reverse order, it is advisable to check its casing. All plastic parts must be covered with lithol (pictured below), even if they are in good condition.
The instructions also recommend lubricating all parts that rub with machine oil for prevention. Having learned how to repair a starter with our own hands, we get a unique opportunity not only to repair our favorite car efficiently, but also to really save money. After all, the price of a new starter is not cheap in stores, and it is not always possible to find a good one.
Source
Gear starter
The general principle of operation is no different. Electrical energy is also converted into mechanical energy. The only difference is the presence of a gearbox. In addition, this starter also has permanent magnets in the winding, which makes it possible to slightly increase the reliability of the electric motor as a whole. Of course, there are some peculiarities here. In particular, many are interested in how much a starter of this type costs. In most cases, a little more expensive than classic ones, but not much. On average by 10-15%. But its service life is an order of magnitude longer, and this is definitely worth taking into account.
Original parts and their analogues: which is better?
If, in the event of a breakdown, it was decided to purchase a new starter, then there is always a choice between two types: original or analogue? In the first case, the cost will be much higher. As a result, purchase and installation costs will be higher. But the original parts are distinguished by their quality. By installing a starter from AvtoVAZ, you can forget about problems with it for 40-50 thousand km. Cost of the original starter:
| Manufacturer's name | vendor code | Parameter | Cost, rubles |
| AvtoVAZ | 21214-3708010-81 | 12 V; 1.5 kWt | From 4 thousand rubles |
But the price of such a part can be 2-3 times more than an analogue.
Therefore, some owners of the vehicle in question opt for an analogue. At the same time, some starter manufacturers produce products according to their service life and quality no worse than the original. But this type of product is often counterfeited. Before you go and purchase an analogue in a store or market, you should carefully study the original packaging. For example, counterfeits are often sold in boxes with low quality printing. There are no special holograms or other important parts and components. Therefore, you should carefully read the details before paying.
The following manufacturers have proven themselves to be good:
| Manufacturer's name | vendor code | Parameter | Cost, rubles |
| Bosch | 1362059 | 12 V; 1.5 kWt | 2 thousand rubles |
| Valeo | 1367008 | 12 V; 1.5 kWt | 1.7 thousand rubles |
| Delco | 986016200 | 12 V; 1.5 kWt | 2.9 thousand rubles |
It is important to carefully examine the starter housing. Perhaps even arm yourself with a tape measure. Some universal models installed on various VAZ vehicles require different body designs. As a result, the overall dimensions differ. Therefore, a non-original part may simply not fit in size.
Advantages and disadvantages of the classic version
So we are actually gradually approaching the answer to the question of which starter is better: gear or conventional. To do this, let's look at the strengths of the classic version. They are as follows:
- low cost;
- high maintainability;
- You can find spare parts almost everywhere.
But there are also some disadvantages, which are expressed in the following:
- high base current required;
- rapid wear of parts;
- does not work well at low temperatures;
- large weight and size.
In general, this is a fairly reliable design with proper maintenance. But development does not stand still, and this has led to more advanced gear starters. Let's look at their strengths and weaknesses.
A starter with a gearbox: what is good and what are its disadvantages
We have already figured out how this device works and what its fundamental differences are. It is no longer difficult to guess which starter is better, gearbox or conventional. The fact is that the first option has the following strengths:
- small size and weight;
- long service life regardless of ambient temperature;
- low energy consumption (40% less than the classic version).
As for the disadvantages, they are there too and are as follows:
- complexity of repair work;
- lack of spare parts in stores;
- high cost of the product;
- low quality gearbox.
Often the main reason for the breakdown of a starter with a gearbox is that low-quality components are installed. This leads to breakdowns and various types of malfunctions. In general, such a unit has more prospects in the future than a conventional starter. And this is not due to the fact that one is good and the other is bad, but due to scientific and technological progress.
How to check the strater?
In order to check the windings you will need a multimeter.
- Place the part on its end, with the leads of the windings pointing upward;
- One probe of the device must be applied to the positive terminal, the other to the starter bolts;
- We check whether the starter turns or not;
- If it turns poorly, it means the starter is not working;
- If the starter is working well, you need to check the relay;
- To test the relay, pass a voltage of 12 V to the terminal, apply the minus to the body;
- If the ohmmeter does not show voltage surges on the scale, then the relay needs to be repaired or replaced. The VAZ 2108 relay needs to be disassembled only if it requires repairs.
Check the surface of the commutator and the armature, clean them of dirt with a cloth soaked in alcohol. There is no need to use acetone or other strong solvents for this purpose. The core and cage also need to be wiped dry and treated with a small amount of silicone grease.
Let's sum it up
If you decide to replace this unit, then you first need to decide where the starter is located. This is usually the driver's side under or to the side of the engine. To remove it, you need to make room. Depending on the location, it may be necessary to remove the engine protection or the air filter with the box. Next, disconnect the wires and unscrew the bolts. Determining where the starter is located is not difficult. It has a cylindrical shape, and several wires come from it, secured with a nut. Everything is done quite simply and quickly.
So we answered the question about which starter is better: gear or conventional. Classic starters are good in their own way, but are gradually being phased out. But they also have their strengths, just as gearboxes have their weaknesses. For example, in the outback it will be difficult to find spare parts for a starter with a gearbox, but for a regular one - no problem. The same can be said about repairs - not everyone has encountered gearboxes on the starter and not everyone will undertake it. How much does a starter with gearbox cost? It all depends on the brand of the car; a normal one will cost 5-7 thousand rubles.
The gear starter design is distinguished by a gear transmission between the armature and the overrunning clutch. The safety margin is ensured by increasing the torque in the gearbox supplied to the flywheel of the internal combustion engine.
By analogy with a conventional starter, the gear version uses permanent magnets instead of windings, simplifying the design, reducing its weight and size. Maintainability is practically not reduced; the main causes of breakdowns and repair methods are discussed below.
Starter replacement and installation procedure
It is worth familiarizing yourself with the process of removing the device in advance. This will avoid difficulties during repairs. It is also advisable to find out in advance where the starter is located.
Otherwise, various difficult situations may arise. The removal process includes the main steps:
- the terminals from the car battery are disconnected and the contact wires from the starter itself are disconnected;
- Next you need to unscrew the special nut that holds the block with the wires;
- it is necessary to dismantle the crankcase protection - if there is one at all (without this it is simply impossible to remove the starter);
- the lower part of the starter is equipped with two nuts that need to be unscrewed;
- then the starter is simply moved towards the wheel and removed from its seat.
After dismantling, it will be possible to carefully inspect the Bendix splines and carry out troubleshooting. Installation is carried out in reverse order. It is only important to lubricate all threaded connections with graphite lubricant. It will not allow the carving to sour over time.
Purpose of a gear starter
The main problems at the time of starting an internal combustion engine - thick oil at subzero temperatures, a dead battery, extreme loads on the on-board electrical system - are completely solved by a gear starter with a planetary type transmission.
A regular starter starts a car in several stages:
- With the ignition key, the car owner closes the circuit on the traction relay;
- at the same time, the overrunning clutch (Bendix) engages with the flywheel;
- the next circuit closes, voltage is supplied to the electric motor;
- the motor starts until its shaft reaches a rotation speed greater than that of the starter;
- in this case, the overrunning clutch will automatically break the engagement of the electric motor shaft and the drive gear.
In a gear-type starter, the bendix and armature shafts are displaced relative to each other in space, but remain parallel to each other. Gears with different numbers of teeth reduce the rotation speed of the bendix, but the torque on the flywheel increases sharply, ensuring guaranteed all-season starting of the internal combustion engine.
Disassembling the starter for VAZ 2108, 2109, 21099 cars
To carry out repairs, maintenance or replacement of parts, the starter must be removed from the engine and disassembled.
Let's see how to do this quickly - without wasting extra time and effort, using the example of disassembling starter 29.3708, which is widely used on VAZ 2108, 2109, 21099 cars.
Required Tools
— Slotted screwdriver (phillips)
— Wrenches (open-end or socket) for 10, 13 and 17 mm
— Retaining ring puller (optional)
Preparatory work
The procedure for disassembling the starter 29.3708 VAZ 2108, 2109, 21099
— Remove the traction (retractor) relay
To do this, use a 13 mm wrench to unscrew the nut securing the tip of the starter winding output, and disconnect the tip from the contact bolt of the traction relay. Using a slotted screwdriver (screws for a Phillips screwdriver or a 10 mm wrench can also be used), unscrew the three screws securing the relay and disconnect it from the starter housing.
Remove the starter traction (retractor) relay
At the same time, we remove the relay core earring from engagement with the tip of the drive lever (Bendix).
Remove the solenoid relay core
— Remove the protective cover of the starter brush assembly
To do this, use a slotted (Phillips) screwdriver to unscrew the two screws securing it.
Removing the starter rear protective cover
Disconnect the cover from the starter housing. Underneath there is a rubber ring-gasket.
Remove the sealing ring of the protective cover
— We remove the axis of the starter drive lever (Bendix)
To do this, use pliers to squeeze the whiskers of its latch and use them to remove the latch from the hole on the axle. We knock the axle out of the hole in the starter housing. To knock out the axle, you can use a nail of a suitable diameter and a hammer.
We remove the bendix axis (starter drive)
— Remove the Bendix travel limiter ring
We knock it down with light blows of a hammer (you can use a 17 mm open-end wrench).
We knock down the bendix limit ring
We remove the retaining ring located under it with a puller or simply pry it off with a slotted screwdriver.
Remove the bendix travel limiter retaining ring
— Unscrew the two long screws holding the two halves of the starter housing together
To do this, you need a 10 mm wrench. We take out the bolts and separate the halves. If they do not separate, lightly hit the front half with a hammer.
Unscrew the starter housing pinch bolts
— Remove the starter drive (Bendix)
Remove the rubber plug from the slot in the front of the starter housing. Using a screwdriver, disconnect the legs of the drive lever from the protrusions on the drive itself.
Removing the starter drive ("Bendix")
We push the bendix forward and take it out.
Drive parts ("Bendix")
— Disconnect the armature and the starter housing
To do this, pry it up with a screwdriver and remove the locking half-ring on the armature shank. We also remove the washer located under it.
Remove the armature shaft retaining ring
If it is necessary to remove the stator windings, unscrew the screws securing them to the starter housing.
Remove the armature and starter stator windings
— Remove the brushes
If it is necessary to remove the brushes, unscrew the screws securing them and remove them.
Notes and additions
— Another starter 5712.3708, installed on VAZ 2108, 2109, 21099 cars, has a slightly different design, and its disassembly differs from disassembling the starter 29.3708.
Source
Pros and cons of a gear starter
Since the gear starter has an improved design, the main advantages of this starting unit are:
- the voltage does not drop when the flywheel spins, it is enough for the ECU;
- the speed decreases, but the torque increases;
- increasing the service life of brushes due to lower starting current on the armature windings;
- with the exception of Bendix, all parts last at least twice as long;
- The launch unit is smaller in size and easier to maintain and repair.
Gear starter repair
Since the engine starting unit has friction parts and is equipped with an electrical part, breakdowns still occur. The complex design of the gear starter in some cases makes repairs unprofitable; this unit is completely replaced. However, in some cases, the car owner can identify and fix the problem on the spot.
Solenoid relay failure
In this case, repairing a gear starter requires complete disassembly of this engine starting unit. Experts recommend taking a photograph of the solenoid relay before disassembling it, so as not to confuse the polarity of the contacts. If the relay is dismountable, visually inspect the “nickels”; if they burn, they can be cleaned with sandpaper; if there is significant wear, it is better to replace them entirely.
Start problems
If, when you turn on the ignition with the key, you hear the characteristic sound of the retractor relay operating, but the flywheel does not spin, most likely the bendix has worn out. In this case, the starter drive should be replaced entirely, preferably in a specialized service center.
In any case, it is necessary to check the battery charge level; perhaps the starting current is not enough, even for a gear starter that sharply increases torque.
No response to the ignition key
This malfunction of the gear starter is most often caused by an interruption in the circuit. To restore the functionality of the starting unit, you must:
- tighten the terminal fastening nuts;
- clean oxidized terminals if necessary to restore contact;
- checking battery charging, charging as necessary;
- revision of the bendex and its replacement if necessary; this part is not subject to restoration.
This breakdown, in principle, does not require a visit to a service station; it can be easily repaired on your own.
Magnets falling out/sticking
When disassembling a failed starter, it is very difficult to maintain the original order of the permanent magnets. In principle, inserts piled up in a heap are not a problem for the car owner if there is a compass. Using the random method, you can put them in the required sequence with a 30–50% probability, so you should approach the repair yourself systematically:
- for normal operation of the starter, 3 magnets are used with the magnetization vector directed outward, and the same number with the opposite direction of the magnetization vector, but inward;
- they must be alternated with each other when installing in a cage;
- the magnetization vector is determined by the compass, for this purpose the insert is installed on the edge near the device, for three magnets the arrow will turn towards them with the north side, for the remaining ones - with the south side;
- They stick to the cage body independently; their relative position in the starter is achieved through spacer polymer rings on both edges of the inserts.
In order for the armature to operate (rotate) in the desired direction, it is necessary to place the starter vertically, put the lower remote ring on it, and then the housing, placing the “+” wire retractor slot on the relay side.
Then the housing is removed together with the lower remote ring, the magnets are installed alternately north/south, and are fixed with the upper remote ring, taking into account the holes for the tie rods.
The brush assembly in the form of a repair kit is mounted after installing the cardboard insulation in the groove of the positive wire.
Attention: Before installing the starter in place, it is necessary to check its characteristics. To do this, you should rotate it when connecting it to the battery and make sure that the retractor is working.
Thus, some faults of the gear starter can be eliminated on your own. However, to ensure guarantees, it is better to visit a service station, where professionals do not make mistakes and advise the user on choosing a starter or repair kit from a specific manufacturer for their car.