Chevrolet Lacetti from the South Korean company GM Daewoo, which appeared in Russia in 2004, went on sale in five different trim levels: Plus, Star, Elite, Premium and Platinum. Depending on the type of equipment, four types of engines and 3 types of gearboxes were installed on the car. All engines are sixteen-valve, volume: 1.4, 1.6, 1.8 liters complying with Euro 3 standards. And since 2007, cars have also appeared with a 2.0 TCi diesel unit with a power of 121 hp.
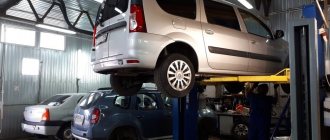
In this case, using the example of a Chevrolet Lacetti with a 1.6 engine, the engine oil was changed, and we will show how it happened in photo report format.
2199-5-08-07
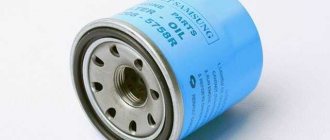
Remove the oil filter.
We clean the filter seat on the cylinder block from dirt and oil drips.
Apply engine oil to the filter O-ring.
We wrap the oil filter by hand until the sealing ring comes into contact with the cylinder block. Then turn the filter another 3/4 turn to seal the connection.
Pour 3.75 liters of oil into the engine through the oil filler neck.
Screw the neck cap clockwise.
We start the engine for 1–2 minutes. We make sure that the indicator of insufficient (emergency) oil pressure in the engine in the instrument cluster has gone out and there are no leaks from under the plug and filter. If necessary, tighten the oil filter and drain plug.
We stop the engine, after a few minutes (so that the oil flows into the oil pan), check the oil level and bring it to normal.
[How to save money on Chevrolet Lacetti maintenance] [Chevrolet Lacetti maintenance at 15,000/75,000/105,000 km] [Chevrolet Lacetti maintenance at 30 thousand km] [Chevrolet Lacetti maintenance at 45 thousand km] [Maintenance of Chevrolet Lacetti at 60,000/120,000 km] [Maintenance of Chevrolet Lacetti at 90,000 km] [Do-it-yourself maintenance - general recommendations] [Safety rules for doing maintenance yourself] [Tools required for Chevrolet maintenance Lacetti]
Replacing engine oil and oil filter Chevrolet Lacetti
Stages of replacing lubricant in a Chevrolet Lacetti
The oil is changed according to the standard procedure, first the old waste is drained, the filter element is changed and new oil is poured. Access to components during replacement is quite convenient, so you can carry out maintenance yourself.
The Lacetti model is very popular in the world; it can also be found under other names, which it received for sale in different countries. Therefore, oil change instructions apply to the following brands:
- Chevrolet Lacetti;
- Chevrolet Estate;
- Chevrolet Nubira;
- Chevrolet Optra;
- Daewoo Gentra;
- Daewoo Lacetti;
- Ravon Gentra;
- Buick Excelle;
- Holden Viva;
- Suzuki Forenza;
- Suzuki Renault.
The most popular engines are 1.6 and 1.4 petrol, although the 1.8 liter capacity is also quite common. There are no fundamental differences in the process of changing engine oil; there is only a slight difference in volume.
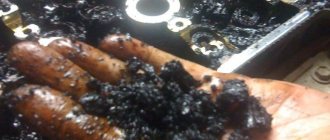
Draining waste fluid
It is necessary to drain the used engine fluid when the engine is warm. This is due to the fact that heated oil is more liquid. This makes it easier for it to leak out of the thin channels of the lubrication system.
To drain old engine oil, it is advisable to drive the Chevrolet Lacetti into a pit or overpass, since the drainage is done from below. If this is not possible, then the most inconvenient step will be unscrewing the drain plug. Especially if there is protection installed that will need to be removed.
When everything is ready, we proceed to the draining operation:
- Raise the hood, then find the filler neck on the engine and unscrew the cap (Fig. 1).
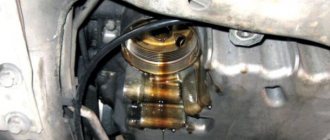
Fig.1 Oil filler neck - We unscrew the oil filter, which is located in the front of the engine, under the hood. Visually, it is located on the right, near the exhaust manifold protective casing, directly under the dipstick (Fig. 2).
Fig.2 Oil filter - Now we go down under the car and place a waste container in the drainage area. You can use a cut canister or an old bucket.
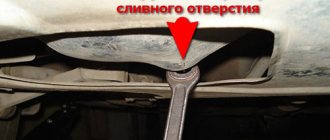
- We unscrew the drain plug using a 17 socket, but in some cases you may need a 19 wrench (Fig. 3).
Fig.3 Drain plug - The drain plug is not located at the lowest point, so about 150-250 milliliters of waste may remain in the pan. To remove them, you can use a rubber bulb or a syringe with a hose attached to it (Fig. 4).
Fig.4 Pumping out residues with a syringe
To unscrew the filter element, it is advisable to have a special puller. If it is not available, you can try to unscrew the filter using improvised means. In this case, you can use, for example, an old alternator belt, a regular belt, a bicycle chain or a simple screwdriver.
Unscrewing the oil filter using improvised means
Using this method, you can drain the maximum amount of used oil, after which you can proceed to further actions. The main thing is not to forget, everything that we unscrewed must be put back in place.
Flushing the lubrication system
Engine flushing on a Chevrolet Lacetti should be carried out only in exceptional cases, which include:
- Purchasing a used car when you cannot know about the quality, as well as the regularity of lubricant replacements.
- During operation, the service replacement interval was repeatedly exceeded.
- Engine operation with constant frequent overheating, which contributes to coking and other deposits.
- In cases of switching to another type, for example from synthetics to semi-synthetics.
There are several types of flushes for the Chevrolet Lacetti engine:
- Five- or seven-minute, capable of cleaning even the most difficult deposits. They must be used very carefully and strictly follow the instructions printed on the packaging. It is recommended to use them only when absolutely necessary. Since there is a high probability of causing premature wear of the sealing seals. And also clog the oil channels with particles of washed away carbon deposits.
- Special compounds that are added to the oil several hundred kilometers before the expected change. They are more gentle, but there is also a possibility of clogging of the oil channels.
- Flushing oil is the most gentle method of cleaning the engine from the inside. This composition is poured after draining the waste, the engine runs for 15-20 minutes, after which the liquid with deposits is drained. The absence of aggressive additives in the wash composition gently cleans the engine, but is not able to remove heavy contaminants.
- Regular oil that you are going to use when changing. This method is not so popular due to its high price.
Before flushing a Chevrolet Lacetti, you should weigh all the pros and cons. And also understand that it will not be possible to completely drain the liquid. Some of it will remain in the channels, which will then mix with the new oil.
Installing a filter, filling in new engine fluid
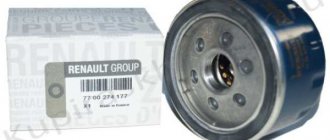
If the Chevrolet Lacetti lubrication system is sealed and does not require repair work to eliminate leaks, you can proceed to adding fresh oil. In addition to the engine oil itself, we will need a new gasket-washer for the drain plug GM 94525114. As well as the original GM oil filter 96879797. If you wish, you can look for analogues on the Internet.
Consumables for maintenance
When everything is ready, let's move on to the bay:
- We put the drain plug in place, it is advisable to replace the washer-gasket.
- We wipe the seat under the filter.
- We tighten and put in place the new oil filter. Pre-lubricate the rubber sealing ring with fresh oil.
- Pour new oil into the filler neck.
- We check the level on the dipstick; it should be between the MIN and MAX marks.
- We start the engine, let it run for 10-15 seconds, then turn it off.
- After 5 minutes, check the level with a dipstick and top up if necessary.
There are several opinions regarding replacing the oil filter. Many old-school owners advise filling it with new oil before installation. However, nothing is said about this in the official operating instructions for the Chevrolet Lacetti. And also in information from global filter manufacturers it is recommended to simply lubricate the o-ring.
Should I fill the filter with oil when changing?
This issue is worth dwelling on in more detail. The fact is that humanity is divided into two camps. Some support this, while others are categorically against it. Everyone has their own arguments and speculations. Moreover, both adequate and absolutely fantastic, which have not yet happened, but in theory can happen... Well, in general, this all reminds us of the eternal debate about
Therefore, decide for yourself which camp you belong to. Personally, I consider myself a supporter of pouring oil into the filter. And not at all because someone else’s arguments sound more convincing to me, but because I went through it and made my own conclusions.
I have been pouring oil into the filter my entire driving life (almost 20 years). But I decided to check and do without this procedure once. The conditions were absolutely the same - the same oil, the same filter and the same car.
There is a video below that shows how quickly the oil pressure light goes out when you first start it if you first fill the filter with oil.
But when I didn’t pour oil into the filter, the lamp did not go out for 3-4 seconds. And at the same time, all this time there was a knocking sound coming from the engine, similar to the knocking of hydraulic compensators. It’s a pity that I didn’t have a video camera with me then and didn’t capture this moment. And I don’t want to repeat it a second time.
It is clear that there is nothing very scary about this and the engine without oil can operate for quite a long time, due to the presence of an oil film. But it’s still quite unpleasant to see the glowing oil pressure indicator and at the same time listen to how the engine makes sounds that are unusual for it. Therefore, I made my choice and pour oil into the filter. Well, you decide for yourself.
Updated.
Now, after 15 thousand km. I did another oil change. Usually I changed it more often, namely, approximately every 8 thousand km, but damn... I was badly battered by the war in Donbass and continues to be battered, so it was not possible to make a replacement as usual on schedule. Although the heart was already “bleeding”, demanding to carry out this necessary procedure.
In general, my opinion about the oil has not changed; I filled it with the same one. The only difference is that, for the reason stated above, it is not possible to purchase oil from a dealer, as before, but had to be bought in a store. I hope it’s not a fake, since all the little things match the original. Here are the most basic ones:
Updated.
Suddenly, the time has come for the next engine oil change. This time I made the replacement after 8 thousand km, because... Believe it or not, but for these 8 thousand km. I didn't add a single gram of oil! Not a drop at all. According to the dipstick, the level, of course, dropped a little, but was slightly above the halfway point between min and max.
This time I decided to try another Aral oil - HighTronic M 5W-40. It had been an eyesore for a long time, but the price was higher than that of my favorite ARAL Blue Tronic. You can buy it in Ukraine
I will note these points. There are two almost identical oils - HighTronic M 5W-40 and HighTronic 5W-40. They are mostly the same, and the main difference is that, in accordance with the recommendations of BMW, Mercedes-Benz and VW engineers, in regions with unstable fuel quality (and in gasoline engines in all regions), the use of motor oil with a standard ash content is preferable and high alkaline number - HighTronic M 5W-40, not HighTronic 5W-40.
The main reason for such recommendations is the increased amount of sulfur in the fuel, which, when oxidized during fuel combustion in the engine, turns into sulfuric acid and leads to corrosion of engine components. To neutralize the resulting acidic environment and counteract the accumulation of deposits, it is preferable to use motor oil with a high base number.
The alkaline number of Aral HighTronic M oil is 1.5 times higher than that of simply HighTronic: 10.46 mg KOH/g versus 7.6 mg. Also, HighTronic M, thanks to the use of a traditional full-ash additive package in its composition, has better cleaning properties to counteract the accumulation of deposits in the engine. Thus, HighTronic M guarantees better engine cleanliness and protection in most cases.
But HighTronic M 5W-40 does not have GM approval, while HighTronic 5W-40 does.
To be honest, I don’t really focus on tolerances. I compare indicators and draw conclusions. The fact that there is no approval does not mean that it is not suitable. The official Aral oil dealer assured me that HighTronic M 5W-40 can be poured into my Lachik. And he even strongly recommended filling it in if the car runs on gasoline rather than gas.
But, as it turned out, I have not yet been able to fill in HighTronic M 5W-40. I just couldn’t buy it... In our front zone it’s hard to find any choice. Ordering by mail is also not an option, since it has not worked for us since the beginning of hostilities.
In the end, I could only find HighTronic 5W-40. Well, it’s okay, we haven’t been living for the last year, so we’ll try it in better times, but for now I’ll test HighTronic 5W-40
I hope the effect will be as positive as from ARAL Blue Tronic, and maybe even better
Updated.
Kilometers fly by... So HighTronic 5W-40 has served its useful life. Over the course of 9 thousand km, I again did not add oil at all. And this despite the fact that the mileage has exceeded 200 thousand km. I am completely satisfied with the oil. Despite the change in viscosity, I did not feel any difference. Perhaps in cold weather the starter began to turn more vigorously, or maybe it just seemed like it. I filled it up again with the same thing.
Updated.
And again the oil change. HighTronic M 5W-40 could not be found again, so according to tradition I filled it with HighTronic 5W-40.
Now the label shows the Dexos approval, which was not on the old canisters
Here is a video of the oil change process
That's basically it. If you have any questions or additions, feel free to write in the comments.
Peace to your home and good luck on the roads!
Required tool:
- puller for unscrewing the oil filter
- container for draining used oil
- rag (for cleaning oil stains)
- Set of required keys
Consumables:
- new oil filter and oil itself
- new drain plug o-ring
How often to change engine oil
First, let's ask ourselves the question - how often to change the oil? It is clear that the more often the better. But oil, especially good oil, is not cheap, and you need to allocate time, which is always in short supply.
There are car enthusiasts who change oil strictly at mileage intervals of 10,000 km, 7,000 km, and others even more often. And there are those who change strictly according to the season, for example, in the fall before winter or in the spring after winter.
A lot depends on the driving style and operating conditions. The oil should be changed more often if:
- Frequent traffic jams and engine idling
- low fuel quality
- operating a vehicle in dusty or polluted air conditions
- trailer towing
- Frequent traffic jams and start-stop mode
- regular trips over short distances, especially in winter, when the engine does not have time to reach the temperature properly
In general, it all depends on the operating conditions of your particular car, as well as on the quality of the oil you buy.
Personally, I used to change it every 10 thousand km. With the increase in mileage, I lowered the bar to 8 thousand km.
Octane corrector Chevrolet Lacetti
The Chevrolet Lacetti octane corrector is installed in the engine compartment and allows you to quickly switch the engine control unit to work with one or another octane number of gasoline.
Almost everyone who opened the hood of a Chevrolet Lacetti for the first time has a question: what is this little black chip with one wire going to nowhere?
On some cars, this wire has a sticker with the laconic inscription “91”, and on some cars this sticker has long been destroyed by atmospheric and human factors.
This is the so-called octane corrector for the Chevrolet Lacetti. Or rather, it’s just a connector that closes certain contacts, depending on the gasoline used. Popularly he received the nickname “trick” or “jumper”.
Attention! If your car does not have this jumper, then you can still switch the octane number. This function is stored in the ECU
How to do this is shown in the article How to switch to 92 gasoline
This option is also retained for 1.8 engines with an HV-240 control unit, as well as for Lanos and Aveo cars with MR-140 units
The ECU has several built-in tables (maps, algorithms) for engine control (parameters of the control unit). Each OZ table is calibrated for engine operation with a certain octane number (different range of adjustments). And with this jumper we simply switch the ECU to work with a different range of SOP, based on what we poured into the tank.
This jumper is called Ron switch, which means octane number switch.
But don’t think that by switching the jumper, your car will immediately fly like an airplane. By switching, we just change the adjustment range of the SPD for the ECU. But the “last word” still remains with the engine control unit.
I’ll try to explain it more clearly using the example of a bucket of water. Let's say you went to a well with an 8-liter bucket. In the well you can collect either 5 liters or 7 liters, but no more than eight! You are limited by the capacity of the bucket. And your neighbor came with a 10-liter bucket. He can also gain either 5 liters or 7 liters, but no more than ten, if he can carry it.
This is what happens with this jumper. We simply give the ECU a bigger bucket! Whether the engine control unit can fully use it or not - it will make a decision personally, based on other parameters, including the signal from the knock sensor.
Therefore, after switching to position 95, the SPD may return to its previous values, or to values close to the previous ones. In short, we give the ECU more options in terms of adjusting the SPD.
The same thing happens when we switch from 95 to 91. We limit the ECU to a smaller bucket so that it does not lift more than eight liters
In general, in general terms it looks like this... I think you can understand the essence.
This idea was brought to life in Ukraine and it was based, as I understand it, on two main reasons:
- quality of gasoline (or rather NOT quality of gasoline)
- An ancient tradition of the population to pour everything that burns into the tank. Moreover, sometimes not so much for the sake of saving, but for the sake of interest to see what will happen - will it work or not at all?
Well, as we have another ancient tradition - they delivered, they delivered, but they never carried out explanatory work with happy customers. Therefore, in most cases, this “trick” rolls around under the hood as a “dead weight”.
It is worth noting that this octane corrector does not literally convert the engine to use 92 or 95 gasoline. It does not change the characteristics of the engine itself, which affect the use of a particular fuel. Namely, the compression ratio remains unchanged! And, as I wrote in the article 95th or 92nd gasoline, the compression ratio is the main parameter for the possibility of using one or another octane number of fuel.
The Chevrolet Lacetti octane corrector simply allows you to get the maximum effect from using a particular octane number of gasoline, without compromising the engine's life, by changing the starting ignition timing.
Some of the population of planet Earth considers this octane corrector a useless thing, which, according to their subjective feelings, does not really change anything.
I don't agree with this opinion.
Here is a simple and clear example of a car filled with 95-octane gasoline.
This is a Chevrolet Lacetti 1.6 liter. with octane corrector in position 91
And this is the same machine after 1 minute, but in position 95
Notice how the ignition timing has increased?
These are the changes in just one minute and a minimum of body movements. It's like free chip tuning with your own hands
It is worth noting that this is a graph of engine idle speed immediately after switching the jumper and may decrease over time. But the essence remains the same - this jumper affects the starting OZ.
Video of how the SOP changes when switching the Ron switch octane number jumper
How much and what kind of oil to fill in a Chevrolet Lacetti
For Lacetti gasoline engines of any volume, the amount of oil poured is the same and is 3.75 liters . But a diesel engine will have to be filled in one and a half times more - you will need 6.2 liters of lubricant, including an oil filter.
The engine life depends on the quality of the selected oil. Therefore, its choice should be approached with all responsibility. The manufacturer offers the use of a lubricant classified at least API SM or ILSAC GF-IV with a viscosity of SAE 10W30, and for operation at temperatures below -25°C with a lower viscosity, namely SAE 5W30, and since 2009 the GM concern has also allowed the use of 5W40 . The Lacetti is filled with GM Dexos II 5W-30 from the factory. And as a rule, it is precisely this, the original, that is recommended to be filled in.
For diesel engines, motor oil of classification MB 229.31 and ACEA C3 with a viscosity grade of 5W40 is used.
When to change coolant
It all depends not on the brand and recommendations of the car manufacturer, but on the antifreeze used and the condition (age) of the car.
If you use G11 antifreeze, then replacement should be carried out every 2 years, or 30-40 thousand km. mileage
If G12, G12+, G12++ were filled in, then you need to remember about replacement after 5 years, or 200 thousand km. mileage
Personally, I use G12++ and change it every 4 years, or 100 thousand km. mileage
But, to be honest, 100 thousand km. I've never rolled. Four years passed faster than I achieved this mileage.
There may also be moments in life that make adjustments to the timing of replacement and the antifreeze used. As an example, I will give two from my life.
First, there was a war here and even grocery stores stopped working. Therefore, one could generally forget about auto parts stores. The mail didn't work either. Therefore, I had to buy a canister of “green Felix” from local dealers. At the first opportunity in the future, I tried to change it to the usual red G12++. But this “green stuff” served its two years quite well.
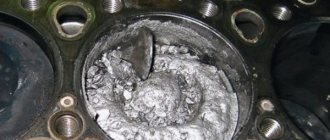
Secondly, the plug in the cooling jacket in the cylinder head leaked. Naturally, the oil mixed with antifreeze and it had to be replaced much ahead of schedule.
And most importantly, do not exceed replacement intervals. Old coolant actively corrodes the cylinder head, pump, fittings, and other elements of the cooling system.
Preparing for work
Special attention should be paid to studying information on how to choose the right filter for a Chevrolet Lacetti. Careful preparation for replacing the air filter on a car is not accidental. The thing is that depending on the model, make of the car and a number of other parameters (car engine size, year of manufacture, shape of the air cleaner), the parameters of the filter element may differ. It follows from this that the purchase and installation of filtering auto parts that are not suitable for a particular Chevrolet Lacetti model can not only affect the financial situation of the motorist, but also harm the car. An incorrectly selected part will not properly perform its functions, which means it will negatively affect the operation of the vehicle.
To replace the air filter on a Chevrolet Lacetti, both original auto parts and cheaper analogues from other manufacturers are suitable. If you intend to purchase an air purifier from another manufacturer, be sure to check the parameters of the parts that are indicated on the product packaging and in the vehicle maintenance regulations. Even minor discrepancies with standard parameters are unacceptable. In addition, you should not buy the first filtering auto part you come across from an unknown manufacturer. Purchasing and installing a low-quality air filter on a Chevrolet Lacetti will lead to negative consequences, including engine overheating.
Models of air filters suitable for replacement on Chevrolet Lacetti 1.4:
- F14D3 Nipparts, article number J01320909;
- AMC Filter, DA-0749;
- Wix Filters, WA09440;
- Blue Print, ADG002248;
- Wix Filters, AP0082/6;
- Purflux, A01487;
- Mann, C 03028;
- Mahle, LX 02679;
- Fram, CA010519.
Models of air filters suitable for replacement on Chevrolet Lacetti 1.6:
- F14D3 Nipparts, J01320910;
- CoopersFiam Filters, PA07582;
- General Motors, 096553450;
- AMC Filter, DA-0789;
- Wix Filters, AP0067/8;
- Purflux, A01494;
- Mahle, LX 02616.
As standard, Chevrolet Lacetti cars are equipped with a rectangular air filter, the frame of which is made of durable plastic. The inner surface consists of a porous hygroscopic material with a fibrous structure. The dimensions of the air purifier in the standard case are 30 * 3.6 * 22 cm.
After purchasing a filtering auto part that is suitable in all respects and of high quality, you can begin replacing the air filter on your Chevrolet Lacetti.
List of required tools:
- Screwdriver;
- Set of wrenches;
- Waste fabric;
- New air purifier.
Checking the oil level and adding oil
During operation of the Chevrolet Lacetti, periodic checking of the oil level in the power plant and its topping up is required. To do this, use the instructions below.
- If the engine is hot, wait until it cools down.
- Pull out the dipstick.
- Wipe with a clean cloth.
- Insert the dipstick into place.
- Remove the meter again.
- Check the oil level. It must correspond to the area between the MIN and MAX marks.
- If the level is below or close to MIN, then it is necessary to add oil of the same brand. To do this, unscrew the oil filler plug.
- Add oil.
- Check the lubricant level.
- Close the oil filler neck.