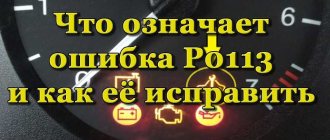
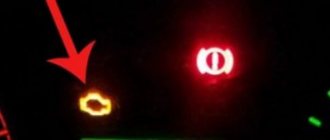
What does code P0135 mean?
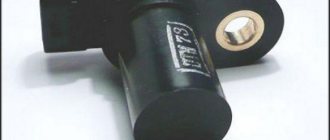
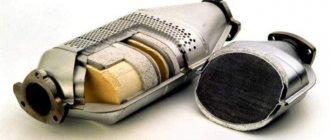
The air/fuel ratio sensor, also known as the front oxygen sensor (bank 1, sensor 1), is installed in the exhaust before the catalytic converter.
The oxygen sensor (OS) is heated by a built-in electric heating element. This is necessary to quickly warm up the sensor to operating temperature when starting the car. Code P0135 means there is a problem with the sensor heater circuit.
Bank 1 refers to the side of the engine that has cylinder number 1. Bank 2 is on the opposite side of the engine. If you have four cylinders, there will only be one bank.
FakeHeader
Comments 9
Not right. Contact C goes to connection point S12, and this is ground. If the wiring is intact, but error p1135 does not go away, then the heater itself in the oxygen sensor is faulty. And you need to measure AD - approximately 0.45 V and BC battery power.
A D = 2.82 BC = 12.12 Battery = 12.24
Not right. Contact C goes to connection point S12, and this is ground. If the wiring is intact, but error p1135 does not go away, then the heater itself in the oxygen sensor is faulty. And you need to measure AD - approximately 0.45 V and BC battery power.
As I understand it, A-18 ECU contact B- 63.44 ECU contact C- ground? (Put it directly on the body?) D- 48 ECU contact
A- 18 contact of the ECU, D- 48 contact of the ECU, Read the measurements from the diagnostic scanner, because A reference voltage is applied to A, which you measure when you throw the second probe at C (ground). B - connection point S2 which is recorded from the main relay of the ECU +12 volts, C - connection point S12 is connected to the vehicle ground. When you measure AD, you get a voltage drop across the ECU measuring element, which is why the tester shows a lower voltage. If there is 12 volts on the aircraft, but error 1135 does not go away, then the heating element of the sensor itself is faulty. If the sensor itself is working, it should produce a sinusoid on the scanner, but only when it warms up to operating temperature from the exhaust gases.
Of course, this is not a happy situation for car owners if the check engine lights up on the car’s dashboard. In this case, you have to contact a specialized service station, where they will diagnose the engine, or if you have an on-board computer installed, identify the breakdown yourself by deciphering the VAZ error codes.
How is code P0135 diagnosed?
P0135 is a clean electrical code that can be easily diagnosed with a multimeter.
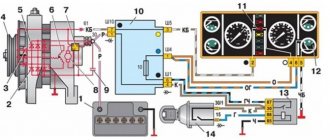
In many cars, voltage is supplied to the sensor heating element from the battery through a fuse and relay. The ground to the heater comes from the ECU.
A typical diagnostic procedure involves checking the sensor heater fuse, then the relay, and then the oxygen sensor 1 heater element resistance. See a step-by-step diagnostic example with photos for code P0135 below.
Common Problems Causing Code P0135 on Different Vehicles
In some Acura, Honda, Lexus and Toyota vehicles, this code is known to be caused by a faulty sensor heater element. A faulty oxygen sensor (bank 1, sensor 1) can be confirmed by measuring the resistance of the sensor's heating element.
The resistance should be low, usually between 0.9 and 10 ohms, depending on the vehicle. Specifications for different vehicles can be found in the owner's manual. Replacing the sensor often solves the problem.
On some Chrysler vehicles, the P0135 code may be caused by an improperly replaced sensor. Different types of sensors may be used on the same vehicle, depending on the vehicle's production date. It is important to check the correct sensor part number using the vehicle's VIN number.
Corrosion on the DC connector is known to cause this code to appear in many vehicles. The connector should be inspected for corrosion. If present, you need to clean the terminals or replace the connector. For example, the Chrysler service bulletin for the 2010-2012 Dodge Ram recommends repairing the sensor wiring harness using a special repair kit.
In some older Mazda vehicles, corrosion of the wiring inside the fuse box can cause code P0135. This can be confirmed by checking the 12V voltage and ground at the sensor.
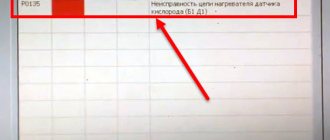
p0504
Also, many owners of a Lada Priora with 16 valves have questions about the appearance of error p0504. She tells the owner that there is a malfunction in the brake pedal sensor. To find out the exact reason for the appearance of p0504, you need to remove the sensor and disassemble it. Pay attention to its springs, one of them could burst - replace the damaged part.
Another reason is copper contacts, which can burn. Inspect them and clean them if necessary. Sometimes error p0504 pops up due to the incorrect position of the brake pedal sensor on Priora 16. Twist it and check whether codes p0504 remain on the screen or not.
Example of step-by-step diagnosis of code P0135
The check engine light came on on a Honda. Trouble code P0135.
Clearing the fault code using the OBD2 diagnostic scanner. According to this vehicle's owner's manual, the first step is to clear the code and check to see if it returns. This is necessary to see if the code is intermittent or constant.
We erased the code and started the car. The Check Engine immediately returns with the same code.
The next step, according to the instructions for this Honda, is to turn the ignition to the LOCK position and check fuse No. 14 FI SUB (15 A). The fuse location is indicated on the back of the fuse box cover.
Check to see if the fuse is blown. We checked the FI SUB fuse - everything is fine. The next step according to the manual is to test the PGM FI slave relay. We tested the relay - it also worked.
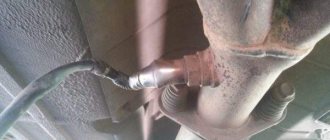
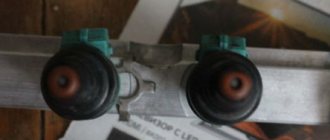
The next step in the diagnostic process is to disconnect the oxygen sensor connector and measure the resistance of its heating element.
The multimeter shows 235 kOhm (kiloohm). According to the repair manual, the resistance should be between 2.5 and 4 ohms. This means that the DC heating element has failed and the sensor must be replaced.
We purchased a new front oxygen sensor and tested the resistance of the heating element for comparison.
As you can see, its resistance is 3.4 ohms. We installed a new sensor and cleared the code. The check engine has not returned, this car is fixed.
How to extend the life of the VAZ-2114
To ensure that the car does not display errors in the operation of individual spare parts and devices, it is necessary to properly care for the car and repair breakdowns in a timely manner, especially since doing this in the VAZ-2114 is as easy as shelling pears. Mechanics allow you to get by with little expense and do the repairs yourself.
To make your car break down less often, follow these instructions:
The process of carrying out self-diagnosis with recording errors on the Lada is clearly presented in the following video: https://www. youtube. com/watch? v=69EcUojwYyk.
Experts talk about how to reset the Check Engine error in the video:
Codes related to P0135
Code P0155 is the closest code to P0135. It indicates a malfunction in the oxygen sensor heater circuit (bank 2, sensor 1). Essentially the same code, but for the opposite engine block. All the same diagnostic steps apply.
Very often, various errors occur in VAZ cars, and in fact, it is not necessary to go to a mechanic to diagnose them; it is enough to read the error code and look at its value in the error table.
The error codes are the same and apply to the following VAZ brands:
1118 Kalina, 2104, 21041, 2105, 2107, 21074, 2109, 21093, 21099, 2110, 21102, 21103, 2111, 2112, 2113, 2114, 21114, 21124, 21 15 with engine injector 8 and 16 valves, 21150 , 21154, 2131, 2170 Priora, 2190 Granta, 2123, 21214, 2131 Niva;
Troubleshooting
Note! If you are unsure of your own abilities, the motorist is strongly recommended to seek help from a specialized workshop or a qualified technician.
If you have the necessary equipment, you can determine whether 8 or 16 valves are broken in a Lada Priora car yourself. Due to the simple design of the machine, repairs do not require the user to have in-depth knowledge of mechanics, electronics or other sciences.
Hello. I got error 1570 on BC - “immobilizer, no positive response or open circuit.” It appears when you turn the ignition key in the form of a beeping buzzer (the car with the key on the dashboard does not blink or light up), and it does not stop for some time after starting the engine. Resetting the error does not help. How to defeat her?
VAZ error table
- On a car with the engine turned off, disconnect the connector with contacts from the controller. Then you need to turn on the ignition, but do not start the power unit. You will need a multimeter to check the voltage between the contact elements.
- The sensor connector is equipped with five pins, counting from left to right when viewed from the side of the air flow from the filter. Between contacts 2 and 3, the nominal voltage should be 10 volts, between 3 and 4 - 5 V. If there are deviations, the user needs to diagnose the integrity of the electrical circuit for breaks and current leakage.
- At normal values, the ignition is turned off and the resistance between the “ground” and the fifth pin number is checked. The resulting parameter should be about 4-6 kOhm. If the value obtained is 0 Ohm, the sensor must be replaced; the problem may also be a short to ground. If the resistance parameter is 100 kOhm, then the cause must be sought in a break in the power supply circuit or in the engine control unit.
- regular use of low-quality fuel;
- violation of air intake tightness;
- lack of spark;
- damage or physical wear of cylindrical devices.
If replacing the fuel does not help, it is necessary to diagnose the air intake system. It is necessary to tighten the fastening clamps, change the air filter element and check the pressure in the rail (the normalized indicator is no more than 2.8 atm). It is also necessary to perform diagnostics:
- high-voltage wires connected to the defective cylinder;
- spark plugs;
- check for possible oxidation at the cable connection points.
- breakdown of the mass air flow sensor;
- lean or enriched air-fuel mixture in the engine cylinders;
- malfunction of the electronic engine control system unit.
To fix the problem, you can try to relearn the throttle valve, to do this, perform the following steps:
- Disable the control unit in any available way. To do this, you can disconnect the battery for a few hours or use diagnostic equipment.
- Activate the ignition for a few minutes. At this moment, the throttle valve should begin to move. At this stage, you cannot press the pedals or start the power unit.
- Turn off the ignition and wait about 30 seconds, then turn it on again. The engine can then be started.
- cleaning the throttle assembly;
- throttle adaptation;
- tightening the contact clamps on the throttle assembly.
- difficulty starting the engine;
- increased fuel consumption;
- tripping of the power unit when idling and “cold”;
- spontaneous engine stop.
- the car engine does not start or stalls for no reason;
- fuel consumption increased;
- electronic devices and mechanisms do not work correctly;
- the power of the power unit is lost, etc.
- Disconnect the connector from the engine control unit.
- Perform a visual diagnosis of the pad. All contacts at the output of the device are cleaned, and contaminants, if any, are removed.
- Check the wires connected to the microprocessor module. Damaged electrical circuits must be replaced.
- Disassemble the device body by carefully unscrewing the bolts and removing the component parts.
- Check the condition of the board. If traces of moisture are visible on it, dry it in a dry and warm place. For this purpose, you cannot use a household hair dryer, stove or open fire.
- The power unit operates for more than twenty minutes.
- The engine operates at idle speed.
- Diagnostics of the adsorber purge valve by the microprocessor module gave a negative result.
- The control unit has calculated that the volume of oxygen after the neutralizer device is significantly higher than the normalized value.
If you find an error, please select a piece of text and press Ctrl+Enter.
Sooner or later, virtually every car owner encounters a CHECK error. Lada Kalina is no exception. First of all, don’t panic, all problems can be solved. Contact the service center or check the error yourself.
In the event of a breakdown, it is important to know where to turn for help, for example, you can call a tow truck in the Shakhovsky district on the website. The tow truck will deliver the car to a car service center, where they will sort out the breakdown and restore the car for a further trip.
When diagnosing yourself, some errors can be displayed on the instrument cluster screen or using a special scanner connected to the diagnostic connector.
- Get behind the wheel of the car and reset the mileage for the current day by pressing the Reset button on the instrument cluster.
- Hold the button and turn on the ignition
- After switching the instrument cluster to test mode, the full backlight will come on and the instrument arrows will move in both directions.
- The menu is switched using the steering column switch buttons, where self-diagnosis, software and error codes are located.
- We determine the codes in the ECM and their designation.
- To complete the self-diagnosis, you must wait 30 seconds without performing any other actions.
Steering column shift buttons
The newer Kalina 2 has a different instrument panel, but the self-diagnosis process itself is similar.
All problems are recorded in memory if there is no connection with the device for 20 seconds, if less an error code is not displayed.
Why does runtime error 1135 occur?
“Nero Error 1135” can most often occur when loading Nero. We can determine that errors during the execution of error 1135 come from:
Error 1135 Crash - The error number will cause the computer system to lock up, preventing you from using the program. This occurs when Nero does not respond to input properly or does not know what output is required in return.
Memory Leak “Nero Error 1135” – When Nero memory leaks, it can cause your device to run slowly due to lack of system resources. There are some potential issues that could be causing problems at runtime, with incorrect coding leading to infinite loops.
Error 1135 Logic Error - Nero's logic error occurs when it produces incorrect output despite the user providing correct input. It materializes when Nero's source code is faulty due to a faulty design.
Such Nero Error 1135 problems are usually caused by corruption of a Nero-related file, or in some cases, its accidental or intentional deletion. Typically, any problem with a Nero file can be resolved by replacing the file with a new copy. If Nero Error 1135 occurred as a result of uninstalling it due to a malware infection, we recommend running a registry scan to clean up any invalid file path references created by the malware.
Self-diagnosis error codes:
2 Excess voltage in the on-board electrical network
3 No signal in the circuit from the fuel level sensor
4 No signal from the internal combustion engine temperature sensor
5 The signal from the sensor measuring the air temperature outside the car is not detected
6 Raising the engine temperature above the permissible level
7 Critically low oil pressure in the engine lubrication system
8 Brake fluid leak or failure of the system's electronic components
9 Excessive reduction in battery voltage
E Data error in EEPROM block memory
Error codes for lights, mirrors and others
- In 9501 - there is no signal from the raindrop sensor on the glass;
- In 9502 - the sensor sensitivity regulator does not work;
- In 9503, 9505 and 9506 - errors in the functioning of the windshield wiper;
- In 9504 there is a problem with the operation of the headlight relay.
If you have heated and electrically adjustable rear view mirrors, additional errors are possible:
- In 9244, 9246, 9247, 9250 and 9251 - malfunctions of the mirror tilt system;
- B 9230 - error in the mirror control unit;
- In 9252 - sticking of the regulator contacts.
As a separate block, you can consider controller problems related to the operation of electrical equipment on the body and in the cabin (category B)
Turn signal lamps do not work
Various problems in the operation of window motors
Problems with power supply to mirrors
Malfunctions of fog lights
Open circuit or overload
Breaks in the glass heating circuits, side lights and low beams
Error that appears after a power failure
Air conditioner evaporator sensors do not work
Open circuit in the interior temperature sensor circuit
Power parameters are out of tolerance
In addition, one of the most common errors on the Lada Kalina is P 0441, indicating an insufficient volume of air supplied to purify the absorber. This problem causes the check lamp to come on after prolonged driving and does not affect the driving performance of the car. Malfunction P 1602 is no less common; it signals a loss of voltage to the ECM and is recorded in memory after the battery is disconnected.
Errors in lambda probes and their heating systems are common. For example, 0036, which indicates a failure of the electrical heating of the sensor. The solution to this problem is to replace the sensor or install a decoy. As changes are made to the design of cars and new options become available, the list of error codes for the Lada Kalina is constantly expanding.
Lada Kalina 2. Error and fault codes
How is self-diagnosis performed?
We have sorted out the main errors on the Priora, now it’s worth finding out how self-diagnosis is performed. The VAZ 2170 with 16 valves has a special controller with which diagnostics are performed. If you have an on-board computer installed, then diagnostics are performed on it. There is also special equipment that allows for a more in-depth check of Priora 16 class systems.
Since most Priora 16 cars already have an on-board computer, we will consider the option without the use of special devices. Diagnostics begins with activation of the test mode. The work proceeds according to the following scheme:
Hello. I got error 1570 on BC - “immobilizer, no positive response or open circuit.” It appears when you turn the ignition key in the form of a beeping buzzer (the car with the key on the dashboard does not blink or light up), and it does not stop for some time after starting the engine. Resetting the error does not help. How to defeat her?
ERRORS ON-BOARD COMPUTER KALINA/PRIOR
0102 Low level of mass air flow sensor signal 0103 High level of mass air flow sensor signal 0112 Low level of intake air temperature sensor 0113 High level of intake air temperature sensor 0115 Incorrect signal of coolant temperature sensor 0116 Incorrect signal of coolant temperature sensor 0117 Low level of temperature sensor coolant 0118 Coolant temperature sensor signal high 0122 Throttle position sensor signal low 0123 Throttle position sensor signal high 0130 Oxygen sensor signal 1 incorrect 0131 Oxygen sensor signal low 1 0132 Crankshaft sensor signal high 1 0133 Slow response oxygen sensor 1 0134 No signal from oxygen sensor 1 0135 Malfunction of oxygen sensor 1 heater 0136 Short circuit to ground of oxygen sensor 2 0137 Low level of oxygen sensor 2 0138 High level of high signal of oxygen sensor 2 0140 Open circuit of oxygen sensor 2 0141 Malfunction of oxygen sensor 2 heater 0171 Too lean mixture 0172 Mixture too rich 0201 Injector 1 control circuit open 0202 Injector 2 control circuit open 0203 Injector 3 control circuit open 0204 Injector 4 control circuit open 0261 Injector 1 circuit short to ground 0264 Injector 2 circuit short to ground 0267 Injector circuit short to ground sunki 3 0270 Short to ground in the injector 4 circuit 0262 Short to +12V in the injector 1 circuit 0265 Short to +12V in the injector 2 circuit 0268 Short to +12V in the injector 3 circuit 0271 Short to +12V in the injector 4 circuit 0300 Many misfires 0301 Misfires in 1 cylinder 0302 Misfire in cylinder 2 0303 Misfire in cylinder 3 0304 Misfire in cylinder 4 0325 Knock sensor circuit open 0327 Knock sensor signal low 0328 Knock sensor signal high 0335 Crankshaft position sensor signal incorrect 0336 Crankshaft position sensor signal error 0340 Sensor error and phases 0342 Low phase sensor signal 0343 High phase sensor signal 0422 Low converter efficiency 0443 Canister purge valve circuit malfunction 0444 Short or open canister purge valve 0445 Short to ground canister purge valve 0480 Cooling fan circuit malfunction 1 0500 Incorrect Speed sensor signal 0501 Invalid signal speed sensor 0503 Speed sensor signal interruption 0505 Idle speed controller error 0506 Low idle speed 0507 High idle speed 0560 Incorrect on-board network voltage 0562 Low on-board network voltage 0563 High on-board network voltage 0601 ROM error 0603 External RAM error 0604 O Internal RAM error 0607 Malfunction knock channel 1102 Low oxygen sensor heater resistance 1115 Faulty oxygen sensor heating circuit 1123 Rich idle 1124 Lean idle 1127 Rich partial load 1128 Lean partial load 1135 Oxygen sensor heater circuit 1 open, short circuit 1136 Rich mixture in Light Load mode 1137 Lean mixture in Light Load mode 1140 Measured load differs from calculation 1171 Low CO potentiometer level 1172 High CO potentiometer level 1386 Knock channel test error 1410 Canister purge valve control circuit short circuit to +12V 14 25 Chain control circuit of the canister purge valve, short circuit to ground 1426 Control circuit of the canister purge valve open 1500 Open circuit of the fuel pump relay control circuit 1501 Short circuit to ground of the fuel pump relay control circuit 1502 Short circuit to +12V of the fuel pump relay control circuit 1509 Overload of the idle speed regulator control circuit 1513 Idle air regulator circuit really speed short circuit to ground 1514 Idle speed control circuit short circuit to +12V, open 1541 Fuel pump relay control circuit open 1570 Incorrect APS signal 1600 No communication with APS 1602 Loss of on-board power supply voltage to the ECU 1603 EEPROM error 1606 Rough road sensor incorrect signal 161 6 Sensor rough road low signal 1612 ECU reset error 1617 Rough road sensor high signal 1620 RFOM error 1621 RAM error 1622 EPROM error 1640 EEPROM Test error 1689 Incorrect error codes 0337 Crankshaft position sensor, short to ground 0338 Crankshaft position sensor, short to ground open circuit 0441 Air flow through valve incorrect 0481 Cooling fan circuit malfunction 2 0615 Starter relay circuit open 0616 Starter relay circuit short circuit to ground 0617 Starter relay circuit short circuit to +12V 1141 Oxygen sensor 1 heater malfunction after the neutralizer 230 Fuel pump relay circuit malfunction 263 Force driver malfunction nki 1 266 Malfunction Injector Driver 2 269 Injector Driver 3 Malfunction 272 Injector Driver 4 Malfunction 650 CheckEngine Lamp Circuit Malfunction