The Chevrolet Niva is a domestically produced SUV that has an elegant body design and excellent performance characteristics. This car is ideal for driving on domestic roads. It will feel great both on asphalt and on dirt roads or in areas where there is no surface at all.
Since the car is capable of driving off-road, it is noted that its front part can often be damaged. The headlights are the first to suffer. They can be damaged either from mechanical stress, or the light bulb may simply burn out.
Chevrolet Niva low beam fuse
The lamp may not light because the fuse has blown. The mounting fuse block on the Chevrolet Niva until 2009 is located in the car interior to the left of the steering column.
Low beam fuses F2 and F12 for the left and right headlights, respectively.
Share “Replacing low beam lamps in Niva Chevrolet”
Yesterday the left low beam bulb burned out. Yes, left again. I don’t know why this happened, but the left lamp is always the first to go out. I always change both at once. Not because I’m a bourgeois, but so as not to have to explain to the traffic police later “why my headlights are shining differently,” and not to poke around again, proving that I didn’t “do anything illegal” there. In addition, the second lamp also has a damaged filament and will not last long anyway.
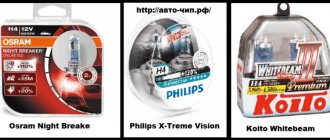
So I change both. Last time it was Osram Night Breaker. As in the picture below. No complaints, except for the price of 1,700 rubles. They lasted for 2 years despite the fact that I did not install separate running lights. I always turn on the low beams. I can also note that they shine with white light, which creates a certain comfort when driving at night. Well, the declared brightness of 120% seems to be fulfilled, although this is only “by eye”. I did not measure with instruments.
This time I could have bought them too, but I found others on sale: Philips Racing Vision with a declared brightness of 150%. It’s not that I’m a fan of brightness, but it’s always nice when the headlights shine well, it’s easier on the eyes. They say that this makes the lamps have a shorter lifespan, but judging by the Osrams, they lasted 2 years. I can’t say that the original lamps worked longer. Price for Philips = 1400 rubles. Let's see how they shine and how long they last.
For those who are just studying the design of the Chevrolet Niva, I will say that replacing lamps is elementary. No trip to service required. Remove the rubber boots from the back of the headlights (it’s impossible to make a mistake there), remove the terminals from the lamp (remember the colors of the wires, they are different), press the spring down and to the side and the lamp snaps off. Put the new one back in the same way (do not touch the glass! so as not to get it dirty). It is inserted into the socket in the only correct way. There is a special “tongue” for this. Don't get confused. Then you snap it on. Put on the wiring. Close the anthers. To replace the right headlight, you will need to temporarily unfasten and move the barrel with the washer. Nothing complicated. But you will be sure that you will have exactly your good, expensive lamps. And sometimes it happens that at the service they put not what you brought, but something “other”...
Read more: How to repair Webasto with your own hands
Thank you for your attention!
Issue price: 1,400 ₽
If the lamps still don’t light, look for where the fuse is located.
If, after replacing the low beam bulb, the headlights still do not come to life, it is likely that the fuses supplying them have blown. To check their serviceability, you need to get to the fuse box, which is located to the left of the steering column and is closed by a cover, which, in turn, is secured with two screws. Unscrew the screws and remove the cover.
Location of the fuse box on the Chevrolet Niva
As I said earlier, in 2009 a restyling was carried out, which also affected the mounting block of the car. If we have a Niva produced before 2009, then we focus on the following photo:
Fuse box on Niva until 2009
Here, fuses F2 and F12 are responsible for the left and right low beam lamps, respectively. On models produced after 2009, the fuse numbering has remained the same, but their location has changed. In the photo below I marked F2 and F12 with arrows.
Fuse box on Niva after 2009 release
That's all about replacing low beam lamps in a Chevrolet Niva. After reading this article, you can easily fix this minor problem yourself.
Chevrolet Niva is a budget SUV with good performance. The car body is comfortable, the engine is powerful, and the equipment is of high quality. The manufacturer took into account the peculiarities of our roads and offered a car that drives confidently both on asphalt and off-road.
Owners of Chevrolet Niva, as a rule, operate it in difficult conditions. Falling stones or branches negatively affect the condition of the headlights, because they are one of the most vulnerable parts of the vehicle. Not only the body is damaged, but also the internal part of the structure. As a result, the light bulbs fail faster.
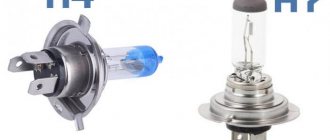
Two types of lighting elements are installed as standard: H7 and H1. The first provides low beam, the second high beam. The channel points in them are optimally placed, which allows you to get a good luminous flux at any time of the day.
When choosing a light bulb, it is important to take into account the manufacturer's recommendations. He pays special attention to two parameters: the type and power of the light bulb. You can find out which devices are best to use in a Chevrolet Niva from the table below.
Other possible faults
If the low beam headlights on a Chevrolet Niva do not light up after replacing the lamps, then the causes of the malfunction may be the following:
- Blown fuses;
- Poor contact of the connectors - in this case, the connector is easily put on the contacts and is poorly fixed, or there is noticeable oxide on the contacts;
- Break in the car wiring in the area from the headlight to the fuse box;
- Faulty low beam switch or relay - unlike previous cases, with such faults two headlights do not light up at once.
- Poor contact of the ground wire in the headlight itself - in this case, all light sources in the headlight do not light up.
In all these cases, restoring the lighting will not be difficult. The main thing is to correctly determine the cause of the malfunction. To do this, you may need a multimeter, which will allow you to determine the area of the open circuit.
Bulb selection: type
When the low beam light on your car stops shining, the cause is probably burnt out. Therefore, before replacing, you have to select and buy a new device.
| Type | Characteristics |
| H4 | 2-filament (low and high beam combined) |
| H7 | 1-strand |
Our case involves an H7 low beam bulb. In the Niva Chevrolet, the headlight unit is divided into 2 compartments, which means that separate single-filament lamps are used for both low and high beam.
All about low and high beam lamps on a Chevrolet Niva car
Chevrolet is a popular SUV in the budget segment. The car was developed taking into account long trips over rough terrain and adapted for the city.
Until 2009, lensless designs were used in head optics. Since 2009, the Niva Chevrolet low beam lamp is a single-filament halogen design with a power of 55 watts.
The luminous element is installed statically, which allows the use of a 99% reflective surface.
When replacement is necessary
The factory equipment assumes the installation of halogen class H7 12v/55W. The marking stands for:
- base 7;
- works from an on-board network of 12 volts;
- power 55 W.
Low beam lamps provide comfortable lighting at dusk and provide optimal illumination in rain and snow. Since the Niva car is designed for driving on difficult roads, reinforced plastic is installed in the optics housing, which is less susceptible to scratches and chips.
During typical operation, the front part of the Niva is subjected to significant mechanical loads: shaking, driving over potholes, etc. Constant increased vibration reduces the life of the running lights. Part that will need to be replaced:
- if the power of the element has decreased and the road is not illuminated enough;
- the element flashes periodically;
- The consumable is completely non-functional.
Change the bulbs in both headlights at the same time. After replacement, it is recommended to adjust the optics unit.
Lamp selection
Among the large assortment, it is easy to determine which lamps are on the Chevrolet Niva. The car is standardly equipped with a lamp with an H1 socket, 60 W for long-range lighting, and a halogen H7 standard, with a power of 55 W for low beam. The service life of each element is 3500 hours.
Optics from different manufacturers differ in brightness level and color temperature: white, yellow light. The lamps illuminate the road well in fog, rain, and snowfall.
The near-halogen lighting from Philips H7 12 55 has a precisely calibrated filament point placement, which allows for good visibility at night. Popular manufacturers of low running lights:
- Osram H7 12;
- Philips H7;
- Bosch H7 55W.
General characteristics for all classes of low beam lamps:
- service life more than 2,500 hours.
- easy to install by yourself;
- clear fixation of the light beam;
- full power until the end of operation.
It is not recommended to install fluorescent lamps with a power of more than 55 W on the Niva: the lampshade may overheat and the wiring may burn out. In addition, the battery efficiency increases, the battery discharges 20% faster.
In addition to standard halogen ones, LED and xenon lamps are installed in Niva optics. When installing xenons, the wiring is completely re-equipped and an ignition unit is installed in the engine compartment. Replacing halogens with xenon and LEDs is prohibited by traffic regulations.
DIY lamp replacement
An advantage in car maintenance remains replacing the low beam lamp on a Chevrolet Niva yourself. The work takes up to 20 minutes both for self-installation and in a car service. To work you will need:
- open-end wrench 10;
- rags;
- flashlight, mirror (if replacement is being done for the first time).
When replacing the optics, it is recommended to check the contacts and operation of the Chevrolet Niva fog lamp, which is also easy to replace with your own hands. The process of installing a new element step by step:
- Using a 10mm wrench, unscrew the nut and remove the terminal from the battery.
- Unscrew the washer reservoir clamps and move it to the side.
- Clean the protective cover of the headlight unit.
- Remove the cover.
- Disconnect the lamp contacts and remove it from the housing.
- Install new one.
To properly disconnect the contacts, pull on the connector, then disconnect the wire ends from the terminal. At the same time, the latch moves up, the spring latch moves back.
When installing a new consumable, proceed in the reverse order:
- Hold the lamp only by the base.
- Install the element exactly into the groove of the diffuser.
- Tighten the latch.
- Connect contacts.
- Secure with latch.
- Connect the wiring to the battery and check operation.
Self-replacement does not require any skills
It is important to follow the procedure for assembling or disassembling the headlight and not touching the glass with your hands. A microscopic fingerprint will remain on the bulb, which sooner or later will lead to incorrect operation of the optics
The main reasons why light bulbs burn out in a car
The most common lamps at the moment are halogen incandescent lamps
. Inside such lamps there is a halogen - iodine or bromine vapor, which is designed to increase the life of the light bulb. They are the cheapest thanks to proven technology and a fairly simple design.
The second most popular are xenon lamps
. They have a more complex design and require additional equipment for operation - automatic headlight adjustment, headlight washers and an electronic ballast (ignition unit), but at the same time they illuminate the road well.
, which appeared relatively recently. They are quite bright, but fade over time.
The main reasons for lamp burnout
When choosing halogen lamps, do not chase loud advertising slogans - brighter and more powerful does not always mean good.
For example, if you purchase a lamp with a power of 90 watts instead of the standard 55, you may encounter that due to the high current and increased heat transfer, heating will also increase, which can lead to burnt contacts and wires, and in the long term - to a short circuit and even fire. Therefore, it is better not to experiment and give preference to lamps of regular power.
The main reasons for the burnout of halogen lamps
All about low and high beam lamps on a Chevrolet Niva car
Replacing low beam lamps on a VAZ 2110 on your own
Chevrolet is a popular SUV in the budget segment. The car was developed taking into account long trips over rough terrain and adapted for the city.
Until 2009, lensless designs were used in head optics. Since 2009, the Niva Chevrolet low beam lamp is a single-filament halogen design with a power of 55 watts.
The luminous element is installed statically, which allows the use of a 99% reflective surface.
When replacement is necessary
The factory equipment assumes the installation of halogen class H7 12v/55W. The marking stands for:
- base 7;
- works from an on-board network of 12 volts;
- power 55 W.
Low beam lamps provide comfortable lighting at dusk and provide optimal illumination in rain and snow. Since the Niva car is designed for driving on difficult roads, reinforced plastic is installed in the optics housing, which is less susceptible to scratches and chips.
During typical operation, the front part of the Niva is subjected to significant mechanical loads: shaking, driving over potholes, etc. Constant increased vibration reduces the life of the running lights. Part that will need to be replaced:
- if the power of the element has decreased and the road is not illuminated enough;
- the element flashes periodically;
- The consumable is completely non-functional.
Change the bulbs in both headlights at the same time. After replacement, it is recommended to adjust the optics unit.
Lamp selection
Among the large assortment, it is easy to determine which lamps are on the Chevrolet Niva. The car is standardly equipped with a lamp with an H1 socket, 60 W for long-range lighting, and a halogen H7 standard, with a power of 55 W for low beam. The service life of each element is 3500 hours.
Optics from different manufacturers differ in brightness level and color temperature: white, yellow light. The lamps illuminate the road well in fog, rain, and snowfall.
The near-halogen lighting from Philips H7 12 55 has a precisely calibrated filament point placement, which allows for good visibility at night. Popular manufacturers of low running lights:
- Osram H7 12;
- Philips H7;
- Bosch H7 55W.
General characteristics for all classes of low beam lamps:
- service life more than 2,500 hours.
- easy to install by yourself;
- clear fixation of the light beam;
- full power until the end of operation.
It is not recommended to install fluorescent lamps with a power of more than 55 W on the Niva: the lampshade may overheat and the wiring may burn out. In addition, the battery efficiency increases, the battery discharges 20% faster.
In addition to standard halogen ones, LED and xenon lamps are installed in Niva optics. When installing xenons, the wiring is completely re-equipped and an ignition unit is installed in the engine compartment. Replacing halogens with xenon and LEDs is prohibited by traffic regulations.
DIY lamp replacement
An advantage in car maintenance remains replacing the low beam lamp on a Chevrolet Niva yourself. The work takes up to 20 minutes both for self-installation and in a car service. To work you will need:
- open-end wrench 10;
- rags;
- flashlight, mirror (if replacement is being done for the first time).
When replacing the optics, it is recommended to check the contacts and operation of the Chevrolet Niva fog lamp, which is also easy to replace with your own hands. The process of installing a new element step by step:
- Using a 10mm wrench, unscrew the nut and remove the terminal from the battery.
- Unscrew the washer reservoir clamps and move it to the side.
- Clean the protective cover of the headlight unit.
- Remove the cover.
- Disconnect the lamp contacts and remove it from the housing.
- Install new one.
To properly disconnect the contacts, pull on the connector, then disconnect the wire ends from the terminal. At the same time, the latch moves up, the spring latch moves back.
When installing a new consumable, proceed in the reverse order:
- Hold the lamp only by the base.
- Install the element exactly into the groove of the diffuser.
- Tighten the latch.
- Connect contacts.
- Secure with latch.
- Connect the wiring to the battery and check operation.
Self-replacement does not require any skills
It is important to follow the procedure for assembling or disassembling the headlight and not touching the glass with your hands. A microscopic fingerprint will remain on the bulb, which sooner or later will lead to incorrect operation of the optics
Features of DIY replacement
Before you begin replacing or repairing fuel lines, you must relieve the pressure in the gasoline supply system to the engine. To do this you will have to perform the following steps.
- It is necessary to de-energize the fuel pump, which supplies gasoline to the engine injectors. The fuel pump power relay is located in the passenger compartment on the driver's side. When you remove the front dashboard cover, a block consisting of four relays opens. The fuel pump relay is the third in a row.
- After turning off the fuel pump, you need to “burn” the fuel remaining in the system. To do this, you need to start the engine and leave it running until it stalls due to lack of gasoline.
- For a final check, try to start the engine again by turning the starter for a few seconds.
Removal of flexible hoses is carried out from the engine compartment.
- The location where the hoses are attached to the inlet tube is indicated by a yellow warning mark. You need to remove the hose from the tube by disconnecting the plastic clip and pulling the hose in the opposite direction.
- The second end of the hose is connected to the fuel filter with a fastening nut. You can unscrew it with a 10 key.
- After inspecting the fastening points, they begin installing a new hose. It is attached in a similar way - the end connected to the fuel line is attached to the fixing nut, the other end is attached to the plastic retainer.
In the same way, change the hose connecting the outlet tube and the fuel line of the gas tank.
Replacing metal elements may require the use of a lift or inspection pit. The fuel lines are located underneath the vehicle, so you will need a flashlight to inspect for damage.
As already mentioned, if the damaged area is small (no more than 15 cm), then it can be cut off with a grinder and replaced with a hose. Only reinforced hoses made of petrol-resistant rubber, marked Fluroelastomer (fluoroelastomer), are suitable. The hose fits over the fuel line, so its inner diameter must be equal to the outer diameter of the pipe.
If the size of the removed damaged area exceeds 15 cm, a metal tube is used for replacement. The connecting elements are pieces of reinforced hose, which are placed on the metal ends of the pipeline and connecting tube. The length of each hose section should not exceed 10 cm.
If the damage to the fuel pipes of the Chevrolet Niva is larger, then their repair is impractical. In this case, you will have to replace the fuel lines with new ones.
The outlet and inlet pipes of the fuel line are removed quite simply. To do this, you do not need to use a lift or inspection hole - all work is performed from the engine compartment.
- De-energize the vehicle by disconnecting the negative terminal of the battery.
- Disconnect the rubber hose attached to the tube with a clamp.
- Unscrew the second end of the tube from the fuel filter using a 10 mm wrench.
The main fuel lines connecting the gas tank to the fuel filter are removed after installing the Chevy Niva on the inspection hole.
- Lower the gas tank slightly so that it does not interfere with dismantling. To do this, use a mounting tool, which is used to press the gas tank until it comes slightly off the mounting hinges.
- Disconnect the flexible hose connecting the line to the fuel filter. If the outlet line is changed, disconnect the hose connecting it to the outlet pipe.
- The line is connected to the gas tank using spring clamps. To disconnect, pull the tube in the opposite direction. After the clamp has been released, pull the line out by hand.
- Install a new handset. If the fuel supply line is changed, then its long end is inserted into the engine compartment and attached to the connection hose with the fuel filter. The other end is connected to the gas tank using spring clips.
- When replacing the outlet line, one end of it is attached to the gas tank with clamps, the other is screwed to the hose connecting the line to the gasoline outlet tube.
Replacing a low beam lamp on a Chevrolet Niva
Chevrolet Niva is the most popular among budget SUVs. In addition to the comfortable body, the Chevy Niva has good characteristics. It turned out this way because it was developed for movement on domestic roads. As a result, the Niva can confidently drive not only on asphalt, but also on unpaved surfaces and off-road. The “poor old lady” Niva has many problems, but one of the biggest is the light, the optics on the Niva, which does not light up at all, this is what our article is dedicated to. Niva cars have their own peculiarity: the light shines somewhere, but not on the road.
In this case, damage to the front of the car can often occur as a result of stones or branches. First of all, headlights on a Chevy Niva suffer, as they are the most fragile part. Impacts can damage not only the housing, but also the lamps themselves. They can burn out as a result of damage to the spiral.
From the factory, the car comes with two types of light bulbs. H7 is used for the low beam of the Chevrolet Niva and H1 for the high beam. These lamps are able to provide good lighting at night due to the optimal placement of the filament point.
What types of lamps are there?
Lamps with different parameters are produced. So, they choose not only the brightness, but also the light temperature in order to get optimal lighting when driving on a wet road, in fog or on a snowy road.
The low beam lamp of the Chevy Niva standard H7 consumes 55W. You should not install too powerful ones, as there will be a risk of overheating of the lampshade and wiring. Also, when using such light sources, there will be an increased discharge of the battery.
In addition to the quality of light, they are also distinguished by the type of device:
- LED
- xenon
- halogen
Initially, headlights for the Niva were developed to use halogen lamps. They are distinguished by low cost and good light. Usually this type is enough for many Chevy Niva drivers, since they have a good resource and do not require connecting additional expensive components.
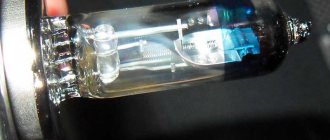
The Niva Chevrolet low beam lamp is a glass bulb with a spiral enclosed inside. Gas is pumped inside, which slows down the oxidation processes of the spiral and maintains its condition longer. One of the disadvantages is the high temperature during operation. This affects the rapid failure of optical elements. But according to experts, this type of lamp is optimal.
Tail lights
Light tuning must be done very carefully so as not to be prohibited and not to violate traffic rules. When purchasing sidelights, you can also switch to new samples; they can be a more uniform color, yellow or white. The sidelights (headlights) on the Niva 21214 are also easy to change yourself. It is better to install sidelights on the Niva in a single color. Niva sidelights last quite a long time. Tail lights when driving a Niva are also subject to less damage and have a long wear life.
How to choose a lamp
There are a large number of offers on the market from manufacturers that have certain advantages
Therefore, first of all, you should pay attention to the features
First of all, it must have the following qualities:
- comfortable and bright light
- long service life
- favorable price
You also need to look at the manufacturer. Lamps from well-known brands may be more expensive, but they will use high-quality materials.
Do not install lamps with increased functionality, for example, the most durable ones - this is usually achieved by reducing the brightness, which can be unsafe in the dark.
It is better to install standard taillights on the Niva, since other types do not fit into the grooves. The taillights are mostly the same.
LED headlights
Niva 4x4 can be ordered from China. Diode headlights fit the Niva without any problems. The lamps are sent in a special box with an adapter, one for the H4 lamp, the other two small connectors for the circumference of the headlight, the so-called angel eye. For our region, you can take two colors, yellow and white, so that when you turn the white color of the circle goes out and only the yellow color blinks.
To install such headlights on Niva 21214, you need to modify the standard places. To install Beijing headlights, it is necessary to enlarge the factory slots for installing headlights in order to install a rim that directly holds the headlight itself when driving. Then we connect the headlights to the terminals and check the lighting on the road.
Instructions for self-replacement
You can replace the low beam lamp on a Chevrolet Niva as quickly and technically competently as possible by following the following instructions:
- Open the engine compartment and disconnect the terminals from the battery.
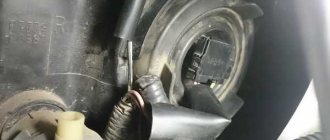
- For convenience, when working with the left headlight, you can completely remove the battery, and from the right - the windshield washer system tank.
- Remove the wire clip above the headlight compartment.
- When the casing is removed, you need to disconnect the block with wiring from the base part.
- Then you should remove the latch holding the base in the headlight (squeeze it with your fingers and pull it out).
- Replace the old lamp with a new one.
- Next you need to install all the elements in reverse order.
- After connecting the battery, check the serviceability of the installed light source.
Important! When installing low beam lamps on a Chevrolet Niva, you should not grab them by the bulbs with bare hands or dirty gloves.
When replacement is necessary
The factory equipment assumes the installation of halogen class H7 12v/55W. The marking stands for:
- base 7;
- works from an on-board network of 12 volts;
- power 55 W.
Low beam lamps provide comfortable lighting at dusk and provide optimal illumination in rain and snow. Since the Niva car is designed for driving on difficult roads, reinforced plastic is installed in the optics housing, which is less susceptible to scratches and chips.
During typical operation, the front part of the Niva is subjected to significant mechanical loads: shaking, driving over potholes, etc. Constant increased vibration reduces the life of the running lights. Part that will need to be replaced:
- if the power of the element has decreased and the road is not illuminated enough;
- the element flashes periodically;
- The consumable is completely non-functional.
How to extend the life of headlight bulbs?
To prevent the low beam lamp from burning out, it is advisable to take preventive measures and prevent burnout in advance. Let's present common methods for solving the problem:
- Installation of fog lights. You can also use daytime running lights. This will make it possible to turn on the low beam only in the dark. The service life of light bulbs is saved.
- Buying quality lamps. It is better not to save money in this matter. It is not recommended to buy used light bulbs at dealerships. Purchasing new lamps at a low price is also not a very wise choice. It is advisable to buy lighting devices from trusted manufacturers.
- Follow the vehicle manufacturer's recommendations. The manufacturer usually recommends specific types of lamps suitable for a specific car model.
- Compliance with safety rules during installation. Replacement requires careful work: wear cloth gloves and install the lamp. If you touch the device with your finger, be sure to wipe it with alcohol or a degreaser.
- Pay attention to tension. If the car's alternator produces unsupported voltage, it will cause rapid breakdown.
- Maintaining proper condition of terminals and wires. Everything must be recorded and connected correctly.
There are several other mandatory conditions associated with the operation of vehicle lighting devices:
- You should not start the car with the lights on. This even applies to side and brake lights. The problem is a power surge when the car starts to start.
- If at least one light bulb burns out, it must be replaced immediately. Otherwise, low beam lamps and other things burn out - this is due to the voltage in the network. A difference of 0.05-0.1 V makes a difference. This even applies to license plate lights.
Some car owners note that it is better to first turn on the heated rear window so that the voltage drops. And then the low beam turns on.
Compliance with the above recommendations will help maintain the functionality of the headlights even when constantly traveling with the low beams on. A reasonable approach to purchasing quality lamps will save money. But we must not forget that burnout is not necessarily a consequence of poor quality, and often the lamp burns out if used/installed incorrectly.
How to remove the headlight unit and replace the bulbs of a VAZ-2123
To replace signal lamps 1 and backlight lamps 2 in the instrument cluster, fig. 58, remove the housing and unscrew the mounting screws. Then pull the unit towards you and disconnect the wiring harness from the blocks 3. Turn the lamp you want to replace counterclockwise and disconnect it.
Expert opinion
It-Technology, Electrical power and electronics specialist
Ask questions to the “Specialist for modernization of energy generation systems”
Dimensions (left side) - Chevrolet Niva logbook of the year on DRIVE2 - AutoCall Since the Niva car is designed for driving on difficult roads, reinforced plastic is installed in the optics housing, which is less susceptible to scratches and chips. Ask, I'm in touch!
Lighting system
Adjusting the headlights
Note
: The direction of the light beams of the headlights should be such that the road in front of the car is well illuminated, and oncoming drivers are not dazzled when the low beam is turned on.
Note
: Adjustment of headlight beams should only be carried out by qualified personnel at a workshop. Headlight adjustment is carried out using optical instruments. If they are not there, then adjustments can be made using the screen, as shown in the figure below.
- horizontal line corresponding to the centers of the headlights;
- a line passing through the centers of light spots;
- A and B – vertical lines corresponding to the centers of the headlights;
- O – center line;
- h – distance of the centers of the headlights from the floor
1. The headlights are adjusted by rotating screws 1 and 2 shown in the figure below, which rotate the optical element in the vertical and horizontal planes.
- screws for adjusting the headlight beam in the horizontal direction;
- screw for adjusting the headlight beam in the vertical direction
2. Place a fully fueled and equipped car, with a load of 735 N (75 kgf) on the driver’s seat, on a flat horizontal platform 5 m from the screen (plywood panel measuring about 2x1 m, etc.) so that the axis of the car is on it perpendicular. Before marking the screen, make sure that the air pressure in the tires is normal, and then rock the car sideways to install the suspension springs.
3. Draw vertical lines on the screen: center line 0 and lines A, B, C and E passing through the points corresponding to the centers of the headlights. These lines must be symmetrical with respect to the center line of the vehicle. At a height h corresponding to the distance of the centers of the headlights from the floor, draw line 1 and 55 mm below it, line 2 of the centers of the light spots.
4. Set the headlight adjustment control on the instrument panel to a position that corresponds to the load of a car with one driver.
5. Turn on low beam. Sequentially, first for the right headlight (the left one is covered by something or is disconnected from the wiring harness), and then for the left one (the right one is closed), adjust the light beams of the headlights with screws 1 and 2 (see the figure above). In this case, the displacement of the light beam of the headlight should not exceed ±3° in the vertical plane and ±2° in the horizontal plane.
6. For correctly adjusted headlights, the upper boundary of the light spots should coincide with line 2 (see the screen picture above), and the intersection points of the horizontal and inclined sections of the light spots should coincide with lines A and B.
Replacing lamps
Block lights
Note
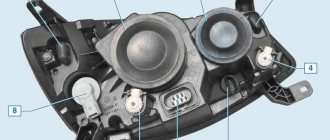
: Before replacing the lamps in the headlight unit, remove the protective cover 3 (see figure below), which is fixed with a wire holder 2. To replace the low (or high) beam lamp, remove the block 5, remove the antennae of the spring latch 6 from the grooves and remove the lamp 4.
1. Turn cartridge 1 counterclockwise and remove it from the socket.
2. Remove block 5 of the low beam headlights to gain access to the side light lamp.
- turn signal lamp socket;
- holder;
- lid;
- low beam (or high beam) lamp;
- low beam (or high beam) lamp block;
- latch.
Back light
Note
: Replace the bulbs in the rear light from the luggage compartment side, having first opened the valve in the side trim.
1. Turn socket 2 counterclockwise and remove it complete with the lamp. To remove the lamp from the socket, press it and turn it counterclockwise, as shown in the figure below.
- lamp;
- cartridge
- https://svetilnik.info/avtomobilnyj-svet/lampa-blizhnego-sveta-niva-shevrole.html
- https://lampaexpert.ru/avtomobilnye-lampy/neispravnosti/lampa-bliznego-sveta-niva-sevrole
- https://polomkiauto.ru/lampy-ustanavlivaemye-v-chevrolet-niva-rekomenduemye-proizvoditelem.html
- https://krutilvertel.com/vaz-2123-2001-glava10-sistema-osveschenija
9.8.18a Replacing the front and rear interior lamps (2009-2018)
After disassembling the 3 buttons, do not touch the plug and remove the entire board. To do this, we bend the clips in the area of the light bulbs and the longitudinal clips that secure each button.
Using a sharp knife on both sides, carefully, they are very hard to see and uncomfortable. We separate each button and gradually remove the board.
How to remove the dashboard trim of a Niva Chevrolet
The main characteristics of the VAZ model are all-wheel drive on all wheels of the car, a two-speed transfer case and a controlled differential that can be locked, depending on the need.
The car's gasoline engine consists of 4 cylinders with a volume of 1.
Models released after the year are more stylish and modern, but the main essence of the car has not changed - the VAZ is very practical for the current state of the roads. The car was widely used mainly in rural areas, but it can also often be found in cities.
The interior of the VAZ car is made of high-quality material and is technically very well equipped. The interior lighting circuit consists of many electrical devices located throughout the interior of the vehicle.
The VAZ instrument panel is equipped with modern LED lighting, which is practical regardless of the time of day. The most vulnerable elements in a car's lighting circuit are the electric lamp and door light switches. We recommend you a special sun visor for cars.
How is lighting arranged in Niva?
The Niva's lighting circuit is looped to the fuse box, which is located inside the car interior under the dashboard on the driver's side. Each of the fuses is responsible for a certain type of lighting device, not only inside the cabin, but also in the exterior lighting of the car. If the lighting of any interior device malfunctions, the first thing you need to do is check the fuses.
To do this, you need to grab the body and pull it towards you. New lamps are installed in the seats in the same way.
To replace individual lighting lamps, you must additionally remove the glasses box. After this, you need to unscrew the three screws using a Torx key. Then, using a flat screwdriver, you need to press out the 4 fastenings of the lampshade, after which it can be removed from its seat.
Installation of an additional lamp.
On the board located inside the lampshade there are 2 sockets for individual lighting lamps. They are unscrewed counterclockwise and then replaced. The standard location of the light source in the Chevrolet Niva is quite inconvenient.
There is often not enough light for rear passengers. In addition, this makes loading things into the car inconvenient, since in the dark the backs of the front seats cast a large shadow and practically nothing is visible from behind. For this purpose, you can separately purchase a lampshade for interior lighting, art. In addition, you need to order a frame for it in order to install it in the hole.
Tags: discovery, land, rover, sport, test
« Previous entry
Recommendations
When performing work, you should follow simple recommendations:
- when changing optics, you need to replace them on both sides to avoid an uneven light spot;
- If the bolts somewhere cannot be unscrewed, you should treat them with an anti-corrosion compound and leave for 15 minutes. It is advisable to use more reliable tools with heads so as not to “lick” the edges;
- all manipulations should be performed without strong pressure or jerking;
- During work, you should avoid using a hammer and other heavy tools;
- Replacement should only be carried out with the power turned off;
- You should work with gloves to avoid injuring your hands.
On the Niva-21214 car, all lighting fixtures can be removed and installed quite simply, with a minimum amount of additional disassembly. If you install and dismantle carefully and calmly, there should be no problems; you can do everything yourself.
Top manufacturers of shock absorbers for chevrolet niva
Anyone can replace the rear shock absorber in Chevrolet Niva cars in 10 minutes. To do this, he will first need to do the preparatory work:
Use a metal brush to clean the threads of the fasteners;
Replacing the rear shock absorbers of a Chevy Niva occurs in the following order:
- Using a wrench, unscrew the bolt of the lower fastening of the device.
- Using two spanners, unscrew the nut from the bolt on the upper shock absorber mount, holding it with your hand.
- They take out the part.
- The new shock absorber is installed in the reverse order.
This spare part for Chevrolet Niva cars is made in different parts of the world. The site contains reviews of shock absorber manufacturers from countries such as Japan, the Netherlands, Russia, South Korea, Belarus.
In March 2022, 7 manufacturers took part in the rating of shock absorbers for Chevrolet Niva on PartReview. It is based on 26 reviews and 83 votes.
You can also find out what Chevrolet Niva owners chose among manufacturers of such spare parts as:
Water pump,
Thermostat,
Springs,
Battery,
CV joint,
and others.
It is interesting that all companies sell shock absorbers either individually or in pairs, rarely as a whole set. This is because the characteristics of the front and rear shock absorbers as requested by drivers are very different and depend on a large number of factors, for example:
- on the number of people in the car;
- on the volume of cargo;
- from motion sickness of passengers;
- on the nature of the roads.
Therefore, each driver individually selects the type of shock absorbers for himself, based on his anatomical and psychological characteristics, for example, someone likes it to be softer in the front and hard in the back, or vice versa. It is clear that the greater the load, the stiffer the shock absorbers should be. In this regard, it is good that modern products have adjustments and settings. Therefore, when asking yourself which rear shock absorbers are best for Niva-Chevrolet, take into account the factors described above.
In practice, it is not always possible to immediately understand what we want, and therefore on forums they often write that they bought some, tried them, didn’t like them, and took others. Therefore, before purchasing, it is recommended to carefully study the forums, this will help you save money.
Read news about the new Niva
- Do-it-yourself power bumper for Niva: Drawings, manufacturing and installation |
- Clutch adjustment on Niva 21214 - Online reference book to help the car owner - looking for and fixing faults
- How to eliminate vibration of the VAZ-21213 transfer case
- Fuses and relays (location and purpose of fuses and relays) Niva Chevrolet "
- Mud tires for Niva 4x4: radius 15 and 16 - which one is better to install "
- Liquids used and filling volumes Niva VAZ 21213, 21214, 2131 lada 4×4
- Wheel stud M12x1.25x41 2121, 21213, 2131, 21214, 2123 rear
- Niva Chevrolet transfer case: device, connection diagram and how to use?
Low beam lamps on a Chevrolet Niva car
In this car, H7 halogen bulbs are responsible for the low beam. These are single-strand flange type lamps. They have a fixed gap between the spiral and the flange, which allows the filament point to always be in the focus of the reflectors. This gives a comfortable light that provides good visibility.
Modern industry produces various modifications of such lamps. For this, different technologies are used that provide parameters responsible for light and power indicators.
For H7 light sources, a power standard of 55 W is accepted, however, there are varieties with increased power characteristics recommended only for off-road use.
There are three types of such lighting sources:
- halogen;
- xenon;
- LED.
"Niva Chevrolet" uses the first of the listed types - halogens. They are inexpensive, which makes them very popular among drivers. They provide comfortable, correct light and do not require additional devices for their operation.
Such a lamp consists of a bulb, for the manufacture of which carbide or quartz types of glass are used, as well as an incandescent filament and gas with the addition of halogens. The main “disadvantage” of such light sources is the very high temperature in operating mode. This greatly affects the wear of the optics. But experts say that it is the halogen H7 that offers the optimal price-quality ratio, which makes them the most widely used type of lamp today.
What kind of lamps are there?
Initially (since 2002) the Chevrolet Niva was equipped with conventional block headlights, but after restyling (2009) the car acquired lens ones. Nevertheless, the lamps in the headlights responsible for the low beam remain the same - halogen with an H7 socket with a power of 55 W.
Low beam lamp Niva Chevrolet
Today, lamps with H7 socket are produced by many manufacturers, both very well-known and not very famous. Which one should you prefer? Everything here will depend on the budget and, of course, on the personal preferences of the car owner. Below I provide a short list of the most popular companies, whose products I have arranged in order of increasing cost (but not quality and durability). In my opinion, the light bulbs from these brands are not only the most affordable available, but also quite high quality.
- VOSKHOD (Russia) – from 75 rub.
- DiaLUCH (Russia) – from 90 rub.
- MAYAK (Russia) – from 80 rub.
- AVS (China) – from 90 rub.
- EVO (China) – from 120 rub.
- NARVA (Germany) – from 160 rubles.
- GE (Hungary) – from 170 rub.
- BOSCH (Germany) – from 170 rub.
- OSRAM (Germany) – from 180 rub.
- PHILIPS (Germany) – from 240 rub.
- KOITO (Japan) – from 320 rub.
Approximate prices are for standard low beam bulbs, but many companies produce devices with increased light output and/or a longer service life. The prices for such products are, of course, much higher.
Note
Only those lamps listed in the table should be used. Other lamps are simply not suitable in terms of base and power.
To easily and correctly replace Chevrolet Niva optics, you will find our articles useful:
“Replacing Chevrolet Niva headlight bulbs - low and high beam, dimensions and direction indicators”;
"Replacing the fog lamp on a Chevrolet Niva".
Main conclusions
On a Chevrolet Niva car, the low beam headlights use a standard H7 12V/55W lamp. It has one filament and is installed in the corresponding block. When choosing a new copy to replace a burnt-out one, you need to pay attention first of all to its type and lighting characteristics. Based on the type of light source, they are divided into the following modifications:
- Incandescent light bulbs.
- Standard halogens.
- Halogen with quartz bulb.
- Xenon.
- Light-emitting diode.
- Gas discharge on sodium.
It is better to give preference to halogen ones, since they have a minimal price, good luminosity and flux density and do not require the installation of additional equipment when replacing. In addition to the burnt-out lamp itself, the reason why the low beam on a Chevrolet Niva stopped working could be a fuse and problems with the on-board wiring.
If you have additional information about choosing and replacing low beam lamps on a Chevy or simply want to share useful knowledge, be sure to write in the comments.
Periodic failure of light bulbs in car lighting devices is common, and such a malfunction can be eliminated without the services of a specialist. In this article we will look at how to independently replace the low beam lamp on a Chevrolet Niva.
Contents: 1. What kind of lamps are there 2. Replacing the light bulb in the low beam headlight 3. If the lamps still don’t light, look for where the fuse is located