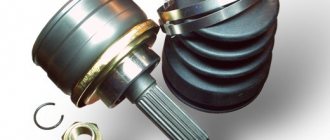
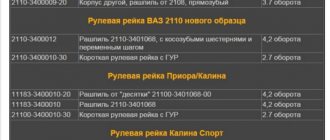
Steering rack boot
The performance of the steering rack mechanism is primarily determined by reliable protection from dirt, moisture and other debris. For this purpose, a special corrugated rubber cover (boot) is provided. The VAZ-2110 steering rack will last a long time if you regularly monitor the condition of the boot. Periodically, using a bright flashlight, check the integrity and tightness of the protective cover and then you can avoid problems with steering rack repair for a long time. If any defects are found in the boot, it should be replaced immediately. Replacing steering rack boots is a rather troublesome procedure. However, this activity can be done with your own hands. To do this you will need a tool, a new boot, a couple of hours and desire. This article provides detailed instructions on how to replace the steering rack protective cover yourself.
We prepare the car and necessary materials
To replace the boot, you need to prepare the following tools:
- keys for 10, 13 and 22;
- heads with ratchet and crank;
- screwdriver;
- hammer;
- pliers.
In addition to a new boot, you should stock up on clamps for attaching the adsorber, lithol, WD fluid and gloves. We will also need a jack and two supports for the car (“goats”). Replacing the steering rack boot on a VAZ 2110 should be done on a cold engine, as there is little space and there is a chance of getting burned or scratched your hands. Therefore, protective gloves will come in handy. It would be a good idea to wash the car well before repairing. To make it easier to replace the boot, you should use a pit or a pair of stands (“goats”). First, set the car to the parking brake. Be sure to put chocks or blocks under the rear wheels. Then we jack up the car and install supports under the front end so that it is convenient to get to the steering mechanism.
Note: There will be no problems with bolts and nuts if they are pre-treated with WD fluid.
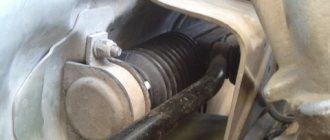
Removing protection
To replace the boot, you must provide access to the steering rack. First, we dismantle the engine protection. Then, using a 10mm wrench or a ratchet with a small wrench, unscrew the fastening of the rack protective screen from the manifold. One nut is at the bottom and two at the top.
Note: To make it easier to remove the screen, you must first rotate it 180 degrees and then pull it out.
Steering rack protective screen
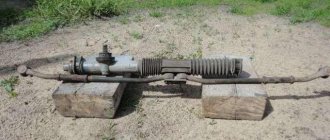
Removing the old boot
To make it easier to continue working, you need to remove the adsorber. The adsorber mounting clamps, as a rule, cannot be removed. Their price is low, so we simply cut off the clamps in passages, then install new ones. After this, remove the steering rods in the following order:
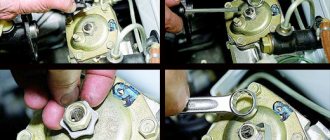
- We flare the tie rod bolts using a screwdriver, hammer and pliers. Then use a 22 mm wrench or a ratchet with a wrench to unscrew them.
- We remove the steering rods from the rack.
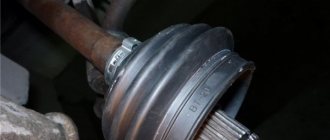
Steering rod disconnected from rack
- Using a 13mm wrench, unscrew the steering rack from the right side, which is secured with two nuts at the top and bottom.
- We take out this fastener along with the side rubber of the steering rack.
- Remove the damaged boot.
Note: To make it more convenient to remove the boot, first slightly unscrew the steering rack on the left using a 13mm wrench.
We install a new boot
So:
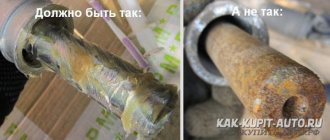
- Before installing a new boot, the steering rack on the VAZ-2110 must be well cleaned of dirt. Then lubricate it well with lithol. If the surface of the rack is well lubricated, the boot will be easier to install. The rubber cover should be put on carefully so as not to tear it. The boot must not be twisted.
New steering rack boot
- We put the tie rods with bolts back into the steering rack. Sometimes this can be difficult to do, especially if someone turned the steering wheel while removing the boot, but if this is not done, then installing the rods with bolts will not be difficult.
- Tighten the tie rod mounting bolts using a 22mm wrench or a ratchet with a wrench. After this, we roll the bolts using a hammer, screwdriver and pliers.
- We install the side elastic band and fastening.
- Using a 13 mm wrench or a ratchet, carefully tighten the steering rack fastenings on the right and left.
- We put the adsorber in place, screw it in with a 10mm wrench and secure it with clamps.
We put up protection
To make it easier to install the protective screen, first turn it upside down and push it through. Then we turn it 180 degrees to the desired position and screw it with a 10 key along with an elastic band. After replacing the boot is completed, we once again check the correct installation and prepare the car for a test drive.
Consequences of damage.
Damage to the boot leads to water, dust and dirt getting onto the steering rod. Then all the dirt gets into the working unit and acts there as a powerful abrasive. Contamination leads to an increase in micro-tears, and after water enters the unit, it causes corrosion. If the problem is not noticed in time, the unit may suffer greatly. This approach will provoke the appearance of extraneous noise (even a slight deviation from the norm will lead to the appearance of extraneous sounds) or loss of control. In order not to spend money on replacing or repairing more steering parts, it is much easier, and more financially profitable, to change the anthers. This will help prevent the replacement of the entire steering and specifically such parts as bearings, springs, piston and others.
The difficulty of this problem is that it is impossible to determine when the break occurred. Thus, you can drive and not suspect that the element is damaged and needs to be replaced. The problem can be determined by checking the play in the parts, or by visual inspection. If this problem is discovered, the damaged element must be replaced immediately.
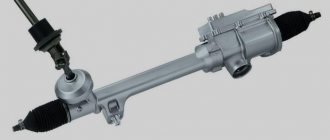
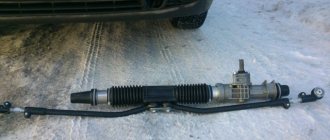
Features of the steering rack with power steering
On a small part of VAZ-2110 cars, the steering rack was equipped with power steering (power steering). Structurally, it is slightly different from a regular rack (without power steering). The photo shows the hoses that ensure the operation of the hydraulic booster.
Steering rack with power steering complete with rods
Therefore, the procedure for replacing the boot on cars that have a steering rack with power steering has its own characteristics.
Preparing tools and materials
In addition to what was stated above, to remove the boot on the power steering racks, additionally prepare the following tools and materials:
- 1 liter of fluid for power steering VAZ;
- container for draining old fluid;
- wooden plugs for closing the hole in the power steering reservoir and the high pressure hose;
- bolt to close the return hose.
In addition, you will need keys for 17, 19 and a hexagon for 6.
Note. When replacing the boot, it is recommended to change the rubber mounts of the steering mechanism, left and right. Therefore, they should also be purchased in advance.
Drain the fluid from the power steering
Replacing the steering rack boot of a VAZ-2110 with power steering is carried out by first draining the fluid from the power steering reservoir. To do this you need:
- use a syringe to pump out fluid from the power steering reservoir;
- remove the fluid supply hose to the pump;
- plug the hole in the tank;
- lower the hose into a previously prepared container;
- turn the steering wheel and wait for the fluid to drain;
Warning! It is strictly prohibited to start the engine to turn on the pump in order to speed up the process of draining the liquid.
- use a screwdriver to remove the clamp securing the return hose and quickly plug it with a bolt, which should be prepared in advance;
- Using keys 17 and 19, unscrew the supply hose (high pressure) and plug it with a wooden plug.
Remove the rack
- in the same order as indicated above, we dismantle the engine and steering rack protection;
- Using a 13mm wrench, unscrew the four bolts securing the rack;
- use a 13mm wrench to unscrew the bolt securing the lower coupling flange, which is located under the steering wheel;
- remove the rack using a screwdriver if it has not fallen on its own;
- We take the rack shaft out of the cabin and turn it over;
Changing the boot
To replace the boot, unscrew the power steering pipes from the rack and remove it through the hole (window) under the car's wing. We change the boot and reassemble in the reverse order.
Note. If you cannot disconnect the pipes, try disconnecting the right link and pulling out the rack from above.
Guided by the advice outlined in this article, replacing the tie rod boot will not be difficult. In addition, you can additionally watch the video, which is easy to find on the Internet today by entering the appropriate query in any search engine.
Preparatory work.
Preparing the site for the operation.
Before starting repairs, there is a need to prepare the car. To do this, there is one simple requirement: to conveniently replace a part, you need to have free access to it. To do this you will need: - drive onto a pit or overpass. This option will greatly facilitate the task at hand. — If it is not possible to put the car in a pit, you can raise the front end with a jack, observing safety precautions. It is necessary to install supports under the rear wheels to prevent the car from falling. Next you need to remove the protection and the wheel. — On some engines, this operation requires removing the battery or generator.
Why replacement is necessary
Abrasion of the surface leads to an increase in the gap in the connection, and this worsens the car's handling. If you put off work until “later” and change the torn cover of the steering rack or tip late, then this will require additional costs to restore worn-out components.
It will be much easier and less expensive to change one or more boots than to wait for the tie rods to wear out.
The safety of the driver, passengers and other road users must be paramount. Therefore, pay close attention to the condition of all parts of the car’s steering mechanism.
How to choose anther
The main requirement for the material used to make anthers is resistance to increased loads. In addition, the product must:
- Withstand extreme temperatures.
- At high temperatures, the material should not crack or melt, and at low temperatures, it should not lose elasticity.
- Be resistant to wear and tear from friction.
- Withstand bending and torsion loads.
Previously, covers for the steering rack were made of ordinary rubber, which dried out in hot weather and became dull in cold weather. The material was covered with small cracks, torn and required replacement.
We recommend
“Replacing a CVT with an Outlander 3: changing the oil and transmission” Read more
In this regard, we have developed special tires with improved characteristics. Silicone, which has more suitable properties, is also used. Any boot is an element designed for a long service life to protect the rack and other components. Therefore, strength must be ensured to withstand high loads.
Ideally, this element protects any part (including the steering rack) throughout its entire service life. For example, the protection of the said rack is provided over a run of 150 thousand kilometers. For a CV joint, the boot should last 100-120 thousand, and for a ball joint - approximately 70-100 thousand kilometers without replacement.
A bad or unclean road makes its negative contribution. Under such conditions, the element may require replacement even with low mileage. There are known cases when the product failed after the car had been run in, before it had driven 3,000 km. In addition, the boot can be damaged off-road when hitting a tangible obstacle - a reinforcement bar, a tree trunk, a concrete slab, etc. You can try to increase the service life of the product by covering the underbody of the car with a metal protection.
Selection of repair kit
Before starting repair and restoration work, you should decide on the choice of repair kit.
- Minimum set. This set includes the necessary list of fastening and sealing elements: washers, bearings, nuts and fluoroplastic bushings.
POPULAR WITH READERS: Replacing the VAZ 2110 generator bearing
- The basic set has bearings and shafts in addition to the minimum set, but its cost can be twice as high as the first option.
Please note that the steering rack can be either old or new. The old slats are aimed at the VAZ 2108, while the new ones are designed for the “tenth” model. The new version is also more convenient to repair. If there is a need to repair the steering rack, which involves replacing the bushing, then there is no need to disassemble the entire mechanism. Remove the corrugation, unscrew the central nut and disassemble the rail into two components. The mechanism will remain on one part, and the other part will be the one where the bushing is located.
Let's start the renovation
To be able to carry out repair work, you will need an appropriate tool that allows you to dismantle the rod, its tip or boot. A lift will also greatly simplify the task.
- If an annoying play is detected in one of the tips, then we replace it according to the given algorithm and, not forgetting to check the article data.
- We remove the wheel from the corresponding side.
- We unscrew the nut that secures the ball pin of the tip in the eye of the steering knuckle.
- To release the conical part of the pin from the eyelet, we apply a lateral impact load to it (with a hammer) or, which is more civilized, use a puller.
- Lubricate the threaded part of the pin on the new tip with an appropriate lubricant, after which we screw the tip onto the rod. Tighten the locknut. To ensure a minimum error in wheel alignment, we ensure that the number of turns matches when dismantling and screwing the tip onto the rod.
- We head to the service center to monitor and adjust wheel alignment.
- During installation, we take “care” of the boot so as not to damage its rubber texture.
- The replacement algorithm is identical for both sides of the suspension.
- A failed rod should also be unconditionally replaced since it falls into the category of parts that cannot be repaired.
- Having dismantled the clamps (2 pieces), remove the boot from the rod and put it aside for a while.
- Armed with a special device that allows you to unscrew the rod, we will implement this action.
- We install a new analogue and put on the boot, securing its extreme sections with clamps.
- If it is not possible to remove the boot through the tip, we dismantle the latter. After assembling the unit, a wheel alignment is required.
- Now let's begin the process of replacing the rack, which can be done in several steps.
- First, drain the fluid from the power steering circuit.
- We disconnect the steering shaft from the seat on the rack gearbox.
- We unscrew several bolts that hold the rack assembly to the subframe. In the Renault Logan modification, 2 pcs.
- To ensure the correct angle of installation of the wheels, we first make the appropriate markings. The shaft is marked with only one mark.
- We disconnect the tips from both sides of the Renault Logan car.
- Now we take out the assembly assembly.
- We prepare a new unit and install it on the car in the reverse order of the dismantling procedure.
Price issue
The cost of new slats depends on the manufacturer, region, and even the specific store where you are going to purchase them.
Good slats cost from 2.3 thousand rubles, but there are better ones for about 3.5 thousand rubles.
Replacement kit
If you don’t want to change it yourself, then get ready to pay about 1.5-2 thousand rubles for the services of specialists from service stations. Today this is the average price of such repairs. Again, it all depends on the level of the car service, and sometimes on its arrogance.
Preparing for replacement
Replacing the steering rack boot is done differently for different cars. It would be good if it is possible to use a lift or inspection hole. If this is not possible, you will have to be content with a car jack.
Some car models require removal of the engine compartment protection from the bottom of the car. On other machines it will be necessary to dismantle the generator and battery. On VAZ cars with front-wheel drive, you will have to remove the air filter housing and adsorber.
Any work on parts of the steering mechanism of the car leads to violations of the installation angles of the front wheels. If you want to minimize wear on the rubber of the steering wheels, make visible marks for the tip, linkage, and steering rack so that they can be aligned during assembly. Upon completion of work, check the installation angles on the stand.