Hello everyone, I’ll tell you about the symptoms when a pomegranate starts to die. VAZ 2114 is my first front-wheel drive car, so this is the first time I’ve come across this element, probably half a year ago I went for a suspension diagnostic and the mechanic told me that I needed to change the outer grenade boots, because they were starting to crack, but I was choked by the toad to give it back 1000 rubles for replacing the anthers and I refused. As a result, when the first minuses arrived on the street, about -10, I began to hear a strange grinding sound in the area of the front suspension when turning right... and after another 4 days, when turning left, the steering wheel began to beat, as if I had an oval disk. it was decided to change this grenade, because a friend had a case with a VAZ 2115 when the wheel drive stupidly fell out of the box and the car stopped, and even without oil in the transmission... I didn’t want that)))
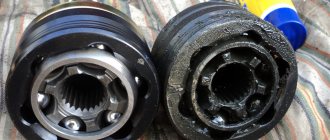
In the end, what is needed to check grenades: 1) visually and by touching with your hand, we check whether the anthers have come off or are torn, and we check by twisting the wheels both in one direction and in the other. I was lucky and I immediately noticed a hole about 5 cm long in the boot.
2) if the anthers are intact, but the grenade crunches, then in 80% it will be one of the outer hinges or both at once, and only 20% of the internal ones.
3) we take the drive with our hand and begin to pull it lengthwise and crosswise, there should be no extraneous knocks, do not be alarmed by the small play in mm2, such a system should not be completely rigid, we also try to push the drive to twist, in one direction, then sharply in the other side. There should also be no knocking or grinding noises.
In general, everything there was almost jammed to hell and the wheel did not want to turn with the drive.
If this does not help, then another option is to start the car and carefully rotate the wheels in gear and listen. and also, if a grenade crunches when turning left, it means a pretzel on the right; if to the right, then on the left.
Malfunctions of CV joints
The main problem due to which angular velocity joints wear out and become unusable is dust and dirt that gets inside the bearing. The element is equipped with a boot. But often these protections are destroyed - be sure to monitor the condition of the anther. You can see it by looking under the car. In this case, the wheels are turned all the way to one side. If grease, tears or cracks are found on the rubber boot, the inner CV joint boot must be replaced.
How to install a new CV joint on a VAZ.
Be sure to follow this sequence for installing new parts:
- Small clamp.
- Grenade boot.
- Large clamp.
- Retaining ring.
- The CV joint itself.
First, we clean the drive shaft from dust, dirt and old grease. Most CV joints come with lubricant, a boot, two clamps and sometimes a new hub nut. If suddenly there is no lubricant in the kit, it is better to use graphite lubricant, and if it is not available, then simple lithol. First of all, we put on a small collar. Then the boot (it should go behind the limiting washer) and a large clamp. Then we put a retaining ring on the drive shaft. Now open the tube of lubricant and completely squeeze it into the grenade. Now it's time to put the CV joint on the drive. Because of the locking ring, it will be difficult to insert the drive into the grenade, so we take a hammer and lightly, trying not to damage the thread, press the grenade into place. Now you need to put the boot on the CV joint and tighten the clamps. Assembly occurs in reverse disassembly sequence, but there is one nuance! Do not overtighten the hub nut! This may cause the bearing to hum. The hub nut must be tightened with a force of 225.0–250.0 N*m. Of course, few people have a torque wrench. So, tighten the nut tightly, but not with all your might. In theory, a force of a maximum of 25 kg will need to be applied to a meter-long knob. But, the extension pipe will spring back under such force, so how can you describe it exactly? But obviously there is no need to jump with weight.
I hope I helped you. If you have any questions, ask them in the comments.
Methods for repairing CV joints
There are three methods for restoring a hinge. The first is a complete replacement of the CV joint on the VAZ-2114 with the same new one. This is how they work at service stations - even if a part can be restored, it is still replaced with a new one. The second method is to replace the cage along with the bearings from the repair kits. And it is also possible to rearrange the joints of equal angular velocities. Repair kits for the second generation Samara are on sale.
How to remove a vaz shruz
Having determined that it is the external grenade that is broken, we begin to remove it.
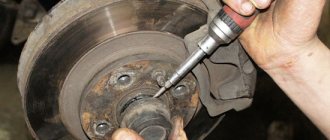
How to unscrew the hub nut on a VAZ?
First of all, unscrew the hub nut. To do this, take a 30mm head and a lever, the larger the better. We put bricks under the wheels to prevent the car from rolling (simply putting it in gear is not an option, the wheel will spin) and begin to unscrew the hub nut.
In this matter, the more you weigh, the better, since I very often lacked my weight and leverage of about one and a half meters. I got out of the situation in the following way: I stood completely on the lever, as close to the edge as possible, thereby giving maximum tension to the nut, and hit the lever with a hammer. Usually this method helped me unscrew even the most soured wheel nuts.
One more nuance: if the outer walls of the head come into contact with the walls of the hub, it is better to lubricate the head with mining or lithol, or, in extreme cases, with silicone grease. Thanks to this trick, the head will not bite in the hub.
Why change CV joints?
If damaged anthers are found during the inspection, they must be replaced. Otherwise, water and sand will get inside the part through cracks in the rubber. Very soon this abrasive mixture will disable the “grenade”. When the car moves around corners, the constant velocity joint can simply fall apart into two parts. After this, the car can no longer be used. There is a significant risk that all the oil in there will leak out of the gearbox. In order to avoid such a nuisance, it is necessary to change the anthers in a timely manner. How much does it cost to replace a CV joint on a VAZ-2114? The price of the service at the service station is 1000 rubles. As for the cost of spare parts, an outer CV joint for a VAZ-2114 costs about 1,500 rubles. depending on the manufacturer. The internal one costs a little more - around 2200 rubles.
Installation
1. Replace the retaining ring of the splined shank of the inner joint housing with a new one.
2. Apply grease to the spline and smooth surfaces of the shank.
3. Carefully insert the shank into the oil seal, trying not to damage the working edge of the oil seal with the shaft splines. At the same time, we direct the locking ring with the gap upward.
4. We vigorously insert the drive into the gearbox and make sure that the retaining ring of the inner joint shank is securely fixed and the drive does not move out of the gearbox housing.
5. We carry out further work in the reverse order of disassembly.
Warning! During assembly, a new hub nut must be installed.
Source
Tools required for replacement, preparatory work
Replacing a CV joint on a VAZ-2114 with your own hands will take about one hour. But you should prepare the necessary tools. To work, you will need keys 17 and 19. You should also prepare a set of heads. Additionally, you will need a wheel wrench, mounting blades, a wrench, and a jack. They also prepare CV joint-4 lubricant, rags, and pliers. For greater convenience, the car should be driven onto an overpass or into a pit.
Removal
3. Drain the oil from the gearbox (see “Gearbox - oil change”).
4. Remove the hub cap and loosen the hub nut (see “Front wheel hub bearing - replacement”).
5. Loosen the wheel bolts (see “Wheel - replacement”).
6. Place the car on a reliable stand and remove the front wheel (see “Wheel - replacement”).
7. Loosen the three self-locking nuts securing the upper support of the suspension strut and unscrew the nuts a few turns (see “Front suspension strut - removal and installation”).
17 mm socket wrench
unscrew the two bolts securing the ball joint to the steering knuckle (see “Ball joint of the strut - removal and installation”).
30 mm socket wrench
finally unscrew the wheel hub nut (see “Front wheel hub bearing - replacement”).
10. Remove the shank of the outer hinge from the hub. If necessary, knock it out through a wooden block or press it out using a universal three-jaw puller (see “Front wheel hub bearing - replacement”).
Note: When removing the left drive, turn the steering wheel all the way to the right; When removing the right drive, turn the steering wheel all the way to the left.
11. Remove the brake hose from the bracket on the suspension strut. Carefully, without allowing too much tension on the brake hose, pull the lower part of the strut outward, remove the shank of the outer joint from the hub and carefully lower the drive onto the wishbone of the suspension.
12. Using the mounting blade as a lever (resting its end against the end of the internal hinge body), we move the hinge outward, overcoming the resistance of the locking ring.
13. Supporting the internal joint, carefully (being careful not to damage the drive oil seal with the splines of the joint shank) remove the joint from the gearbox and remove the drive assembly from the car.
Replacing the outer CV joint (grenade) in a VAZ 2110, VAZ 2112 with your own hands. Photo and video instructions
We are undergoing repairs on a VAZ 2110, manufactured in 2004, mileage 185 thousand km, the right front CV joint has crackled, it will need to be replaced. We will show you detailed photos and video instructions on how to perform this procedure yourself. The lesson is also applicable for VAZ 2112, VAZ 2111.
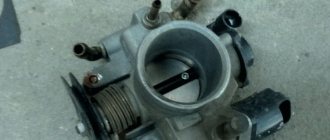
We lift the car and remove the wheel. We unscrew the drive nut, it is a wrench or a 30 socket:
We unscrew the two 17mm bolts that secure the ball joint:
We remove the boot from the grenade; to do this, use a flat screwdriver to knock down the fastening clamp:
Next we will use a CV joint puller:
You can also use a reverse hammer for this purpose. We take out the grenade, thoroughly clean the seat of old grease using carburetor cleaner.
We take a new CV joint, we have it from ZEKKERT, order number GS-3263 (the kit includes a boot, 90 g grease, internal and external clamps, a retaining ring).
We will keep the boot from the old grenade, since it is polyurethane, and on the new part it is made of rubber; take this point into account when ordering.
We turn over the new CV joint, stick in a tube of lubricant, lubricate it, this should take about half of the tube, squeeze the rest into the boot:
If you have some other grenade grease on hand, feel free to add it. We insert the CV joint into place, push it in with our hands, then tighten the boot and put a clamp on it. Lubricate the grenade with copper grease and insert it into the hub:
We tighten and tighten the drive nut, connect the ball joint. In total, the work took less than 30 minutes.
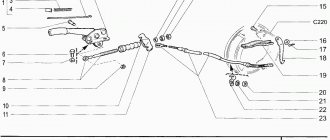
Removing and installing front wheel drives
You will need: a screwdriver, keys “17”, “19”, socket head “27”, wrench.
1. Drain the oil from the gearbox.
2. After removing the protective cap, loosen the hub nut.
3. Loosen the wheel bolts and hub nut. The hub nut is tightened with a large torque, so it is recommended to use, for example, a piece of pipe as a lever.
When unscrewing the hub nut, the vehicle must be placed on the ground!
Loosen and tighten wheel bolts only with the vehicle on the ground. The tightening torque of the bolts is 65–95 N m (6.5–9.5 kgf m).
4. Brake the car with the parking brake, install traction bars under the rear wheels and lift the front of the car, installing reliable supports.
5. Remove the front wheel and finally unscrew the hub nut.
7. Remove the cotter pin from the tie rod ball joint nut to the swing arm.
8. Unscrew the nut securing the steering rod ball joint.
9. Using a puller, press the tie rod ball joint pin out of the strut swing arm.
10. Remove the two bolts and disconnect the ball joint of the front suspension arm from the steering knuckle.
11. Move the steering knuckle with the stand to the side...
12. ...and remove the splined shank of the outer joint from the hub.
13. Using a pry bar, press the drive inner joint shank out of the transmission.
If you intend to remove both drives, after removing one of the drives, insert a technological plug into the gearbox instead (for example, an old internal joint) and only then remove the second drive. Otherwise, the differential side gears will move and the drives will not be able to be installed.
Which brand of grenade should I choose?
When searching for components, you should approach their selection with care. The CV joint is the main part of the car's drive and often fails, so you should choose a spare part not only for reasons of price, but also quality.
It’s better to find the original; look carefully at the box in which the CV joint is sold, as you can often find a very high-quality fake. Also pay attention to the part number, it should be 2108-2215056 . The average price is about 2000 rubles .
When considering certified analog spare parts for purchase, you should look at the quality of workmanship. Even reading most of the positive reviews about a particular brand, you should not exclude the percentage of defects, which always exists.
Tags: CV joint, grenade, which is better grenade, grenade VAZ 2109, 2109, 2108, 2114, 2113
Comments 30
How are the grenades going?
I have a tripoid, I’m not complaining, before this it was simple. Today a salesman came into our store and said that tripoid is better!
A tripod is an internal CV joint. And a ball CV joint is an external CV joint. They have a different operating principle and purpose of work! WHAT IS THE ESSENCE OF THIS?
ahh I understand everything. Internal one, old model or new! Of course, a tripod is more reliable. It won’t crunch, but the backlash is less with a ball-type one. YOU CHOOSING IT, BUT I WOULD PUT A BALL-BOARD
The ball one was also internal, but I already changed it today to a tripod. As I understand it, this type of CV joint is more reliable on all foreign cars; I trust gas tank engineers more than ours.
The only difference is that ours are sitting over the hill)))
I think the first type of CV joint is better in design, because internal CV joints are installed exactly like this on modern foreign cars.
It doesn’t matter whether it’s the first or the second CV joint. I tried both in my field. As the practice of “raping” CV joints has shown, they always broke in the wrong part. The most important thing is that the CV joint must be original, properly hardened, and not a Chinese basement raw material!
>>>CV joint must be original, properly hardened, and not Chinese-basement raw material! Well, you yourself wrote that the tripod should be original, and not some kind of sticky one, so you can’t see the difference.
Slightly different operating modes provide their own corrections for the condition of components and assemblies. Everything can be broken. I install CV joints of the highest quality that I can find in the city. Not a single grenade has yet broken in the moving part - that’s what I’m talking about. It makes no difference whether it is tripoid or not, both will perform their functions. If the moment is extremely high, then it occurs in the area of the spline part. But in this case, if the grenade is of high quality, then it will be extremely difficult to break it, regardless of its design.
If you are interested in how grenades break on all-wheel drive with a locked differential, I can show you in pictures