1200 rub. for the photo report
We pay for photo reports on car repairs. Earnings from 10,000 rubles/month.
Write:
A short and useful video that will help owners of VAZ classic models correctly set the ignition to the marks, that is, set the camshaft, install the timing chain. To make the process as simple and fast as possible, watch carefully the video training lesson from a master of his craft.
Having installed the camshaft, then place the sprocket according to the mark (almost not reaching it). The next step in installing the ignition will be adjusting the valves, installing the distributor and ignition.
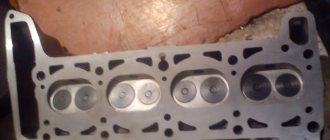
Different bolts and tightening degree of the VAZ-2107 cylinder head. What is the difference
The “classic” was originally equipped from the factory with ordinary M12x120x1.25 bolts for a 19mm head. Their original catalog number was 2101-1003271 or 21213-1003271. The second number suggests that such bolts were also used on the VAZ-21213 Niva, which is why they are also called “Niva bolts”. Another colloquial name is “penny”. But most often they are simply identified as “cylinder head bolts for an old-style classic.”
On VAZ-2108 and VAZ-2109 cars, torsion bolts of a new type began to be used, which are also suitable for the “classics” - M12x115x1.25. They were unscrewed and tightened with a 12mm hexagon. It is noteworthy that AvtoVAZ’s catalog number remained the same, 21213-1003271. And it is the bolts of the new type that are sold in the original packaging. Their difference is that they “stretch” - and if correctly, they undergo elastic deformation. Actually, this is why you need to turn it twice by 90 degrees.
Old style cylinder head bolt
New sample cylinder head torsion bolt
Pay attention to the length of these bolts, encoded in the markings. 5mm difference with regular bolts. It is by these 5 millimeters that the bolt is deformed, completely filling the internal thread
It is by these 5 millimeters that the bolt is deformed, completely filling the internal thread.
What is the difference between these bolts, other than the first ones are not sold in the original packaging and different bolts require different torque patterns? Classic bolts can be reused many times if their condition allows it. But on the other hand, you need to remember to do preventive tightening of the cylinder head bolts. About once a year, or more often, you will have to check the tightening torque of all the head bolts of your VAZ-2107 and tighten them if necessary.
The new type bolts do not require such a procedure, because due to elastic deformation they provide constant pressure on the cylinder head cover. But such bolts are disposable. When disassembling the cylinder head, you will have to buy a set of new ones. And unscrewing such bolts can be complicated by the fact that bolts tightened without a torque wrench can break.
Judging by the reviews of car owners, very often they can be unscrewed only by welding the nuts to 19. Therefore, many try to find old-style bolts, which are less troublesome.
Why install a different camshaft?
The main reason for installing a new part is to replace it in case of failure. But sometimes such a decision is made for other reasons. For example, a car owner dreams of improving engine performance. And for this he begins to tune the engine. It is believed that a more advanced camshaft can help improve engine performance.
How is this achieved? Another device may make it possible to increase the valve lift and the width of the engine's operating phase. In theory, this should help produce more mixture, which will improve performance.
And there are so many things that numerous “amateurs” are trying to cram into the cylinder head. But there is only one car that can become a “donor” for installing a new device. And this is everyone’s favorite Niva (VAZ 21213). The Niva camshaft is an ideal solution for tuning the 7 engine!
The phase width of this part, as well as its intake valve lift, are relatively suitable for the operation of the Seven engine. And the engine receives an increase in power of about 2 horsepower. Of course, this is not such a big deal. But at the start the car responds a little better.
If a car enthusiast is willing to pay money for a special “sports” shaft, then he may well buy one that is manufactured in domestic factories for this purpose. Today you can find a worthy “comrade” within 10 thousand rubles.
Preparatory work
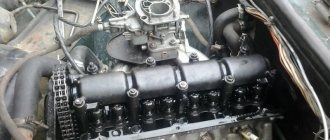
The first thing to do is remove the air filter. For those who have a carburetor VAZ, the process is not difficult. With injection models you will have to tinker a little longer.
To gain access to the cylinder head, you need to completely dismantle the part of the fuel system located in the engine compartment.
It is better to remove the carburetor completely, since removing the cylinder head with it is a rather labor-intensive procedure, as a result of which one of the components is often damaged.
After this, unscrew the nut holding the distributor - it and the cables are removed. Sometimes the fastener does not give way. It is not difficult to break its tightness by treating the fastener with WD-40 and leaving it alone for a couple of minutes.
At this point, disassembly is stopped, since it is necessary to drain the coolant - place a container under the fitting located on the bottom and unscrew its plug
After this, slowly (this is important) unscrew the cap from the distribution tank. When the antifreeze pours out, proceed to dismantling the cylinder head casing
Use a socket wrench for this. Place the loosened nuts and spring washers in a box so as not to lose them.
When the antifreeze has poured out, proceed to dismantling the cylinder head casing. Use a socket wrench for this. Place the loosened nuts and spring washers in a box so as not to get lost.
Now all that remains is to remove the head and install a new gasket. We won’t dwell on this point – there is nothing complicated here.
If the camshaft fails
The camshaft on the VAZ 2106 model is rarely dismantled. Typically during repair or disassembly. Sometimes to replace it.
Signs
First, let's talk a little about the signs that indicate that the camshaft is faulty, its journals or beds are worn out. It is difficult to determine whether the shaft or something else is knocking in the VAZ 2106 engine, but it is possible. The knock of the camshaft is dull and clearly audible. As engine speed increases, the knocking becomes more frequent.
Some drivers determine knocking in this unit using a stethoscope or a stick through the valve cover. But often it is difficult for an inexperienced driver to do this. Therefore, the best way to diagnose the camshaft is to remove it, wash it and inspect it.
If the camshaft is faulty, the following symptoms may occur:
- a dull knock, reminiscent of hammer blows;
- it is impossible to adjust the valve clearances; while the crankshaft is turning, the camshaft is constantly in different positions.
This video shows how you can eliminate longitudinal runout of a camshaft.
The most reliable method for diagnosing problems with the VAZ 2106 camshaft is to dismantle it from the car and wash it. You can wash it in gasoline or other cleaning liquid. Next, you need to hold the shaft and hit the bed, when you hear the slightest knock, we determine whether the mechanism is worn out. Be sure to make sure that the shaft does not move in bed, because when it hits the limiter it will make a dull knock.
Removed shaft
The camshaft has a great influence on the pressure in the lubrication system. If the gaps between the bed and the camshaft are large, then the pressure will be low, and as a result, unsatisfactory lubrication of other parts.
Causes
The main malfunctions that result in the need to replace the camshaft are its wear, the appearance of various scuffs and grooves on the bearing journals. Likewise, replacing the camshaft is necessary if it is found to be deformed or cracked. When such malfunctions occur, the power unit loses power and also begins to function intermittently. Problems with the camshaft are identified by a knocking sound in the cylinder head.
The camshaft on the “six” is rarely removed. In addition to the above reasons for replacing and reconfiguring the power unit. After this, you can notice a significant increase in power, like in sports cars.
Timing phases and when to set them according to marks
Valve timing refers to those moments at which the piston in the engine moves up and down over a certain interval. When irregularities in the valve timing occur, the pistons move incorrectly along the interval, resulting in uneven engine operation on the VAZ-2107.
If the driver notices that the car’s power decreases, fuel consumption increases, and engine interruptions occur, then it is necessary to resort to setting the valve timing according to marks. How to set marks on a VAZ 2107 carburetor and injector, we will learn from this material, since the design of the timing mechanism is identical.
How to set timing timing marks
The procedure involves performing the following manipulations:
- The VAZ 2107 needs to be placed on a hard surface, with chocks placed under the wheels and the hand brake pressed all the way. The gear shift lever must be set to neutral mode.
- The cover is removed from the cylinder head by first unscrewing all the fixing nuts to “10”. It is better to replace the gasket with a new one, even if the old one shows no signs of damage.
- Using a key set to “24”, you need to turn the crankshaft on a VAZ 2107 car. This is done in order to be able to align the marks on the moving and stationary parts of the mechanism. To carry out these actions, it is recommended to use good lighting or use a flashlight. The crankshaft rotates until the mark on the pump and generator drive belt pulley coincides with the long mark marked on the block.
- Combining these risks, the mark on the sprocket should eventually coincide with the ebb on the camshaft bed. If the mark ends up at the bottom, then you should rotate the crankshaft 360 degrees.
- If you can’t make sure the labels match, then proceed to the next steps, which are described below.
- The crankshaft is rotated until the marks on the star and the bed ebb align.
- Using the key at “13”, you need to loosen the tensioner. The 2 nuts securing the tensioner are unscrewed, after which this device is removed.
- The bolt that secures the sprocket to the camshaft is unscrewed. To do this you will need to use the key at “17”.
- The sprocket is removed, after which it must be rotated until the marks on the VAZ-2107 timing belt pulley coincide with the long mark on the block. The star fastening bolt does not need to be unscrewed, since after removing the tensioner the camshaft star rotates.
- We put a chain on the sprocket, if it was decided to unscrew it, and install it in place. Finally, the tensioner is installed, for which you should tighten it with 2 nuts to “10”. You can install the tensioner first, but later you will need to use a crowbar or pry bar to get the sprocket into place. Finally, screw the tensioner nut to “13”.
This relative arrangement of the parts allows the piston of the 4th cylinder to be positioned at top dead center TDC.
Features of servicing the timing mechanism
After the timing marks are installed on the VAZ-2107, you need to perform the following actions:
- The timing chain of the VAZ-2107 is being tensioned.
- Adjusting the valves, or more precisely, the thermal gap between the camshaft cams and the rocker arm.
- Setting up the ignition system.
The process of adjusting the valves on the VAZ-2107 is carried out according to the following scheme: initially 6 and 8 valves are adjusted, the report must be carried out from the radiator. After they are adjusted, you need to start adjusting valves 4 and 7, then valves 1 and 3, and finally valves 2 and 5.
How to adjust the valves on a VAZ-2107 car can be found out in more detail in the relevant material on this site. In conclusion, it is worth noting that VAZ-2107 cars are one of the most reliable vehicles, the production of which began back in the 90s.
Annotation on setting up the ignition system of the VAZ 2107 with your own hands
The Zhiguli “classic” VAZ 2107 does not belong to modern cars, manufactured with the latest technology and stuffed with sophisticated electronics. This is its beauty - there is no need to contact car service specialists for any reason; most of the car maintenance work can be done by the owner himself. This also includes the procedure for the ignition option, which anyone can perform, having previously studied the detailed instructions.
Installing a new camshaft
In order to install a new timing shaft, you will need the same tools as to dismantle it. The installation procedure is as follows:
- Be sure to lubricate the surfaces of the cams, bearing journals and bearings with engine oil.
- We install the camshaft in the “bed”.
- Using a 10 mm wrench, tighten the bolts of the thrust flange.
- We check how the shaft rotates. It should turn easily around its axis.
- We set the shaft to such a position that its pin would coincide with the hole on the fixing flange.
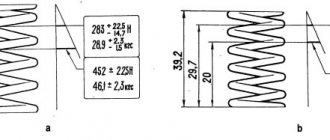
- We install the bed on the studs, screw on the nuts, and tighten them. It is important to follow the established procedure. The tightening torque is in the range of 18.3–22.6 Nm.
The nuts are tightened using a torque wrench with a torque of 18.3–22.6 Nm
Self-tightening of VAZ 2108 cylinder head bolts instructions, photos and videos
In order for a car to always work correctly, all its components must function properly. This is especially true for the power unit. If you want to know how the VAZ 2108 cylinder head bolts are tightened, why is this necessary and what is needed for this? Our resource will help you understand these issues.
In what cases is tightening needed?
Most domestic drivers do not understand for what purpose this procedure needs to be performed, what order must be followed and what the tightening torque should be. However, every driver should know that incorrect actions during this process can damage the cylinder block. Accordingly, this procedure should be treated with all care and responsibility.
Just a few years ago, vehicle manufacturers were required to tighten the cylinder head bolts during the first maintenance of the vehicle. But now this need has disappeared and now it falls entirely on the shoulders of the drivers. If you are the owner of a VAZ 2108, then this procedure should be carried out from time to time. In what cases is it needed:
- If an oil stain appears in the place where the cylinder head connects to the block itself. This indicates a leakage of consumable fluid, which can be a consequence of both wear of the gasket itself and loosening of the pins.
- If you have done engine repairs. Sometimes even qualified specialists can make such mistakes. Therefore, the owner of a VAZ 2108 may find this information useful.
- For verification purposes. Experienced car enthusiasts recommend tightening the bolts at least every 2 thousand kilometers. In practice, there are cases when during the operation of the VAZ 2108 the pins loosen on their own.
Thus, if you notice a leak of engine fluid in the place where the head connects to the cylinder block, first of all you need to check the tightening torque of the pins.
Procedure and diagram
We advise you to tighten the torque of the screws if you have ever encountered such a process. The following will describe the general procedure for the Lada 2108, but it should be noted that each engine has its own operating nuances that need to be taken into account.
Necessary tools
You will need a torque wrench for this procedure. This tool is needed specifically for tightening screws and determining torque. It can be purchased at any specialized store, and its price fluctuates around 1,300 rubles (approximately 400 hryvnia).
Sometimes so-called “masters” say that it is not necessary to use a torque wrench for this procedure. They say that an ordinary wrench will work just fine, and in general, you can tighten the screws “by eye.” Naturally, it will be possible to tighten the screws, but it will be incorrect, and later this may cause other problems.
Stages
If you feel that the quality of the head screw is poor, then do not even try to tighten it. Replace it immediately to protect yourself from possible problems. In addition, before the actual procedure, you should check the quality of the thread. It is also advisable to lubricate it. Do not forget that reusing spring parts is unacceptable, since in this case you will not achieve normal tension.
The stages of tensioning the pins on the Lada 2108 are similar to those performed on classic car models. The diagram is provided below. The process itself should begin with the central bolts. It takes place in four steps.
- Using the above tool, all cylinder head bolts must first be tightened to a torque of 2.0 kgf*m. First, the two middle elements are tensioned, then the two lower and two upper ones, which are located on the sides of the middle bolts. Then you need to tighten the two leftmost and two rightmost screws, starting with the bottom ones. The order should be exactly like this. The numbers on the diagram indicate the order of the components.
- Then, in the same order, using the same tool, you need to tighten the components with a torque of 7.5 - 8.5 kgf*m.
- After this, all pins must be tightened 90 degrees.
- Then they should be turned again, again by 90 degrees.
Checking the alignment of the timing marks
If you do not match the crankshaft and camshaft marks, the engine will not operate correctly. Setting timing marks on a VAZ 07 injector is no different from the same procedure on carburetor engines. The mark on the crankshaft pulley should align with the mark on the front engine cover. And the point on the rim of the camshaft sprocket should be opposite the beacon on the bed.
Align the mark on the star with the protrusion
When you put on the sprocket, lock the camshaft so that it is stationary. Do not tighten the star nut all the way. Align the marks on the camshaft by turning the sprocket. The chain should remain in its original position, so throw the links until you reach the alignment of the mark and the ebb on the bed. Then use the wrench to move the crankshaft a quarter turn counterclockwise. Turn the crankshaft back so that the marks on it match. When the marks are aligned on both the crankshaft and the camshaft, tighten the nut on the camshaft sprocket with a torque wrench. Tightening torque – 5 kgf*m. Adjust the chain tension using the tensioner.
What bearings to put
When a wheel bearing requires replacement, the question immediately arises of which part to install. Many people advise using original components. However, today the quality of parts leaves much to be desired and the issue of choice remains quite relevant.
Table: type, installation location, and size of bearings
| Installation location | Bearing type | Size, mm | Quantity |
| Front wheel hub (outer support) | Roller, conical, single row | 19,5*45,3*15,5 | 2 |
| Front wheel hub (inner support) | Roller, conical, single row | 26*57,2*17,5 | 2 |
| Rear axle shaft | Ball, radial, single row | 30*72*19 | 2 |
Manufacturer's choice
When choosing a manufacturer of a wheel bearing for a VAZ “Seven”, we can recommend SKF, SNR, FAG, NTN, Koyo, INA, NSK. The companies listed have many locations around the world. These products are of high quality and meet the most stringent requirements.
Among the domestic manufacturers that supply bearings for cars of the Togliatti plant, we can highlight:
- CJSC "LADA Image" - manufactures and sells original Lada wheel bearings through secondary markets;
- Saratov plant - produces parts under the SPZ brand;
- Volzhsky Plant - uses the Volzhsky Standard brand;
- Vologda plant - sells products under the VBF brand;
- Samara plant SPZ-9.
Replacing the front wheel bearing
Work on replacing a wheel bearing begins with the preparation of tools and materials. You will need:
- set of socket wrenches;
- screwdriver;
- chisel;
- hammer;
- pliers;
- extension for knocking out the bearing race;
- new bearing, seal and lubricant;
- rags;
- kerosene.
How to remove
To dismantle the part, lift the front wheel using a jack. In a service station, work is carried out on a lift. When replacing a bearing, the following sequence of actions must be performed:
- Unscrew the fasteners and remove the wheel.
- Unscrew the fastening and dismantle the caliper.
To avoid damage to the brake hose after removing the caliper, the latter is carefully suspended and secured with wire.
How to put
After dismantling the wheel bearings and cleaning the hub itself, you can begin installing new parts. The work is performed in the following order:
Tightening on VAZ model 2107
Now it's time for the puff. After installing the head, tighten all the bolts by hand (that is, without a key). Continue until they stop giving in. During the process, make sure that the cylinder head does not move.
Next, tightening is carried out. The work is carried out according to the standard scheme: the two central bolts are tightened first, then those located to the left and right of them, and then the corner ones.
To ensure the correct tightening torque, you should use a special torque wrench. And even then, the procedure is performed in several stages:
- for the first time, bring the torque to 4 kgf m;
- on the next lap, increase it to 11.5.
Tighten the small (11th) bolt only to 3.8 kgf m.
After completing the installation of the cylinder head, reassemble the engine in the reverse order to that described. Try starting the engine. If everything works, then fill in the coolant.
Installing a new shaft
The new camshaft must be lubricated with engine oil before installation.
- Check the lever springs. If they are broken or bent, replace them.
- Screw the adjustment bolts into place.
- Install the springs, then attach the rocker to them.
- Now you can insert the camshaft with housing. Lubricate the levers, cams and journals of the camshaft with oil. Fit them on and tighten them with a torque wrench. The procedure is performed from the center to the edge. Tightening torque – 2 kgf*m.
The diagram for tightening the VAZ 2107 camshaft nuts is in the photo
Diagram of the camshaft nut tightening order
Dismantling the unit and preparing for repair
Carrying out work of this kind requires fairly high qualifications and special equipment. Removal of the cylinder head is carried out in the following sequence:
- The car is installed in a garage box, the battery is disconnected.
- The following elements are removed from the engine: air filter housing, carburetor and head cover.
- The upper timing sprocket is unscrewed from the camshaft and removed.
- Using a socket and a powerful wrench, the head mounting bolts are removed.
- After this, the assembly is carefully removed from the cylinder block.
- The gasket, or rather its remains, remains on the surface; they must be removed using a non-metallic tool to avoid damage.
VAZ 2107 engines use gaskets made of fire-resistant composition. After dismantling the head from the cylinder block during the repair process, it is necessary to transfer it to a workbench for inspection and repair. It is necessary to start with a thorough inspection and testing of all components to identify parts with significant deviations from the nominal values. All such parts will require replacement with spare parts.
The VAZ 2107 block head is installed on a wooden stand on the desktop. It plays the role of a fixing valve device during their disassembly. Defective parts are removed and replaced; all sealing gaskets are also subject to renewal. At this stage, preparation for repairs can be considered complete.
Why is the camshaft knocking?
The camshaft of a car consists of a number of elements, and the failure of most of them leads to a characteristic knocking sound when the car engine is running. If you hear camshaft knocking, you may have one of the following reasons:
- Camshaft problems. In this situation, self-healing is impossible. You will need to spend time sharpening or sharpening the camshaft frame or completely changing the part;
- Lubrication system malfunction. Even a slight deviation of the lubrication system from normal can lead to camshaft . On the other hand, the reason may be related not only to the small amount of incoming oil, but also to its quality. If, during the process of passing through the units, coolant or other impurities enter the oil, it begins to cope with the assigned tasks worse;
- Deformation of the camshaft or its mechanical damage (parts thereof). The most common problems include blown camshaft bearings and broken journals;
- The fuel supply process is disrupted;
- Camera resource has been developed.
This fault can be diagnosed if you are sure that the camshaft is knocking. If it continues to knock when the engine is running hot, the problem is worn knuckles. This describes just some of the problems that can lead to camshaft knock. The sooner a certain malfunction is detected by diagnostic equipment or visual inspection by specialists, the greater the chance of solving the problem before it begins to affect other elements of the device.
Lada 2107 2006, 74 l. With. — self-repair
Comments 2
Participate in the discussion can only registered users.
13.5 is normal, I think, otherwise antifreeze constantly leaks through the gasket if you tighten it loosely, either they started making such gaskets, or the bolts. Well, the main thing is not to overtighten, otherwise the cylinder walls will bulge a little inward, over time the hone will wear off and there will be a little oil starvation, Yes, and it’s harder for the piston to run in. Unless, of course, the block was sharpened with a false head.
Somewhere I came across the answer to this question. It seems on some nivoforum. They wrote there that the “old style” bolts with a 19mm wrench are tightened using the first method, and the 12mm bolts with the second method. I came to a conclusion similar to yours)
“>
Timing shaft diagnostics
In the removed state, you can easily assess what defects are on the shaft. Visually, you can detect damage such as scuffs and scratches, as well as wear on the cut on the cams and coating of the aluminum word on the necks.
Even if minor traces of deformation were noticed, the camshaft on the VAZ 2107 must be replaced.
We present a table that shows the permissible values of the dimensions of the shaft journals for its further use.
| Part number (report starts at the front) | Threshold of permissible size values, mm | |
| Minimum | Maximum | |
| Shakey | ||
| 1 | 45,91 | 45,93 |
| 2 | 45,61 | 45,63 |
| 3 | 45,31 | 45,33 |
| 4 | 45,01 | 45,03 |
| 5 | 43,41 | 43,43 |
| Supports | ||
| 1 | 46,00 | 46,02 |
| 2 | 45,70 | 45,72 |
| 3 | 45,40 | 45,42 |
| 4 | 45,10 | 45,12 |
| 5 | 43,50 | 43,52 |
If these values are not met, it is important to replace the “bed” or timing shaft.
Replacing the camshaft oil seal VAZ 2101-2107
Replacing the camshaft oil seal on a VAZ 2101-2107 is required in two cases - when the camshaft is removed and installed, or the oil seal wears out and begins to leak oil.
The fact that the oil seal is starting to poison can be determined by increased oil consumption (although there may be other reasons) and visually, by oil drips coming from the oil seal. Before you start replacing the oil seal, it is a good idea to stock up on a cylinder head gasket - it is not always preserved when the cover is removed.
In order to replace the camshaft oil seal on a VAZ 2101-2107, it is necessary to remove the pulley and, accordingly, the timing chain. To do this, you first need to remove the alternator belt. The generator is attached to the adjustment bar with a nut that needs to be loosened.
After this, move the generator and remove the belt from it. Now the belt will not interfere with the removal of the timing chain. In order to get to the camshaft pulley, you need to remove the cylinder head cover.
First of all, you need to disconnect the exhaust hose from the air filter housing. We unscrew the casing (it is not necessary to remove the air pipe, we just need to move the air filter casing to the side).
The carburetor fuel hose interferes with removing the cylinder block cover - you just need to remove it from the bracket and move it to the side. Now you can unscrew the nuts and remove the cover.
Next we need to remove the camshaft cover (it is attached to the engine with six bolts). There are marks on the camshaft pulley that correspond to marks on the engine. In order to avoid problems when installing the pulley, they need to be combined with each other.
Once this is done, you can remove the chain tensioner by unscrewing the two nuts. The chain is now loose and can be removed from the camshaft pulley. After this, using two screwdrivers, remove the camshaft pulley, take out the cotter pin and can get to the oil seal.
You just need to pry it out with a screwdriver and install a new one in the groove. When installing a new oil seal, it is best to lubricate it around the perimeter with engine oil.
After the oil seal is installed, we put the VAZ 2101-2107 camshaft pulley in place, the timing chain and fasten the tensioner. We close the mechanism with the lid, screw the cylinder head cover into place (if necessary, you need to install a new head gasket, having first cleaned off the remains of the old one).
We return the hoses to their place, install and fix the air filter housing and connect the gas exhaust hose. Now you can put on the generator belt and secure the generator.
In this case, it is worth installing it in such a way that the deflection of the belt in front of the generator is not more than one centimeter when pressed firmly.
In practice, such work will not take more than an hour, but its cost at a service station is quite high. Therefore, by doing the procedure yourself, you can save a lot.
The editors warn: in order to replace the camshaft on a classic without errors, you need to watch the video from start to finish with sound.
The author recommends pulling out the chain after tightening the engine head. This can be done either immediately or during the process. However, you should not delay this process.
He then tells you how to find the necessary marks to install the shaft. This is done in two ways - either on the cylinder or along the engine guide. The mechanic then demonstrates the bolts that need to be tightened. He calls on you to measure your strength so as not to break the fastening.
The next step is installing the sprocket. The author clearly indicates where the mark on it should point. After installation, it must be tightened so that it does not loosen. It is very good if the marks on the cylinder and sprocket match.
Next, the author moves on to adjusting the engine valves. This process is not shown in the video; the narrator invites viewers to his channel, where there is a detailed video instruction on this topic. Later, the video takes us to the moment when the valves are adjusted to the four mark. The process of connecting the ignition begins.
The author reports that you need to remove the toner cap and coat it with sealant. This measure will help avoid oil siphoning. The fuel supply hoses are then shown. The hose numbers correspond to the cylinders. They cannot be confused. This became the final chord of the video.
We hope that after watching the video of replacing the camshaft of VAZ 2105, 2106 and 2107, you will complete it without problems and teach others.
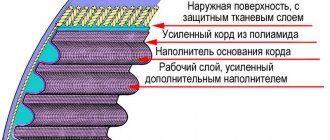
Replacing the timing belt on a VAZ 2104-05
Sources
- https://remont-vaz2106.ru/vaz-2105-zamena-raspredvala-i-rychagov-klapanov
- https://tuningvaz.in/zamena-salnika-raspredvala-2101-2107/
- https://image-auto.ru/remont_auto/258-zamena-raspredvala-vaz-2105-2106-2107.html
Signs of Camshaft Wear
The operation of the camshaft is associated with constant exposure to high loads, as a result of which the part gradually wears out and requires replacement. The need for repair arises when characteristic symptoms appear:
- knocking when the engine is running under load;
- reduction in power indicators.
There are a number of reasons why the RV fails:
- natural wear and tear;
- low-quality motor oil;
- low oil pressure in the lubrication system;
- insufficient oil level or so-called oil starvation;
- engine operation at high temperatures, which leads to deterioration of the lubricant properties;
- mechanical damage (wear or broken chain).
The main malfunctions that impair the performance of the camshaft are scuffing on the working surfaces (journals and cams) and deterioration of the limiter.
It is quite problematic to determine from the sounds coming from the engine compartment that the problem is related specifically to the camshaft, but it is still possible. The knocking sound of the engine resembles the dull blows of a hammer, which become more frequent as the engine speed increases. However, the best way to diagnose a shaft is to dismantle, disassemble and troubleshoot it. During inspection, the shaft should not move in the housing relative to the axis, otherwise a dull sound will be produced when hitting the limiter.
Video: reasons for the longitudinal play of the VAZ camshaft
Power reduction
The drop in power on classic Zhiguli cars is a phenomenon caused by wear of the camshaft and rockers. With proper engine operation (timely oil changes, monitoring its level and pressure), the problem only appears over long vehicle runs. When the cams wear out, the required phase width and valve lift at the intake are no longer ensured.
The RV can become deformed under extreme heat, which is caused by problems in the cooling and lubrication systems. At first, the problem may manifest itself as a knocking sound. Therefore, if there is a suspicion of this breakdown, for example, the motor has overheated, then it is recommended to diagnose the shaft in order to avoid more serious troubles with the engine timing belt.
How to choose quality parts
Buy a camshaft from a reliable and time-tested company, for example, PJSC Avtovaz. The packaging has a seal with a hologram. It shimmers in the light and features the company's logo. There is also a sticker with a barcode on the box. The item is packaged in blue translucent film. There is a stamp from the Quality Control department inside the package. Buy rockers together with adjusting bolts. There are new and old style levers. The holes in them differ in diameter and number of cuts. If you buy rockers and bolts separately, chances are they won't fit together.
READ How to install a lock on a bathroom door
How to tighten a hub nut without a torque wrench
Many car enthusiasts, when repairing their car, consider it not advisable to purchase torque wrenches or other specialized devices (pullers, etc.). There is a good way to tighten the fastener to the required torque without using a torque gauge. The following devices will be required: 1. Ratchet with a head for a lock nut; 2. Pipe for extending the ratchet to create the required “shoulder”; 3. Roulette; 4. Marker; 5. A weight that can be hung on the “shoulder” (for example, a 32 kg weight).
The essence of the method is to calculate the moment using the formula from elementary physics classes:
P is the applied force, N; l is the distance from the hub to the point of application of force - the “shoulder”, m. The ready-made formula for our case will be as follows:
P1 = (M2•100)/(M1•10) ( • 10 (or • 9.8) - translated into Newtons), where
P1 is the distance at which the sinker is attached to the “shoulder” relative to the torsion point, cm; M1—cargo mass, kg; M2—required torque, N•m.
Calculation example for a Ford Focus 2 car
P1 = (M2•100)/(M1•10) (•10 (or •9.8) = (45•100)/(32•10) = 4500/320 = 14 cm. Conclusion: to ensure a tightening torque of 45 N•m will require a sinker weighing 32 kg, located on the pipe at a distance of 14 cm.
- First screw on the locknut and tighten it slightly.
- We mark a distance of 14 cm, where the rod should hang;
- We hold the ratchet with one hand and hang the sinker with the other, thereby tightening the fastening;
- The operation continues until the fasteners stop tightening under weight, which means that we have achieved the required force. Accuracy +/- 5%.
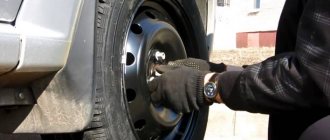
Rear wheel bearing
Structurally, the rear hub of the Lanos uses a pair of roller angular contact bearings. This type of bearing is very torque critical. An undertightened or overtightened bearing does not last long. The service manual indicates the following sequence for tightening the rear wheel bearing:
1) Tighten 20 Nm (2 kgf) 2) Release 180 degrees 3) Tighten 1 Nm (0.1 kgf)
The rear hub is easy to tighten without using a torque wrench - by hand. Tightening MUST be done with the wheel installed!
Mark a distance of 25 cm on the ratchet. At this distance we will apply force when tightening (see footnote). For this, you can use household spring scales, although with some experience you can not use scales. The main thing is not so much the exact tightening torque, but rather the fact that the bearing is tightened in such a way that the thermal gap is maintained
.
— Tighten the bearing by rocking the wheel with an approximate force of 8-10 kg. When turning the wheel, you should feel resistance to rotation. That. We are trying to install bearings. - Release it half a turn. -Tighten to 500 grams or slightly higher. We focus on the fact that the wheel rotates without effort
IMPORTANT!
When rocking the wheel, we should not feel any play. Next, we loosen the nut a little to align the hole for the cotter pin, while rocking the wheel. We must achieve very slight radial play. It should be felt when the wheel rocks, literally on the verge of play appearing. Although this is actually not a backlash, but the same thermal gap.
Rest
For other threaded connections, the tightening torques are as follows:
- M6 - 10 Nm;
- M8 - 25 Nm;
- M10 - 50 Nm;
- M12 - 105 Nm;
- M14 - 180 Nm.
Let us remind you that we previously published a collection of technological instructions for Lada Vesta. With it you can repair your car yourself.
Keywords: Lada Vesta engine| Lada Vesta clutch | gearbox Lada Vesta | front suspension of Lada Vesta | rear suspension of Lada Vesta | steering mechanism Lada Vesta | Lada Vesta brakes
5
Found an error? Select it and press Ctrl+Enter..
Coronavirus has an impact on AvtoVAZ, new details
What is the maximum speed of Lada Granta Lux
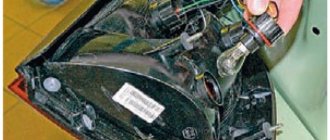
Replacing ignition coils and spark plugs on LADA cars
AvtoVAZ explained what to do if the symbols of the Lada Vesta instrument cluster flicker
Gearbox assembly
Assembly of the VAZ 2105 gearbox
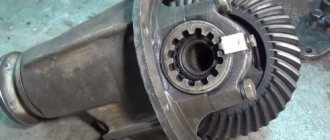
Rear axle gear parts
Reliable operation of the gearbox is ensured by strict adherence to the following assembly and adjustment procedures.
Differential assembly
Installing and adjusting the drive gear
Final drive gears
The correct position of the drive gear relative to the driven gear is ensured by selecting the thickness of the adjusting ring installed between the thrust end of the drive gear and the inner ring of the rear bearing.
Select the adjusting ring using mandrel A.70184 and fixture A.95690 with indicator.
Adjusting the drive Installing the differential box
Checking the preload of the differential box bearings using tool A.95688/R
Checking the lateral clearance in the meshing of the main gears using tool A.95688/R
Video about “Assembling the gearbox” for VAZ 2105
VAZ (2 parts). Rear axle gearbox repair - Part 1 How to replace the rear axle gearbox, replacement tips. Dismantling the steering gear assembly of VAZ.
Split Gear Function
Tightening torques for the main threaded connections of lawn next since 2014
A conventional gear mounted on the camshaft is designed to transmit torque from the crankshaft to the camshaft of the timing mechanism. The part is a single piece without any moving parts. A split gear consists of two components - they can move relative to each other. This design allows the camshaft angles to be changed without affecting the tension of the timing belt or drive chain.
For example, this part on VAZ engines can rotate the shaft 5° in one direction or the other. Here you need to understand that you can change the engine operating characteristics in this way only in specific modes - in the upper or lower ranges.
Very often, to increase power and other engine characteristics, the camshaft and its gear are changed. If you replace them, you can adjust the valve timing differently. It will also be possible to change the valve lag angles. If a split gear is installed on the engine instead of the factory one without replacing the camshaft, then only the overlap angles can be changed.
Basic functions of the camshaft
The camshaft opens and closes the valves, allowing the fuel mixture into and out of the cylinder. There are cams on the camshaft. These are the protrusions that transmit torque to the levers. One arm of the rocker (lever) receives torque from the camshaft, the other transmits it to the valves. Thus, the valves open.
When the cam rotates further, it ceases to act on the rocker, and the springs return the valve to its original position, that is, close. The camshaft is driven by the action of the crankshaft. They are connected by a timing chain or belt. If we draw an analogy with a bicycle, then the crankshaft is the pedals, the camshaft is the rear wheel, and the timing chain is the same on a two-wheeler. While the crankshaft makes two revolutions, the camshaft makes only one.
The engine must be cold when replacing the camshaft. You will need:
- New camshaft;
- Set of levers with bolts;
- Wrenches for 7, 8, 10, 13, 17 and 24;
- Small and large screwdriver;
- 3 spare lever springs;
- Rail;
- Valve cover gasket;
- Torque wrench
- Remove the air filter, separate the tip, cable and throttle linkage.
- If you have a carburetor engine, remove the fuel hose from the bracket; if you have an injection engine, disconnect the vacuum hose, air supply hose and remove the fuel filter from the bracket.
- Remove the cylinder block cover.
- Align the mark on the camshaft sprocket with the top dead center of the 4th cylinder. If you have a carburetor engine, you can turn the crankshaft with a special wrench. And if there is an injector, then you need to jack up the car, engage fourth gear and spin the rear wheel.
- Remove the gasket.
- Bend the camshaft sprocket washer with a chisel.
- Engage fourth gear to lock the crankshaft.
- Remove the tensioner.
- Unscrew the nut and remove the star. Tie the chain to the sprocket so that the links do not jump to other teeth.
- Unscrew the nuts and pull out the camshaft.
- Remove the rocker, bolts and springs.
How to understand that the camshaft needs to be changed?
You can determine a camshaft malfunction without opening the hood by two signs:
- knock;
- reduction in engine oil pressure.
The main reason for malfunctions in the camshaft is the appearance of gaps. They appear between the shaft bearing journals and the bed bearings on which the camshaft rests. The cracks are formed due to the fact that parts of the camshaft are worn away. Gaps cause the shaft to move in the vertical or horizontal axis. If the shaft play is 1 mm, then this affects the operation of the engine. Reasons for the appearance of gaps:
- the camshaft was not replaced in a timely manner;
- do not change the oil on time;
- use of low-quality oil;
- the driver drives at low speeds, so little oil enters the timing belt and parts wear out faster.
Wear of the rocker in the form of a scuff Ring scuff on the main journal of the camshaft The valve stem left a ring mark
The camshaft also needs to be changed if the oil channels in it are clogged. Before changing the part, look for any play, fracture, deformation or scuffing of the shaft.
Basic recommendations when tightening cylinder head bolts
To successfully tighten the cylinder head with your own hands, follow these recommendations:
- Use the vehicle manufacturer's instructions. It indicates the exact values of force and torque, and also specifies the specific procedure for installing the cylinder head during engine repair.
- Check the original condition of the bolts. If you notice a breakdown or distortion of the thread, then buy new samples.
- The surface of the hole and bolt threads must be absolutely clean. You can quickly clean the cylinders using a wire brush, which is used when painting stamped discs.
- If you find blind holes for the cylinder head bolts, carefully use oil for lubrication. If there is more lubricant than necessary, you will not be able to install the bolt completely.
- If TTY type bolts are used in the cylinder head block, it is strictly forbidden to re-tighten them. With maximum force, they can simply rupture and lead to the destruction of the gasket.
- When installing a new gasket under a bolt, it is necessary to clarify the information on the magnitude of the force and torque when tightening.
- Using special TTY type bolts when tightening, it will be necessary to align and tighten them to a precise degree. To do this, you will need an appropriate tool that has an angle indicator in its body.
A tool with an angle indicator in its body
Causes and types of malfunctions
During its operation, the timing shaft is constantly exposed to high temperatures and high dynamic loads. Therefore, it inevitably loses its properties and fails. When this happens, the driver begins to feel that the engine is losing power, and under load, a slight knocking noise occurs in the engine. If this happens, it's time to open the cylinder head.
So what could happen?
- The cams or journals are worn out. Any part that rotates during its operation will naturally begin to wear out over time. The wear process can be accelerated by low oil pressure or poor quality, as well as manufacturing defects of the part itself. Worn cams cannot lift the intake valve properly, resulting in less fuel entering the cylinder than needed.
- Camshaft deformation. Severe overheating of the engine, which occurs when the lubrication is not working well or when there are problems in the cooling system, leads to this type of breakdown. The malfunction can be identified by a characteristic knocking sound. It is prohibited to operate the car in this case - otherwise you can easily damage the operation of the entire gas distribution mechanism.
- Shaft fracture. Sometimes it happens that the camshaft simply breaks, which may be a consequence of desynchronization in the timing system. The engine stops working, the valves become bent, the guides are damaged, and the piston group mechanisms are destroyed.