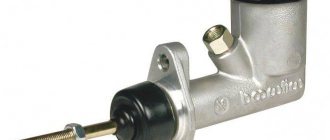
Purpose and operation of the VAZ 2106 clutch slave cylinder
In short, the working cylinder in the VAZ 2106 clutch system performs the function of an ordinary converter. It translates the driver's foot force into high brake fluid pressure in the vehicle's hydraulics.
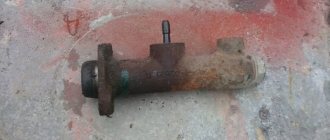
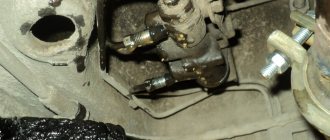
The clutch slave cylinder for the “six” can be purchased at any spare parts store
However, the clutch slave cylinder should not be confused with the main one, because these devices are located in different places on the machine. The main cylinder is located in the passenger compartment, and the working cylinder is attached to the clutch housing with two bolts. Getting to the working cylinder is easy: just open the car hood.
The clutch slave cylinder is located on the crankcase cover
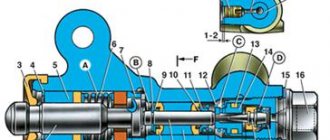
Working cylinder device
The clutch slave cylinder consists of the following elements:
- cast body;
- hydraulic piston;
- pusher rod;
- working spring;
- a pair of ring-shaped sealing cuffs;
- washer and retaining ring;
- air valves;
- protective cap. The clutch slave cylinder has a simple design
Operating principle
The operation of the cylinder begins the moment the car owner presses the clutch pedal connected to the push rod:
- The rod moves and presses on the piston located in the main clutch cylinder. This cylinder constantly contains brake fluid.
- Under the influence of the piston, the fluid pressure increases; it rushes sharply through the hose system to the clutch working cylinder and begins to put pressure on its rod.
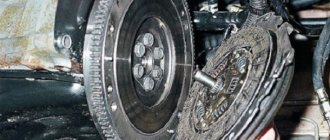
- The rod quickly extends from the cast cylinder body and presses on a special fork, which moves sharply and puts pressure on the release bearing.
- After this, the clutch discs disengage, resulting in a complete disconnection of the transmission from the engine. At this moment the driver has the opportunity to engage the required gear.
- When the driver takes his foot off the pedal, everything happens in reverse. The pressure in all cylinders drops sharply, and the return spring pulls the working cylinder rod back into the cast housing.
- The fork is released and goes down.
- With nothing else in the way of the clutch discs, they engage again, connecting the transmission to the engine. The car then moves further in the new gear.
The slave cylinder presses on the fork and disengages the clutch
Signs of breakdown
Every owner of a VAZ 2106 should know several important signs that indicate that something is wrong with the clutch cylinder:
- the clutch pedal began to be pressed unusually easily;
- the pedal began to fail (this can occur either from time to time or constantly);
- the brake fluid level in the reservoir has dropped significantly;
- noticeable leaks of brake fluid appeared on the bottom of the car in the area where the gearbox is located; If fluid leaks appear on the clutch slave cylinder, then it’s time to repair the cylinder
- It has become more difficult to change gears, and moving the gear lever is accompanied by a strong grinding noise in the box.
Fortunately, the clutch cylinder is easy to repair. It is quite rare to change the working cylinder on sixes, and repair kits for them can be found in almost any auto parts store.
Work on top of the car
So, a start has been made, the goal is to remove the gearbox to replace the clutch. On VAZ 2106 and similar cars this is done quite quickly, it is only important to follow a certain sequence:
- Inside the car, remove the gear shift knob. It is attached using plastic latches. Sometimes difficulties arise with dismantling, and it gets to the point where the latches break off. The price of a new set of fastenings is no more than one hundred rubles, and you can purchase it even after repairs have been carried out. Therefore, do not be afraid if you suddenly break the plastic antennae.
- Go to the engine compartment, unscrew the four nuts that secure the exhaust pipe to the manifold. The fact is that the exhaust pipe will interfere with the removal of the box, but it is enough to move it a little to the side.
- Disconnect the battery and remove it from the car.
- Unscrew the two top bolts of the starter, disconnect the power wires for the windings and the solenoid relay from it.
- Disconnect the ground wire that goes to the gearbox.
How to remove the clutch slave cylinder
Before you begin repairing the clutch cylinder, it will have to be removed from the vehicle. Here's what you need for this:
- pliers;
- set of spanners;
- set of socket heads;
- empty container for brake fluid;
- rags.
Sequence of operations
It is most convenient to remove the clutch cylinder in the inspection hole. As an option, an overpass is also suitable. If the driver has neither one nor the other, it will not be possible to remove the cylinder. The work is performed in the following order:
- The cylinder return spring is removed by hand. No tools are needed to remove the cylinder return spring.
- There is a small cotter pin at the end of the pusher. It is carefully grabbed with pliers and pulled out. It is convenient to remove the cylinder cotter pin with small pliers
- Now you should loosen the locknut on the slave cylinder hose. This is done using a 17 mm open-end wrench. The locknut on the cylinder hose is loosened with a regular 17 mm open-end wrench.
- The cylinder itself is attached to the crankcase with two 14 mm bolts. They are unscrewed with a socket head. The cylinder fasteners are unscrewed with a 14 mm socket head with a long knob
- To remove the cylinder, you need to hold the hose end by the nut using a 17 mm wrench. With the second hand, the cylinder rotates and is disconnected from the hose.
Video: removing the clutch cylinder on a “classic”
Monitoring the brake fluid
One of the main signs of failure of the clutch slave cylinder in VAZ 2106, 2101, 2107 cars is partial or complete failure of the pedal inside the car when pressed. This indicates a lack of tightness in the system - gradually the amount of brake fluid decreases, and the harder and more often you press the pedal, the more fluid will leave at a time.
This will cause the clutch to stop working and changing gears will be difficult or impossible. If you do not monitor the level of brake fluid in the reservoir and do not eliminate leaks in a timely manner, then consequences may arise - the clutch basket and release bearing will fail, not to mention the creation of emergency situations.
How to repair a clutch slave cylinder
Before describing the cylinder repair process, a few words should be said about repair kits. The vast majority of problems in six cylinders are related to leaks. And this happens due to wear of the cylinder sealing cuffs. Cuffs can be purchased individually or as a set.
The set includes three cuffs and one protective cap
Experienced car owners prefer the second option. They take the kit, disassemble the cylinder and change all the seals in it, regardless of their degree of wear. This simple measure significantly increases the service life of the wheel cylinder and ensures that there are no brake fluid leaks for a long time. The repair kit for the “six” clutch slave cylinder consists of a protective cap and three sealing collars. Its catalog number is 2101–16–025–16, and it costs about 100 rubles.
For repairs you will need the following tools:
- pliers;
- open-end wrench 8 mm;
- rags;
- flat screwdriver;
- vice.
Repair sequence
It will be extremely difficult to perform all the operations listed below without a normal bench vice . If they are, then you need to do the following:
- The clutch cylinder, removed from the car, is clamped in a vice so that the air valve is on the outside.
- Using an 8 mm open-end wrench, the air valve is unscrewed and inspected for wear and mechanical damage. If the valve shows even minor scratches or abrasions, it should be replaced.
- After unscrewing the valve, the vice is loosened, the cylinder is installed vertically and again clamped with the vice. The protective cap must be on the outside. This cap is carefully pryed from below with a flat screwdriver and pulled off the stem.
- Now you can remove the pusher itself, since nothing else holds it. To remove the pusher, the cylinder will have to be clamped vertically in a vice
- After removing the pusher, the cylinder is again clamped horizontally in a vice. The piston located in the cylinder is carefully pushed out of it using the same screwdriver.
- Now the locking ring is removed from the piston, under which there is a return spring with a washer (you need to remove the locking ring very carefully, as it often jumps off and flies away). Following the ring, the washer is removed, and then the return spring. The retaining ring must be removed very carefully
- There are only two cuffs left on the piston: front and rear. They are pryed in turn with a thin flat screwdriver and removed from the piston (some drivers prefer to use a thin awl to pry up the cuffs). To remove the cuffs from the cylinder piston, you should pry them with an awl or screwdriver
- The surface of the piston, freed from the cuffs, is carefully inspected for scratches, cracks and other mechanical damage. If dents, burrs, cracks or other defects are found, the piston will have to be replaced. The same rule applies to the inner surface of the cylinder body: if defects are found there, the best option would be to buy a new cylinder, since such damage cannot be repaired.
- In place of the removed cuffs, new ones from the repair kit are installed. After this, the cylinder is reassembled with the installation of a new protective cap from the same repair kit.
Video: we independently disassemble the “classic” clutch cylinder
Selection of GVC for VAZ 2107
The best option for replacement is to purchase a GCS designed specifically for classic VAZ models. Clutch master cylinders from UAZ, GAZ and AZLK vehicles are not suitable. The same applies to foreign analogues - foreign cars with rear-wheel drive are equipped with GVCs, which only highly qualified specialists can adapt to the VAZ 2107 (different sizes, different threads for pipelines, different pipe configurations). However, you can easily replace the original cylinder with a GCS from a VAZ 2121 and from a Niva-Chevrolet.
Manufacturer's choice
When purchasing a new GVC, you should focus on products from trusted Russian manufacturers (AvtoVAZ JSC, Brik LLC, Kedr LLC), the Belarusian company Fenox, which is adapted to our conditions and is affordable. The average cost of GVC is 600–800 rubles.
Table: comparative characteristics of GVCs from different manufacturers
| Manufacturer, country | Trademark | Cost, rub. | Reviews |
| Russia, Tolyatti | AvtoVAZ | 625 | Original GVCs are made with high quality and are more expensive than analogues |
| Belarus | Fenox | 510 | Original GVCs are inexpensive, made with high quality, and are popular among drivers |
| Russia, Miass | Brick Basalt | 490 | Improved design: the absence of a technological plug at the end of the cylinder and the presence of an anti-vacuum cuff increases the reliability of the product |
| Germany | AND THOSE | 1740 | The originals are of the highest quality. The price is tied to the EURO exchange rate |
| Germany | HORT | 1680 | Original GCS are reliable and durable in operation. The price is tied to the EURO exchange rate |
| Russia, Miass | Cedar | 540 | The original GVCs do not cause any particular complaints |
Recently, there have been many counterfeits of well-known brands on the market. They can be distinguished by their low-quality workmanship and low price relative to their original analogues.
Bleeding the clutch of a VAZ 2106 with the help of a partner
Replacing the cylinder or any other manipulations with the clutch inevitably leads to depressurization of the hydraulic drive and air getting into the clutch hoses. To normalize clutch operation, this air will have to be removed by bleeding . Here's what's required:
- 0.5 liters of new brake fluid;
- a piece of rubber hose 30 cm long;
- open-end wrench 8 mm;
- empty brake fluid container.
Sequence of work
For normal pumping you will have to use the help of a partner. It is simply impossible to do everything alone.
- When the clutch slave cylinder is repaired and installed in its original place, brake fluid is added to the reservoir. Its level should reach the upper mark located near the neck of the tank. The fluid in the clutch reservoir must be added to the mark next to the neck
- The clutch cylinder has an air valve with a fitting. One end of the hose is put on the fitting. The second is lowered into an empty container (a regular plastic bottle is best suited for these purposes). The second end of the hose attached to the fitting is lowered into a plastic bottle
- After this, your partner must press the clutch pedal six times. After the sixth press, he should keep the pedal completely recessed into the floor.
- Unscrew the air valve fitting two or three turns using an 8 mm open-end wrench. After unscrewing, a characteristic hiss will be heard and bubbling brake fluid will begin to flow into the container. You need to wait until the bubbles stop appearing and tighten the fitting.
- Now again we ask the partner to press the clutch pedal six times, unscrew the fitting again and bleed the air again. The procedure is repeated until the liquid flowing from the fitting stops bubbling. If this happens, the pumping can be considered completed. All that remains is to add fresh brake fluid to the reservoir.
Bleeding the system
Draining fluid from the clutch drive system is very simple:
- Using a blower, pump out the liquid from the expansion tank.
- Unscrew the fitting on the working cylinder and wait until all the fluid is gone.
- Press the clutch pedal several times to remove any remaining brake fluid.
- Change tubes if necessary.
- Tighten the fitting.
- Fill the reservoir with fresh brake fluid.
- Place a transparent tube onto the fitting.
- Have an assistant press the clutch pedal several times. With the last press, you need to hold it in the extreme position.
- Unscrew the fitting half a turn, allowing fluid and air to escape.
- Repeat the procedure until liquid begins to flow without air bubbles. Don't forget to monitor the level in the expansion tank.
In fact, two or three passes are enough to get rid of air in the system. As you understand, pumping the clutch on a VAZ 2106 is not difficult. The procedure is very similar to bleeding the brakes, only it is much faster - the line is very short.
After replacing the clutch, it will need to be adjusted. Pay attention to the working cylinder rod - it has a thread along which you can move the nut. It is by moving it that the clutch is adjusted on VAZ 2106 cars and the rest of the classic series. It is also possible to adjust the free play of the clutch pedal; for this purpose, a special bolt is provided directly above it.
How to adjust the clutch rod on a VAZ 2106
After bleeding the working cylinder, it is necessary to adjust the clutch rod. To do this you will need:
- set of open-end wrenches;
- medium-sized caliper;
- pliers.
Adjustment sequence
Before you begin making adjustments, you should look at the machine's operating instructions . It is there that you can clarify all the necessary tolerances for the clutch rod and pedal.
- First, the clutch pedal play (also known as free play) is measured. The most convenient way to measure it is with a caliper. Normally it is 1–2 mm.
- If the free play exceeds two millimeters, then use a 10 mm open-end wrench to unscrew the nut located on the free play limiter. After this, you can turn the limiter itself and set the required free play of the pedal. Using the limit pin, the free play of the clutch pedal is adjusted
- Once the stop pin is installed properly, its nut is screwed into place.
- Now you need to measure the full amplitude of the pedal. It should be in the range from 24 to 34 mm. If the amplitude does not fall within these limits, the rod should be readjusted and then the measurements repeated.
Video: how to adjust the clutch drive
VAZ cars: repair, maintenance, tuning
Failures in the clutch operation of the classic VAZ 2107 - VAZ 2101 must be eliminated immediately. The clutch hydraulic drive system is not too complicated, maintenance work does not take much time, so removing, disassembling and repairing the VAZ clutch master cylinder will not be difficult even for novice drivers. Let’s find out how to deal with problems in the VAZ clutch right now.
Checking and replacing the hose on the clutch cylinder
The hose on the clutch slave cylinder is an extremely critical part that is exposed to high brake fluid pressure. Therefore, the car owner must monitor its condition especially carefully.
The clutch cylinder hose is a very important part, the condition of which must be carefully monitored
Here are signs that indicate that the hose should be changed urgently:
- cracks and other mechanical damage visible to the naked eye have appeared on the hose;
- the hose looks intact, but there are visible leaks of brake fluid on it (this means that it is still damaged and microcracks have appeared on it, which the driver simply cannot see);
- The threads on the hose ends are partially or completely stripped.
If you notice any of the above, the hose should be replaced immediately. It is better to install standard VAZ clutch hoses, their catalog number is 2101–16–025–90, and the cost is about 80 rubles.
Hose replacement sequence
Before starting work, you should stock up on an empty plastic bottle and two open-end wrenches: 17 and 14 mm.
- The car is driven into the pit and secured with wheel chocks. Open the hood and find the place where the slave cylinder hose is screwed to the clutch hydraulic tube.
- The main hose nut is held firmly with a 17 mm wrench, and the fitting on the hydraulic tube is unscrewed with a second wrench - 14 mm. After unscrewing the fitting, brake fluid will flow out of it. Therefore, there should be a container in the inspection hole to collect it (a small basin would be the best option).
- The second end of the hose is unscrewed from the working cylinder body using the same 17 mm wrench. There is a thin O-ring in the cylinder under the hose nut, which is very often lost when removing the hose . This ring should also be changed (as a rule, new seals come with new clutch hoses).
- A new hose is installed in place of the old one, after which a new portion of brake fluid is added to the hydraulic system.
So, even a novice driver can change the working cylinder on a six. All you need to do for this is to carefully prepare the necessary tools and strictly follow the above recommendations.
The clutch mechanism of a vehicle is one of the most important automotive units, which ensures the immediate function of the propulsion mechanism - translational movement along and against the direction of travel of the vehicle. Without interaction with this mechanical-hydraulic unit, using the car is not possible.
Product location
The master cylinder on a VAZ 2107 is located under the hood, directly on the wall separating the interior from the hood, near the driver’s feet. Directly above it is the expansion tank, and next to it are the vacuum booster and the brake master cylinder. Usually, simply looking at the product is enough to determine the problem. The presence of a leak indicates that the part is faulty and requires repair or replacement.
Purpose of the device
Cars are equipped with clutch master and slave cylinders, without which the operation of the mechanism is impossible. The VAZ 2107 clutch master cylinder is designed to push out brake fluid. Below is a diagram from which you can visually find out the operating features of the unit.
When you press the clutch pedal, the piston moves in the device in question, thereby pushing out the brake fluid. This liquid enters the working cylinder through a tube, where the reverse process is observed (the liquid pushes out the piston). Brake fluid drives a piston, which is connected by a fork to the clutch disc. As a result, the clutch disc and flywheel are separated, allowing you to change gear. The GCS is also called the main one, since it is with its help that force is supplied from the pedal when it is pressed.
The need to replace the device: when required
Like all parts of any car, the GVC tends to wear out, resulting in the need for repair or replacement. The simplest breakdown of a product is wear of the boot, which can be determined by the characteristic signs of a fluid leak.
To identify a cylinder malfunction, an initial visual inspection is required. It is possible to repair a failed main circulation system on a VAZ 2107; for this you can look for repair kits, but this is not always rational due to the quality of modern spare parts, so it is easier and faster to replace it entirely. The malfunction can also be determined by the characteristic loss of pressure in the system, which is determined by pressing the pedal. Let’s take a closer look at how to change a faulty VAZ 2107 mechanism.
Clutch master cylinder
According to its principle of operation, the clutch master cylinder of the VAZ 2106, like its counterparts on other brands, is mounted in the upper position, and acting on it with the corresponding foot pedal entails an increase in pressure in the hydraulic system. As a result, the clutch slave cylinder is activated, and the required vehicle mechanisms are connected.
Signs indicating defects in the six clutch master cylinder:
- incomplete disengagement of the clutch mechanism with the engine (“drives”);
- the presence of leaks from various elements of the system, incl. from under fasteners, rubber products and pipelines;
- “wedge” of the clutch master cylinder when the brake pedal is in a recessed position.
The necessary replacement of the clutch cylinder is carried out in the following order:
- We free the hydraulic drive reservoir from liquid using a special bulb.
- We disconnect the hose and the fitting of the product, having first unscrewed the clamping clamp.
- We dismantle the tube fitting using a wrench set to “13”.
- We dismantle the 2 elements fastening the product to the studs for fastening the foot pedal, using the anchor head at “13”.
- We dismantle the product itself.
- Installation is carried out in reverse order.
- We fill the clutch reservoir with a special fluid and, using pumping, give the hydraulic drive a working condition.
Disassembling the clutch master cylinder for repair work is carried out in the following sequence:
Some tips when repairing the master cylinder
Tip #1. Do not drain all the working fluid from the hydraulic drive when removing the main fluid pump. It's not obligatory.
Tip #2. Try to avoid the following cylinder cleaning fluids:
- kerosene;
- diesel fuel;
- petrol;
- mineral oil.
To prevent damage to parts, use only brake fluid.
Tip #3. Lubricate the working parts of the working cylinder before assembly.
Tip #4. The piston in contact with the pusher must be treated using a special grease.
Tip #5. After installing the main circulation pump, do not forget about bleeding the hydraulic drive.
Good luck on your journey. Neither a nail nor a rod, dear motorists!