"LADA Kalina" are popular domestic cars in sedan and hatchback bodies, which were produced by AvtoVAZ OJSC from 2004 to 2013. Then the second generation models were launched into production - LADA Kalina 2 (hatchback and station wagon body styles). Changing the oil on Kalina is a mandatory procedure carried out during routine maintenance and largely determines the reliability and durability of the vehicle.
The rules for the maintenance of cars of the Kalina family (first and second generations) require periodic replacement of used motor oil, in common parlance “working out”, in power units and stipulate that it should be carried out no later than through:
- 3000 km (first replacement);
- every 15,000 km traveled or once a year thereafter.
Getting ready for replacement
Changing the oil in the Lada Kalina engine can be carried out not only during scheduled maintenance, but also when it is discovered that its volume in the engine crankcase has decreased significantly. Control is carried out using a special probe.
The volume is considered sufficient when the oil mark on the dipstick is located between the MIN and MAX marks. If it is located below the MIN mark, then the engine oil needs to be added, and if the MAX mark is higher, then drain off the excess. In both cases, it is necessary to identify the reasons that led to such a picture and eliminate them.
Recommendations for selection
The choice of oil for Kalina is considered the most important stage of replacement, since the procedure for changing the fluid itself does not cause big problems even for beginners. The work takes 1 – 2 hours.
Therefore, try to choose the mixture that you are going to pour into the engine of your Lada Kalina as correctly as possible.
All oils available on the market are divided into 2 categories:
- all-season;
- seasonal (summer and winter).
Most car owners prefer universal all-season vehicles, but in harsh winter climates this is not always a wise choice.
The best solution would be to use seasonal oils. If more viscous compounds are suitable for summer, then in winter it is recommended to use low-viscosity liquids. Based on what the temperature is in your region.
As the maximum cold start temperature of the power unit increases, oils with the following viscosity classes are used for Kalina:
Among them, 20W40 is used in the temperature range from -15 to +45 degrees Celsius, and 0W30 is suitable for severe winters when the temperature drops below -35 degrees and does not rise above +25 degrees Celsius.
In terms of manufacturers, the following brands and their motor oils performed well:
- Luxe Hit;
- Teboil Gold;
- Lukoil Lux;
- GT Turbo SM;
- TNK Super;
- Esso Ultra;
- Mobil 1, Synt S and Super S;
- Extras 1, 5 and 7;
- Liqui Moly Optimal;
- ZIC A Plus.
These are motor oils recommended by experts and Kalina car owners that optimally meet the engine requirements.
Oil consumption rates are up to 1 liter for every 1000 kilometers according to the car manufacturer’s tolerances. The amount of oil consumed is influenced by a number of factors, including the quality and viscosity of the motor fluid used.
The level of engine oil consumption will reach maximum levels during aggressive and active driving, as well as at high speeds. Plus, the piston rings, pistons themselves and cylinder walls will additionally wear out.
Try to drive slowly and do not overload the engine unless absolutely necessary. Otherwise, you will have to change consumables much more often than indicated in the instruction manual.
Another pressing issue is how much oil is in the Lada Kalina engine. The amount of lubricant purchased directly depends on this. Taking into account washing, it will require 2–3 times more.
The amount of oil on the Lada Kalina engine with a volume of 1.6 liters and 8 valves is 3 liters. Be guided by the marks on the dipstick, since the actual amount of lubricant to be filled is somewhat different from what is indicated in the motor specifications.
After pouring the required amount of oil into the engine, check the level with a dipstick. The oil film should be exactly between the minimum and maximum o and “Max”).
The Lada Kalina will consume working fluid as it is used, so be sure to periodically check the level and add the missing amount. If the time for replacing the lubricant is approaching, it will need to be drained as completely as possible in order to refill with fresh composition. Some of it will still remain in the system.
What kind of oil to pour
Recommendations of AvtoVAZ OJSC regarding types of motor oils are given in the operating manual for the LADA Kalina car and include more than 18 products from various manufacturers. All of them are certified in the Russian Federation and have the appropriate viscosity grade (SAE classification).
Among owners of LADA Kalina family models, the most popular are semi-synthetic oils produced by Shell, Mobil and Lukoil.
Markings
Let's look at oil manufacturers, as well as markings that can help you find out whether Lada Kalina supports a particular oil.
- Lukoil Lux. SAE class – QW-40, 10W-40, 5W30; group – SL/CF
- Luxe Hit/Best. SAE class – 10W-40; group – SL/CF
- Novile Super. SAE class – 5W-30, 20W-50, 15W-30; SJ/CF
- Rosneft Maximum/Premium. SAE class – 5W-40, 10W-40, 5W-40; SL/CF
- Tatneft Synthetic/Ultra. OW-40, 5W-30, 5W-40; SM/CF, SL/CF
- Esso Ultra. 10W-40, SJ/SL/CF
- Mobil 1.OW-40, 5W-50, 10W-40; SJ/SM/SL/CF
- Shell. 5W-40, 10W-40; SL/CF
- ZIC A. 5W-30, 10W-30; SL
As you can see, Lada Kalina owners have a wide selection of oils with different classes and standards. Based on these standards, a car enthusiast can safely fill in any oil from the specified list.
Engine oil volume
The amount of engine oil to be filled is almost the same for all engines of the Lada Kalina car. Its volume is 3.5 liters. An exception is the VAZ 21126 power unit, in which the amount of lubricant filled depends on which gearbox (gearbox) it is equipped with:
- Manual transmission – 3.2 liters;
- AMT robotic gearbox - 4.4 liters.
In addition, you need to take into account that when replacing the oil filter, about 300 ml of engine oil is poured into it, so the total amount will be less than that indicated above.
Tools and materials
To change the oil, you will need to prepare a standard set of tools and materials.
This list includes:
- hexagon size 12;
- rags;
- funnel for pouring fresh oil;
- empty container for draining waste;
- socket or socket wrench 17;
- oil filter puller;
- personal protective equipment to avoid getting burned by hot oil;
- new filter;
- fresh engine lubricant.
Step-by-step instruction
Having installed your car on the inspection pit/overpass/lift, begin step-by-step operations to replace the mining, during which you must:
- raise the hood of the car;
- open the oil filler neck;
- clean the oil pan from dirt;
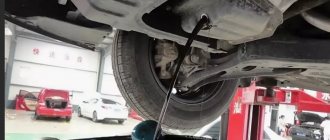
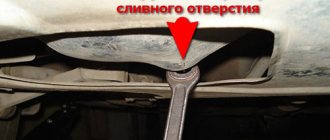
- place an empty container under the drain hole of the oil pan;
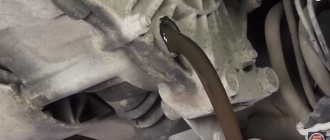
- Using a 17mm wrench, carefully unscrew the drain plug;
Important: you need to be careful when draining waste. Contact with skin may cause burns.
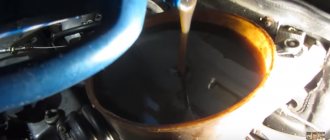
- after all the waste has drained, which takes about 10 minutes, screw the drain plug into place. Pre-clean it from dirt and waste residues;
- Using a special puller, unscrew the oil filter, not forgetting to replace the container with the drained oil;
Tip: If you don't have an oil filter remover, use a large screwdriver. To remove the filter, use a screwdriver to pierce its housing. Then, using a screwdriver as a wrench, unscrew the filter.
- Using a clean rag, thoroughly wipe the filter seat from dirt and waste residues;
- carefully pour motor lubricant into the new filter (about 300 ml) and lubricate the rubber sealing gasket with it;
- Carefully install the oil filter, tightening it by hand. After the rubber sealing gasket comes into contact with the cylinder block, turn the filter another 3/4 turn;
- insert a funnel into the oil filler neck and pour new motor oil into the engine (somewhere around 3.2 liters). At the same time, do not forget to control the level of auto-lubrication in the crankcase of the power unit using a dipstick. A level is considered normal when the mark is in the middle between the MIN and MAX marks. If the mark is located above the MAX mark, then drain the excess auto-lubricant by unscrewing the drain plug;
- Pour a sufficient amount of engine oil into the engine, tighten the filler neck with a plug, having previously cleaned it of dirt and traces of carbon deposits.
- This completes the oil change process. Before starting the engine for the first time, it is recommended to check for signs of leakage on or under the engine.
If no leaks are detected, then the power unit can be started. The first time they run it for 1-2 minutes. During this time, the red emergency oil pressure warning lamp located on the instrument panel should go out. If the warning light goes out within a few seconds, then the work has been done efficiently and you can drive out onto the road.
2302-3-2-07-a-02 (Copy)
Attention! Be careful - the oil is hot and harsh on the skin.
Drain the oil until it begins to drip from the drain hole. After wiping the plug and removing any remaining dirt from its thread, we wrap the plug in place. We remove oil leaks from the engine oil pan. We place the waste oil container in the area where the oil filter is located and unscrew it, rotating it counterclockwise. If this cannot be done manually, use a puller. To avoid damaging the sensor wiring harness and the crankshaft position sensor itself.
Preparing to change the filter
In order to quickly replace the filter, it is important to have all the necessary components available, as well as select a place that should be as level as possible and preheat the engine. It is important to buy components from an official source so that they are of appropriate quality. To replace the filter, you need a pit or a lift; when such devices are not available, a jack may also be suitable. Warm up the engine in order to drain residues from the system. Here it is worth especially noting safety precautions, which, if neglected, may cause health problems. It is not at all difficult to get a thermal or chemical burn, so it is important to approach this matter using special protective equipment. These include gloves and special clothing.
How often does the filter need to be changed?
This period is considered fixed and depends on the distance the car travels. The optimal range is 15,000 kilometers. Although there are experts who claim that other characteristics of the vehicle’s operation also affect the replacement. Thus, a more urgent need for an oil change may arise if long trips were made on poor-quality road surfaces. It can be affected by changes in vehicle consumables, sudden changes in temperature conditions and an aggressive environment. If such circumstances exist, the period during which the Kalina oil filter is changed can be equal to 10,000 kilometers.
About the types of transmission oils for Kalina
Traditionally, AvtoVAZ recommends products for use. Lubricant produced by the same company is poured into the gearbox of new VAZ cars; it acts as a break-in and flushing lubricant until the first maintenance; after replacing it, you can select a product from another company.
Brand and volume of oil for LADA KALINA gearbox
The manufacturer specifies that the new oil must be synthetic or semi-synthetic and meet viscosity grade SAE 75W-90. This is an all-season liquid that works at ambient temperatures from -40 °C to +35 °C. 75W-80 and 80W-85 oils are also suitable. 80W-90 liquids can be used in regions where winter temperatures do not drop below -10...-12 °C.
In addition to viscosity, the oil must comply with API GL-4 class. This includes transmission fluids that are designed to operate in medium-loaded gears: hypoid, bevel and spiral-bevel, operating at oil temperatures up to +150 °C and contact pressure up to 3000 MPa.
Let's consider which oils are most popular in the LADA KALINA gearbox.
- LUKOIL TM-4 (GL-4) 75W-90. This is a semi-synthetic transmission fluid used in manual transmissions, differentials and transfer cases of cars and trucks. It is made from highly purified mineral base oil, synthetic components and a multifunctional additive package. The oil has high anti-corrosion, anti-foam, anti-wear and viscosity-temperature properties. It reliably protects transmission elements under high loads, ensures smooth operation of the gearbox at low temperatures and has high oxidative and thermal stability.
- SHELL SPIRAX S4 G 75W-90. Semi-synthetic gear oil API GL-4 for manual gearboxes of cars and small trucks. Used in VAG cars as a first fill fluid. The oil does not destroy synchronizers, ensures smooth operation of the gearbox, and protects transmission elements from shock loads, corrosion and wear. It has an extended service life and improves the performance of the gearbox.
- ZIC GF TOP 75W-90. Synthetic transmission oil for manual transmissions and drive axles. Compatible with synchronized boxes. In Hyuindai and Kia cars it is used as a first fill fluid. Belongs to material class GL-4/5. Meets the requirements of 75W-85 GL-4 oils. The fluid ensures reliable lubrication of all transmission elements at high speeds and heavy loads, cleans the gearbox and axles, increases the service replacement interval, reduces wear, protects against corrosion and has excellent thermal-oxidative characteristics.
- Castrol Syntrax Universal 75W-90. Synthetic multi-purpose gear oil for gearboxes and manual transmissions. Suitable for use in synchronized manual transmissions of cars and trucks, as well as final drives and differentials of trucks and construction equipment. The fluid has excellent fluidity at low temperatures and effectively protects against wear under high loads. It has an extended service life and is compatible with conventional mineral oils and sealing materials.
- LIQUI MOLY Hochleistungs-Getriebeoil GL4+ (GL 4/GL 5) 75W-90. Synthetic transmission oil for manual transmissions and drive axles. It is compatible with synchronizers and is resistant to aging. Thanks to a special additive package, the fluid reliably protects transmission elements. The oil prevents wear and corrosion, works well under high loads and maintains its characteristics at high temperatures. Can be used in gearboxes that require GL-4 oils and manual transmissions that are combined with a hypoid transmission.
DIY car repair and maintenance
Step-by-step plan for replacing the CV joint (grenade) So, the grenade (both internal and external) on front-wheel drive models of domestic cars (God forgive me) starting from the VAZ 2108 and ending with at least 2115 is the same (well, maybe different manufacturers and different final service life). The same principle applies to Priora, Kalina and Grant.
Greetings, dear visitors! I want to devote this article to replacing the external grenade. If you follow the sometimes unclear terminology (which I don’t always like) - replacing the constant velocity joint, i.e. CV joint. I try to write my articles in everyday language, in which people ask for information.
The photo above shows a damaged Lada 2114, already repaired. The front right side, which we are repairing, was collected in a heap by a frontal impact along with the entire front end (look at the gaps between the parts after the repair, in my opinion, the repair was done perfectly). Looking under the front right wheel I noticed that the drive was bent.
If you don't loosen it while the wheel is on the ground, it will be very difficult to unscrew it later. After which, I jacked up the car completely and removed the wheel and unscrewed the grenade nut. There is a washer under the nut (don't lose it, as the new CV joint doesn't come with one).
Next, you need to unscrew the ball. This can be done by unscrewing two 13mm bolts, or you can unscrew the bottom nut of the pin by 17mm and knock it down by pressing it down with a pry bar, while simultaneously tapping it with a hammer (not on the pin or ball), which is what I actually did. Additionally, release the brake caliper hose.
By moving the hub to the side (having previously pushed the grenade inward with the mounting tool and pulling the hub towards us), we release the outer grenade, which we would simply replace without pulling out the entire drive along with the inner CV joint,
...if it weren't for the drive that was bent into a ram's horn. And you see the fate of the outer grenade in the photo - it crumbled.
So, let's replace the drive too. The photo below shows a CV joint from an Italian manufacturer called TRIALLI (Trialli) for 900 rubles. Quite a cheap product of very good quality.
And the photo below illustrates the components of the CV joint:
- The grenade itself.
- Two clamps.
- Protective cover (boot).
- Retaining ring.
- A tube of special lubricant (calculated for the entire service life of the hinge, if the case remains intact all this time). There is another cheap but excellent CV joint - 4 for lubricating a grenade for 50 rubles in any auto store
- Hinge nut.
Since we were changing the drive, we had to knock off the support washer from it and replace it with the new drive, which should fit clearly into the lower groove (photo below). In theory, they should be installed on the new drive anyway. After that, put on the boot and lower it into its seat.
And install the retaining ring. If it is too stretched, first squeeze it and place it in the upper groove. The easiest way to do this is with cone-shaped pliers, inserting them inside the ring and stretching the ring to fit it into the groove. And then, using a special wrench or simple pliers, tighten the lower clamp, but do not tear it off.
Next, you need to inspect the inside of the hinge for any flaws or debris. Then fill it with lubricant. Insert the neck of the tube into the separator, press it firmly and press the lubricant until it comes out through all the cracks. Usually almost the entire tube fits there.
Replacing the oil filter without changing the oil. Clean maintenance »
Replacing the oil filter without changing the oil.
Clean maintenance Also, a fairly common special case can be considered the impossibility of getting the filter element itself at the time of oil change (for example, the order is late, and the car model is original or one for which not every filter is suitable), but to risk the engine and install something of unknown origin, analog no one wants it.
There are often options for installing a filter that turned out to be initially defective. Factory defects, by the way, are a fairly common occurrence for oil filters and their seals made in Russia or China. In addition, there are stories among car enthusiasts that an intermediate filter change (without an oil change) extends the life of the lubricant itself and the engine compartment. Whether to believe in them or not is a separate question that we will not consider here.
The essence remains the same: how to carry out the planned procedure yourself, without resorting to the services of a car service, because some cunning auto mechanics will charge as much for the work as for a full range of services.
Replacing the oil filter without changing the oil
Many people have doubts related to the fear of the entire volume of lubricant leaking out during the manipulations performed. But you should not be afraid of such troubles. If you do everything wisely, then the oil will not go anywhere from the engine, it is only important to know how?
If you think a little logically, there should not be large oil losses when installing a new filter. The lubricant flows under the influence of gravity into the oil sump, which is located below the installation site of the filter barrier. Thus, the leak will only be to the extent that the oil remains in the filter itself - and this is approximately a glass, or even less. People who do not want to lose even that much are advised to completely drain the oil and, after installing the element, return it back to the system.
This advice does not inspire confidence in us: no matter how careful you are, dust and small debris will still get into the oil. And cheap savings over time can result in repairs that will cost many times more. And the changing process itself is not too different from the standard one, unless, of course, you exclude the moment of expressing fluid.
- The work is carried out on a cold engine, otherwise there is a high chance of scalding your hands with hot oil. If you have driven a car before, you should wait about half an hour before replacing it;
Place any small container under the filter, which will prevent leaking oil from staining everything in the area;
The plug on the valve cover remains intact: when unscrewed, more lubricant will escape;
The oil filter is unscrewed. If the oil is still warm, everything remaining in the filter may rush out at once and splash the surrounding area;
On the new element, the rubber seal is coated with the same oil that is in the engine;
The filter is screwed into place;
; if it falls below the average position between min and max, you need to add oil to normal;
Source
Where should you start replacing?
You should start by opening the part of the engine that is located below. Next, take a container under the used oil and apply it directly to the open part of the engine. It is important to wait until the oil is completely drained. Next, you need to disconnect the harness block from the sensor, or rather from its connector. After that, using a special tool, the casing is disconnected, from which an element is taken out that has already served its purpose. It is important to inspect the perforated tube as it will continue to function until the next routine replacement of this consumable. At this stage, it is important to inspect and carefully check all connecting units and components, so if necessary, you need to replace gaskets and other elements if they are worn out.
Replacement of front brake pads LADA "Kalina"
Brake pads, like car tires, wear out as you drive and require periodic replacement. The peculiarity of the car’s braking system is that the load during braking is unevenly distributed on the front and rear axles. The front wheels, and, accordingly, the brake pads, experience greater loads than the rear ones. This means that they also have to be changed much more often. The front brake pads on Kalina are replaced two to three times more often than the rear ones. To do this, you can contact specialists or do the work yourself. In the latter case, you must have a set of standard tools and new front brake pads. The procedure for replacing front pads on a Kalina equipped with and without ABS is the same.
How often should you change the front pads of LADA “Kalina”
- retaining brackets and springs;
- brake hoses;
- cuffs, seals and boots of brake cylinders;
- brake discs; adjusting rods;
- brake pad mounting parts.
With use, these elements wear out, faults accumulate in them and cause uneven or accelerated wear of the brake pads. The service life of the pads is shortened by the chemicals that are sprinkled on the streets in winter to prevent the formation of ice. Therefore, even the designer of the Kalina will not be able to name the exact mileage after which the pads will need to be replaced. The need for replacement is determined by another criterion - the thickness of the friction linings. If they are thinner than one and a half millimeters, the pads must be replaced.
Fuel filters Kalina
The fuel filter is responsible for cleaning the fuel before it enters the combustion chamber of the car. The viburnum has two fuel filters, one for coarse fuel purification and the second for fine purification.
Fuel pump mesh
The mesh installed on the fuel pump is called a coarse fuel filter; popularly it is also called a “diaper”. This part largely protects the fuel pump from large particles of debris that end up in the fuel tank with gasoline. Sometimes the mesh becomes dirty, which leads to problems with the car.
It is necessary to change the fuel pump mesh every 50,000 km, but it often happens that the mesh becomes dirty much faster due to the low quality of automobile fuel in our country.
Replacing the fuel pump mesh Kalina
Fuel filter
This filter is located under the bottom of the car near the rear beam, and is secured with a clamp. Its purpose is to clean the fuel from particles of debris that have passed through the mesh of the fuel pump. After the fuel filter, gasoline directly enters the combustion chamber through the nozzles, that is, after the filter, gasoline should come out more frequently without any debris.
You have to change the fine fuel filter a little more often than the fuel pump mesh, namely every 30,000 km, but many car owners advise replacing it before every winter, so as not to have problems with starting the car in cold weather.
Replacing the fuel filter Kalina
Symptoms of clogged Kalina fuel filters
There are several symptoms that clearly indicate that one of the fuel filters is dirty and requires urgent replacement.
Symptoms:
- Loss of engine power (the car does not gain its former speed, the dynamics have worsened);
- Difficulty starting the engine after idle time;
- The car starts and immediately stalls;
- You have to turn the starter for a long time to start the internal combustion engine;
How to check?
You can check the frequency of the fuel system by measuring the fuel pressure in the fuel rail; if the filter is clogged, the pressure will be much lower than the required values (3.8-4.0 kgf/cm). It should also be remembered that low fuel pressure in the system can be caused by an old faulty fuel pump, a broken RTD and injectors leaking fuel.
Signs of the need to change the oil on Lada Kalina
There are also reasons for changing the oil that are not related to regulations. The nature of these symptoms varies and most often leads to an oil change:
- spontaneous engine shutdown;
- difficult starting;
- active lamp on the instrument panel;
- blue smoke from the exhaust pipe;
- increasing the operating temperature of the power plant;
- Increased noise during operation, vibration appears.
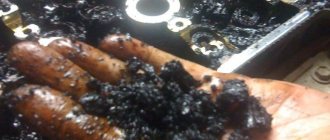
Before you start replacing the lubricant, you should check the dipstick. Checking the oil level is done after the machine has been idle for a long time, preferably in the morning. The liquid must not be cold. The car must be on a level surface.
Then you need to lower the dipstick into the neck - the level should be above the Min mark. Next, you need to drop the oil onto the paper and let it spread. Too dark color and dirt indicate the need for replacement.
Air filters
These filters are used in Kalina to clean the air entering the cabin and engine. Both filters are made of paper and do not last very long; their service life depends on where the car is used. If the car is used on gravel or country roads, the service life of these filters is sharply reduced.
Engine air filter
This filter is installed in the engine compartment in a special box and serves to clean the air necessary for the operation of the internal combustion engine, which is subsequently mixed with fuel to form a fuel mixture.
The filter must be replaced every 30,000 km, but if the car is used on dirt roads, it is best to replace this part with a new one a little earlier at 20,000 km.
Symptoms of a clogged engine air filter
When the air filter in a car becomes clogged, the following symptoms appear:
- Engine power is lost;
- Engine starting deteriorates;
- The car engine stalls spontaneously;
- No idle;
If such symptoms appear on your car, you need to check the air filter for frequency; if it is very clogged, and you don’t have a new filter at hand, you can pop it and put it in place. This will be enough to complete the train and buy a new filter.
Replacing the Kalina air filter
- Unscrew the 4 bolts securing the air filter box cover and remove it;
- Install a new filter and close the lid;
Cabin filter
It is installed in front of the stove fan and serves to protect it from debris, as well as to clean the air from harmful gases and various odors. The cabin filter also helps protect air ducts from contamination.
Symptoms of a clogged cabin filter:
- The flow from the air ducts becomes noticeably weaker;
- The stove or air conditioner loses its effectiveness;
- An unpleasant odor appears from the air ducts;
If such malfunctions are detected in your car, you need to clean or replace the cabin filter.