Lada Granta MAGMA › Logbook › Installing rubber steering rod plugs.
The other day I installed a very useful gadget on my swallow.
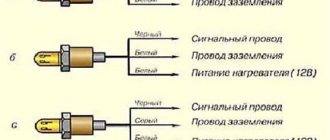
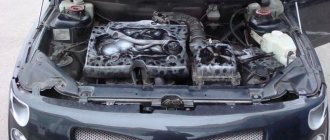
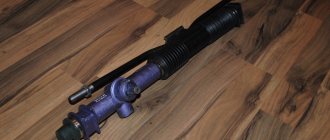
Rubber dirt-proof plugs for steering linkage openings from Kalina. They seem to be popularly called “ears.” I bought it at the local auto parts market. To install, you must remove the tie rod ends. True, people mostly cut them, so as not to bother with pressing out the tips, and attach them with self-tapping screws through special ears directly to the body. I absolutely do not want to make holes in my body with self-tapping screws to avoid further corrosion in these places. Moreover, the place is very susceptible to moisture and dirt. And cut “ears” without fastening them with self-tapping screws will fall off very quickly. In short, the other day I decided to install them correctly. I jacked it up, removed the wheel, squeezed and pulled out the cotter pin, and unscrewed the steering pin nut with a 19mm wrench. Next, I pressed out the finger using a steering puller. The puller must be inserted very carefully under the boot, the main thing is not to tear it. Also, you should not press it too hard, otherwise some of the lubricant will come out of it. We begin to squeeze the puller until the finger pops out of the cone. If, when the puller nut is tightened as much as possible, the finger does not want to come out of the seat, you need to make a pointed blow with a hammer on the puller from below. Measure the force of the blow; you cannot hit it hard with a heavy hammer. Suspension components may be damaged. A light blow is enough and the finger will pop out. If this does not happen, again tighten the puller nut as much as possible, thereby increasing the tension, and again make a gentle, targeted blow. Repeat all of the above until the steering tip pin pops out of its seat. This is all described for a specific type of puller that I had on hand (as in the photo). For other types, the principle of operation may differ.
Next, a “surprise” awaited me. These same “ears” come in two types: 1. The kind I bought - from ordinary viburnum. Unfortunately, I don’t know the original numbers. Shown in the first photo. The fundamental difference is that the traction slot is located close to the edge of the elastic. With our grant, without modifications, only the standard equipment will be installed. For standard and luxury, look for the second type. Well, or as a last resort, if you don’t find it, then I will describe how they need to be modified with a “file” so that they fit properly and do not fly out of the seat.
2. The kind you should have bought - most likely from Viburnum - sport. I don't know the numbers either. Shown in the second photo. The fundamental difference is that the slot for traction is located closer to the center.
The point is, the Norms and Luxes are equipped with a standard suspension from Kalina-Sport. The front castor has been changed and a new steering rack with fewer revolutions has been installed. Thanks to all this, the steering rods are located in the openings almost in the middle, whereas in a regular Kalina and in the Grant Standard configuration they are located close to the edge of the opening. And if you install “ears” number 1 on Granta Norma or Lux, they will simply fly off or instantly tear.
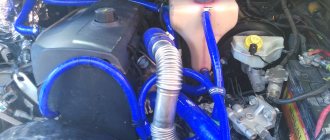
In order not to rush around looking for “ears” number 2, I modified the rubber bands I bought and installed them temporarily as is. In the photo I marked where it is necessary to trim and by how much.
Next, I installed them in the openings and assembled everything in reverse order. They sat very tightly. After trimming there is no excess tension on the rubber. I've been using them for two weeks now and they haven't fallen out or torn yet and they look good. The photo shows their current condition.
For now I’ll travel with them, but when I come across ears with a middle slot, I’ll buy and install them without hesitation. Still, after trimming, small gaps remained in the engine compartment. And dirt still flies through them in small quantities. So consider the type of plugs specifically for your car, and buy the right ones.
I hope someone will find useful information. So far I’ve discovered that there are these plugs that fit the norm perfectly, and I’ve scoured dozens of pages on various forums.
Steering rod Lada Granta
Replacing the Lada Granta steering rod
Replacement of the steering rod on a Lada Granta car is carried out in the event of its failure, when play in the ball pin increases, as well as to replace the rubber protective boot or when carrying out other work in which the presence of traction will interfere. Prepare a standard set of tools, a ball pin remover and perform the following sequence of actions:
· Remove the battery by disconnecting the terminals.
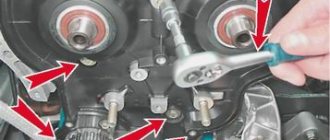
· Use pliers to remove the locking pin and, having unscrewed the pin nut, use a puller to disconnect it from the rotating arm of the telescopic stand.
· Use a flat-head screwdriver to pry up the locking plate of the tie rod bolt heads.
· Remove the locking plate and loosen both bolts.
· Unscrew the bolt securing the linkage and remove it from the engine compartment through the wheel niche.
· Carry out the necessary repairs, then install in the reverse order.
About installing plugs for Lada Granta steering rod openings
The very location of the holes for the tie rods and the logic of air exchange in the engine compartment actually allow us to hope that air will escape through them. And dirt, accordingly, will not fly inside through them.
However, everything is ruined by the size of the openings. It's huge. Even if dirt doesn’t hit the engine compartment like a fire hose, something certainly gets there.
To eradicate these holes, plugs for steering rod openings 2110 were purchased at a cost of 65 rubles. The quality of the material is quite consistent with the price. Coal dust lightly bonded with rubber. It tears like paper. But the workmanship is quite up to par, oddly enough.
There is, however, some redundancy of design ideas. Curly cutouts, complex edge profiles, bosses for self-tapping screws - I remember on Moskvich - 2141 everything was much simpler. There was a frame and two simple sheets of rubber were nailed to it, fastened together with ordinary pistons (like palms folded together, between which the rod itself passed).
You need to start installation from the right side. It’s simpler, clearer, and there’s an opportunity to warm up the muscles that have shrunk over the winter in front of the heavy left side. We remove the wheel. I cut the plug at the bottom so that it became open and the steering rod could pass through it. The cunning figured profile of its edge must be placed on the edge of the opening in the body. It is not simple. But it is possible. I still have some extra rubber that I have nowhere to put on - I cut it off with scissors. This is slightly visible in the lower right corner of the photo. Then I picked up my sea green BDF 451 RFE, some screws with a drill end and... here it is:
Please note that the edge profile of the plug is interlocking. A correctly and firmly seated plug will not fall out even without self-tapping screws. I think so. For those for whom an extra hole in their own car is like an extra hole in their own body, this is important. In general, the part into which we screw the screws is strong and quite thick. It won't rot for a long time.
Which tie rods to choose
When choosing spare parts, you should decide whether to install factory or analog parts. Often, parts installed from the factory last much longer than those we install as replacements. However, sometimes even original parts last less than expected.
- Left steering tip 11180-3414057-00 (VAZINTERSERVIS /OAT/) price from 450 rub.
- Right steering wheel end 11180-3414056-00 (VAZINTERSERVIS /OAT/) price from 450 rub.
Good quality and very popular tips from TRACK
- Left tip TR70-107 price from 400 rub.
- Right handpiece TR70-108 price from 400 rub.
If it is not possible to purchase original factory tips, you can choose analogues:
- HOFER HF 812002 price from 700 RUR set of 2 pieces
- BELMAG BM1118-3414056/57 price from 800 RUR set
You can also immediately purchase tips from the company TRACK TRST-110 in a set of 2 pieces, price from 850 rubles per set
Grantanswer #2
Many Lada Granta car owners sooner or later have various questions about the car. Experienced owners have fewer such questions, while beginners have more. Our “Grant Answer” section has been prepared just to answer your questions.
If you have questions that you would like answered, you can ask them in the comments.
What is the fuel consumption on a Grant with an automatic transmission, with a quiet ride?
A clear answer to this question cannot be given, since the driving style and the conditions in which the car moves differ greatly from driver to driver and from city to city. The manufacturer, represented by AvtoVAZ, regulates consumption at 7.6 liters per 100 km in the combined cycle, which is approximately one liter higher than that of its manual counterparts. However, owners of a Lada Granta with an automatic transmission confirm the consumption is about 1.5-2 liters more in the city, relative to a manual, and about 0.5 liters more on the highway. If you are interested in a more detailed answer regarding fuel consumption, read our article: Fuel consumption on the Lada Granta.
When cold the car starts and immediately stalls, on the second try everything is fine. What is the problem?
A recurring feature of Lada Granta cars. Official representatives of the plant do not give a clear answer to this question, citing the possible uniqueness of each problem and advise visiting a car service center for diagnostics. Most often, diagnostics show the serviceability of all systems, and the result of this feature is not very high-quality gasoline. As a rule, changing the fuel or gas station helps solve the problem. Otherwise, a more thorough diagnosis will be required. In any case, this issue should be approached individually and there is no general solution to the issue at the moment.
Is it worth installing steering rod plugs?
My personal experience in operating cars from the Volzhsky plant says that installing rubber plugs, which are sold in car dealerships or car markets, is a little more than useless. The whole reason is that the material for these same plugs is extremely unstable, as a result of which after just a couple of weeks or a month the protective petals come off and you again have a gaping hole. The most effective method of protecting tie rod openings is to use canvas and other homemade rag plugs. In many cities, such devices are sold at car markets or in small auto shops, and they will often offer to install them there. This type of protection will be the most durable and effective. However, again based on my experience, I want to say that no plugs will help protect against dirt and make the engine compartment clean. In any case, after some time there will be dust and dirt under the hood again. The most effective way to keep the engine compartment clean is to clean it regularly. It is enough to simply wipe all the units with a damp cloth several times a year and wash them in a car wash once every year or two.
Red silicone dirt-proof plugs for the steering rod opening for Lada Granta, Kalina, Kalina 2
CHOOSE SECURE PAYMENTS After payment you will receive an electronic cash receipt
Tube for modifying the seals of the sliding windows of Lada Granta, Kalina, Kalina 2
with 19% discount
Silent bolts for door locks Lada Kalina, Kalina 2, Granta
with 19% discount
USB charger 2 slots for Lada Priora, Granta, Kalina 2
with 11% discount
Set of seals for lockers and fender liners for Lada Granta, Kalina 2, datsun
with 11% discount
Rubber battery mat
with 19% discount
Hood seal Lada Granta, Kalina 2
with 10% discount
Tune-Auto protective cover for the rear bumper of Lada Kalina, Kalina 2 station wagon
with 9% discount
Set of universal fan nozzles on a nut
with 19% discount
Pay for goods by credit card, using QIWI, Yandex.Money or WebMoney and save on your purchase from 4%, avoiding postal and bank commissions
This product was chosen by 99 customers
The plugs are designed for installation in steering linkage openings to protect the engine and engine compartment of the vehicle from dust, winter salt and dirt entering through these openings. Silicone plugs do not harden in the cold.
Weight, kg: 0.5 Dimensions, cm: 24 x 19 x 5 Volume, m3: 0.00228
Product delivery options
Note! Below are the shipping methods available specifically for this product. Payment options may vary depending on the shipping method. Detailed information can be found on the “Delivery and Payment” page.
Parcel by Russian Post
Available payment methods:
- Cash on delivery (payment upon receipt)
- Using cards Sberbank, VTB, Post Bank, Tinkoff
- Yandex money
- QIWI
- ROBOKASSA
Shipping throughout Russia. Delivery time is from 5 to 12 days.
Parcel by Russian Post 1st class
Available payment methods:
- Cash on delivery (payment upon receipt)
- Using cards Sberbank, VTB, Post Bank, Tinkoff
- Yandex money
- QIWI
- ROBOKASSA
Shipping throughout Russia. Delivery time is from 2 to 5 days. More expensive than regular delivery by Russian Post, approximately 50%. Parcel weight up to 2.5 kg
Express Parcel EMS
Available payment methods:
- Cash on delivery (payment upon receipt)
- Using cards Sberbank, VTB, Post Bank, Tinkoff
- Yandex money
- QIWI
- ROBOKASSA
Shipping throughout Russia. Delivery time is from 3 to 7 days. More expensive than regular delivery by Russian Post, approximately 100%.
Transport companies
Available payment methods:
- Using cards Sberbank, VTB, Post Bank, Tinkoff
- Yandex money
- QIWI
- ROBOKASSA
Delivery is possible to any locality where there is a representative office of the transport company. Delivery time is from 2 to 10 days. Sending large parcels is approximately 50% more profitable than by Russian Post.
Courier delivery in Togliatti
Available payment methods:
- Cash upon receipt
- Using cards Sberbank, VTB, Post Bank, Tinkoff
- Yandex money
- QIWI
- ROBOKASSA
Delivery time from 1 to 12 hours.
Pickup from our warehouse
Available payment methods:
- Cash upon receipt
- Credit, installments
- Using cards Sberbank, VTB, Post Bank, Tinkoff
- Yandex money
- QIWI
- ROBOKASSA
Pickup times must coincide with store opening hours.
A car is a very complex and multi-component mechanism, some of the parts or places of which can become a kind of “Achilles heel” if they are not known about and protected. If we talk about examples, then these could be the places of the steering rod opening that need protection, along with other models, on cars such as Lada Priora and VAZ 2110, 2111, 2112. Let us explain why you can purchase dirt-proof plugs for the steering rod opening and should even be considered mandatory.
Since we live in a country with very changeable weather conditions, our car is under constant stress due to this and is subject to negative influences. We mean that all the dirt from the roads (no matter off-road or highway) can get into the engine compartment. By installing plugs, you minimize this possibility.
They are located in a very thoughtful place - the inner surface of the front wheel arches. Protection is ensured by the fact that the plugs are made of very durable rubber and are available in a wide range of colors and sizes, which ensures a perfect seal. Installation is a matter of minutes, if not seconds.
Reviews
Delivery of goods is carried out throughout Russia and the CIS:
1. Russian Post (from 350 rubles and above)
Delivery to all regions of the Russian Federation and CIS countries
2. Transport Companies (from 400 rubles and above)
Delivery throughout Russia and the Republic of Kazakhstan
- TK Energy (nrg-tk.ru)
- TC Business Lines (dellin.ru)
- TC SDEK (www.cdek.ru)
- TK PEK (pecom.ru)
- TK KIT (tk-kit.ru)
3. Pickup
The order can be picked up at the office at Tolyatti, 40 Let Pobedy 38, TD “Malachite”, 1st floor.
Payment can be made in the following ways:
1. Payment to a Sberbank card
You can pay using the SBERBANK-Online application and other Bank applications.
After placing an order, making payment, do not indicate comments , we ourselves will understand by the amount of the order and the name of the sender. After receiving the funds, the status of your order will be changed to paid until 17.00 of the current day, or from 9.00 of the next Moscow time.
2. By bank card
Automatic acceptance of payments using MIR Bank cards, VISA International, Mastercard.
You can also pay with credit cards with a grace period.
To select payment for goods using a bank card, on the corresponding page you must click the “Pay for order by bank card” button.
2. QIWI wallet 89272115207
3. Cash on delivery of Russian Post (commission from 4%)
IMPORTANT! When sending by cash on delivery, RUSSIAN POST will take a commission for providing the cash on delivery service of 150-300 rubles, and the delivery cost also increases due to the evaluation of the goods.
Cash on delivery delivery is possible only within Russia.
ATTENTION! When choosing cash on delivery, the delivery cost is paid in advance before dispatch, for the product itself upon receipt.
The amount of the order by cash on delivery should not exceed 5000 rubles. Also, painted parts, goods made to order, covers, upholstery, door inserts, EVA mats, steering wheels, etc. are not sent by cash on delivery. (minimum 50% prepayment).
Be sure to save the payment receipt or a screenshot of the transfer.
The best guarantee of order fulfillment and quality is the feedback from our customers.
Reviews about our work can be read in our VKontakte group https://vk.com/topic-136384247_36675422?offset=180
- home
- About Us
- Catalog
- Shipping and payment
- Reviews
- News and Promotions
- Personal Area
Disassembling the steering mechanism
We disassemble the steering mechanism when repairing it. Remove the steering mechanism (see “Removing the steering mechanism”). Remove the steering gear boot (see “Replacing the steering gear boot”).
Remove the steering rod support. We insert the bit into the groove of the crankcase pipe mounting nut.
We unscrew the nut, striking the beard (right-hand thread)…
...and remove the crankcase pipe.
Use a screwdriver to press out the two clamps of the bushing located inside the pipe...
...and remove the bushing.
Remove the two rubber rings from the bushing (arrows indicate the bushing clamps).
If it is necessary to replace the nut, use pliers to remove the locking rings... ...and remove the locking ring... Remove the pipe securing nut.
Remove the rubber plug from the rack stop adjusting nut. Using a scraper, remove the jammed metal in the locking areas of the stop adjusting nut.
Using a special 24mm wrench with an external octagonal head, unscrew the stop nut.
We take out the stop spring. Using a screwdriver...
...remove the O-ring.
By hitting the crankcase against a wooden block, we knock out the rack stop. Using a screwdriver...
...remove the liner from the stop. A rubber ring is installed in the groove of the stop.
Remove the rubber ring from the crankcase that seals the hole for the steering mechanism on the front panel.
Remove the boot from the gear shaft. Use a 6mm hexagon to unscrew the two screws (shown by arrows)…
...and remove the crankcase cover.
Remove the separator with the thrust bearing rollers.
Remove the sealing ring of the cover.
We remove the rack from the crankcase.
We press out the gear shaft by holding the shaft in a vice with soft metal jaw linings and pressing the crankcase upward with the mounting blade.
We remove the gear shaft with bearing from the crankcase. We pry it off with a screwdriver...
...and remove the bushing retaining ring.
We take out the gear shaft bushing assembled with the support plate.
If it is necessary to replace the needle bearing, use a drill with a diameter of 4 mm to drill two diametrically located holes in the crankcase so that they extend to the end of the outer ring of the needle bearing. Through the drilled holes, using a rod of the appropriate diameter, we knock out the outer ring of the bearing from the crankcase.
Using a puller, we press the ball bearing of the gear shaft with the inner ring of the roller thrust bearing.
Use a puller to press the inner ring of the needle bearing off the shaft.
Using a screwdriver, pry and remove the gear shaft oil seal from the crankcase cover. If the outer race of the roller thrust bearing needs to be replaced...
... use a scraper to remove the extruded metal in four places and take out the ring. We generously lubricate the bearings, rack and gear teeth, and the plastic rack bushing with Fiol-1 lubricant. We assemble the steering mechanism in the reverse order. We press the outer ring of the needle bearing into the crankcase using a mandrel of suitable diameter. To seal holes in the crankcase, you can use “fast steel” or “cold welding”. We press the gear shaft with the ball bearing into the crankcase using a piece of pipe of a suitable diameter or a high head, applying force to the outer ring of the bearing. You can press the gear shaft into the crankcase, resting the outer ring of the bearing on the jaws of a vice. Then we put the crankcase on the bearing...
...and press the crankcase with light blows of a hammer through a wooden block.
We press the gear shaft seal into the cover through a mandrel or head flush with the end of the cover. We insert the rack into the steering gear housing. We install the pipe.
After tightening the pipe fastening nut, tighten the nut.
Scheme for monitoring the gap in the engagement of the rack and pinion shaft:
1 – dial indicator; 2 – indicator mounting bracket; 3 – nut; 4 – sealing ring; 5 – steering gear housing; 6 – needle bearing; 7 – gear shaft; 8 – bushing; 9 – crankcase cover; 10 – rack; 11 – liner; 12 – rack stop; 13 – indicator leg; 14 – spring
We rotate the gear shaft so that the flat on it is located on the right side. We move the rack so that the steering rod support mounted on the rack is located in the middle of the pipe groove. We insert the rack stop, the stop spring and tighten the stop nut. It is recommended to replace the stop nut with a new one. We adjust the gap in the engagement of the gear with the rack. To do this, set the rail in the middle position and block it from moving. Insert the leg of the dial indicator into the hole of the adjusting nut of the stop until the tip of the leg touches the stop of the rack. The diameter of the tip of the indicator leg must be at least 3.5 mm...
...so that the leg rests against the end surface 1 of the stop, and does not fall into its hole 2 (for clarity, shown on the dismantled stop). We apply a torque of 15 N m (1.5 kgf m) to the gear shaft, while the gear pushes the rack and stop. Based on the indicator readings, we determine the amount of movement of the stop, which corresponds to the actual value of the gap in the engagement. If it exceeds 0.05 mm, tighten the adjusting nut, achieving the specified amount of movement of the stop. After this, having unlocked the rack, we check the ease of rotation of the drive gear throughout the entire range of travel of the rack.
Article rating:
How to install steering rod plugs on a Lada GrantaLink to main publication
Related publications
- How to remove the front heater radiator UAZ Bukhanka
A little theory: front suspension design
Before attempting to fix any problem, there is a tendency to look at the blueprints or repair manual. It is known that the VAZ-2192 parts catalog contains the following object:
This is what the steering rack looks like in the drawing
Whether the knock will remain in the steering rack of Kalina-2 depends on the following: how accurately element “14” is adjusted. The adjusting nut, marked “14”, looks almost invisible here. But first impressions are deceiving. In the catalog, by the way, the element is called “Stop Nut”.
It is important to know that the thrust nut has external threads. And it spins clockwise. And the words “tighten the rack” mean screwing in the specified nut, and nothing more.
Now let's move on to practice and see what the node in question looks like in reality: