It is more convenient to remove the rear axle from a VAZ 2108, VAZ 2109, VAZ 21099 on a lift. If it is not possible to place the car on a lift, carefully raise the rear of the car by placing a jack under the beam. Then install supports under the jack sockets on the car body.
USEFUL ADVICE When removing the rear axle, it is necessary to have assistants who will hold and lower the rear suspension beam. If, after removing the rear suspension beam, you intend to disassemble the rear beam, first loosen the wheel bolts and hub nuts.
WARNING Loosen and tighten wheel bolts only with the vehicle on the ground. The tightening torque of the bolts is 65-95 Nm (6.5-9.5 kgf-m).
1. Remove the tips of both parking brake cables from the equalizer and remove the cables from the holders on the bottom of the car (see “Parking brake” in section 8 “Brake system”).
2. Disconnect the brake hoses of the rear wheels from the pipelines on both sides of the car and the elastic arm of the pressure regulator from the bracket on the rear axle beam (see “Replacing the pressure regulator” in section 8 “Brake system”)...
3. Unscrew the nuts of the lower fastening of the rear struts, remove the bolts and disconnect the rear struts from the rear axle beam brackets on both sides of the VAZ 2108, VAZ 2109, VAZ 21099. Helpers should hold the rear beam.
4. Unscrew one nut on both sides of the bolts securing the rear beam to the brackets, knock out the bolts and remove the rear axle beam from the car by rolling the beam out from under the car on wheels.
USEFUL ADVICE The manufacturer recommends removing the rear axle beam along with the brackets from the VAZ 2108, VAZ 2109, VAZ 21099 vehicle by unscrewing three nuts securing them. However, after prolonged use, rusted studs may break. Therefore, it is better to remove the rear axle beam by disconnecting the beam from the brackets that remain on the body.
5. Install the rear suspension beam on a VAZ 2108, VAZ 2109, VAZ 21099 car in the reverse order of removal. Finally tighten the nuts of the rear beam mounting bolts with the vehicle standing on the ground. After installing the rear axle beam, bleed the brake system on a VAZ 2108, VAZ 2109, VAZ 21099 and adjust the parking brake.
The beams, both rear and front, are important links in the car. The rear beam of the VAZ 2110 is made of two longitudinally located levers connected to each other. Fastening is made using amplifiers that were welded to each other.
Beam structure
On the inside, brackets with special holes necessary for installing shock absorbers are attached to the suspension arms. There are also flanges located there, bolted to the axle of the rear wheels and shields located on the brake mechanism. Bushings are attached to the suspension arms on the front side. They are inserted into hinges made of a special rubber-metal material.
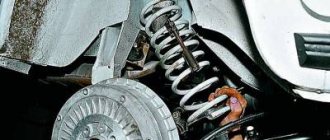
Bolts pass through them, connecting the suspension arms together with the stamped-welded brackets. They, in turn, are attached with bolts welded into the side member of the car. The springs of the rear beam of the VAZ 2110 are located in such a way that the first end rests against the recess of the shock absorber, and the second passes through a special gasket directly into the support area attached to the underside of the arch on the car body.
The gasket acts as an insulator and is made of rubber. The shock absorber mounted on the rear suspension is double-acting. It is attached with short bolts directly to a bracket located on the trailing arm in the rear suspension area. In the upper part, fastening is done using the rod method. The rod is fixed in the upper support directly on the suspension spring. The shock absorber is fixed through a protective rubber pad and a support washer.
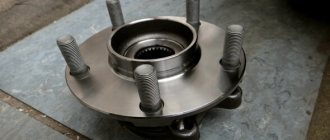
A double row thrust bearing is located in the middle of the hub. Its structure is very similar to the bearing located in the hub of the front wheels, but it is much smaller in size.
What to do next
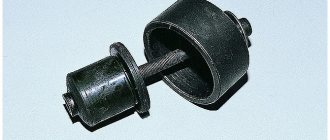
Before installing a new part, thoroughly clean the seat with a wire brush and rags. The cleaned area is treated with a solution of soapy water to facilitate installation of the new part. It is almost impossible to do this without a special device. If you don't have one, don't worry, you can easily make it yourself. A bolt with a nut or a stud 12 mm thick is suitable for this. You will also need two thick steel washers. Their diameter should be slightly larger than the outer diameter of the part being replaced.
Replacing silent blocks 2109, or rather, installing them is done like this. The bolt and washer are installed in the eye of the beam. On the other side, they also put on a washer and screw on the nut. Now you can tighten the nut with a wrench while simultaneously guiding the hinge. This can be done by tapping the joint with a hammer. If the edge of the hinge rests on the washer, select a spacer between the fixture washer and the beam. You can use a large wrench.
After the rubber-metal hinge is in place, the device is removed and the beam can be put in its place. To do this, lift the car body and pull out the previously installed wooden block. Using a jack, carefully lift the beam and align the hole of the hinge and bracket, while correcting their alignment with a drift or other suitable object. Place the bolt in place, tighten the nut, and put the wheel in place.
The VAZ-2109 silent block is replaced in a similar way on the other side of the car. The final tightening of the nuts is carried out after the wheels have been installed and the car has driven for a short distance. At this point, the replacement of the VAZ-2109 silent blocks can be considered complete. If you still have any questions, watch the video:
Removing the rear block
Replacement of the rear beam is carried out after transporting the car to an inspection ditch or lift. To begin, remove the brake pads located at the rear of the VAZ 2110. Disconnect the steel ropes that secure the parking brake to the underside of the beam attached to the rear of the bracket.
Now disconnect the thin brake hoses leading to the brake cylinders located at the rear of the car. Disconnect the brake pipes attached to the beam. In addition, you will need to disconnect the elastic lever from the beam, which is located on the drive responsible for regulating the pressure.
Using a size 17 wrench, unscrew the 4 mounting bolts holding the hub axle together with the rear suspension beam. Remove the axle itself along with the brake mechanism shield and, if necessary, separate them by unscrewing the two fastening screws using a Phillips screwdriver. Bend the bracket and remove the brake pipe.
It is necessary to disconnect the lower ends of the shock absorbers and the nuts attaching the beams to the brackets from the beam. After this, you need to remove the bolts from the beam and carefully remove it. Using a size 17 socket, remove the 3 nuts securing the bracket to the body.
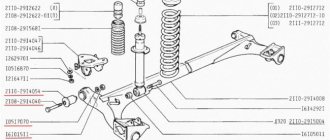
Rear suspension structure: 1 — rubber-metal hinge; 2 — suspension arm mounting bracket; 3 — shock absorber casing; 4 — compression stroke buffer; 5 — casing cover; 6 — support washer; 7 — shock absorber cushion; 8 — spacer sleeve; 9 — shock absorber; 10 - insulating gasket; 11 — rear suspension spring; 12 — lever connector; 13 — rear suspension beam arm; 14 — shock absorber mounting bracket; 15 - flange; 16 — lever bushing
Useful tips
- Before disassembling the beam, you need to loosen the tension of the hub nuts and other connections that are tightened with a large torque.
- It is recommended to change rubber-metal hinges in a specialized workshop - this requires special tools, as well as experience in such work.
- The instruction manual states that the beams must be dismantled together with the brackets by unscrewing the three nuts holding them in place. But due to long-term use of the machine, the studs can rust and therefore easily crack. For this reason, it is recommended to remove the beam by disconnecting it from the brackets - it is better to let them remain on the body.
The beam is installed in place in the reverse order; there are no pitfalls here. After the car is already on the ground, you need to tighten all the nuts. It is also necessary to check everything after 80-100 km. After installing the beam in place, the brake system must be bled, the parking brake must be adjusted, and, if necessary, the camber and toe must be adjusted.
Replacing silent blocks
If squeaks and extraneous noises occur in the car, it is necessary to replace worn parts. This will help avoid more significant breakdowns that will lead to complex and expensive repairs. The first thing you need to pay attention to when checking the performance of beams is the silent blocks. They are replaced using a special puller made using several sections of pipes to which washers are welded.
If you do not want to spend extra time on manufacturing, purchase the device at any specialized store. The rear wheels must be secured using shoes specially adapted for this procedure or ordinary bricks. This must be done because the car, raised with a jack, can jump off it and crush you.
Remove the raised wheel and check how loose the silent blocks are in the beam arm. If they are loose, repairs will need to be made. Unscrew the upper support nut and, applying short blows to the bipod, turn out the wheel. The blows must be applied until the support pops out. Then unscrew the long bolt, which is located at the top of the lever, and proceed to directly inspect the silent blocks of the front beam.
They must be knocked out with strong blows of the hammer on the chisel. They pop out of the grooves with ease after the first successful hit. In order to obtain greater sliding ability, first clean the old socket. After this, all parts are moistened with a soap solution, and the new silent block is pressed into place of the old one using the pressing method. Please note: after you press in, there should be no play at all, otherwise the repair of the front beam will be in vain.
Replacing the silent blocks on the lower beam will require much more effort. First of all, turn off the stabilizer so that the lever can move freely. Unscrew all the nuts that hold it in place and knock them out in the same way as when replacing the front beam. After you press in the new silent block, the replacement can be considered complete.
Please note that the removal of the rear beam of the VAZ 2110 is not carried out alone. You will need the help of several people. They are necessary to support and lower the rear suspension in a timely manner. In addition, work on tightening or loosening the bolts on the wheels of the car should only be done when it is standing on the ground.
The rear beam of the VAZ 2109 is an unreliable thing, and the owners of this car may have a large number of reasons to remove it. For example, the owner of a vehicle may hear unusual noises: grinding metal, quiet impacts, etc. These “special effects” will be heard in the rear of the VAZ 2109. The sound can be either constant or occur occasionally, for example, when there are bumps on the road.
1 — rubber-metal hinge; 2 — rear suspension arm mounting bracket; 3 — shock absorber casing; 4 — compression stroke buffer; 5 — casing cover; 6 — support washer; 7 — shock absorber cushions; 8 — spacer sleeve; 9 — shock absorber; 10 - insulating gasket; 11 — rear suspension spring; 12 — lever connector; 13 — rear suspension beam arm; 14 — shock absorber mounting bracket; 15 - flange; 16 — lever bushing
It is very difficult for a person who does not have the necessary experience to determine on their own what caused new noises in a car. This is due not only to a lack of practice, but also to the large number of variants of the problem. So, for example, a knocking stabilizer can “move” the silent block to the side, the noise can often be caused by bearings on the axle shafts - in general, there are many options. Therefore, to find out the exact problem, it is recommended to go to a service center and carry out the repair yourself.
Symptoms of a problem
There are several main signs of failure of the rear beam silent blocks, including:
- Unstable behavior of the car on the roads;
- Tires wear unevenly, which is not difficult to notice from the tread pattern;
- When driving on a bad road (that is, 95% of all our roads), unpleasant squeaks and impacts on the car body are observed.
These signs are indirect, since they may be associated with other failures of the vehicle’s chassis. For example, dull knocks are also a sign of a faulty rear pillar. Therefore, in order to make sure that there is a particular problem, you will need to fully diagnose the chassis.
Malfunctions
Often, replacing the rear beam bushings is due to the fact that defects arise in the design of the element. They are like this:
- The elasticity of the rubber element deteriorates;
- The rubber breaks;
- The central bushing is displaced;
- Rotations occur in the seat.
If problems are detected with the silent block of the rear beam, you will need to drive the car into the garage in the near future and replace the damaged components. Unlike foreign cars, changing the silent seal on a VAZ 2109 is quite simple and without outside help. Plus it costs almost pennies.
Installation and dismantling of beams
The VAZ 2109 beam is very convenient to install and dismantle when using a lift. But if your garage is not equipped with such an addition, then carefully lift the “back” of your swallow with a jack. For greater reliability, place special shoes or at least bricks under the wheels and engage the gear.
Once the vehicle is raised, the wheels can be unscrewed. Then remove the shock absorbers from the rear suspension. The parking brake cables are disconnected and the “shirts” are removed. The brackets securing the cables to the vehicle body are bent, and the cables themselves are removed from the brackets.
When dismantling the brake hoses located on both sides of the beam, be sure to plug the resulting holes with something. Otherwise, brake fluid will leak.
Unscrew the nut on both sides that serves to secure the beam to the brackets. Carefully knock out the bolts. Now you can pull out the beam. Some useful tips:
As you can see, removing and installing the rear beam of a VAZ 2109 is not at all difficult; all car owners can do this work. The main thing is time and desire.
Source
Choice
Before you start replacing the silent blocks of the rear beam, you need to decide what exactly you will replace the old, worn bushings with.
We figured out the markings and realized that for the VAZ 2109 you need to take only those that are suitable in size and diameter for the rear beam of the nine.
Today, for the VAZ 2109 they offer two types of silents, differing in the material of manufacture.
| Silent block type | Peculiarities |
| Rubber silent block | They are not as durable, but provide greater softness when operating the car's suspension. |
| Polyurethane silent block | A more rigid modification, in which the increased rigidity is the main disadvantage. At the same time, these products are more resistant to temperature changes, do not deform so quickly, and remain operational longer. |
The choice should be made based on the available budget. Rubber elements cost several hundred rubles less. As for manufacturers, we recommend paying attention to the companies SEVI, BelMag, Boge and SS20.
Size difference
Lada 2109 Wild chaise › Logbook › The beam fastening was torn out on the road [VARIM]
The other day the car started to quit when accelerating, I had to park it near the house for a week, I didn’t have time to figure it out. The day I went to the garage to see from the pit what the problem was, everyone looked at me in surprise: I was driving, but they were following me with their eyes. Hmm... Strange.
Entrance to garages, country road. There were 300-400 meters left to my garage, and... I hear a wild grinding sound from behind. I stopped to inspect the car, and there:
I flew up to the garage with wild noise and ringing. The neighbor in the garage was staying with his buddies at that time. When they ran out, they remarked to me that I would have to change the entire suspension, and when they examined it further, they completely upset me - I needed to digest the spar.
The garage is open, the most difficult thing remains - to get into this small opening when the car is thrown from side to side. But this problem turned out to be not the most important one; my battery ran out. The men, for which I am eternally grateful to them, lifted the car from behind and pushed me into the garage.
Communities › VAZ: Repair and Improvement › Blog › Torn off rear beam
During the next pile-up with acceleration in a turn, I heard extraneous sounds coming from the trunk... this tore the beam from the spar...
the third plate is not included in the frame, but it’s clear where to cook it.
We connect it to the pipe in the threshold with a piece of 50 corners
, this is the one that is used as an amplifier
we cut more precisely, we have experience
I sincerely believe that doing this is faster than struggling under the car and welding the ceiling position to the already tired, rotten side members. The RDS was used as usual.
Tags: rear beam came off, repair of mounting for VAZ 2108, 2109, 21099, 2113, 2114, 2115
Comments 34
normal. everyone is alive and well. basin HFCH
The most important thing is that everything is fine)))
electrode MP-3 or some other?
No, esab’s ones are exclusive. MP3s blow God knows where. But these ones are just a fairy tale. The troika cooks almost the entire bodywork in my hands. Occasionally I cook one and a half www.esab.ru/ru/ru/
It's clear. I'll have to promote myself there additionally
I don’t know how the chisels work, but on my 12th coupe, no matter how you lift it, the doors close perfectly
into the jack or into the threshold? into the threshold through a meter board? specify...
I always put it in the threshold, I don’t put anything in it. Only a diamond jack with a recess for the threshold
I think that the thresholds have already been changed, and a thick amplifier has been welded in. You shouldn’t exaggerate the capabilities of the Lada
I’m the only owner, only if someone cooked it at night while I was sleeping))) I can, of course, not be lazy and shoot a video tomorrow or the day after tomorrow
come on, jack the end of the door into the threshold, and hang out the whole side.
well, a jack at the end of the door is not a problem, but hanging the side with such a jack simply won’t work
come on, jack the end of the door into the threshold, and hang out the whole side.
counter question, why didn’t they show the whole side on the video?
Then I’ll try to hang the whole side with a normal jack, I’m even curious)))
from 2 approaches to the front jack - the entire side is hung
Well done, I wasn’t afraid, of course I almost got to this point, the new spar was torn, I also opened it from the interior, reinforced it with plates, since one pin attaching the beam to the spar was torn off (thanks to the stampers for their contact welding of these pins), it was drilled right through hole, and pulled off the pin with engravers, and drove for six months with a torn spar =) the beam also danced and the car was constantly chattering, there is also a blog entry if you’re interested
I've already done everything. Just for fun, I'll take a look at it in my spare time.
Source
The fastening of the rear beam of the VAZ 2109 was torn off
#1 Dimaspb
The rear beam fastening on the left is torn off. For good measure, you need to digest the entire bottom, sills
Tell me what time and what amount to expect - work + material. if the entire bottom is digested + sills + side members and if the main problem is eliminated for now: the rear left spar
auto vaz 21099, 99g
#2 Alexey Frolov
The rear beam fastening on the left is torn off. For good measure, you need to digest the entire bottom, sills
Tell me what time and what amount to expect - work + material. if the entire bottom is digested + sills + side members and if the main problem is eliminated for now: the rear left spar
auto vaz 21099, 99g
#3 Martian
The rear beam of the VAZ 2109 is an unreliable thing, and the owners of this car may have a large number of reasons to remove it. For example, the owner of a vehicle may hear unusual noises: grinding metal, quiet impacts, etc. These “special effects” will be heard in the rear of the VAZ 2109. The sound can be either constant or occur occasionally, for example, when there are bumps on the road.
1 — rubber-metal hinge; 2 — rear suspension arm mounting bracket; 3 — shock absorber casing; 4 — compression stroke buffer; 5 — casing cover; 6 — support washer; 7 — shock absorber cushions; 8 — spacer sleeve; 9 — shock absorber; 10 - insulating gasket; 11 — rear suspension spring; 12 — lever connector; 13 — rear suspension beam arm; 14 — shock absorber mounting bracket; 15 - flange; 16 — lever bushing
It is very difficult for a person who does not have the necessary experience to determine on their own what caused new noises in a car. This is due not only to a lack of practice, but also to the large number of variants of the problem. So, for example, a knocking stabilizer can “move” the silent block to the side, the noise can often be caused by bearings on the axle shafts - in general, there are many options. Therefore, to find out the exact problem, it is recommended to go to a service center and carry out the repair yourself.
The problem of domestic cars
A VAZ 2109
Bulgarian will also be in place, a 10 cubic meter carbon dioxide cylinder, a welding machine with a maximum current of 150 amperes, several chisels, a set of metal drills. You can’t do without a jack here either; it’s better to have two of them.
Stock up on cutting wheels of approximately 1-2 millimeters and one cleaning wheel. Any type of jigsaw will do. Brush with rust converter, fiber disc (can be replaced with a simple budget brush). Standard driver's set, 2mm cord and plumb line. It seems that I have listed everything that is needed. It's time to get to work.
Removing rotten parts
We begin repairs by removing rotten, rusty and deformed parts. I will describe the process using the example of a car, a VAZ 2109, which I was tasked with repairing. First, I’ll give you my problem areas in the car. The front floor of the car is completely rotten with all the jacks and reinforcements. And the jack could only be used with a sub-engine beam. The rear floor was also rotted. Corrosion also affected the car doors. In general, the bottom was almost absent. The wings were not in the best condition.
The front hood was noticeably rusty, all the floor connectors and the floor of the gas tank and spare tire were missing. The same fate befell the reflectors of almost all headlights. The front spar burst in the gearbox area. And above the muffler, in the floor of the trunk, there was a huge hole. The corners of the door were “eaten” by corrosion.
I describe in detail the condition of my car so that car enthusiasts can identify similar faults in theirs and draw the right conclusions. Once the necessary tools for car body repair are at hand, we begin installation.
Features of elements
The main function of silents is to eliminate vibrations and deformations that occur during vehicle operation.
When choosing new silent blocks for the rear beam of a VAZ 2109, pay attention to the markings. It should be 2109-2914054. For VAZ 2114-15 models, the markings are different, but the elements themselves are very similar.
In principle, it is possible to install a silent block from a dozen on a VAZ 2109, but you will have to work hard with pressing in the rubber bushing due to the difference in size. The reverse procedure is not possible.
Rear beam
Installation and operation of the tool
Step 1
First, we disassemble the engine compartment: drain the antifreeze, and then remove the radiator itself. The doors also need to be removed, if everything there is completely rotten, then you can simply tear it off, cut off the flanges with a grinder, to which the TV was welded.
We cut off the rear panel, as well as the wings. Using welding and patches, we weld holes in the mudguards (if any), install flanges made of fresh metal, to which the TV will later be welded. In the video where mechanics are doing car body repairs, you can see everything in more detail and “live.”
Step 2
We install and weld new mudguard reinforcements; it would be good to use roofing iron for this. Next comes the fitting of new parts: rear and front fenders, TV threshold and hood. These elements should be secured using self-tapping screws. This is where we need a set of drills. Now comes the difficult cooking process. After the wings, TV and threshold are “seated” on the screws, you can start welding. The TV should be painted in advance, because once it sits firmly, it will no longer be possible to apply the color properly.
Step 3
To perform the following operations, I needed to hoist the car onto the tipper. Restoring the geometry of the car body will take quite some time. This procedure is carried out using a slipway on which the car itself is mounted. Special clamps ensure reliable fastening, and power posts provide a certain force for alignment. It is better to perform this part in a car repair shop.
Step 4
Let's move on to cooking the bottom. We use patches and attach them to the front and rear floors using a welding machine. We weld all jacks, connectors and floor reinforcements. The thickness of the metal of the car body significantly affects the welding process, and for each model it is necessary to select the time separately. Using a paint sprayer, we coat all cavities of the car with an anti-corrosion mixture.
Properly applying a vinyl decal to a vehicle is no easy task. Our article has a detailed description of this process.
You will find the software necessary to check the possibility of tuning cars at https://avtopolza.ru/tyuning-russkix-avto/tyuning-russkix-avtomobilej-v-rezhime-onlajn/ link.
Step 5
In my case, the arches were completely rotten. Mechanics advise not to suffer or digest them, but simply buy and install new body elements. But if you are in the mood for repairs, then this is also quite possible. Spray resin is a good coating for arches, but even it will not save them in the future. Rust will get through it too. There are also other anticorrosive mixtures. The choice depends on the budget and experience with this or that material.
We hope this instruction will help you in repairing the body of your car and after the final stage - painting, it will shine like new.
Source
Why did it happen so?
Perhaps the automatic requests do not belong to you, but to another user accessing the network from the same IP address as you. You need to enter the characters into the form once, after which we will remember you and be able to distinguish you from other users exiting from this IP. In this case, the page with the captcha will not bother you for quite a long time.
You may have add-ons installed in your browser that can make automatic search requests. In this case, we recommend that you disable them.
It is also possible that your computer is infected with a virus program that is using it to collect information. Maybe you should check your system for viruses.
If you have any problems or would like our support team, please use the feedback form.
Silent blocks produced by AvtoVAZ can safely be called one of the highest quality parts. It is not surprising that other foreign manufacturers also use them for their cars.
Element appearance
The durability of almost any part, including the silent block, directly depends on the driving style of the motorist. The service life of the element is more than 30 thousand kilometers.
