Since the VAZ 2104 is an inexpensive car, so you don’t want to invest a lot of money in this car, so many people do tuning the VAZ 2104 with their own hands and it turns out quite well, it all depends on personal skills and desire. If you do tuning of the Lada 2104 with your own hands, then when working with the suspension you will need a shock absorber spring remover, with its help it is much more convenient to remove the shock absorbers.
But what is good about the VAZ 2104 is the cheapness of spare parts and the fact that they are very easy to get, and this despite the fact that this model has not been produced for a long time. And when tuning a VAZ 2104, you will still need new spare parts, just like when tuning a VAZ 2113 or any other VAZ.
Tuning VAZ 2104
Tuning the VAZ Four is a fairly common phenomenon in Russia, and there is an explanation for this fact. First of all, the car has not been produced for a long time, and the condition of existing cars is far from new. With the help of a process such as tuning, you can not just repair a car, but make fundamental changes and make the car unique.
What is tuning
Tuning is a process aimed at changing and improving the standard characteristics of a car by equipping it with non-standard components and assemblies. Tuning involves making changes not only to the technical part of the vehicle, but also affects the body, interior and trunk. There really is no limit to perfection. In most cases, it all depends on the financial capabilities of the owner, since many modifications of this kind are not a cheap pleasure.
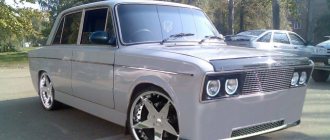
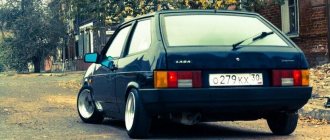
Photo gallery: tuned VAZ 2104 cars
Tuning allows you to emphasize the individual style and character of the car
With a little work on the exterior of the car, you can give it a completely different look for a very reasonable price.
By making even minor changes to the appearance of a car, it can be made different from production cars.
Body tuning opens up wide opportunities for implementing various ideas
Minimum and maximum possible parameters of non-standard disks
So, the smallest disk diameter provided by the VAZ-2107 manufacturing plant is 13 inches. The maximum size should not exceed 15 inches, provided that low-profile tires are available.
The wheel rim must either correspond to the parameters of the VAZ-2107 hub according to PCD - 4x98 mm and according to DIA - 58.5 mm, or its installation will require the use of special adapter spacers. The product with PCD – 4x100 mm can be installed using fasteners with an eccentric.
You can try to get around the 5J-6J rim width limitation by changing the “ET” value. The use of spacers will reduce the size of the offset, which will allow the installation of wider wheels. But the question immediately arises about the appropriateness of these actions.
Giving a more modern look to any older car model is quite appropriate and acceptable in most cases. Changing disks in this sense is no exception. However, once you get carried away with tuning, you shouldn’t forget about the technical characteristics.
Any re-equipment must be accompanied by an improvement in both appearance and performance. Or at least you should try not to spoil what was originally there.
Body tuning
Body tuning is the first thing that changes a car begin with . The fact is that the modernization of the engine or transmission will not be noticeable, but the appearance immediately catches the eye. Depending on your goals, changes can be small, medium or deep.
- Initial body tuning involves installing alloy wheels and a so-called skirt, tinting the windows and replacing the radiator grille.
- With medium tuning, a body kit is installed, airbrushing is performed, modern optics are introduced, and standard locks and moldings are removed.
- Deep tuning requires serious modifications to the body, in which, for example, the roof is lowered or the car is converted into a coupe.
Windshield tinting
Before you start tinting your car and, in particular, the windshield, it is worth understanding what the meaning of this process is and whether it is possible to darken the windshield in the Russian Federation. Many car owners are of the opinion that tinting gives solidity, increases the status, comfort and coziness of the car. High-quality tinting provides the following advantages:
- safety in case of an accident. In the event of a collision, the broken glass will remain on the film and will not scatter to the sides, which eliminates additional injuries;
- overheat protection. During hot periods, the interior heats up less;
- Protects the driver's eyes and reduces fatigue. The film is especially helpful when driving at night, protecting against glare from oncoming traffic;
- protection of the interior from burnout. The salon retains its original appearance;
- the ability to hide objects in the cabin from prying eyes, which reduces the likelihood of an attack on personal property.
Darkening the windshield reduces the likelihood of glare at night and overheating of the cabin in the summer.
To avoid unpleasant communication with traffic police officers in the future, you need to choose a tint film with a light transmittance of at least 80%. The fact is that the new windshield transmits light by 80–95%. In accordance with clause 4.3 of the technical regulations, windshields and those through which forward visibility is provided to the driver must transmit at least 70% of the light. In addition to film, there are other tinting methods, for example, electronic, sprayed, electrochromic, but the film version is the most common.
The tinting process itself does not cause any particular difficulties and can be carried out in a garage, but it requires attention and accuracy. The surface of the glass is cleaned of dirt, elements that impede the normal application of the film are removed (side panels, front panel, if necessary). To apply the material, the surface is moistened with a soap solution and tint is applied, removing the protective layer. After part of the protective base (5 cm) has been removed, the film is pressed against the surface of the glass, removing air bubbles using a clean rag or a special spatula. If the glass is darkened completely and not partially, work should begin from the top from the center. After applying the material, the excess film is cut off with a blade.
Video: applying tint film
Changing headlights
Changing headlights on a VAZ 2104 is a fairly common occurrence. This tuning option allows you to modernize the standard car lighting and make the optics more attractive. However, having decided to modify the standard lighting, you need to take into account the fact that such changes should not lead to dazzling oncoming drivers. The simplest option for tuning optics is installing xenon. This modification significantly improves lighting at night due to the high power of xenon lamps.
It is recommended to entrust the installation of xenon to specialists, especially since in Russia independent installation of such equipment is prohibited. In addition, xenon-type lamps must be installed in headlights that do not have glass with lenses and fins.
In addition to replacing the standard lighting, the headlights can be decorated with “eyelashes” (special overlays). Such changes make it possible to give the car some individuality, without requiring large financial investments from the owner. Externally, the linings look like a continuation of the hood lid. They are located at the top of the headlight, giving the optics a more aggressive look. The main thing is to choose the right “eyelashes” for the car, since not every element will fit the VAZ 2104 optics.
The “eyelashes” on the headlights give the VAZ “four” a special appearance and uniqueness
Standard lighting can also be supplemented by installing fog lights, which not only improve visibility, but also help identify yourself on the road in bad weather conditions (heavy rain, fog). On the “four”, fog lights are usually mounted on the bumper. You can improve the fog light by installing lamps that will work on low and high beam.
However, not only the front, but also the rear optics are subject to tuning. Most often, taillights are tinted by painting them with special paint. Film can also be used for dimming, but it must be taken into account that the brightness of the lighting equipment should not be lower than 90% of the factory lighting power. Recently, LED optics have become widespread. You can purchase both finished products and modify the standard lighting yourself. As a result, headlights and lanterns will acquire a beautiful appearance and become more advanced.
You can darken the standard taillights or install completely modified optics
Tinting and grille on the rear window
Tinting the rear window of a VAZ 2104 serves almost the same purposes as the windshield. Plus, the car moving behind will not be so blinding through the rearview mirror. The principle of tinting the rear and side windows is similar to tinting the windshield. The main thing when applying the film is to carefully prepare the surface so that there are no particles of debris under the film . Otherwise, the quality of tinting will suffer. If there are places where the film does not adhere well to the glass, you can use a hair dryer: it makes application of the material easier.
As a tuning element, you can install a grille on the rear window, which will make the car more aggressive. The part is installed under the rubber seal. To do this, you will need to dismantle the glass itself, insert the grille and then perform installation along with the rubber band. A VAZ 2104 with such an accessory on the rear window can not be seen as often as other “classics”, but nevertheless it is worth considering what advantages the installation of this part provides:
- the likelihood of being blinded by cars moving behind in the dark is reduced;
- glass sweats less in the rain;
- In summer, the interior heats up less.
Installing the grille also has some negative aspects:
- In winter it will be difficult to clear snow;
- Debris accumulates in the corners between the grille and the glass, which is also not easy to remove.
The grille on the rear window of the VAZ 2104 makes the car more aggressive, giving it a certain sporty style, but makes it difficult to clear snow and dirt
Roll cage
The safety frame is a special structure made of pipes connected to each other by welding. Its main purpose is to protect the driver and people in the cabin in the event of an accident. First, you need to understand that a safety cage is installed on those cars that take part in racing, that is, when there is a high probability of a coup or other serious damage to the car.
Since the VAZ 2104 is far from a racing car, it is worth thinking carefully about whether installing a frame is really necessary . The fact is that with such a design, which costs in the range of 1–10 thousand dollars, it will be problematic to pass technical inspection. This is due to the fact that you will need to present a certificate. In addition, it is prohibited to operate a car equipped with a safety cage within the city. If installed incorrectly, the frame may simply collapse at the moment of a collision, which will lead to additional injuries instead of protection. Plus, to install the product you will need to dismantle the entire interior.
The safety cage is a structure made of pipes that is installed on cars participating in car racing.
Retrotuning
In the automotive world there is such a thing as retro tuning. How does it differ from the usual procedure for transforming an old car? The peculiarity of retrotuning is to give the car the appearance of a new car in its original form. Cars of previous years do not look as attractive as we would like. Once upon a time, the “four” was familiar and did not stand out in anything special. However, today, when the car is no longer produced, it can attract more attention, especially if it looks like a car that has just rolled off the production line.
The retrotuning process involves restoration work, which is quite labor-intensive and time-consuming. This process usually begins with the body. It is restored and brought to perfect condition. Next, attention is paid to the interior, which may require restoration or tailoring of some individual elements. Today, the VAZ 2104 is not yet such a rare car, which makes it easier to find the necessary parts.
It is worth understanding that retro tuning does not always involve a complete restoration of the entire vehicle. Sometimes the car owner gives the car its original appearance only externally, and sometimes he also radically changes the technical part, introducing modern technologies into it. In this case, much depends on the goals pursued during the tuning process, and the funds that are expected to be invested in the process of modifications.
Retro tuning involves restoring a car, both outside and inside, to the condition it was in when it was released.
Trunk tuning
A distinctive feature of the luggage compartment of the VAZ 2104 is its volume, which with the seats folded is 1340 liters. Some car owners make various modifications to make more efficient use of space. To give a more attractive appearance, the trunk elements are sheathed with modern materials, for example, carpet.
Raised floor and paneling
One of the modifications to the luggage compartment of the Four, like any other classic Zhiguli model, is the installation of a false floor, which is a low box. This design allows you to store necessary things and items in order. Based on the practice of car owners, it is best to make the raised floor rectangular in accordance with the dimensions of the trunk. To take measurements, you can remove the luggage compartment mat and make a blank using it. The height is usually taken to be 15 cm.
The raised floor allows you to use the trunk more rationally and always keep things in their place
It is most convenient to use plywood to make a raised floor.
- Blanks are cut out of it using a jigsaw in accordance with the required dimensions.
- The elements are fastened together using corners, and the top cover is mounted on canopies.
- Inside the box is divided into sections depending on what is planned to be placed in it.
- The top of the box is lined with carpet.
- If desired, make side tables and cover them with the same material.
In the trunk of the VAZ 2104 on the sides you can organize tables for placing tools and other necessary things
Roof rack
Since the VAZ 2104 has a station wagon body, the roof rack differs from the standard dimensions of the “classic” one - it is longer. The installation of a standard trunk will not surprise anyone. However, you can purchase a more modern version of this design in the form of arcs. Fastening is carried out in standard places using special racks and adapters for them: these elements allow you to accurately fit the product on the roof of the car.
A modern roof rack in the form of slats looks more attractive than the standard design
Wheels and tires
A fairly common option for tuning a VAZ 2104 and other “classics” is to install rims and tires that are different in size from the standard ones. To give the car a sporty appearance, it is enough to install attractive alloy wheels of increased diameter and wide-profile tires. However, do not forget that not every disc that you like will be suitable for the VAZ Four.
The first disc you come across cannot be installed, not only because of a possible discrepancy in size (diameter of the hub or mounting holes). The disc may simply not fit the reach, which is why the tires may touch the fender when turning. From the factory, the car was equipped with 13-inch wheels and 175/70 R13 tires. The disks themselves have the following characteristics:
- bolt pattern - 4*98;
- width - 5.0–5.5J;
- hub diameter - 58.5 mm.
The following tire sizes are suitable for the car in question:
- 185/60 R14;
- 175/65 R14;
- 195/50 R15.
The most popular for tuning are wheels made of light alloys, mainly based on aluminum. Such discs can be cast or forged. Compared to steel, i.e. factory stamped, alloy wheels have advantages. First of all, it is a more attractive appearance and a reduction in wheel weight by 15–20%. Due to the lighter wheel weight:
- loads on suspension elements and tires are reduced when hitting uneven surfaces;
- controllability improves;
- the dynamics of the car increases;
- braking improves.
Replacing standard wheels with alloy wheels significantly transforms the appearance of the car, and also improves its dynamics and handling
Seats
Comfortable driving largely depends on the comfort of the seats. If the car is old, then the seats are inevitably in a deplorable state. Therefore, many VAZ 2104 owners are thinking about installing more comfortable seats. There are many options, ranging from “seven” to foreign brands (Mercedes W210, Toyota Corolla 1993, SKODA, Fiat, etc.).
To increase the level of comfort, it is advisable to replace the VAZ 2104 seats with foreign ones
The seats from the VAZ 2107 will fit with minimal modifications. To introduce any other chairs, you first need to try them on to see if they will fit into the “four” interior. The rest of the process comes down to fitting new products, welding work and rearranging standard fasteners. If there is a need to replace the rear seat, the procedure is carried out in a similar way.
Video: installing seats from a foreign car using the example of a VAZ 2106
How to remove headrests
There are versions of the VAZ 2104, the seats of which are equipped with headrests. They can be removed if necessary, for example for repairs in case of damage or for cleaning. This is done quite simply: just pull the headrest up and the product will completely come out of the corresponding grooves in the seat back. Installation is carried out in reverse order.
To remove the head restraints, just pull them up
Suspension tuning
The design of the VAZ 2104 suspension is far from perfect. Therefore, anyone who decides to subject their car to tuning will, without a doubt, also affect the chassis. The simplest option for upgrading the suspension is to install sports shock absorbers. This will make the car more collected on the road. However, chassis tuning does not end with shock absorbers alone. In most cases, this process involves lowering the car, i.e. reducing the ground clearance, which will make the car more attractive, especially when installing beautiful wheels. To reduce ground clearance, install more powerful and stiffer springs with fewer turns or simply cut off the standard ones.
To strengthen the front suspension, it is recommended to install a second stabilizer. Refinement involves welding the appropriate fastener for mounting the part. In addition, it is worth replacing all rubber elements (bump stops, silent blocks, stabilizer rubber) with good quality parts. The rear suspension design can also be modified by installing an anti-roll bar. This will reduce the car's roll when cornering.
With a serious approach, more global changes in the design of suspensions are possible, but this requires appropriate knowledge. The main thing to remember is that replacing any one element will not give the desired result: tuning the VAZ 2104 suspension must be carried out comprehensively . Making modifications will not only increase the level of comfort, but will also make the car safer.
One of the options for tuning the VAZ 2104 suspension is to install a main anti-roll bar at the rear and an additional one at the front.
Alloy wheels
In some cases, some car enthusiasts prefer to install alloy wheels with dimensions R16 or R17 on their “Seven” cars, but this inevitably increases the overall width of the wheel and its offset (ET). This leads to the need to strengthen the suspension elements and the use of low-profile tires, which do not work well on country roads or in winter.
In order to choose the right stamped or cast wheels for a VAZ 2107, drivers should not go beyond the limits of wheel offset ET23-34 mm, width 5.0J-6.5J, and also should not set the radius above 16. In addition, you must carefully observe bolt pattern and drilling pattern upon purchase, as this is the main indicator of compatibility.
Tuning the exhaust system of VAZ 2104
With a serious approach to tuning the Zhiguli of the fourth model, the exhaust system is not neglected. As a result, you can achieve not only an increase in power, but also get a beautiful exhaust sound.
- An exhaust manifold. You can modify it yourself or install a factory-made “spider” type product. The design of such a collector consists of interlacing and connecting pipes in a certain way. In order not to spend money on purchasing such a part, you can get by with “little expense” - modifying the standard manifold yourself. To do this, you will need a round file and special cutters, which are clamped into a drill: they are used to process the inner surface of the exhaust manifold. At the end of the procedure, polishing is carried out with GOI paste.
In the process of tuning the exhaust system, the standard exhaust manifold is modified or a “spider” is installed. - "Trousers". The exhaust pipe connects the exhaust manifold and the resonator. If you intend to install forward flow on your “four”, then the “pants” need to be replaced, since an oversized pipe will be required . This will ensure that the exhaust gases exit without any obstruction.
- Forward flow. The introduction of forward flow on the VAZ 2104 will allow you to get a beautiful sound and an increase in power. When the engine is modified, power increases, which indicates the need to install a direct-flow muffler due to an increase in the volume of exhaust gases. If we consider the design of the forward flow, it is similar to a resonator: material is used inside to absorb sound. You can install direct flow at a service center or with your own hands, for which you will need a welding machine. A more powerful engine combined with a modified exhaust system will not leave your car unnoticed in city traffic, although some car owners are of the opinion that an old Lada with a large pipe instead of a standard muffler looks ridiculous.
Expert advice
First you will need to remove the factory instrument panel. After this, the latches, which are located on the sides of the shield, carefully open. You will need to use a screwdriver to remove the bolts. Installation of new LED lamps is carried out in place of old factory devices. To attach such LEDs, previously prepared glue is used.
You will need to check whether the new lamps work. To carry out such work, it is not necessary to spend money and order the services of specialists from a car service center. You can also change the factory seat upholstery yourself. You will first need to purchase comfortable fabric of modern manufacture. To complete the transformation in the cabin, an acoustic system can be installed for those who like to drive with music.
You can also improve the design with a sports leather steering wheel and stylish window handles made of chromed aluminum. Then the car will be simply beautiful.
Installation of new parts and assembly
Then, through a wooden spacer, with gentle blows of a hammer, the part is pushed onto the shaft until it stops.
Attention! Before assembly, you must make sure that there is lubricant inside the CV joint; as a rule, there is not enough of it there. According to the documentation for the VAZ 2114 car, the cavity of the internal grenade must contain at least 80 cm³ of lubricant, and the external one - at least 40 cm³. As a lubricant, you need to use a special thick lubricant “CV joint-4”.
As a lubricant, you need to use a special thick lubricant “CV joint-4”.
The other end of the drive is inserted into the splined part of the gearbox so that the splines coincide. Now you need to get out of the ditch, take a hammer and a wooden spacer and hammer the drive into the socket until it stops. You need to strike carefully, and in no case forcefully. In this case, you need to periodically look under the car, monitoring the process of the internal grenade shaft entering the gearbox.
Anthers need to be changed more often than CV joints themselves, since the unit can last 100-150 thousand km, and tires - at best, 30 thousand. To replace the outer grenade boot, it is not necessary to remove the entire drive; you just need to pull the shaft out of the hub spline. But such a replacement is not only inconvenient, but also meaningless. The reason is that in the near future you will still have to disassemble the car and pull out the entire drive in order to replace the boot of the internal CV joint.
Author's article from the DIY car repair section, which describes the process of replacing the CV joint and its boot on VAZ 2108, 2109, 21099, 2110 cars. The CV joint (constant velocity joint) should be changed if: P during the start or during movement at When turning the wheels, a characteristic cracking sound (knock) is heard. You can verify the correctness of the diagnosis by checking the drive shaft for play (rock the drive shaft by hand). With a dust cover the situation is much simpler. Its condition can be checked by simply turning the front wheel completely in any direction and looking under the wheel. If cracks, breaks, or splashed traces of lubricant are visible on the boot, this means it’s time to replace it.
Photo number 2 shows a homemade key for unscrewing the drive, a trouble-free and reliable tool. Consists of: a chisel to which a 30mm head is welded plus a metal pipe 1.5 meters long. After you have unscrewed the hub nut, you can loosen the wheel bolts (perform all these actions with the car standing on the ground). We lift the front wheel (you can have both at once) of the car and install stops under the body to fix the front part of the car.
You can use the old inner CV joint as a retainer. If this is not done, then after removing the second drive, the differential gears will shift and during assembly it will not be possible to insert CV joints. ) Fix the drive shaft in a vice, remove the clamps from the inner and outer CV joints, turn the boots inside out (if the boots are torn, you can simply cut them off with a knife). Using a hammer and a drift (copper or bronze attachment), we knock the CV joint off the shaft, applying force to the joint cage. Next, if the purpose of the work is to replace the boots: We wash the CV joint with gasoline, removing old grease and trapped dirt. We put a new boot on the shaft and stuff it onto the splines, pre-filled with lubricant P CV joint.
After inserting the drive into the gearbox, it should be seated until the CV joint is completely fixed in the side gear, without hitting the shaft too hard with a hammer along its axis (you should use a softening spacer, for example, a wooden block). Further assembly is carried out in the reverse order, and do not forget to replace the old hub nut with a new one. And after tightening, you need to close the edge of the nut to prevent unwinding. When using an article or photographs, an active direct hyperlink to the website www.
Sources
- https://ladaautos.ru/vaz-2110/mozhno-li-sdelat-zamenu-pylnika-shrusa-vaz-2110-bez-ego-snyatiya.html
- https://expertvaz.ru/2114/zamena-shrusa.html
- https://mir-autoproma.ru/kak-pochinit/619-zamena-pylnika-naruzhnogo-shrusa-vaz-2110.html
Illusory repair possibilities
It should be said right away that repairing throttle position sensors is extremely rare. Firstly, the part itself, even the most expensive one, costs only a few dollars, and it makes sense to spend the money. Secondly, in most cases it is simply impossible to make repairs, for example, to restore a worn-out base layer. However, in some models you can slightly shift the resistive tracks relative to the slider and thereby extend the life of the device.
So, there is a special screw on the sensors. With its help, the position of the tracks is fixed. If they are already worn out, then you should loosen this same screw, this will change the location of the slider a little, and you can be a little patient with replacing the device. But don't count on long-term respite. Naturally, we remember that the contactless sensor cannot be repaired. This completes the adjustment, repair and replacement of the throttle position sensor, now you can operate the car for several more years and not even think about such issues.
To check the supply voltage, disconnect the wire block from the sensor. Turn on the ignition and use a tester to measure the voltage between terminals “A” and “B” of the wire block. The supply voltage should be about 5V. To check the sensor, we connect the block of wires to it and, with the ignition on, measure the voltage (the wires of the block can be pierced with thin needles connected to the terminals of a voltmeter) between the sensor terminals “B” (“ground”) and “C” (slider) - it should not be more than 0.7V. Turning the plastic sector of the drive by hand, fully open the throttle valve and measure the voltage again - it should be more than 4V. Turning off the ignition, disconnect the wire block and connect an ohmmeter between terminals “C” and “A” (or “B”) of the sensor. Slowly turning the drive sector, we monitor the readings of the tester arrow. There should be no jumps in the needle throughout the entire working range. To replace the sensor, remove the throttle body from the receiver studs without disconnecting the coolant inlet and outlet hoses from it (see Removing the throttle body).
Using a Phillips screwdriver, unscrew the two screws securing the sensor to the throttle body...
...and remove the sensor.
The sensor is marked 2112-1148200
Remove the sealing foam ring installed under the sensor.
Install the sensor on the throttle body in reverse order. In this case, the damper must be in the closed position. The tightening torque for the sensor mounting screws is 2 N•m.
The VAZ 2107 throttle sensor, together with a mass air flow sensor and oxygen concentration control, acts as an element that controls the supply of fuel to the combustion chamber depending on the position of the throttle valve. As with any repair to replace electronic fuel injection sensors, they must be checked for functionality. To check, you will need a regular multimeter with the function of measuring resistance in the power circuit and a set of standard tools.
To check the throttle sensor:
- Disconnect the package with wires from the sensor.
- The connector body will be marked. Connect the ohmmeter leads to terminals “B” and “C”. We open the throttle valve; for a working sensor, the resistance will increase from 2.7 to 8.2 kOhm.
- Next, we switch the multimeter to voltmeter mode and connect its negative terminal to engine ground, turn on the ignition in the circuit, and the positive probe will turn on. For a working sensor, the voltage should be approximately equal to 5V, if absent or significantly different from the norm, there is a malfunction in the power circuit or in the computer. After measuring the voltage, turn off the ignition.
After confirming that the throttle sensor is not working and deciding to replace it, you must:
- To remove the sensor, use a Phillips screwdriver to unscrew the two screws securing it to the throttle body and remove it.
- There will be a foam gasket between the sensor and the housing.
At this point, the repair work to check and remove the VAZ 2107 throttle sensor is completed. The installation must be carried out with the damper closed, aligning the protrusion of the damper axis with the groove on the sensor body.
Sources
- https://carnovato.ru/proverka-regulirovka-datchika-polozhenija-drosselnoj-zaslonki/
- https://www.autofizik.ru/VAZ/VAZ-210721047/features-of-repair-of-a-VAZ-2107-20-with-engine-VAZ-2104/checking-and-replacing-position-sensor-d
- https://remont-vaz2106.ru/datchik-drosselnoj-zaslonki-vaz-2107
Seat belts
On early Zhiguli models of the fourth model there are no rear seat belts, although mounting holes are provided for them. But sometimes it becomes necessary to install them:
- for the safety of rear passengers;
- for installing a child seat.
To carry out such a modification, you will need classic belts (VAZ 2101), which are attached in the appropriate places: to the pillar behind the rear seat, at the bottom of the wheel arch and under the back of the rear seat.
To increase the level of safety, belts can be installed on the rear seats of the VAZ 2104
What determines the performance of the coil?
The classic ignition coil or “bobbin”, as it is also popularly called, is essentially a low-voltage voltage converter from the battery and generator to high-voltage, which is then supplied to the spark plugs. That is, this is a miniature electrical transformer.
The traditional coil, used on carburetor models of vehicles, consists of two windings. The primary winding receives low voltage pulses, for example 12 Volts. As a rule, this is a small number of turns (up to 150) of thick insulated copper wire. The “primary” has 2 terminals on the coil cover. There are much more turns in the secondary winding - up to 30 thousand, but the wire used is much thinner. One end of the “secondary” goes to the “minus” of the primary winding, the other to the central terminal of the coil. In the center of the windings there is a core that enhances the magnetic field. The coil body is insulated, and its cavities are filled with special oil for transformers.
The fundamental characteristic that indicates the serviceability of almost any coil is the resistance of the windings.
A budget way to solve the problem
To begin with, you should pay attention to the fact that there are a variety of methods for changing the dashboard: some will be expensive, others are a budget method that will not require significant material costs. In this case, we will consider a budget way to solve the problem. It involves the use of special LEDs.