It's no secret that in its standard, that is, in serial form, the engine does not develop all the power it is capable of. You can configure the firmware in a new way, but you won’t be able to significantly change the load curve without reducing the environmental class. You can buy a "racing camshaft" to install in place of the stock one. But then the firmware will have to be changed to accommodate the new phases... Let's consider what happens if we use only accessible tuning methods. Let's say right away that on the VAZ-2114 hatchback the increase in power can be 20% or even 25%, and we are talking about only 8 valves. There is no need to bore the valve channels.
Let's leave illusions in the past, and for this we watch one video.
An example of increasing the power of a VAZ-2114 engine
During the tuning, the 2111 (1.5 l) engine was modified.
- Boring of seats along the internal diameter, which is equivalent to enlarging the valve;
Valve seats, VAZ 2111 engine
New cylinder head elements
Tuning timing gear
Our new engine remains “not plug-in” - the valves do not reach the pistons. When tested on a bench (the sensors were turned off), the result was not impressive.
Checking without adjusting the ECU
If you install the engineering firmware, you can select the parameters “from start to finish.” And then the picture looks better...
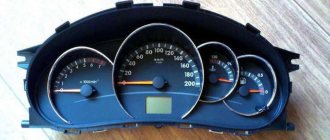
Torque graph after tuning is completed
All sensors, including the lambda probe, were connected in the latter case. We managed to get 96 “forces” at 5300 rpm!
How not to increase power!
- Do not attempt to bore channels. This operation can be performed in the absence of ball cutters, but in garage conditions nothing will work even with cutters. The bottom line is that the accuracy of the cutter installation is important - the error should not exceed 1-2 microns.
- As you can see, on the stock VAZ-2114 hatchback the increase in power was 24%, and this is without installing a “chandelier”, “improved exhaust” and other expensive elements.
- There is no point in buying a “racing camshaft” without having the appropriate tuning firmware.
Measures to refine the power unit
Over time, many car enthusiasts want to get more from their car and are thinking about the question of how to boost the engine of a VAZ 2106. How to ensure that the power on a VAZ 21063 is equal to that of a “pure six”? Let us remember that boosting an engine is an increase in power by increasing its displacement and compression ratio. This requires deeper technical tuning; disassembling the engine is indispensable. Here is a list of measures that will allow you to boost the VAZ 2106 engine and give a significant result (an increase of up to 110 hp and more).
- Milling the cylinder head over the entire plane to a thickness of up to 1 mm. As a result, the combustion chambers of all cylinders are reduced, the compression ratio increases, and subsequently the engine power. You must understand that after such an operation it will not be possible to drive on fuel with a low octane number, at least 95. When using such gasoline, the combustion process in the chamber will significantly accelerate, detonation will occur, an impact on the piston, piston pin, and so on. Detonation significantly accelerates engine wear and can lead to serious damage.
- Installation of a sports modification camshaft. It will ensure increased valve lift and high-quality filling of the cylinder with fuel.
- Boring of cylinders for piston size 82 mm. Make sure that the sleeve wall will allow this operation.
- Installing lightweight forged pistons and connecting rods and a lightweight flywheel will free up even more engine energy, which it spends on internal resistance.
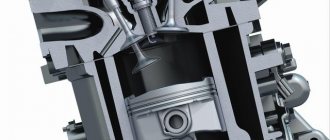
Design of the internal combustion engine modification of the VAZ 2106
What to do with engine 11183?
It is clear that a mandatory step in tuning the 11183 engine will be replacing the ECU. It’s simple: the standard M74 block cannot be flashed, but “January 7.2” is a good and time-tested solution. You will also have to abandon the “E-Gas” option, which means replacing the throttle assembly and receiver.
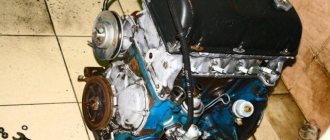
Everything I had to throw away
The intake tract parts were borrowed from the 2111 engine. A cable pedal was installed, and the engine began to look human.
Everything works well with the “January” controller, but standard firmware is not an option if the camshaft has been replaced. And it, in turn, has the following parameters:
- Release phase width – 104 ;
- Intake phase width – 109 ;
- Opening angle at outlet – 272 ;
- Inlet opening angle – 268 ;
- Valve travel (exhaust/intake) – 9.5/10.1 mm.
After installing the new shaft, the motor became plug-in. However, on the 2114 hatchback, increasing power almost always comes with a compromise. In this case, we had to sacrifice reliability. What's improved:
- Maximum torque increased by 14 N*m ;
- The power also increased – the limit of “90 horsepower” was passed.
By the way, any tuning leads to a decrease in durability. Make a choice.
Engine tuning: installation of forged pistons
When working to increase engine power, the original cast pistons are often replaced with forged ones.
This is done for one purpose - to reduce the load. A forged piston is lighter than a cast piston. In addition, under heavy loads (the higher the speed, the higher the load on engine parts), casting behaves an order of magnitude worse than forged metal. Along with replacing the pistons, it makes sense to change or lighten the connecting rods. This process is more complex - the accuracy of removing excess metal must be at least 0.1 grams. But this procedure is less profitable than a complete replacement with H-shaped forged connecting rods, which are longer than the original ones.
Such a part is much lighter and stronger, and the latter factor will increase the compression ratio in the combustion chamber. With a long connecting rod, it is recommended to use pistons with a reduced compression height. The result of such work is boosting the engine.
Method for increasing the power of an 8 valve engine with a split gear
The split, that is, adjustable gear was not used in the last project. It is better to install it on “non-plug-in motors”. Setting method:
- The moving and fixed parts are marked with a mark, the same as on a standard pulley;
- Installation is carried out in the usual manner, aligning the crankshaft and timing mechanism according to the marks (as when replacing a belt), you should also remember about the correct tightening torque of the belt;
- If in the 4th cylinder the intake and exhaust valves are not open “to the maximum”, we carry out an adjustment: loosen the outer screws, and, holding the outer part of the gear, set the camshaft correctly. Tighten the fixing screws.
Split gear with retaining screws removed
Re-equipment of the vehicle chassis
What else should you pay attention to when converting your VAZ 2106? Engine tuning and chassis tuning should complement each other. It is impossible to leave the driving characteristics of a car unchanged by installing a more advanced and powerful engine. Both the gearbox and the rear axle gearbox must be changed. The gear ratio of the driving pairs of units must correspond to the new capabilities of the engine, otherwise they will quickly fail.
The brake system needs to be improved first. In such cases, ventilated discs are installed on the front wheels, and the rear drums are replaced with disc brakes.
They are much more reliable and productive than drum ones. The caliper is installed from a VAZ 2108, brake discs are of the ATE 412125 type. The most difficult part of the installation is adjusting the axle shaft to the mounting diameter of the disc. The caliper is mounted in the same way as the front brakes. When installing the axle shaft, the bearing should be replaced with SKF. The new system is connected to the old highway. In addition, the brake master cylinder needs to be replaced with a foreign-made product.
Having rebuilt the entire brake system, pay attention to the suspension. New machine capabilities require stiffer shock absorbers and reinforced springs. To enhance the rigidity of the body, it is advisable to install special spacers. One is installed in the engine compartment of the car, increasing the rigidity between the side members of the car and the seats of the front pillars. The second is mounted in the luggage compartment and fixes the geometry of the rear shock absorber and spring seats.
Separately, it is worth noting the steering system of the car. Strengthening the anti-roll bar will help make the steering wheel more rigid.
This is achieved due to a slightly shortened stabilizer of the same type, which, with the help of individually made fasteners, increases the rigidity of the standard one many times. Yes, you will have to tinker, but you will be pleasantly surprised by the behavior of your car on the road.
Tuning parts, popular and not so popular
We have arranged all the elements in order of increasing uselessness:
- Receiver with increased volume. After replacing the standard unit, there is an increase in output at medium and high speeds. But for the region of 1000-2500 rpm, it would be preferable to have a standard receiver.
Receiver with increased volume (shorter path)
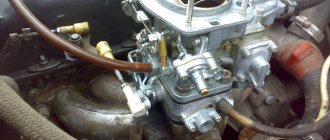
Tuning throttle assembly
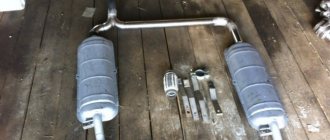
As for the exhaust tract, you can install a “4-2-1 spider” - it creates a vacuum in front of the valve that is not yet open... Torque and power are improved from this, the question is by how much.
Any “tuning” begins not with the engine, but with the selection of “gear ratios”... This advice is common, and it also applies to the VAZ-2108 and 2114 families.
Crankshaft balancing
Having lightened the connecting rod and piston group, it is necessary to balance it with the flywheel, pulleys and preferably with the clutch basket. In this case, it is better to replace the original crankshaft with a fully counterbalanced one - it is heavier, but for this part the more important parameter is strength. The lack of balancing of this system will not allow full operation of the updated VAZ 2106 engine. Engine tuning must be carried out taking into account the complete coordination of the new parts with each other, otherwise the replacement will not lead to the desired result, but will only cause disappointment.
Many things can be done yourself - this will reduce the cost of conversion and give you the right to say that you did everything yourself. But such tuning of the VAZ 2106 engine with your own hands can only be done by a limited circle of motorists, so do not hesitate to contact them for those works where accuracy is important.
Where to begin?
You shouldn’t immediately rush to improve the engine, turning the car into a racing car. It’s better to start tuning a car 2106 with something simple - do simple operations that don’t require much effort.
The first step in upgrading the VAZ 2106 is replacing the wheels and tires. This is an effective way to attract attention. Today the market offers a huge selection of alloy wheel models. But if nothing fits, you can order the production of an exclusive kit from the studio, but it will cost a pretty penny. You need to follow several recommendations to take the first step and start tuning the VAZ 2106.
- You should not install wheels with a diameter larger than 14 inches on a VAZ, as a larger diameter will reduce the car’s handling and may require modifications to the wheel arches;
- It is worth remembering that alloy wheels are not as practical as iron wheels; they are easily deformed when they fall into holes. Restoring their shape is difficult and expensive. To ensure trouble-free operation, it is better to install forged wheels, but they are quite difficult to find and they are somewhat more expensive than alloy wheels;
- It is necessary to choose the correct tire profile (tire height). This is the second designation in the tire size marking. For example, 185/65 R14. Where the designation 65 is the tire height. For VAZ, values in the range of 55–65 are best. The width of the tire is selected in accordance with the width of the rim.
Helpful advice It is recommended to start tuning the VAZ 2106 by replacing wheels and tires in order to awaken interest in further modernization, because appetite comes with eating.
Basic engine malfunctions
All modifications of VAZ-2114 engines have a number of characteristic breakdowns. The most common are:
- Floating engine speed at idle. Most often, this problem occurred on new cars and was corrected under warranty. The cause is most often a malfunction of the throttle position sensor, idle speed control or vacuum unit.
- The same reasons lead to the car stalling while driving. An additional problem in this case is the incorrect operation of the mass air flow sensor.
- During operation, the power unit froze. First you need to measure the compression in the cylinders; if it is low in one of them, the cause is burnt valves or a head. With the same difference in compression, the problems are hidden in the valve pressure settings or their gasket. If there are no deviations, then you need to check the ignition module.
- Failure to heat up to operating temperature (from 87 to 103 degrees) is due to a faulty thermostat.
- Engine noise occurs due to unadjusted valves. If it intensifies when you press on the gas, then you need to check the connecting rod bearings or cylinder pistons.
If it seems to you that the power plant has lost power, then you should look for other symptoms. They are the ones who will tell you why it does not develop speed and does not meet the stated characteristics.
Achieving the goal
This brings us to the end of our conversation on the topic: “Tuning the VAZ 2106 engine.” The photos presented on the page will help beginners navigate the question of what parts and components they need to pay special attention to when bringing what they want to life. As a result, the car owner receives a completely new vehicle, absolutely incomparable in technical parameters with its ancestor. A powerful engine, a sensitive gearbox, and a rigid car body allow you to actively maneuver at speeds that are accessible to this car only when driving on a straight highway. On the track, thanks to such a procedure as engine tuning, the VAZ 2106 will be able to leave far behind not only similar cars, but also some foreign cars.
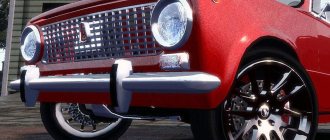
Appearance
As you know, the “kopek” was built on the basis of the Italian Fiat-124 car. Externally, these cars were practically no different. But as for our modification, the VAZ-21011 had some differences.
So, this car came with a slightly different chrome radiator grille, where there were more frequent vertical lines. And at the bottom of the panel there are four slots. They serve for greater air flow and, accordingly, for better engine cooling. The metal bumper of the VAZ-21011 car lost its characteristic fangs and received rubber linings. There were special openings on the rear pillar that served as exhaust ventilation for the cabin. These holes were covered with the original chrome grilles.
The rear reflectors have been moved to the lights. A reversing light was also integrated into them. On a regular “penny” it was located under the bumper.
Is tuning common among VAZ-21011 car owners? These machines are modified in different ways. Someone makes the engine (we'll talk about modifications to the internal combustion engine a little later), and someone else makes the exterior. If we talk about styling, the “stens” movement has recently become fashionable, supporters of which install original wheels on classic cars and lower the suspension (or install pneumatic ones). Externally, this car looks quite impressive. The reader can see one of these copies in the photo in our article.
Related modifications: flywheel and fuel supply systems
A side effect of installing a crankshaft with an increased crank radius and larger diameter pistons is an increase in the moments of inertia of the moving parts of the engine. It becomes noticeably “dumber” as the speed increases, despite the fact that the “classic” engine is not initially sporty.
Since the inertia of the flywheel makes a huge contribution to the total moment of inertia (up to 80-90%) (its diameter is maximum, and the moment of inertia of rotation is proportional to the square of the radius), the most effective way to facilitate engine spin-up is to reduce the flywheel and clutch. In the now classic books of E.G. Singurindi, dedicated to the preparation of production cars for competitions, this issue was considered up to the presentation of specific drawings.
Although when the flywheel is lightened, its mechanical strength suffers, if the metal is cut correctly, this has no practical effect on reliability. After modification, dynamic balancing of the flywheel and crankshaft assembly is required.
Tuning flywheels make it possible to achieve an even greater reduction in the moment of inertia in comparison with machined cast iron ones. However, excessive relief is also a “thing in itself”, since it has a negative effect on the “lower parts” (it is more difficult to start, to drive hard).
The “classic” power system, be it a carburetor or fuel injection on the latest releases, is not very suitable for a tuned engine. Moreover, injection is the most promising: it’s not only about the ability to fine-tune the fuel supply and ignition, which in itself gives the maximum return from the engine, but also about a more advantageous configuration of the intake tract, especially with tuning receivers.
For the carburetor to operate, it is necessary to create a vacuum in its diffuser, that is, even in the most “extreme” tuning options, when an individual carburetor is installed on each cylinder, there is still parasitic resistance in the intake tract, which reduces the filling of the cylinders.
In injection systems, gasoline is supplied to the manifold under pressure, and it becomes possible to reduce resistance as much as possible (bored channels of the cylinder head and manifold, a throttle body of increased diameter, a receiver tuned for a specific engine). Standard ECUs allow easy flashing; programs for editing injection system calibrations and ready-made tuning firmware are also available.
Taking into account the same maximum unification of the Tolyatti conveyor, installing fuel injection on an initially carburetor engine is not a problem: the standard front cover is replaced with a new one, with a boss for the crankshaft position sensor, the old KV pulley is replaced with a new one, with a cut reference ring. The cylinder head is also the easiest to install from the “injection” model (the shapes of the intake channels are different, there are now no extra channels for supplying coolant to the carburetor manifold). Taking into account the fact that we are talking about complex tuning, it is best to immediately take a cylinder head from a Niva with fuel injection.
Extreme options: superchargers and turbochargers
However, there is another method of boosting, which is perfectly suitable for an “ancient” engine with a relatively low compression ratio. We are, of course, talking about supercharging, and there are many options - you can apply the classic method of American hot rodding by installing a drive supercharger (the cheapest source is dismantling right-hand drive cars, keywords - SC-12, SC-14), you can choose with a large amount of work turbocharger.
However, at the same time, this method of boosting is also the most difficult to set up: a lean mixture and incorrectly selected ignition timing can “kill” the engine very quickly. At high boost pressures, it will be necessary not only to lower the geometric compression ratio, but also to completely rebuild the engine, replacing the pistons, connecting rods and crankshaft with stronger ones than the standard ones, so such a project will also become the most expensive.
In conclusion, we note that such simple “tuning” options as “zero” filters and direct-flow mufflers are useless without the modifications described in this article.
Also read our material in which we tell you what cramps are.
Autoclub78 https://autoclub78.ru
Tuning doors VAZ 2106
Greetings to all readers of my blog. For most classic owners, this is a useful entry. There are so many stupid topics on the drive about silent locks on classics.
Either I didn’t search well, or there is no detailed report on installing locks from 2108 on classics, but there are more than enough entries like “I installed locks from 08, I am delighted to recommend it to everyone.”
Therefore, I will now try to describe in detail how to install locks from 2108 to 2106. And so to install the locks I purchased: silent locks
silent locks (chocolate bars)
- Door lock mechanism VAZ-2108-09
Door lock VAZ-2108-09
- Gazelle door lock retainer
Bolts for fastening the locks and the lock retainer. Here is a rod with plastic that fits onto the door opening ball from the outside.
Well, that seems to be all, it’s only for the two front doors, all 2 pieces each. I started by installing the lock itself, there were no difficulties here, I removed the old lock, drilled the lower left hole, adjusted the chocolate bar so that it would stand level and sharpened the second hole with a file, then I machined an oval for the rod.
Driver's door
- Then I started adjusting the chocolate bar, I need to grind it down or file it along the bevel that is on the chocolate bar, as in the photo
Grind off
At first I only sawed off the protruding metal, but this turned out to be not enough; when the back door was not fully open, the lock would touch the back door. Before installing the lock, you need to grind off the bolts so that they do not stick out and press down the door a little, this is done so that the rack does not get too strong crumple, well, more on that a little later.
Like this
The next step is to refine the door, unnecessary holes are puttied and painted over, but since I am wrapping the car in film, I sealed it.
It turned out like this
Next we move on to installing the lock latch. We remove the lock from the old lock, saw the stand and pull out the plate from there where the old lock and its fastening were screwed.
small cut
- Mark the center of the lock bolt using a small pencil with electrical tape wrapped around it and inserted into the lock.
Since I couldn’t find the counter part for the lock retainer on sale, I made it myself from a metal plate. The bolts need to be shortened so that they don’t rest against the rack.
mating part of the latch
We drill the mounting holes a little larger so that we can adjust them. And before installing the latch, you need to slightly “adjust” the stand until the latch stops touching the door.
under straightening
- Then we refine everything again
we ennoble
- and install the lock
Install and adjust
Actually, installing additional sound insulation and replacing the casing is already considered tuning. To increase comfort, you can optionally install automatic windows.
The appearance of the doors can be changed either by completely replacing them, or by installing stylish handles and visors. It should be remembered that installing new doors is quite an expensive process.