Self-service and repair of VAZ cars is a common occurrence for many car owners. Periodic failure of some parts of the heating system is common in the “tenth” family. The most common problem is a broken heater rheostat. In the article we will look at where this element is located and how to replace it.
The heater rheostat (resistor) is responsible for changing the speed of the hot air flow through manual control inside the car. If this part fails, the heater fan operates only in the 4th extreme position. Constant operation of the electric motor at high speed leads to inconvenience in using the stove and rapid wear of the fan.
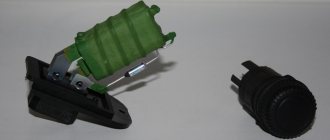
Heater resistor
Self-service and repair of VAZ cars is a common occurrence for many car owners.
Periodic failure of some parts of the heating system is common in the “tenth” family. The most common problem is a broken heater rheostat. In the article we will look at where this element is located and how to replace it. The heater rheostat (resistor) is responsible for changing the speed of the hot air flow through manual control inside the car. If this part fails, the heater fan operates only in the 4th extreme position. Constant operation of the electric motor at high speed leads to inconvenience in using the stove and rapid wear of the fan.
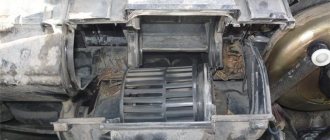
Heater motor
7.11.1. Design Features
| GENERAL INFORMATION |
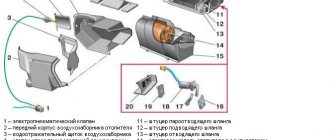
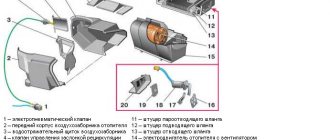
Diagram of the automatic heater control system
| 1 – fan electric motor; 2 – additional resistor; 3 – controller; 4 – mounting block; 5 – ignition switch; 6 – cabin air temperature sensor; | 7 – recirculation switch; 8 – recirculation valve; 9 – micromotor gearbox for heater damper drive; A – to the instrument lighting switch; B – to power supplies |
3
Diagram of the automatic heater control systemAddresses of the output plugs of the heater control system controller
The controller receives information from:
– sensor 6
air temperature in the cabin (a small fan is built into the sensor);
– micromotor gear shaft position sensor 9
heater damper drive, i.e. information about the position of the heater damper.
Based on the information received and the set air temperature, the controller controls the position of the heater damper, sending appropriate signals to the damper drive micromotor.
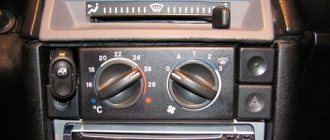
If the fan operating mode switch handle is in position A, then the controller also controls the fan speed depending on the difference in the air temperature in the cabin and the temperature set point.
A valve is used to quickly warm up the air in the cabin. 8
recirculation with switch
7
. When the valve is turned on, the flow of outside air into the cabin is blocked and only cabin air circulates through the heater.
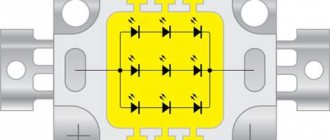
The vehicle is equipped with a heater fan electric motor of type 45.3730, excited by permanent magnets.
Additional resistor 2
serves to select the fan operating mode. It has two coils with a resistance of 0.23 and 0.82 Ohms. When you turn the heater fan switch knob on the heater control panel, you can turn on either both spirals (1st speed), or a spiral with a resistance of 0.23 Ohm (2nd speed), or turn on the engine directly without a resistor (3rd speed). I speed).
It is recommended to replace a faulty electric motor with a new one. The only possible repair is cleaning the collector.
Addresses of the heater control system controller output plugs
| Plug | Pad address | |
| 13-terminal | 6-terminal | |
| 1 | “Minus” of the micromotor gearbox shaft position sensor | Output "1" additional resistor |
| 2 | “Plus” of the electric motor of the micromotor gearbox | — |
| 3 | “Minus” of the cabin air temperature sensor | Housing ("mass") |
| 4 | “Plus” of the micromotor gear shaft position sensor | Output "3" additional resistor |
| 5 | “Plus” of the cabin air temperature sensor | Output “2” of additional resistor |
| 6 | "Plus" diagnostic output | "Plus" of the power supply |
| 7 | — | |
| 8 | “Minus” of the electric motor of the micromotor gearbox | |
| 9 | "Minus" diagnostic output | |
| 10 | — | |
| 11 | Input “Turn on backlight” | |
| 12 | Diagnostic output “+8 V” “Plus” of the electric motor of the cabin air temperature sensor |
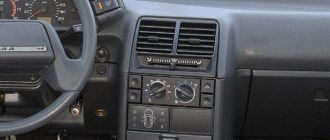
Location of the heater resistor on VAZ 2110-2112
To replace a burnt-out resistor yourself, it is enough to know where the part is located, as well as to have a minimum set of tools on hand. Regardless of what year the car is, the location of the rheostat remains the same - in the engine compartment, near the heater fan. During a visual inspection, this resistance block cannot be seen, because it is hidden by a plastic cover (“frill”).
For an accurate understanding of where the part is located, here is a photo.
Reasons for rheostat failure
Despite the simplicity of the design of the heating system in VAZ cars of the “tenth” family, resistor malfunctions often occur. Let's consider several main reasons for the breakdown of this part:
- short circuit in the circuit (more precisely, low resistance of the windings in the fan motor);
- tight movement of the stove impeller caused by contamination and lack of lubrication on the mechanisms. The jamming of the stove causes the resistor to burn out;
- Constant operation of the stove in the first position. It is worth periodically running the heater at high speeds.
Also, the cause of a resistor malfunction may lie in the poor quality of the part. It is enough to install the factory version, and the problem will go away.
As a recommendation, we note that for normal operation of the heating system, it is necessary to periodically service the stove, change the cabin filter and prevent dirt and dry leaves from getting into the stove.
Replacing a faulty resistance block
Because Apart from the body design, there are no differences in the mechanisms and main units between the VAZ 2110, 2111 and 2112; the instructions for replacing the heater rheostat are universal. You can repair a problem with the operation of the stove yourself if you have a couple of screwdrivers and several spanners.
The step-by-step process for replacing the rheostat looks like this:
- Open the hood and unscrew the wipers.
- Next, remove the plastic trim under the windshield (“jabot”).
- Remove the chip with wires from the rheostat and remove it from its seat.
Important! Before starting work, you should make sure that the cause of the problem lies in the resistor. The test is easy: get to the part and connect the multimeter to the power wires, then turn on the ignition. Another sign of a problem is that the stove operates only in the 4th position.
Also, as a recommendation, we note that at the time of disassembling the plastic lining, you can clean the stove cavity. When driving in the autumn, dry leaves and dirt often get into the stove, which makes it difficult for the fan to rotate.
Assembly
When installing a new damper, be sure to make sure that the fork located on its axis is clearly engaged with the lever. If the flap is in the raised position, you did everything right. Otherwise, it will be impossible to control the device, so you can forget about restoring the functionality of the stove.
Article on the topic: Instructions for replacing stabilizer struts on a VAZ 2114
Damper location
After this, reverse the assembly procedure according to the dismantling steps. Refill the system with coolant and check that the new damper is in place.
It is important to ensure that there are no leaks or tight hose connections.
Turn on the stove and check how the heater behaves. If everything is normal, you have carried out competent and successful work, for which we congratulate you.
Tips for using the stove
For several years of production of cars of the “tenth” VAZ family, engineers did not provide for the possibility of modifying the rheostat. The design with this part does not allow you to be 100% confident in the reliability of the heater. It is also worth noting that the location of the part is not the most convenient.
To ensure long-term operation of the resistor, we recommend following the following recommendations:
- use the stove in different positions and do not allow long periods of operation in one mode;
- If there are extraneous noises, creaks and whistles from the fan, it is recommended to stop its operation until the cause of the noise is eliminated.
Because The price of this part is low, and it often breaks down - we recommend carrying a spare with you in case of breakdown. We also note that in the absence of a spare part, the operation of the faulty heating element can be restored by resoldering the contacts. This method is temporary, so having instructions for replacement will not be superfluous.
Otherwise, the design of the heater in the “tenth” VAZ family is simple, so it rarely fails. The weak link in this design is the rheostat, but understanding how to replace it allows you not to think about a possible breakdown.
Source
Replacing the heater resistor VAZ 2112 16 valves
I welcome everyone who loves to make, fix and repair everything with their own hands. Mr.PykoJob will help you with advice, show you with an example, disassemble and assemble everything simply and easily!
With the onset of cold weather, a malfunction of the VAZ 2112 heater appeared. The airflow only worked at maximum speed. It immediately became obvious that the problem was in the resistor of the electric heater fan.
The problem is unpleasant, but easy to fix. In this article I will show you how to deal with it and fix it if you encounter the same problem.
To get the resistor, you need to remove the frill, disconnect the terminal and, by unscrewing one screw, remove the resistor itself.
Since I have an old-style resistor, the difficulty was that the spring-loaded contact was unsoldered. Therefore, we solder it back and check the operation.
After a successful test, we install everything in place.
While installing the resistor, the screw fell off because... it is located in an inconvenient place. For those RukoJobs like me, I came up with a little life hack to get the screw and not lose it again:
I attached a neodymium magnet to a screwdriver - in this way I took out the screw and simply and conveniently screwed it into place.
Source
Popular problems
Most often, owners of the domestic “ten” are faced with situations regarding the stove when the regulator does not respond to user manipulations. That is, the regulator does not work. Whatever position you choose, either cold or only hot air comes from the air ducts.
Scheme
There are different reasons for damper failure.
| Causes of failure | Characteristic |
| Micromotor gearbox jammed | This element is responsible for controlling the damper drive |
| Problem in the control unit | It should be checked in order to understand whether the micromotor gearbox, the damper, or the control unit is at fault |
| The plastic dampers have moved from their seat and are jammed, making it impossible to control the stove. | This is typical for the old-style VAZ 2110 heater damper, when plastic was still used for this component. |
When the gearbox is functioning, but the damper still does not turn, you can hear characteristic sounds - clicks. This indicates that a square shaft rotates inside the socket.
There is only one way to cure such a malfunction - remove the old damper made of plastic with foam insulation, and replace it with a new, modern one. The new type of damper is made of metal, and the seal for it is made of rubber.
DIY resistor replacement
To replace the VAZ-2112 heater resistor with a new one, you will need to perform a number of simple steps:
- Remove the “–” terminal from the battery to prevent a short circuit.
- We dismantle the lining, the trim from the frame on the windshield and the upholstery for sound insulation.
- The vacuum booster must also be dismantled, which will create difficulties when replacing a broken element.
- There is a block with wires on the resistor that needs to be disconnected.
- Now that access to the faulty element is provided, it is necessary to check its functionality. What if the problem of a non-working heater is not in this element, and we will replace the working resistor. To check, we will use an ohmmeter, which must be connected to the contacts one by one. If there is a deviation from the norm, you will need to change the resistor. Otherwise, you will need to look for the cause of the breakdown elsewhere.
- We remove the old element and install a new one in its place.
- The car is reassembled in the reverse order.
You already know where the heater resistor is located on the VAZ-2112 and how to replace it with a new one and can easily do this work yourself. And after these manipulations, your car’s heater will work like new. It will heat the interior at any speed and clearly respond to temperature control.
Differences in design
The VAZ 2110 was equipped with stoves of the so-called new or old model. Both systems, including those on the VAZ, which has an injector instead of a carburetor, are not particularly different in design.
So, the immediate differences:
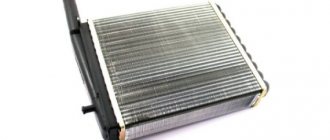
- The main difference between the new stove and the old one is in the design of the heater radiator. Therefore, if you are repairing a heating system and decide to install a new model instead of an old radiator, then take into account some nuances;
- In addition, the SAUO controller is also not exactly like that. 4 or 5 position controllers manufactured before the fall of 2003 have already been discontinued and are not suitable for new heater models;
- The micro-gearboxes are also different, starting from release in September 2003. They differ in resistors (shaft position sensors), so you need to check whether the resistor in the MMR model that you purchased is interchangeable.
DIY fuse replacement
One of the reasons why the heating system refuses to work is a burnt-out fuse for the VAZ-2112 stove, located behind the heater. The fuse that belongs to the heating system is marked F7. The current strength is at 30A. This part is also related to the operation of the cigarette lighter, optics washer, lighting system in the glove compartment and heating on the rear window. Thanks to such a system, you can easily determine that it is the fuse for the VAZ-21124 stove that needs to be replaced - not only the heater will refuse to work, but also all the elements that were listed above.
There is nothing difficult in replacing the VAZ-2112 heater fuse, you already know where it is located and what marking it has. We simply remove the burnt out part and install a new one in its place. But fuses don't just blow. This is caused by a short circuit in the car circuit. If it is not found and repaired, the fuse will blow again and require replacement. And this is much more difficult, because in some cases it is necessary to go through the entire circuit of the car in order to detect the short one.
Decoding the fuses of the mounting block for VAZ 2109, 2108, 21099.
Decoding will be done in double format, where F1-F16 is the mounting block 2114-3722010-60, 2114-3722010-18, and numbers from 1 to 16 are the old-style mounting block 17.3722.
- 1 (8 A) F9 (7.5 A) – Right fog lamp;
- 2 (8 A) F8 (7.5 A) – Left fog lamp;
- 3 (8 A) F1 (10 A) – Headlight washers, relay and washer valve;
- 4 (16 A) F7 (30 A) – Headlight cleaners, headlight cleaner relay, heater fuse, front and rear window washer motor, radiator cooling fan relay, glove compartment light, rear window heating relay;
- 5 (8 A) F16 (15 A) – Oil pressure lamp, turn and hazard indicators, rear lights, windshield wiper switch gear, brake fluid level lamp, parking brake lamp, “STOP” lamp, temperature and fuel level indicator.
- 6 (8 A) F3 (10 A) – Tail lights and interior lighting.
- 6 (8 A) F6 (30 A) – Window regulators and power window relays.
- 7 (8 A) F10 (7.5 A) – Rear state lighting. numbers, dashboard lighting, cigarette lighter lighting, heater lever lighting.
- 8 (16 A) F5 (20 A) – Horn, engine cooling fan motor and its relay.
- 9 (8 A) F10 (7.5 A) – Dimensions of the left headlight and left rear light.
- 10 (8 A) F11 (7.5 A) – Dimensions of the right headlight and right rear light./li>
- 11 (8 A) F2 (10 A) – Hazard alarm and its lamp.
- 12 (16 A) F4 (20 A) – Cigarette lighter, heated rear window and its activation relay.
- 13 (8 A) F15 (7.5 A) – High beam of the right headlight.
- 14 (8 A) F14 (7.5) – High beam of the left headlight and lamp for turning them on.
- 15 (8 A) F13 (7.5 A) – Low beam of the left headlight.
- 16 (8 A) F12 (7.5 A) – Low beam of the right headlight.
Replacing the heater resistor VAZ 2112 16 valves
- To the beginning of the forum
- Forum Rules
- Old design
- FAQ
- Search
- Users
The 1-2-3 speeds of the VAZ-2112 2004 heater do not work. As I understand it, you need to buy an additional heater resistor? Is it installed under the frill and screwed into the stove body?
If someone has already changed this additional resistor, tell me, is it possible, without buying it, to repair the old one, solder and replace the resistors? Does it have a thermal fuse and can it be replaced with a fuse? If so, what amperage fuse? Thanks in advance for your answers!
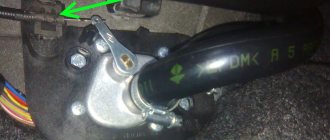
RDO 2108-8101081 is used on the oldest SAUO units, which have only 2 speeds. (0 A 1 2). RDO 2110-8118022-01 is installed on a modified heater until September 2003, the SAUO unit has 3 speeds (0 A 1 2 3). The most common malfunction in this resistance is that all stove speeds stop working, except maximum 3. The reason is that the thermal fuse is unsoldered (indicated by a red arrow), and is treated by soldering it in place. But if it is unsoldered later, you need to look in the direction of the motor, the motor takes a very large current (not lubricated, wear on the brush assembly, etc.). RDO 2123-2118022 has been installed on the latest heaters since September 2003, the SAUO unit has 4 speeds and does not have an auto mode (
0 1 2 3 4
).
Here I have a block like this, with stove speeds 0 1 2 3 4 I’ll try to repair the old one, there are only two resistors and a thermal fuse.
Added after 38 minutes 47 seconds:
Does anyone know what thermal fuse is needed to repair this additional resistor?
?
Because, if in the second picture the thermal fuse is soldered with low-melting solder (as far as I can see), then in the third picture it is simply replaced by a fusible temperature insert (a cylinder on two antennae) and it does not unsolder, but simply burns out.
Source
How to check the serviceability of the SAUO controller
To check the automatic control system, you will need a multimeter to measure the voltage on the pink and brown wires (turn on the ignition and turn the temperature knob). Depending on which controller is installed on the car, the voltage changes differently. On cars before 2001, a heater control controller 1303.3854 was installed; its voltage in the “min” position decreases after 13 ± 5 seconds, and is constantly supplied to o. Thus, when the output voltage of the ACS unit does not change, it is not working. On cars after 2003, block 1323.3854 and stove 2111-8101012 were installed.
When the controller malfunctions, the dampers may not work, but in order to diagnose other causes of the malfunction of the VAZ 2110-12 heater, you will have to disassemble the heater.