Let's consider the features of installing a previously removed or new distributor (ignition distributor) on the engine of VAZ 2108, 2109, 21099 cars. We will carry out the installation taking into account the fact that the position of the distributor on the engine, before removal, was not remembered or noted in any way. Therefore, it is necessary to install the distributor so that the ignition timing is as close as possible to the required one, so that you can then start the engine.
We install the pistons of the first and fourth cylinders of the engine at the highest dead center
To do this, turn the crankshaft clockwise until the mark on the camshaft pulley matches the protrusion on the rear timing cover.
In the hatch on the clutch housing, the long mark (mark) on the flywheel should be opposite the triangular cutout of the scale.
You can turn the camshaft pulley mounting nut with a 17mm wrench (to do this you will have to remove the protective cover of the timing drive) or with a large slotted screwdriver by the flywheel teeth in the clutch housing hatch.
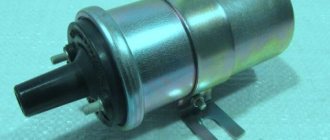
Preparing the distributor for installation
Let's remove the cover from it. We install the contact of the slider on the output of the high-voltage wire of the first cylinder. This can be done by placing the cover on the distributor and finding the mark for the output of the first cylinder on it.
aligning the slider and cover before installing the VAZ 2108, 2109, 21099 distributor on the engine
Installing the distributor on the engine
Lubricate the sealing ring of the distributor with engine oil. We insert it into the mounting socket on the studs. In this case, the protrusions on the distributor shaft coupling should fit into the slot at the end of the camshaft. If the first two points are fulfilled, then they will coincide.
We secure the distributor, but do not tighten the nuts completely, since later we will set the ignition timing and it will be necessary to rotate the distributor. Replace the cover and tighten the two screws securing it. We connect the high-voltage wires to it in the correct order.
Setting the ignition timing
Notes and additions
— Cylinder counting on VAZ 2108, 2109, 21099 engines is carried out from the timing drive. That is, the first cylinder is the farthest from the distributor.
More articles on VAZ 2108, 2109, 21099 cars
The vehicle's ignition system plays a very important role in the operation of the engine, regardless of the power system. Thanks to it, the supply of spark to each of the chambers is controlled, depending on the marks on the cylinder covers located on the cylinder cover. In the carburetor “nine” this order is numbered: 1-3-4-2.
Depending on the advance angle set in the distributor, ignition can be late, early or normal. For front-wheel drive vehicles, this process is of particular importance.
The procedure for removing and installing the distributor on a VAZ 2109-2108
So, before you begin removal, pay attention to the installation position of the distributor relative to the body. Be sure to remember or mark it so that when installing it, put it in the same position.
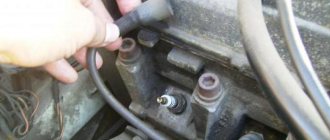
Then you need to disconnect the high-voltage wires from the distributor cap: 4 spark plugs and one central one from the ignition coil:
It is also necessary to disconnect the plug with wires, which is clearly shown in the photo below:
Then we pull off the thin hose from the vacuum corrector of the distributor:
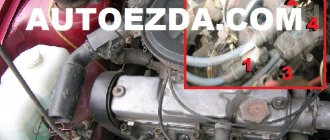
Now you can proceed directly to unscrewing the nuts securing the VAZ 2109-2108 distributor itself. There are three of them in total: one is located in the center at the top:
And the other two are located on the sides, and it is more convenient to unscrew them with a regular open-end wrench, since a ratchet with a head simply cannot get there. Do not unscrew the side ones completely yet, as you need to set the TDC marks.
But before removing the ignition distributor, it is necessary to install the piston of the 1st cylinder at TDC. To do this, through the hole in the gearbox housing (after removing the rubber plug), you need to align the marks on the housing and the flywheel. With the gearshift lever in the neutral position, use a 19mm key to turn the crankshaft pulley to the required torque. This is what it should look like:
And only after this we unscrew the two remaining nuts and begin to remove the distributor, removing it from the studs to the side:
If you decide to replace the distributor, then you need to buy a new one, the price of which for VAZ 2109-2108 cars is about 1000 rubles. Before installation, you must remove the cover by unscrewing the two bolts that secure it:
And when you put it in place, make sure that the outer contact of the slider during installation is exactly opposite the output of the first cylinder on the cover:
That is, after the distributor is placed on the housing studs, lean the cover and see if the position of the contact of the slider coincides with the output of the 1st cylinder:
And after that, we finally tighten all the nuts securing the distributor and install the cover in its place. And do not forget that it is necessary to maintain the original position of the distributor relative to the body in order to maintain ignition timing.
What are the functions of the VAZ 2109 distributor and what does it represent? Is it possible to repair it? Let’s take a closer look.
Car enthusiasts call this device a distributor. Its main purpose is to transmit a signal to the switch and distribute a spark to the spark plug. Depending on the ignition system, the distributor performs certain functions that are not very different from each other. The main components of the element are the sensor and the distributor.
How does a VAZ distributor with a contact system work?
- 1. The main components are: a shaft, a slider, a plate with weights and springs for contact, a capacitor and a corrector;
- 2. The shaft is a device with two moving parts connected to each other, one of which has cams;
- 3. The mobility of the element is ensured by a corrector assembled from cams;
- 4. Under its rotation, the cams diverge, as a result of which all the springs are stretched, and only the upper part rotates in relation to the lower one at the desired angle;
- 5. Thanks to the traction, the vacuum device is combined with the contact plate and the vacuum tube;
- 6. After opening the throttle valve, a vacuum of air occurs, leading to the rotation of the moving contact plate;
- 7. A capacitor is placed on the surface of the distributor, which is necessary to minimize the spark and increase the secondary voltage;
- 8. The slider redistributes the voltage to the spark plugs.
Ignition adjustment
Before you begin adjusting the ignition, you need to prepare the engine. To do this, it should be warmed up for several minutes. After this, with the engine running at minimum idle, remove the silicone tube from the carburetor side so that it remains attached to the vacuum ignition timing regulator, and check if it is discharged. If there is no vacuum, you can turn off the engine. Next, plug the hole in the tube. To do this, it is advisable to use a regular bolt. After this, you can begin adjusting the ignition system.
First of all, you need to unscrew the three nuts on which the distributor is attached. The “nine” has a special hatch with a scale for adjusting the ignition angle.
The VAZ flywheel must be positioned so that the transverse mark is opposite the triangle located on the scale. This flywheel position is designed to keep the pistons of the first and fourth cylinders at top dead center, with the ignition timing equal to zero.
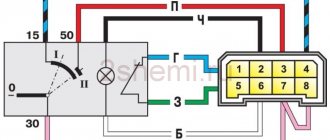
Next you will need a strobe light. It must be connected to the circuit according to the diagram applied to the device model. The usual connection diagram is as follows: The red wire from the strobe light must be connected to the positive terminal of the battery, and the black wire to the minus sign, and the metal clamp must be installed on the wire of the fourth cylinder.
Then you can check the installation. To do this, start the engine and point the detection device at the hatch with the scale. The mark located on the flywheel must correspond to the correct division on the scale, and the triangle must indicate the zero position. Slowly turn the distributor clockwise until the mark on the scale moves by 2 degrees (92 gasoline) or 6 degrees (for 95).
After installing the ignition, disconnect the strobe light and remove in sequence: the wires from the fourth cylinder, the battery and the coil. Connect the silicone tube back to the carburetor.
Next, you need to check whether the ignition system is set correctly. To do this, start the engine and warm it up to operating temperature. If everything is done correctly, the symptoms that were present before will disappear. If everything is still the same, you need to look for the problem in the carburetor.
Sometimes, for example, on a deserted country road, it is not always possible to find a strobe light. In this case, you can adjust without a strobe using a light bulb. To do this you need:
- Disconnect the wire going from the ignition coil to the distributor. You need to connect a wire from the lamp to it, and connect the second one to the car body.
- Just as when working with a strobe, unscrew the distributor mount.
- Start the engine. The lamp should light up. After this, you should slowly rotate the distributor until the light from the light bulb goes out. After this, you need to smoothly and carefully turn the distributor in the other direction until the lamp turns on. As soon as the light appears, the fastening can be tightened.
Distributor 2109, like all parts, tends to break
What signs indicate a malfunction, what to do in this case, and is replacement possible?
Signs indicating distributor failure and possible future repairs:
- Jerking of the car while driving;
- Failure of the power unit to start;
- Tapping of the piston pins when the car picks up speed;
- The car cannot reach the required speed;
- Fuel is consumed more than expected.
What causes the VAZ 2109 distributor to fail?
- The slider has failed;
- Damaged contacts;
- Malfunction of the sensor;
- Bearing failure;
- The cover is damaged, there are cracks on the surface;
- Broken contact in the hall sensor plug.
In order to eliminate the malfunction, replacement of faulty spare parts will be required. Repair of the distributor can be carried out either in a car repair shop or independently. The first option is more acceptable, since only a qualified specialist can determine whether parts need to be replaced or the entire element needs to be repaired.
How to repair equipment yourself?
- 1. Disconnect all kinds of wiring, fastenings, remove the distributor according to the diagram shown below;
- 2. Pay attention to the presence of burning stains and damage to contacts;
- 3. A fully functioning slider must fit tightly to the equipment, otherwise it must be replaced;
- 4. Assess the degree of tension in the spring; if it is weak or has changed its appearance, replacement will also be required.
Only correct identification of the causes of failure can guarantee high-quality repairs.
How to remove and install the distributor on a VAZ 2109
- 1. Disconnect the wire from the negative terminal of the battery;
- 2. Completely disconnect all high-voltage wires;
- 3. Disconnect the throttle valve drive cable;
- 4. Unscrew all nuts. This is necessary in order to remove the device from the bracket that secures the wires;
- 5. To maintain the initial ignition timing, make marks on the distributor body and the drive of auxiliary elements;
- 6. Pull the wires out of the ignition distributor. To do this, use a screwdriver to bend the clamps;
- 7. Remove the rubber plug located in the crankcase hatch;
- 8. Start cranking the crankshaft until the piston of the first cylinder is located at TDC;
- 9. After unscrewing the remaining nuts, remove the distributor;
- 10. Installation and replacement of equipment on a vase is carried out in the opposite order.
General tips for connecting high-voltage wires.
Checking high-voltage wires. To check the wires, you will need a multimeter tester. Check the resistance of the wires - it should be no more than 20 KOhms (in practice, the longest wire of cylinder 1 has a resistance of up to 10 KOhms). If the wire resistance is more than 20 Kom, it must be replaced. Carefully inspect the wires for chafing on parts of the motor or other wires. In case of significant abrasion, replace the wire. In case of minor abrasion, it is possible to lay the wire so that it does not rub and fix it in this position.
Laying wires. Do not try to connect the wires in a bundle. Disassemble the wiring harnesses, release the wires from the plastic holders. Connect the high-voltage leads to the corresponding cylinder spark plugs. Lay the wires so that they do not rub against each other, engine parts, or hoses. Avoid sharp bends and tension on the wires. After connecting all the wires, secure them into the bundle with special comb holders included in the delivery kit.
Operating principle
On a VAZ-2109 car, the distributor works as follows:
- high voltage voltage is generated by a coil according to the principle of electromagnetic induction;
- This voltage goes through the high-voltage wire to the central contact in the ignition distributor cap, which is constantly in interaction with the slider;
- the latter distributes the electrical impulse over four contacts, each of which corresponds to a specific spark plug;
- The slider constantly rotates when the engine is running and thereby closes the central contact with the contacts of each spark plug.
The voltage to generate a spark is supplied to the spark plugs through wires in the order of operation of the cylinders - this is 1-3-4-2. The slider moves due to the drive shaft connected to the engine camshaft.
Engine workflow through cylinders
The cylinders are activated as follows:
- In the first there is an upward movement. The gases expand and the mixture of air and fuel burns.
- In the third, to carry out the compression procedure, the piston rises.
- In the fourth, “injection” occurs - the piston moves down and at the same time a mixture of air and gasoline enters the cylinder.
- In the second cylinder, the piston rises and takes the upper position so that gases escape through the valve system. After which the exhaust gases are removed from the power unit.
VAZ-2109 distributor device
These cars can be equipped with two ignition systems - contact and contactless. Depending on the specific system, distributors may vary. They differ in design, but their function is the same. So, on a VAZ-2109 the distributor can be equipped with contacts. On more modern cars - sensors. If the ignition is contact, then a breaker with a slider is used. There are no sliders in contactless ignition. There is a special sensor here. The remaining characteristics are identical.
Distributor device with Hall sensor
On the VAZ-2109, the manufacturer installed a contactless type distributor equipped with a Hall sensor. It is four-spark, additionally equipped with a centrifugal and vacuum corrector.
In addition to correctors, the device has other elements that contribute to proper operation. Thus, the distributor is equipped with a special plastic screen. It is necessary to protect the working surfaces of the mechanism from dust and dirt. The slider mounted on the distributor rotor has a constant resistance of about 1 kOhm. In addition, the design includes thrust washers, lock washers and O-rings. The body is one-piece, aluminum.
Which to choose
Independent experts and service workshop specialists advise buying an original hall sensor for the VAZ 2109. Here is the serial number: 21080-3706800-00. If the seller does not have the original in stock or the wait for an order via the Internet takes a long time, then you can purchase an analogue.
Table 1. Prices and numbers of hall sensor VAZ 2108–21099
| Manufacturer | Number | Cost in rub. |
| LADA | 21080-3706800-00 | 590 |
| AVTOVAZ | 21080370680082 | 240 |
| GALLANT | GLSS133 | 230 |
| AUTO ELECTRONICS | 21080370680000 | 195 |
| AVTOVAZ | 21080370680001 | 190 |
| REMCOM | RK02008 | 150 |
Sources: exist.ru, autopiter.ru
Factory products may have different endings in numbers, for example, 1, 2, 3 and so on. It's not fake. This is simply a product produced at a related enterprise of the Tolyatti auto giant.
How does the Hall sensor and centrifugal mechanism work?
On a VAZ-2109 car, the distributor corrects the ignition timing during engine operation. This is possible due to the use of a centrifugal device in the design. It can affect the slider when the engine accelerates sharply. The centrifugal mechanism is similar in design to those devices that were installed on contact-type ignition systems. In addition, the breaker on the VAZ-2109 car is also equipped with a vacuum corrector. When a vacuum is created in the intake manifold, it is then transmitted through a special tube to the corrector chamber. There is a rubber diaphragm there. The latter is connected to a rod, which is fixed to the plate. This is where the Hall sensor is located. This element made it possible to remove the contact group from the distributor and make the operation of the ignition system more stable.
The Hall sensor, together with this plate, can move, thereby adjusting the ignition timing. In this case, the SOP increases or decreases. It depends on the number of revolutions and how intensely the engine picks them up.
Dismantling
After dismantling the distributor, you can disassemble the device in order to repair its components, or completely replace the distributor with a new unit.
- De-energize the car by removing the negative from the battery;
- Disconnect the high-voltage components and the vacuum ignition corrector hose from the distributor;
- Remove the drive cable responsible for the throttle valves from the bracket. Next, the fastening nuts are unscrewed and the bracket is dismantled;
- Before removing the ignition distributor, apply a mark to the housing of the distributor and drive of auxiliary elements. This way you can simplify your task of setting the ignition timing for its precise setting. The mark is applied to the metal by scratching;
- Press the latch holding the block with the power wires and disconnect it from the distributor;
- Place the piston from the first cylinder to the top dead center position by moving the engine flywheel clockwise;
- Unscrew the remaining ignition distributor screws. The first fastener was removed when removing the damper cable sheath bracket;
- Remove your damaged distributor.
Disassembly and repair
Quite often, repair work with the distributor is associated with wear and the need to change the seals (coupling). To change the oil seal, as well as other failed components of the distributor, we bring to your attention the appropriate instructions, as well as video tips.
- Remove the ignition distributor cap by releasing the locking clip.
- Remove the slider. It is wiped with a clean rag and checked for mechanical damage. If there are chips or cracks, the element must be replaced.
- The runner must fit tightly on the shaft, which is achieved due to the presence of a plate spring with a pressing action. If it stretches or breaks, replace it.
- There is a resistor in the slider housing. The normal reading of its resistance is 1 kOhm. By measuring the data with an ohmmeter, you can draw conclusions regarding the performance of the component.
- Remove the low voltage wiring terminal. To do this, unscrew the mounting screw from the housing.
- Remove the plastic screen that serves as dust protection.
- A power wire comes from the Hall sensor and is held by the holder's claws. Using a screwdriver, the claws are opened and the wire is removed. Next, you need to unscrew the pair of mounting screws securing the Hall sensor support plate.
- Remove the vacuum corrector. Just be sure to disconnect it from the support plate lever before doing this. To perform this operation, carefully remove the retaining ring from the pin.
- The next step is to remove the pair of screws that hold the corrector to the distributor body.
Disassembling the unit
- Lift the corrector lever slightly, which will allow you to remove it from the sensor plate pin and remove the corrector itself.
- These steps will allow you to easily remove the support plate by lifting it with a flat head screwdriver. Remove the element. The plate must be replaced if the bushings are worn out or there is mechanical damage to the unit.
- Unscrew the two fasteners to disconnect the plate and the Hall sensor.
- You need to remove the oil seal, that is, the coupling. It is located on the distributor shaft. The coupling is closed with a thrust washer. That, in turn, is fixed with a retaining ring. You first need to remove the ring, which will make it possible to remove the thrust washer.
- Remove the oil seal by knocking out the pin with a small-diameter borer. Determine the dimensions of the boletus during the repair process.
Checking for damage
- There are adjusting washers under the oil seal.
- Remove the roller along with the centrifugal regulator from the distributor body.
- Clean the housing using kerosene and a dry cloth. Make sure that there are no mechanical damage, chips or cracks on the case.
- Examine the condition of the bushings. The roller rotates on them, and with severe wear, the roller begins to become loose. Also, the device is replaced along with the bushings if there are signs of wear, defects, or damage.
- To disassemble and replace damaged elements of the centrifugal regulator, you first need to remove the weight springs using a screwdriver.
- If the springs are intact and undamaged, not deformed, make notes on their seats. If you mix them up during assembly, problems may arise.
- Remove the driven plate along with the screen from the shaft.
- Make sure how effectively the weights move along their axes. Movements should be free, without any jamming. If there are problems, the weights are changed.
- It is a mistake to check the movement of loads without first removing and cleaning them.
Symptoms indicating a malfunction
It is not difficult to determine that a VAZ-2109 distributor with a carburetor is broken. The car will jerk when driving. However, there are no other reasons for this behavior. If the tank is filled with high-quality gasoline, the fuel pump and carburetor are working properly, then the distributor is to blame for the vibrations. When the car picks up speed, the engine will rev.
Malfunctions can also be judged by an engine that refuses to start. When you press the accelerator pedal and increase speed, detonation occurs. This also indicates a non-working distributor. If the dynamics have deteriorated significantly, then the distributor should be checked. When the fuel rises, the first thing you need to do is find out if the breaker is working, and only then turn the carburetor.
Typical faults
Among the main and frequent breakdowns, several can be identified:
- So, the slider may burn out, and this may cause problems with starting the engine. The engine may start, but will immediately stall.
- If the fastening of the distributor is loosened, the OZ could be damaged. This can lead to difficulty starting, loss of power, and unstable engine idling. This is also one of the reasons for increased fuel consumption. To fix it, tighten the fastening with a 10 mm wrench - rotate two nuts, as well as one bolt.
- Another popular cause of malfunction is the distributor wires (VAZ-2109). They may be connected incorrectly or the order may be out of order. The engine may not start at all, or it will start, but at the same time it will “sneeze”.
- Oxidation or destruction of contacts in the cover is a common problem that occurs with ignition distributors for VAZ. If the contacts are oxidized, you can try to restore them with white spirit. This is one of the reasons why the engine troits.
- In addition, the distributor cover may be broken. VAZ-2109 quite often worries its owner about this. You can see the breakdown location very easily. It is clearly visible. A failed cover can cause current leaks, causing various interruptions in the operation of the motor.
- Another problem with the lid is the contact carbon in the lid breaking or wearing off. In this case, the engine will not start. To eliminate the cause, replace the coal separately or the entire lid. If the Hall sensor is malfunctioning, the engine will not be able to start. If the wires from the sensor are broken, the result will be the same.
- If the vacuum corrector is faulty, the power unit will not pull up. The power and throttle response of the engine will decrease. The vacuum regulator sets the angle under load a little earlier. One of the possible reasons is a lack of tightness in the regulator body or a leak in the hose from the carburetor. Or the rotary plate of the corrector may be stuck. You can try to fix the leak. But often a complete replacement of the distributor on a VAZ-2109 is required. The asking price is up to five hundred rubles.
Replacing vacuum distributor
By and large, the record is trivial for me so as not to forget when I changed the vacuum. But for those who are interested, you can read a little about what it serves and how to diagnose a breakdown, and in general, what a trubler is and what it is for. Lots of BukF. :))
Actually, I installed this vacuum today to replace the old one with a broken diaphragm, all this pleasure cost 19 UAH.
What is a distributor in a car, what does it consist of, how does it work?
For normal operation of a gasoline internal combustion engine, the formation of a spark is necessary in a timely manner. For this purpose, a special device is used to ensure its appearance when the piston is in the TDC (top dead center) position, and sparking occurs in different cylinders at different times. Such a device is called a breaker-distributor, or in other words, a distributor. Without it, not a single gasoline internal combustion engine operates, and for many years it was an integral part of any ignition system, including VAZ 2109, 2106, 2107, 2108.
Why do you need a distributor?
The ignition system is a critical part of a gasoline engine.
The operation of the latter is based on the timely combustion of the fuel-air mixture (FA), for which purpose a high-voltage voltage is specially generated, which is then supplied to the spark plugs. A spark is formed on them, causing combustion of the fuel assemblies, as a result of which the engine performs useful work. All these processes require a distributor. If we evaluate its role during the operation of the ignition, it should be noted that it: - initiates the onset of spark formation, due to the opening of the breaker contacts (in more modern car models, for example, VAZ 2109, 2106, 2107, 2108 of the last years of production, a Hall sensor is used for these purposes );
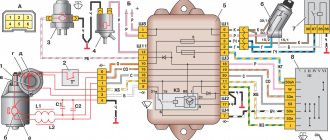
— directs the high voltage generated in the ignition coil to the desired spark plug; — changes the beginning of the moment of spark formation depending on the driving modes and the fuel used, for which vacuum centrifugal regulators are used; — provides accumulation and discharge of energy in the reel. A functional ignition diagram will allow you to better understand what the distributor is used for and how it works:
Operating principle of the distributor
In many ways, the operating principle of the distributor remained unchanged for many years. In VAZ cars, such as VAZ 2109, 2106, 2107, 2108, an ignition system of this type was used almost until the end of the last century.
The basis of the work is the connection of the distributor with the engine crankshaft. When the piston in the first cylinder takes the position corresponding to TDC, the breaker contacts open, a high voltage appears in the ignition coil, directed through a slider located in the distributor cover to the spark plug of the first cylinder.
There the combustion of the fuel assembly occurs, and the crankshaft continues to rotate. In addition to moving the pistons, it causes the breaker cam to rotate. When in another cylinder another piston occupies a position corresponding to TDC, at this moment the breaker contacts in the distributor open again, and a high-voltage voltage is generated in the ignition coil and supplied to the desired spark plug.
This joint rotation of the crankshaft, the breaker cam and the distributor slider ensures that a spark appears where and when needed. However, this does not cover all aspects of how the distributor works. To understand its operation, it is necessary to touch upon such concepts as the angle of the closed state of contacts (UZSK) and the ignition timing angle (IAF)
UZSK
A concept such as UZSK characterizes the time when the breaker contacts are closed. In essence, this is an indirect characteristic of the accumulation of energy in the coil after the completion of spark formation. UZSK directly affects the amount of energy spent on sparking and, accordingly, on engine operation.
In cases where the distance between the contacts is small, the coil will not accumulate the necessary energy and the spark energy will be low, which will lead to interruptions in the operation of the motor. A large gap also leads to interruptions, since the contact breaking time is reduced and the coil does not have time to fully discharge.
Each ignition system has its own optimal UZSK, to ensure which, if necessary, the distributor must be checked and adjusted.
UOZ
This concept concerns the moment of ignition of a fuel assembly. The fact is that its combustion does not occur instantly, and often, to ensure optimal conditions for such a process, it must begin earlier than the piston reaches the TDC position. The OZ characterizes the time by which the appearance of a spark precedes the appearance of the piston in the TDC position.
It is constantly changing, and its value completely depends on the operation of the motor under specific conditions, i.e. depending on the load, vehicle speed, quality and type of fuel used. To ensure optimal combustion of the fuel assembly, the distributor contains a centrifugal regulator and is also connected to a vacuum regulator.
What does the distributor consist of?
A device such as a distributor includes a large number of different parts. It is not the purpose of this material to consider their purpose, but you can see what components the distributor consists of in the figure below
As can be seen from the figure, the distributor consists of several independent units. And if the purpose and operating principle of the voltage distributor unit are simple and clear, then you can familiarize yourself with the work of others in more detail. However, it is advisable to check the condition of the high-voltage distributor and slider each time the car is serviced.
Centrifugal regulator
Such a device determines the moment when fuel assemblies begin to burn in the engine cylinders. As already noted, a spark initially appears when the piston reaches the TDC position, and it is at this moment that the distributor is initially adjusted. However, two points need to be taken into account:
— Combustion of fuel assemblies occurs at a constant speed, starting from the spark plug and then spreading further throughout the volume of the cylinder. Combustion does not occur instantly, and the greatest efficiency of a gasoline internal combustion engine is achieved when the piston has passed TDC and reached BDC (bottom dead center). — When the engine is running, the crankshaft speed changes, increasing it reduces the time required for efficient combustion of the fuel assembly. To eliminate this contradiction, the concept of CVD is introduced, which implies the start of fuel combustion before the piston reaches TDC. The device that ensures the formation of the UOZ is a centrifugal regulator, shown in the figure; it consists of weights connected by springs and a plate.
Its operating principle is based on centrifugal force; an increase in crankshaft speed causes the weights to diverge, and through the plate - a change in the position of the cam and the runner. This will cause the contacts to open sooner and will also cause high voltage and spark to occur earlier. The fuel assembly will ignite when the piston position has not reached TDC, which will ensure its efficient combustion.
Distributors from different manufacturers have a similar adjustment of the fuel assembly ignition moment, including in VAZ 2109, 2106, 2107, 2108.
Vacuum regulator
Such a device is designed to change the SOP when the engine load changes, determined by the position of the throttle valve. The following figure will help you understand how this is done:
The vacuum regulator is a closed cavity separated by a diaphragm. One of the cavities is connected to the carburetor. The vacuum created in it, depending on the position of the throttle valve, causes the diaphragm to move. A change in its position is transmitted through the rod to the movable disk, which affects the position of the breaker cams, adjusts the time of its operation (earlier or later), and, accordingly, the ignition time of the fuel assembly.
Thus, the distributor, depending on the load on the engine, changes the moment of spark formation, affecting the characteristics of the engine. This adjustment is present in all VAZ 2109, 2106, 2107, 2108 cars, and the joint operation of the described regulators can ensure efficient engine operation over the entire range of loads and crankshaft speeds.
In order to check whether the vacuum regulator is working properly, simply remove the end of the tube from the carburetor and pull air toward you. A working regulator should keep the air discharged inside. If the discharge disappears, then the membrane of your vacuum is broken, and such a regulator will not work. This will cause your engine to run rough, become dull when accelerating, and jerk when driving smoothly at a steady speed.
Octane corrector
This device allows you to mechanically change the OZ depending on the fuel used (octane number) or its quality. You can see the corrector in the figure below.
In fact, these are two plates, one is installed on the distributor and has an arrow, the other is attached to the engine, and there are marks on it. By changing their position in relation to each other, you can mechanically set the desired ignition angle. This is required mainly when using different types of gasoline.
Contactless systems and Hall sensor in the distributor
The distributor described above is a classic version and was used for many years on all cars, including the VAZ family, such as 2109, 2106, 2107, 2108. However, as electronics developed, voltage switches began to appear in which the breaker signal was used not for switching the ignition coil, but for controlling the electronics. Later, the distributor lost its mechanical breaker and was replaced by a Hall sensor.
The Hall sensor used has a fairly simple design. Yes, it must be recalled that the Hall sensor is an element that responds to a magnetic field. Therefore, the design of the sensor using Hall elements is based on this principle. To do this, a Hall sensor is located directly on the plate, on the other side there is a permanent magnet, and between them there is a rotating metal screen in which special slots are made.
When the screen blocks the field from the installed magnet, the Hall sensor has zero voltage at the output; when windows are opened instead of a solid screen, the Hall sensor generates a high voltage at the output. The distributor transmits this generated sequence of pulses to the voltage switch, and it controls the ignition coil.
At one time, a similar system was implemented in many cars, VAZ 2109, 2106, 2107, 2108 were no exception.
How to check the distributor
The most common manifestations of an ignition malfunction will be as follows: - floating idle; — engine that won’t start; - engine stalling while driving.
Most often, the cause of this may be the distributor. The easiest way to check the performance of the ignition, including the distributor, is as follows. To do this, unscrew the spark plug, bring it to the engine and start it, observing the appearance of a spark. If it is not there, then you need to check the functionality of the high voltage wires. If there is no spark again, then the diagnosis is clear - the distributor has failed.
In this case, you need to visually check the condition of the slider, the condition of the contacts and the distributor cover. Burnt contacts are cleaned and dust and debris are removed from the internal surfaces of the distributor. In a workshop or garage, you can check the performance of the ignition and distributor using measuring instruments and indicators.
The distributor appeared on the car almost simultaneously with the gasoline engine, and for many years remained almost unchanged, including on domestic cars of the 2109, 2106, 2107, 2108 family. And only after the advent of a modern element base, which includes the Hall sensor, gave way to contactless and then microprocessor ignition systems.
How to replace the distributor?
To dismantle, remove the negative terminal from the battery. Then remove all high-voltage wires that go to the cover. Next, disconnect the hose from the vacuum corrector. After this, remove the bracket, holding the wires. Installation of a new distributor on a VAZ-2109 is possible only in one rotor position. This makes the process easier. There is no need to make any marks. To install a new distributor, you need to install the device in its original place, and then tighten the nuts that secure it to the engine. This completes the replacement procedure.