Once, after parking for a week, the car would not start - the battery was completely discharged...
The battery was removed for subsequent charging and the next day the search for the gluttonous culprit began; the current consumption of the armed car for 3 minutes was an indecent 150 mA.
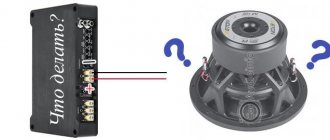
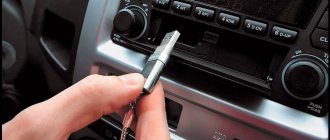
After suspicions from the signaling were removed, it was time to check the radio (Alpine CDE-170RM): 1. Turn on the radio - the current consumption increased to 530 mA; 2. Turn off the radio - the current consumption dropped to the same 150 mA; 3. We remove the radio socket - the current consumption has dropped to a remarkable 40 mA.
It turns out that the visually disabled radio does not turn off completely and consumes as much as 110 mA, which is too much for the settings memory, however.
Of course, you don’t have to bother and remove the panel every time, but it’s interesting to get to the bottom of the problem.
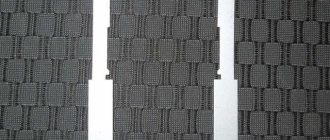
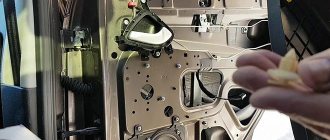
We check the connection of the power part of the radio to section A of the ISO connector - everything is in order, as per the instructions, although it was confusing that when the ignition is turned off, there is + 12V from the ignition switch on the connector contact, which should not be there, we take it out, look and are surprised:
To figure out what’s what, let’s find the pinout of this connector on the Internet and compare it with the image of the connector:
It is worth noting that not all radios are susceptible to this “problem”; some of them can turn off completely even with this connection, so you need to check.
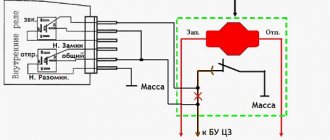
As always, the Internet helps out - after a short search, a simple and elegant solution was found based on two diodes:
To implement this scheme, we will need to run an additional wire to the radio connector. Since the main consumption of the radio comes through the constant + 12V contact from the battery (usually a thick yellow wire), and the 7th contact simply allows it to be turned on (usually a thin red wire), a wire with a cross-section of 0.5 mm2 was pulled from the fuse box, 31 th contact:
For those who are not familiar with the principle of operation of diodes, I made the following picture:
After all the modifications, the turned off radio no longer consumes current, and to listen to music in a turned off car, you just need to perform 3 steps: 1 - Turn on the ignition; 2 — Turn on the radio; 3 - Turn off the ignition.
Tools:
- Open-end wrench 10 mm
- Small flat screwdriver
- Knife (if necessary)
- Soldering iron (if necessary)
Parts and consumables:
Notes:
Initially, in this car model, the calculation is made for a 1-DIN radio. If the owner wants to install another type, a newer one, for example 2-DIN, he will need to start sawing the partitions in the console itself. And if the size is not suitable, then a suitable cantilever frame will have to be cut into the panel. This is much more complex than the first type of installation listed. In the second option, it is better to entrust the installation to a specialist, because there is a high risk of damaging the interior trim.
Here is a description of how to install a 1-DIN radio.
1. Remove the negative terminal from the battery.
Read also: Hyundai Solaris dips when pressing gas
2. Remove the plastic pocket installed in place of the future radio using a flat-head screwdriver.
3. Having taken out the pocket, on the reverse side you will find slots where ISO connectors will be inserted to connect the radio. Disconnect the connectors to completely remove the pocket.
4. Now remove the metal frame from the radio and install it in the place where the plastic pocket was. Unbend the frame's tendrils to lock it securely in place.
Note:
There should be a click to confirm that the frame installation was successful.
5. Connect the connectors to the radio.
Note:
If you connect the radio to the connectors incorrectly, all car systems may fail, including, of course, the sound system.
Some radio manufacturers make custom connectors. Most of them come with an ISO plug. But there are times when none of the types are suitable, then the last option remains - cutting the wires. You remove the original plugs of the radio and the plugs of the car wiring and solder them together, but be sure to match the color.
A mistake many car enthusiasts make is twisting the wires and wrapping them with adhesive-backed insulating tape. In winter, the same electrical tape cracks due to frost. As a result, a short circuit may occur in the wiring, which will lead to the failure of all electrical systems of the car.
6. Insert the car radio into the previously installed frame.
7. How to install speakers, see here.
Since the beginning of 2011, all Lada Granta models have been manufactured with audio preparation: factory radios and receivers. The quality of reception and sound is not always at the highest level due to its cheapness and simplicity. When purchasing a Lada Grant from the showroom, the owner receives audio preparation, acoustic wires, and installed electrical wiring.
The door panels have already prepared openings for installing speakers. True, few people use the standard seat, as they prefer the rear shelf to improve the sound.
Choosing the right radio size
We carry out installation either independently or by contacting specialists at the service center. In the second case, the service is paid.
By default, all VAZ and Lada models are equipped with a 1-DIN radio. The opening dimensions correspond to: 180 x 50 mm. This is an old standardization that has been in force since the times of the USSR. Modern audio modules can be purchased complete with a pre-installed LCD display. The size of the opening must comply with the standard: 180 x 100 mm, that is, doubled in height. Size marking: 2-DIN.
To install the radio in the Granta liftback, cut out the top pocket, remove the plastic, and install the assembled module. For a beginner, the process will seem somewhat complicated, so strictly follow the instructions.
Installation of an audio system on Granta of different configurations
In the “standard” configuration in Grant, power wiring harnesses are already pre-installed, which are located in the console opening. The wires are connected exclusively to the car radio, so don’t be surprised if you can’t find them in the doorways.
In the Lada Granta Norma, the power wires coming from the console are already connected to the doorways. You just need to connect the sound system in full accordance with the assembly diagram. It often happens that the pre-installed door wiring does not match with some speaker connectors. Here we get out of the situation by purchasing additional suitable wires.
During assembly, the Lada Granta “luxury” is equipped with a special touchscreen multimedia system and already installed speakers. The improved radio is complemented by a Bluetooth system and a 5-inch display with a linear output.
Among other things, the built-in car radio allows you to connect a memory medium – a USB 2.0 flash card, through which you can listen to recorded music.
How to connect a Lada Granta head unit with a 1-DIN connector
- We carry out the work inside the car, having previously disconnected the terminals from the battery in order to prevent a short circuit in the circuit;
- We remove the plastic partition - pocket. It covers the hole, preventing objects from falling inside the torpedo. We use a flat-head screwdriver to unscrew the bolts;
- Two ISO plugs are visible behind the partition body. These types of wire terminals are manufactured in accordance with international automotive standards. More than 98% of all automakers use the standard when equipping technical equipment;
- We remove the metal frame - the block - from the body of the audio unit and place it in the cavity of the torpedo.
- We first connect the blocks with wires. Fitting into the connectors is accompanied by a characteristic click;
- We insert the module into the metal frame.
Note to the driver. Incorrect terminal connections result in a short circuit. To ensure the safety of the connection process, the connectors have guides that allow you to install the block in only one position.
Common mistakes when installing a standard Granta liftback radio with your own hands
- when connecting additional terminals, manual twisting of wires is used instead of classical soldering;
- regular insulating tape is used on connections instead of heat-resistant sleeves;
- Incorrect connection of a large number of speakers on one branch leads to overload, heating, and short circuit.
Read also: How to make an output for a flash drive on a radio tape recorder
Installing a sound amplifier
By liftback radio amplifier we mean:
- crossover installation;
- subwoofer installation.
The choice is up to the owner of the Lada Grant, as different goals are pursued: cleanliness, sound quality. Obviously, the cost of equipment will also increase. Crossovers are installed in the cavity of the glove box, since their dimensions do not exceed 100 x 150 mm and are rectangular in shape. Subwoofers are fixed in the luggage compartment. Equipment requires more space.
Connection of an external device is carried out strictly in accordance with the operating instructions:
- brown wire color: responsible for the operation of the system;
- black: power supply to equipment;
- yellow: audio module activation;
- red: settings and programming.
At the very end, do not forget to connect a red wire with a pre-installed fuse to the positive terminal of the battery. It directly connects the amplifier (subwoofer) to the current source.
Installing two speakers in the front doors
- dismantle the door card, handle, control unit;
- We compare the standard cutouts for the speakers with the actual dimensions. If necessary, expand with a file or fine sandpaper. It is strictly forbidden to use cutting objects, as there is a high risk of damage to the plastic of the door card;
- we check for the absence of roughness in the hole, install the speaker, fix it, connect the standard terminals with wiring;
- we check the operation of the speaker, install the door card, and fix the metal grille to protect the speaker from mechanical damage.
Characteristics of the standard radio "Lada Grants Liftback"
The radio for the Lada Granta liftback is supplied as standard equipment. Product in 2-DIM format (100 x 180 mm).
In addition to the classic radio, there is a built-in card reader, Bluetooth, and a USB output for connecting flash drives. The only disadvantage of the audio module is that it is a push-button type. Which is not to the liking of many car enthusiasts, which is why they install more modern modifications.
During the startup of the audio module, a greeting from Lada Kalina 2 is displayed. This is not an error, as many owners think. This type of audio was originally developed for the Lada Kalina 2. Obviously, the manufacturer did not change anything and started production for the Granta. Installation/disassembly of the module is somewhat complicated due to the tight fit, so be prepared for this.
It is based on the Windows operating system, which allows you to connect to the World Wide Web via a 3G modem. There is no such option out of the box; you first need to reflash the device, but more on that later.
Via Bluetooth, it is possible to connect to a phone, and the “hands-free” option is activated. Which is very convenient and practical when driving. The owners were also pleased with the stock radio. At first glance it looks simple, but it turns out not to be so. Available programming function for a specific channel on a given topic.
For example, as soon as a news broadcast comes on, the radio automatically switches to the programmed channel. The audio module reads the following formats: MP3, WMA, WAV, WMV. Control of the standard radio of the Lada Granta liftback is accessible and intuitive, even for an inexperienced owner.
Read also: Toyota Camry speedometer
Connecting the amplifier to the radio via the ISO connector
We connect the amplifier through the highest level input to the radio (speaker output).
This connection method is suitable for the average user. Music lovers are not satisfied with this method because of the huge number of circuits between the radio and the amplifier (preparatory amplifier, radio amplifier, voltage divider of the external amplifier, power amplifier), which introduce their own refractions.
How to flash the firmware
- Buy an SD card, format it in FAT, exFAT format;
- We download the firmware for free on the manufacturer’s official website;
- We save the data in the root directory of the SD card;
- We insert the SD card into the slot on the radio, start it, wait for the update to finish;
- Turn on and off the module;
- We customize the new interface for ourselves.
If the firmware is installed incorrectly, additional screen calibration using the CAN bus will be required. It is impossible to do this yourself, only in a service station. After successful flashing, the following is available:
- graphic equalizer;
- viewing photos, pictures, videos;
- improved sound quality;
- possibility of installing a navigation system.
Disadvantages of a standard radio
- Outdated firmware from the “box”;
- Not all options are initially available;
- The need for periodic software updates;
- Push-button interface.
Which radio should I install?
The plant supplies basic versions of the machine without a head acoustic unit. The choice of equipment is up to the owner of the machine, who can mount a simple player in a small-sized case or an advanced multimedia processor with processor control.
Lada Granta in expensive modifications is equipped with a standard radio that allows you to connect external drives or smartphones. The design of the equipment allows you to update the software or install a navigation module (with a separate 3G modem). To store cards and additional software, an SD drive must be installed on a permanent basis, which reduces the list of switched devices.
Reviews
| Module type | Price, rub.) |
| Standard 1-DIM (push-button version) | from 3500 – 3700 |
| Standard 2-DIM (sensor) only for Lada Granta liftback | from 7500 – 8000 |
| Third party manufacturers, depending on configuration and specifications |
| № | Positive |
| 1. | Victor, 39 years old: after buying the car, he did not change the radio, despite the push-button control option. The sound quality is good, the radio reception is excellent, that's enough for me. |
| 2. | Konstantin, 41 years old: bought the car second-hand, second owner. I didn’t change anything, I left the original radio. The functionality is good, the build quality is also good, it reads from a flash drive. |
| 3. | Vasily, 44 years old: I listen to the radio more, the reception in the city is good. True, it causes interference near metal structures, but this is natural. |
| 4. | Kirill, 36 years old: I work as a taxi driver, on wheels all day. The standard tape recorder saves the day, it works properly. My friends recommended replacing it with a touchscreen model from the new Granta, but so far the old one hasn’t failed. |
| Negative | |
| 1. | Victor, 38 years old: the standard audio module, although not bad, seemed to me not enough, so I replaced it with a foreign one and supplemented it with an amplifier. Now the volume is good, the quality is high. |
| 2. | Mikhail, 42 years old: I work as a courier, I drive for the entire shift. I expected more from the standard radio, so I had to replace it with a new one. The volume suits me, I plan to connect an amplifier - a crossover. |
| 3. | Ivan, 33 years old: I bought the car second-hand, immediately replaced the audio module, the reviews are not good. New and high-quality equipment from Trinity, no problems. |
| 4. | Vladlen, 40 years old: friends gave me a gift in the form of a radio with touch control for our anniversary. Before this there was a push-button one. Can't compare, quality, sound, control, functionality at a high level. |
Conclusion The opinions of motorists on the functionality and sound quality of the standard radio are divided, which is obvious. Everyone evaluates according to their own criteria. Some people care about sound, others about functionality, and others about control. Regardless of the type of radio: push-button or touch-sensitive, the workmanship is good. No massive breakdowns or defects were recorded. Maintenance is not expensive, parts and components are available both at official representative offices and on the Internet. Now it will not be difficult for the owner to remove the radio on the Granta liftback with his own hands without contacting a service station.