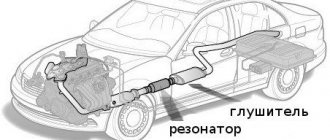
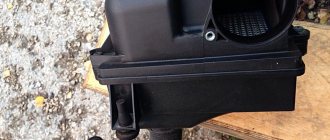
The exhaust system of the VAZ-2110 is designed for cleaning exhaust gases. The components included in it have a fairly long service life. But since the entire system is constantly experiencing temperature overloads, the metal gets tired, cracks and burnouts appear. Repairing the exhaust system yourself is quite simple. This allows owners of the “ten” to significantly save on maintenance. The design of the exhaust system includes: the main muffler, neutralizer, exhaust pipe and resonator.
Typical exhaust system faults
Be sure to verify that there are any problems with the exhaust system before starting any repairs. And identify the node that has become unusable. Any breakdown reveals itself with the following signs:
- Broken connecting pipes. As a result, the integrity of the entire system is compromised and exhaust gases are not properly purified.
- Burnouts on the elements of the main muffler and resonator. This leads to the fact that the exhaust gases are not cleaned, and an extraneous sound appears when the engine is running.
- Strong noises appear from the exhaust system and the main muffler, indicating that there is damage.
If small cracks appear in the VAZ-2110 exhaust system (8-valve injector), then in the early stages they can be healed using sealants. This measure will increase the service life of the elements slightly, by no more than one year.
How to determine whether a muffler is faulty
All original mechanisms on the VAZ 2110–2112 are adjusted at the factory to ensure a minimum noise level while driving. At the same time, engineers take into account not only the design of the engine itself, but also the car body. Therefore, after tuning the car, the noise level of the muffler increases sharply.
The main malfunctions of the muffler are those factors that interfere with its correct operation:
formation of holes in the body;
The use of such an element is unsafe for the driver
The most common problem with silencers on VAZ 2110–2112 can be considered the occurrence of knocking noises while driving. Even new and original products can cling to the bottom of the car and make loud noises:
Kkiss
https://www.autolada.ru/viewtopic.php?t=142153
Problems with the operation of the device on the VAZ 2110–2112 can be determined visually. To do this, it is recommended to drive the car into a viewing hole or lift the rear of the body on a jack:
Inspect the entire exhaust system pipe. The presence of holes can be noticed immediately. In addition, rust spots will indicate that there is clearly damage inside the muffler housing.
Rock the mechanism with your hand - if it sways too much, then it’s time to change the fixation rubber bands and the reinforced gasket between the parts of the muffler.
After leaving the inspection hole, start the engine and sharply press the gas pedal several times - black exhaust smoke indicates severe burnout of the product.
Why do you need a gasket?
The gasket is an essential element between the main muffler and the resonator. Since all parts of the exhaust system become very hot, the gasket is made of heat-resistant materials.
If, when replacing a resonator or muffler, a gasket is not inserted between them, then the joint will not be as tight as possible. In addition, when driving on uneven roads, the two elements will rub against each other and quickly fail.
There is no need to worry about the procedure for replacing the gasket: it has a convenient shape and is placed on the element pipe with one movement of the hand:
How to remove the main muffler on a ten
As with most front-wheel drive models, replacing the exhaust system of the VAZ-2110 is quite simple. You do not need any special skills, extensive experience, or special tools.
But it is advisable to carry out all work on an inspection hole or overpass. The sequence of work is as follows:
- The connection between the resonator and the muffler is made using flared pipes and an O-ring. This connection is crimped with a metal clamp, which consists of two halves and bolts.
- First of all, dismantle the clamp; to do this, unscrew the nuts from the bolts using two 13mm wrenches and remove the O-ring. On cars of the tenth family, sealing rings made of graphite are used. Therefore, they do not stick to the surface of the pipe.
- Remove the old main muffler from the rubber hangers.
Exhaust manifold functions
It consists of several pipes that merge into one, but has different mountings and configurations for different engines. To produce VC, high-carbon cast iron, stainless steel and titanium are used, sometimes coated with ceramic/chrome.
The task of the “spider” (as the exhaust manifold is called in the Russian Federation) is to transfer combustion products collected from all cylinders to the exhaust pipe. Gases from the AC enter the catalyst or directly into the exhaust pipe and then to the muffler. The exhaust manifold is attached to the engine, or more precisely to the cylinder head (cylinder head), sealing the joint using a special element.
Source
Installing a new muffler
Assess the condition of the rubber hangers, which are located on different sides of the main muffler body. If they are overstretched or have cracks, be sure to replace them with new ones during installation.
The cost of these rubber bands is small, they are available in any store. Next you need to do the following:
- Install the new main muffler onto the rubber hangers.
- Insert a graphite O-ring between the pipe flares.
- Place the clamp in place and tighten the nuts using 13mm wrenches.
At this point, the repair of the main muffler of the VAZ-2110 exhaust system (8 valves) is completed. Start the engine and check the muffler operation. There should be virtually no sound from the exhaust pipe. The motor will run clean and smooth.
How to remove the resonator
The resonator needs to be changed only after a new muffler has been installed. The sequence of work aimed at dismantling the device:
- The resonator is secured using a crimp-type clamp and an O-ring.
- The connection to the neutralizer is made using a floating flange, which consists of flared pipes and two bolts.
- The fist is located on the opposite side of the resonator.
The work must be carried out on a cooled engine.
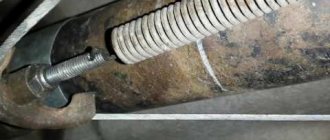
Quite often it is not possible to unscrew the bolts, so to make the work easier, you just need to cut them off using a grinder. Be sure to install new bolts during reassembly. If you don’t have a grinder at hand, then you need to use a penetrating lubricant, for example, WD-40. Apply this composition to all threaded connections, then wait 20-30 minutes.
Unscrew all the bolts and remove the clamps on the resonator. After this, you need to remove the old resonator from the rubber suspensions. Be sure to evaluate the condition of all rubber products. If they show signs of wear, install new ones during reassembly.
Resonator installation
In the VAZ-2110 exhaust system (16-valve injector), work is performed in exactly the same way as on 8-valve engines. The procedure is as follows:
- The new resonator must be mounted on rubber hangers and connected to the muffler. Moreover, it is necessary that the pipe from the resonator be strictly parallel to the ground.
- If the neutralizer has wear, rust, or burrs, the connection must be lubricated with high-temperature sealant. This will ensure a high-quality connection of the exhaust system components.
- Tighten the resonator and catalytic converter flanges using only new nuts and bolts.
- The resonator is fastened to the neutralizer using two bolts and flanges. Moreover, the pipe is secured to the pants using a spring connection and flaring. An O-ring made of metal asbestos or graphite is installed inside.
This completes the replacement of the resonator; repairs present no difficulties. All work can be done independently, you just need an inspection hole or overpass.
How to remove the neutralizer
The VAZ-2110 exhaust system is standard for all cars. Almost the same design is used on nines, sevens, and even foreign cars. Even a motorist with very little experience can repair all elements of the system. If you have already decided to change the resonator and muffler, then it is also advisable to install a new neutralizer. The neutralizer is necessary to dampen the vibration coming from the car engine. This is a device that mechanically separates the muffler resonator and the exhaust pipe.
Replacement is carried out as follows:
- If there is no damage to the springs and bolts, they can be reused. If there is wear, you need to purchase new elements.
- The ring is replaced in any case, even if it is in almost perfect condition. If this ring begins to allow exhaust gases to pass through, damage to the flaring of the exhaust pipe and the converter will occur.
- Unscrew all the bolts used to secure it. They must first be treated with a penetrating lubricant.
How can I fix the problem?
So, the place of gas breakthrough through the muffler has been detected, you just need to make a decision about replacement or try to repair the unit.
Often the holes in the body are small, and in this case it is not always advisable to buy a new muffler. It is necessary to remove the unit from the car and show it to a welding specialist, who will tell you whether it can be repaired. The craftsman will cut out the rotten part of the body, shake out the remains of the burnt partitions from the inside and apply a patch of new metal. Fistulas that occur at the points where the pipe is connected to the body must also be eliminated by welding. The only caveat is that these repairs solve the problem only temporarily. Such a muffler will not serve for a long time, and it may perform its function poorly; due to the lack of partitions, the sound will break through.
If it is decided that the muffler needs to be replaced, then you need to select and purchase it. New elements are made of black or stainless steel, so the choice is limited. The latter last much longer than black ones, but their cost is higher. In addition, welding work in case of repair of a stainless steel body will be more expensive. When purchasing a new muffler, it is worth purchasing a new set of suspension rubber bands, as well as a graphite O-ring. It is installed at the junction of the resonator and muffler pipes.
The exhaust system of the VAZ-2110 is designed for cleaning exhaust gases. The components included in it have a fairly long service life. But since the entire system is constantly experiencing temperature overloads, the metal gets tired, cracks and burnouts appear. Repairing the exhaust system yourself is quite simple. This allows owners of the “ten” to significantly save on maintenance. The design of the exhaust system includes: the main muffler, neutralizer, exhaust pipe and resonator.
Installation of a new neutralizer
If you decide to modify your car, you can install the Stinger exhaust system on the VAZ-2110. It is more reliable and advanced than stock.
All work is carried out the same way. The neutralizer is installed as follows:
- Install the neutralizer, and then put on the bolts. This must be done very carefully, making half a turn, no more.
- When tightening, you must first tighten the bolts that secure the neutralizer to the resonator. The last to be tightened are the bolts securing the converter to the exhaust pipe.
Removing the exhaust pipe
Most drivers call the exhaust pipe “pants”, since the element is very similar to this item of clothing. It is secured to the exhaust manifold using bronze nuts and studs. The trousers are attached to the neutralizer using a spring-loaded connection. There is a gasket between the exhaust manifold and the pants to prevent gases from leaking.
Dismantling the intake pipe is carried out as follows:
- Using a 13mm wrench, you need to unscrew the nuts that secure it to the exhaust manifold. If there are metal plates with bent edges under the nuts, they must be bent. Please note that the connection uses studs that are screwed directly into the manifold.
- If the stud is damaged, replacement is quite problematic. Therefore, it is necessary to carry out all work carefully to keep the threaded connection intact.
- Be sure to allow the engine to cool before starting work, then apply penetrating lubricant to all threaded connections. With these simple steps, you won't have to use too much force, which will save your studs. If you break a pin, it will need to be drilled out. Before this, the exhaust manifold must be removed. Moreover, if you damage the exhaust manifold, replacing it will cost you a pretty penny. The cost of a new one is more than 2000 rubles.
- After unscrewing all the nuts, it is necessary to move the exhaust pipe to the side and remove the gasket.
- Unscrew the bolts that connect the exhaust pipe to the converter.
This completes the dismantling of the exhaust pipe of the VAZ-2110 exhaust system.
How long does an exhaust manifold gasket last?
The exhaust manifold gasket is not one of those elements whose replacement is included in the routine maintenance plan. It can serve for two, five, or ten years. Its condition does not depend on age and mileage. The only factor that affects its service life is the correct operation of the engine. If it operates in standard mode, does not overheat, uses good fuel, the gasket will last a long time. If the opposite is true, it may burn out even after three months of operation.
Installing a new exhaust pipe
All work is done in reverse order. But there are several features that you definitely need to know:
- Install a new exhaust pipe.
- A new gasket needs to be installed between the exhaust manifold and the pants.
- Be sure to install a new O-ring between the neutralizer and the pants.
- Tighten the nuts on the exhaust manifold studs. Tighten them evenly in a crisscross pattern.
- Tighten the bolts that are on the spring-loaded connection to the converter.
This completes the repair of the exhaust system. The sound will be muffled as much as possible, the car will become almost silent. It is advisable to lubricate the new gasket with a CV joint type compound. This will improve the seal.
The operation of VAZ cars is often accompanied by various breakdowns and malfunctions of various parts and systems. The 2110 exhaust system is no exception, failures of which can be eliminated by replacing the muffler or other components.
Replacing pant gaskets on a VAZ 2114
You've probably heard such a slang and quite common word among car enthusiasts as VAZ 2114 pants. If you have no idea what it is, then everything is simple, it's just the exhaust pipe of the exhaust manifold.
The product is used to remove exhaust gases directly from the internal combustion engine. And it got its original name for the shape of the structure (one end of the pipe has a split and closer to the opposite edge smoothly flows into a single pipe) with the shape of the pants. This is how the popular name “clung” to the product.
From a design and reliability point of view, the most vulnerable point in the exhaust pipe is the sealing gasket at its connection to the manifold. Over time, the insulating element simply burns out or becomes deformed from exposure to high temperatures, especially since the thickness of the gasket metal is quite small.
Mufflers for VAZ 2110 cars
The information contained in the operating manuals or electronic catalogs about the structure of the exhaust system of tenth-generation VAZ cars does not always correspond to reality, which causes some disagreement among car enthusiasts. The selection for cars is carried out on the basis of a specific body type: for example, in the case of front-wheel drive cars in a hatchback body, the muffler is much shorter than in models with sedan and station wagon bodies. The difference in length is explained by the length of the car body.
The parts installed on the tenth family are divided into two body types:
- Station wagon and sedan - VAZ 2110 and VAZ 2111;
- Hatchback - VAZ 2112.
Mufflers for VAZ 2110/2112 cars are classified according to body type
Classification is also carried out according to old and new models. The main difference from similar parts on the Lada Samara is that for the tenth family, subcategories play a significant role. The muffler mounts of older models are made in the form of a hook: they were produced until 2007, and then the mounts were converted to pins.
Mufflers of old and new models differ in the type of fastenings
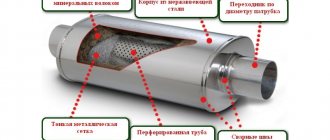
Design
The main task of the muffler is to reduce the noise level while the car is moving and the engine is idling. The resonator, or additional muffler of the car, is an element located in the middle of the exhaust system. Its design consists of the following parts:
- frame;
- throttle;
- block;
- thermal insulation;
- perforated pipe.
Design of the exhaust system of tenth generation VAZ cars
The structure of the part itself is as follows:
- frame;
- middle obstacle;
- rear barrier;
- rear perforated pipe;
- middle perforated pipe;
- exhaust and inlet pipes.
The structure of the VAZ 2110 muffler and the direction of movement of exhaust gases in the system
The perforated tube is the main component of the direct-flow muffler design. Combustion products entering it effectively expand in its body due to perforation. This operating scheme allows you to speed up the process of removing combustion products several times. Installing such a muffler increases the level of exhaust system resistance by up to 10%, which is significantly higher than without its use.
tuning the exhaust system of a car Encyclopedia of tuning and modifications for VAZ 2110, VAZ 2112
| The muffler of a car becomes unusable over time, which is why additional noise appears during operation. The problem can only be solved by replacing the muffler with a new one, but do you know how to do this? |
| Finally I digested my muffler! From the spider itself to the nozzle itself, everything is made with our own thoughtful hands. He was digesting a lot of things for everyone, but he himself was “like a shoemaker without boots.” So, I will be short and to the point to describe how to remake the exhaust system yourself. |
| If you smell exhaust gases in the car, then you should not delay in solving this problem, because we are talking about your health and the health of your passengers. Let's look at why this happens. |
| Air pollution from exhaust gases causes significant harm to the environment and human health. It is the products of oxidation and combustion of gasoline and diesel fuel that make up a significant proportion of carcinogenic and toxic substances concentrated in the atmosphere. In closed spaces, exhaust gases can cause serious poisoning, including death. |
| Many car enthusiasts have probably noticed that powerful cars have a double exhaust pipe. It's no secret that such tuning can be done on simple everyday cars with fewer horses under the hood. Do you know how to install a double exhaust on a VAZ yourself? |
| Russian cars cannot boast of a quiet exhaust system; vibrations and noise accompany the owners throughout their entire operation. But there are a number of ways to modify the exhaust system of a VAZ, for example, installing a corrugation in the exhaust system. |
| Tuning a car's exhaust system is a large chapter that includes a set of measures. If you approach this issue head-on, then such tuning significantly improves the characteristics of the car. One of the main points in such modifications is replacing the exhaust manifold with a Spider 4-2-1. |
Silencer is a device for reducing noise from gases escaping into the atmosphere. Over time, it becomes unusable (burns out) and begins to rattle. Before choosing a VAZ muffler, read the main points that you should pay attention to when purchasing.
The lambda probe, also known as an oxygen sensor, allows you to estimate the amount of free oxygen remaining in the exhaust gases. Its readings allow the ECU to adjust the mixture composition. Oxygen sensor malfunctions can cause the engine to malfunction. Before replacing it, try restoring the oxygen sensor yourself.
Most car enthusiasts are trying to make their car more comfortable and quiet, while another group of people (mostly young people), on the contrary, are thinking about how to make a loud exhaust. It doesn’t matter whether it allows you to attract the attention of the opposite sex or scares away pedestrians, but the desire to make a forward flow on their own is in their blood.
On any forum that is somewhat related to cars, there are many topics that discuss the installation of forward flow, spider and other elements of the exhaust system. The eternal debate about the imaginary or real increase in horsepower due to tuning the exhaust system stretches on for dozens of pages. Where is the truth?
Surely you have seen more than once how fire bursts from the muffler of a racing car at specialized shows. This effect is called “dragon tongue”. The emission of flames from the exhaust pipe intuitively gives the idea that the tuning car has enormous power. Let's try to figure out how this effect is achieved and whether it is possible to make fire from the exhaust pipe of a VAZ.
Disco, disco, partisans. This is exactly the association I have with all the external light tuning of a car. The car begins to look like a Christmas tree, but this does not stop the young guys. And all because this whole multi-colored garland arouses the interest and main attention of the opposite sex. Let's talk about installing LEDs in the muffler tip.
Malfunctions on VAZ cars of the tenth family
AvtoVAZ specialists conducted research, the results of which revealed that the car body, being a closed structure, has its own peak harmonics and can resonate at a certain frequency. To suppress spurious frequencies emitted by both the vehicle engine and those shielded by the body, it is necessary to use the range from 60 to 400 Hz, corresponding to medium and high engine speeds. A change in noise characteristics can be caused by making minimal changes to its design.
The most difficult noise to deal with is at low frequencies. From a technical point of view, it is impossible to combine tuning the exhaust system of a car and combating noise. You can maintain maximum power with a direct-flow muffler, and reduce the sound to a comfortable volume with a factory one.
Owners of VAZ 2110–2112 most often encounter breakdowns, burnouts and leaks in the exhaust system. Incorrectly set ignition, excessively rich mixture and pipe corrosion are the main causes of burnt out exhaust pipes. This defect is accompanied by knocks and pops, which indicate burnout of metal parts. A sign of burnout may be smoke from the exhaust pipe, indicating an overly enriched fuel mixture that is burning in the exhaust pipe.
Replacement for VAZ 2110/2112
Tools required for changing on tenth generation VAZ cars:
- to remove nuts of different sizes you will need a set of sockets;
- set of ratchets for heads;
- a hammer with a round head;
- combination or standard ring wrenches;
- reciprocating saw, hacksaw or any other tool for cutting metal;
- two exhaust pipe clamps;
- penetrating type sealant and lubricant;
- canvas or latex gloves for safe work;
- protective glasses;
- jack;
- goats - with their help the car will be supported in weight;
- wheel shoes;
- new muffler.
Dismantling the old
The vehicle must be on a flat, hard surface before starting work. You can drive it out of the garage and get to work on removal.
- The handbrake lever is pulled all the way, the gear is switched to the parking position in the case of an automatic transmission or to neutral gear for a manual transmission.
The gear shift lever is moved to “park”
Wheel chocks are installed under the wheels of the car to prevent the car from moving.
The car is jacked up and placed on trestles to facilitate access to the exhaust system
The car is carefully lowered onto the trestles and securely secured to them
On tenth generation VAZ cars, the muffler is located under the bottom in front of the rear axle
The muffler is secured with two clips on the front and rear
The muffler and exhaust pipe are separated, and the joints are cleaned of dirt and rust.
Installing a new
The process of installing a new muffler is similar to the dismantling process, only it is carried out in the reverse order. In this case, it is necessary to observe certain nuances:
- Using a cutting tool, the end of the exhaust pipe to which the old muffler was attached is straightened.
A cutting tool is used to straighten the end of the exhaust pipe before installing the muffler.
The diameter of the exhaust pipe is adjusted to the size of the muffler
The new muffler is installed on the fasteners from the old muffler
The ends of the exhaust pipe and muffler are coated with sealant
New fasteners for the muffler are installed in place, but are not tightened
A new muffler is inserted into the exhaust pipe
The clamps at the junction of the muffler and exhaust pipe are tightened with a ratchet
The clamp nuts are tightened all the way
Replacement features
- The vehicle exhaust system requires regular inspection. After dismantling the worn muffler, it must also be carefully inspected and made sure that the remaining elements are free of defects and flaws. If there are traces of corrosion on the metal of the exhaust pipe, it must be replaced, since such a deplorable condition can lead to leakage of exhaust gases.
- Extension of the exhaust pipe is carried out if, when dismantling the old muffler, too large a section of the pipe was cut off. This is done using a special section called “mom-dad”.
- Cutting the metal of the exhaust pipe must be done extremely carefully and accurately, since fuel and brake hoses along with wiring pass in close proximity to it.
- To avoid injury to the eyes, safety glasses must be used.
Replacing the exhaust system resonator
The main reason for replacing parts of the VAZ 2110/2112 exhaust system is fatigue and metal corrosion, which is accompanied by the appearance of extraneous noise while driving. In most cases, the muffler and an additional muffler called a resonator are replaced.
Replacement of the VAZ 2110/2112 resonator, or an additional muffler, is carried out if it is defective
At the same time as replacing exhaust system components, it is recommended to change fasteners and rubber gaskets. Under the influence of moisture and dirt, such parts quickly undergo corrosion and oxidation, causing them to become unusable and deformed. For this reason, clamps and rubber gaskets are purchased simultaneously with a new muffler and resonator.
Replacing the resonator of the VAZ 2110/2112 exhaust gas discharge system is carried out as follows:
- The muffler and resonator of the machine are combined using clamps and fastening nuts. The clamp bolts are unscrewed; if it is impossible to remove them carefully, you can cut them off with a grinder.
On a VAZ 2110, the resonator and muffler are attached using bolts that are unscrewed or cut off with a grinder
There is an O-ring between the resonator and the muffler
The resonator mounting bolts are not completely unscrewed - they must hold the additional muffler
The rear suspension cushion of the resonator is removed from the bracket
Muffler VAZ 2110 - how to professionally replace it yourself
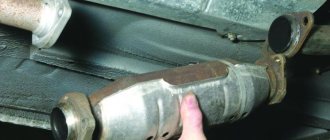
The exhaust system of any car constantly suffers from hot caustic gases, dust, dirt, moisture, impacts, and the VAZ 2110 muffler is no exception. Attempts to repair by applying welded “patches” to through holes help only for a short time, and therefore, you have to think about a major repair with replacement.
Muffler device for VAZ 2110
On the “ten” the entire exhaust system consists of separate components:
- exhaust pipe (“pants”);
- neutralizer;
- Lambda probe;
- additional muffler (resonator);
- main muffler.
The most vulnerable and most often in need of repair are mufflers. It is not difficult even for a novice car enthusiast to understand the procedure for replacing these parts. Let's try to figure it out together how to gain experience in auto repair and save money.
Replacing the main muffler VAZ 2110
The main signs indicating the need to replace the muffler “can” are the appearance of pockets of through corrosion, fractures of the body and pipes, and severe deformation from impacts. Work should begin when the car is installed on the inspection hole. For a successful start and completion of the operation, a standard set of car keys and overalls is sufficient, since the bottom of the car is not the cleanest place.
Muffler 2110 is attached to the bottom of the car on brackets through hanging rubber bands, and to the resonator pipe by means of a bolted connection of two halves of clamps, tightening the flared ends.
Dismantling and installation of the device is carried out in the following sequence:
- the bolts that tighten the clamp are unscrewed (often, due to severe corrosion, the bolts cannot be unscrewed and then they are cut off with a grinder. It is recommended to install a new clamp and bolts each time during repairs);
- the graphite sealing ring is removed;
- the muffler is removed from the suspension rubber bands;
- if necessary, the rubber bands are replaced with new ones (experts recommend doing this);
- the new muffler is suspended;
- a graphite seal is installed at the junction of the pipes;
- a clamp is put on, the parts of which are tightened with bolts.
Changing the resonator on the muffler of a VAZ 2110
The resonator can be replaced separately or together with the main muffler.
Since we have already considered replacing the main muffler, we will describe the installation and dismantling of only the additional muffler:
- on the side of the main muffler, at the connection of the pipes, the bolts of the crimp clamp from two halves are unscrewed;
- the sealing ring is removed;
- from the neutralizer side, two spring-loaded bolts are untwisted, tightening parts of the floating flange;
- the sealing ring is removed from the connection;
- The additional muffler of the VAZ 2110 is removed from the rubber hangers, which are also removed from the mounts and inspected, and if necessary (if mechanical damage is detected in the form of cracks or tears) they are changed.
To install the muffler, you must carry out the described steps in reverse order, replacing the failed parts with new ones.
Necessary tips before replacing the neutralizer
The first along the exhaust gas path is the converter. It is he who is entrusted with the task of reducing the temperature and extinguishing the remains of unburnt fuel. This part is replaced using the same algorithm as for the muffler without any significant differences. One of the most discussed issues among car enthusiasts is the option of replacing the standard neutralizer with a flame arrester.
In this case, you need to think carefully and weigh the pros and cons. Why do you need such tuning? After all, an outwardly similar element has a different internal structure. It promises increased engine power and is ready to serve much longer. But this “medal” has two sides. The driver himself decides whether to conduct an experiment on his own car, since if you notice an increase in fuel consumption by 10-15%, then the flame arrester should be blamed for this.
Replacing the muffler on a VAZ 2110
VAZ 2110 owners are quite lucky, since replacing the muffler is quite simple and does not require special skills or extensive experience. But you definitely need an inspection hole.
The replacement procedure sequence is as follows:
- The muffler is connected to the resonator through an O-ring on the pipe flare. Plus, the connection is compressed with a clamp, which consists of two parts.
- The clamp must be dismantled, so remove the ring. Since the O-rings used here are graphite, they should not stick to the metal.
- Now the old muffler can be dismantled quite easily.
- Be sure to check the condition of the suspension rubber bands located on different sides of the muffler body. They often end up stretched or covered with cracks. Rubber bands are quite cheap, so buy new ones and replace the old ones with them.
- The new muffler is first mounted on rubber bands, after which it is inserted into the same new graphite sealing ring between the flares. Use a clamp to compress the connection. Ready!
Replacing the resonator yourself
One of the most common problems with the exhaust gas exhaust system on the VAZ 2110-2112 is the burnout of one of the elements.
In this article we will look at the problem with the resonator. The first signs that burnt areas have appeared in the system are a change in the exhaust sound; it becomes much louder than usual. In this case, it is necessary to check in the inspection hole exactly where the sound came from, find this place, and accordingly, replace the part with a new one.
To replace the resonator on VAZ 2110-2112 cars, we will need a tool such as:
- The head is 13 mm deep.
- Ratchet handle.
- Socket wrench 13.
- The screwdriver is flat.
- Penetrating lubricant.
- Hammer (not always, but possible).
Changing the resonator
It is also advisable to replace the resonator on a VAZ 2110. This is done after changing the muffler.
New resonator for VAZ 2110
The work of replacing the resonator is performed in the following sequence:
- The resonator is secured to the muffler with a crimp clamp with an O-ring.
- It is attached to the neutralizer using a floating flange consisting of two bolts and a flare.
- On the opposite side of the element there is a so-called fist.
- Removing bolts is often quite difficult. So that you don't have to suffer, just cut them off with a grinder and buy new bolts. This is the simplest solution to the problem.
- If you couldn’t get a grinder, use a liquid key. This is a popular product among motorists - WD40 or its analogues. Treat the bolt attachment points with this compound, wait a while, after which the bolts should come off.
- After removing the bolts, remove the muffler clamp.
- Remove the resonator from the suspension rubber bands. Check the condition of the rubber bands. If they are worn out, replace them with new ones.
- Take a new resonator, secure them to rubber and connect them to the muffler so that the pipe leading to the muffler from the resonator is parallel to the ground.
- If you notice wear, burrs, or traces of rust on the neutralizer fist, be sure to coat the connection with sealant. Moreover, it must be a high-temperature sealant.
- Armed with new bolts and nuts, tighten the catalytic converter and resonator flanges.
- The neutralizer is fixed to the resonator with two bolts using a flange connection. The fastening occurs to the states, but there is a receiving pipe, using a spring-loaded connection and two flares. The space between them contains a sealing ring made of graphite or metal asbestos.
RESONATOR REPLACEMENT
- The resonator is attached to the muffler using a crimp clamp with an O-ring;
- It is attached to the neutralizer by means of a floating flange (two bolts) and flaring;
- On the opposite side of the neutralizer there is a “fist”;
- It is often problematic to unscrew the knuckle mounting bolts; they are simply cut off with a grinder and replaced with new ones;
- If suddenly you don’t have a tool at hand, we clean the places where the bolts are attached and treat them with a “liquid wrench” (WD-40 or its equivalent);
- Unscrew the bolts and remove the muffler clamp;
- We remove the resonator from the suspension rubber bands, change the rubber bands if necessary;
- Then we hook a new resonator onto rubber bands and attach it to the muffler so that the pipe running from the resonator to the muffler is parallel to the ground;
- When there is wear on the neutralizer fist or there are burrs, grooves or rust on it, it is necessary to lubricate the connection with a special high-temperature sealant;
- Using new bolts and nuts, tighten the flanges of the catalyst and resonator;
- The neutralizer is attached to the resonator by means of a flange connection (two bolts), to the receiving pipe (pants) by means of a spring-loaded connection and a pair of flares, between which there is a graphite or metal-asbestos ring.
Replacing the neutralizer
As you can see, the exhaust system of the VAZ 2110 car is designed quite standardly, its repair is not difficult even for a motorist with little experience.
When changing the muffler and resonator, it is likely that you may need to replace the converter. This operation is simple and can be done in a few steps.
The neutralizer serves to dampen vibrations from the engine and prevent them from occurring in the exhaust system of the domestically produced VAZ 2110 car.
If it needs to be replaced, it is done like this:
- If the old springs and bolts are intact and have no obvious damage, you can continue to use them. They show characteristic signs of wear, be sure to buy new elements.
- The ring should be replaced in any case, no matter how well the old one is preserved. If gases begin to leak through the old ring, this will lead to very rapid wear and damage to the converter flare and the exhaust pipe.
- After installing the neutralizer, new bolts are put on, they are carefully but firmly tightened. Moreover, the first thing you need to do is tighten the bolts that secure the resonator.
Signs of a burnt-out VK gasket
Signs of a burnt gasket may include:
As for the sound of the power unit, when the gasket burns out, a characteristic “chirping” is usually heard. In such cases, they say that the engine is “cutting.” This sound is created by exhaust gases escaping where the seal is damaged. Naturally, exhaust from under the hood enters the cabin through the heating and ventilation system. This creates additional inconvenience for the driver and passengers, and also poses a certain threat to their health, so in any case, replacing the exhaust manifold gasket if it is damaged is a necessary necessity.
In cars with injection engines, the operation of which is controlled by an electronic control unit (ECU), if the integrity of the gasket is damaged, the CHECK lamp on the dashboard may light up. This is due to the fact that the lambda probe, installed on the manifold itself or the exhaust pipe, detects changes in the amount of oxygen in the exhaust and transmits a signal to the ECU. Until the fault is eliminated, the controller forces the engine to operate in emergency mode.
Replacing pants
Pants
The exhaust pipe, also called pants (due to its appearance), is attached to the manifold using studs and nuts. Its fixation with the neutralizer is carried out by a spring-loaded connection.
- Remove the exhaust pipe, paying special attention to its attachment to the manifold. Studs are used here, not bolts. They are screwed into the manifold, and connecting nuts are screwed onto them.
- If the pin is damaged, it will be extremely difficult to replace it. Therefore, it is important to try to keep the old one intact and safe.
- Treat the nuts with WD40, a product we all know. This will allow you to avoid using excessive force and keep the studs intact. If that doesn't work, the studs are drilled out. The process is complex, lengthy, and requires experience and skill.
- There is a gasket between the manifold and the pants that needs to be replaced. Also install a new converter o-ring.
- Now firmly press the exhaust pipe using the nuts. To do this you will need to compress the gasket.
- Then tighten the bolts of the spring-loaded connection with the neutralizer of your VAZ 2110.
As you noticed, there is nothing complicated in this work. Each element is quite easily dismantled and a new one is installed in its place. Just be careful, act carefully and consistently. Plus, of course, do not forget about the importance of the quality of new parts. Buy only good spare parts that will ensure long-term and efficient service of the exhaust system on your VAZ 2110.
Complete replacement of the VAZ 2104 exhaust system
Very often the car drives until it breaks down. Don't stop the machine from working, says the famous saying! And then they just put it in for repairs. In such cases, the exhaust system is completely replaced. This, from some point of view, is even simpler and more profitable than changing any one part. After all, if you change one part, and after a couple of thousand kilometers the next one breaks down, then this turns out to be double work, and sometimes the price for it is not small. So, let's look at how to change the exhaust system on a carburetor VAZ 2104 and an injection one.
Carburetor VAZ 2104
On carbureted cars, the exhaust system is simpler. What does it consist of:
- Downpipe (pants)
- Resonator (middle pipe)
- Muffler (rear)
- Gasket between exhaust manifold and pants
- Locking plates
- Exhaust pipe mounting nuts
- Clamps for fastening exhaust system parts together
- Clamp for fastening the exhaust pipe to the body
- Exhaust system mounting rubber bands
Now let's move on to the sequence of work to replace the muffler on a VAZ 2104:
Advice! Carry out muffler replacement work only on a cold car. You won't burn your hands, and it will be more convenient to work.
- We will start from the end of the car. Without removing the muffler from the belts on which it is suspended, it is necessary to unscrew the clamp securing it to the resonator.
- It is often very dirty and rusty. Therefore, first clean it with a metal brush, and then spray it with VD.
Advice! Do this operation at once with all the clamps and the fastening of the pants to the manifold, so that the parts can fall off and it will be easier for you to unscrew them.
- Now, using keys 12 and 13, unscrew the clamp. Usually the bolt is a 12 key and the nut is a 13, but there may be other options.
- If you can’t unscrew the clamp bolts, then simply cut it off with a grinder and knock it down with a chisel.
- Next, it is necessary to ensure rotation of the muffler on the seat of the output pipe of the resonator. This is done by spraying the joint with VD. It will also be useful to tap the connection with a hammer and try to rotate the muffler.
- When it starts to rotate, you can safely remove it from the rubber bands and remove it from under the car.