Installation of oil nozzles on a VAZ 2112 car
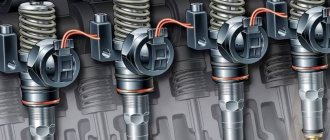
The main unit of the VAZ 2112 car is the engine. Severe temperature operating conditions of the unit lead to its overheating, especially the main elements, which are the pistons. To reduce the temperature while the car is moving, their bottoms are cooled with oil. For these purposes, special nozzles are pressed into the second, third, fourth and fifth main bearing supports. These are tubes with spring-loaded balls inside. When the engine starts running at high speeds, the oil pressure increases, which puts pressure on the balls located in the injectors. The springs begin to compress, holes open in the tubes, and oil from the VAZ 2112 injector gets onto the piston from below. At idle speed, the oil pressure reduction valves, which contain the VAZ 2112 oil injectors, are closed, which ensures normal lubrication of the crankshaft liners.
Advice: When overhauling the engine or repairing it, you need to replace the oil injectors on the VAZ 2112 with new ones. During operation, they wear out, and most of all they become clogged, the valve spring weakens. This leads to a decrease in engine speed, a drop in oil pressure and poor spraying.
VAZ 2112: oil cooling nozzles - how to install correctly
Installation of oil nozzles on a VAZ 2112 car
The main unit of the VAZ 2112 car is the engine. Severe temperature operating conditions of the unit lead to its overheating, especially the main elements, which are the pistons. To reduce the temperature while the car is moving, their bottoms are cooled with oil. For these purposes, special nozzles are pressed into the second, third, fourth and fifth main bearing supports. These are tubes with spring-loaded balls inside. When the engine starts running at high speeds, the oil pressure increases, which puts pressure on the balls located in the injectors. The springs begin to compress, holes open in the tubes, and oil from the VAZ 2112 injector gets onto the piston from below. At idle speed, the oil pressure reduction valves, which contain the VAZ 2112 oil injectors, are closed, which ensures normal lubrication of the crankshaft liners.
Advice: When overhauling the engine or repairing it, you need to replace the oil injectors on the VAZ 2112 with new ones. During operation, they wear out, and most of all they become clogged, the valve spring weakens. This leads to a decrease in engine speed, a drop in oil pressure and poor spraying.
Article: 21120-1004081-02more, additional articles: 21120100408102, 2112-1004081-02hide
Order code: 136359
In stock Available for order – >10 pcs. Data updated: 03/06/2021 at 01:30
Order code
136359 Articles 21120-1004081-02, 21120100408102, 2112-1004081-02 Manufacturer AvtoVAZ Catalog group: ..Engine Engine Width, m: 0.005 Height, m: 0.005 Length, m: 0.03 Weight, kg: 0.007
Product reviews
Where is it used?
Reviews
There are no reviews for this product yet.
Write a review
Articles about the product
- “Crystal” VAZs: Lada Granta and Lada Largus April 9, 2013 Today in the next article in the series “Crystal” VAZs or typical breakdowns of domestic cars” we will talk about the latest developments of the Volzhsky Automobile Plant: Lada Granta and Lada Largus. Let's talk about the history of the creation of these models, as well as their characteristic malfunctions.
- Injector VAZ-2112 AvtoVAZ piston cooling Article number: 21120-1004081-02, 21120100408102, 2112-1004081-02 Order code: 136359 70 ₽ or place an order by calling 8 800 6006 966
Availability of goods in warehouses and stores, as well as the price of the goods is indicated on
06.03.2021 01:30
.
Prices and availability of goods in all stores and warehouses are updated once an hour.
If there is a sufficient quantity of goods in the store you need, you can buy it without pre-ordering. Internet price
– valid when ordering on the website or through a call center operator by phone
8-800-600-69-66
. Subject to sufficient quantity of goods at the time of order.
Price in stores
– retail price of goods in store sales areas without pre-order.
The period for moving goods from a remote warehouse to the warehouse of an online store.
The parts data presented on this page is for informational purposes only.
672a95a801c6b3289c6cf840291dd845
Add to cart
Available to order:
Order quantity:
Product successfully added to cart
!
Comments
1. I would be careful when sharpening homemade nozzles. You need to select the thermal expansion of the material so that it does not accidentally jump out of the socket. 2. The direction of the jet at BDC is definitely not necessary there 3. On the other hand, the end of the injectors is soft, its direction can be edited, it’s completely stationary 4. I don’t understand how they are trying to make sure that at TDC the injector hits one end of the piston, BDC to another.
I don’t know what to say. Any ideas for improvement?
Installation of oil nozzles on a VAZ 2112 car
The main unit of the VAZ 2112 car is the engine. Severe temperature operating conditions of the unit lead to its overheating, especially the main elements, which are the pistons. To reduce the temperature while the car is moving, their bottoms are cooled with oil. For these purposes, special nozzles are pressed into the second, third, fourth and fifth main bearing supports. These are tubes with spring-loaded balls inside. When the engine starts running at high speeds, the oil pressure increases, which puts pressure on the balls located in the injectors. The springs begin to compress, holes open in the tubes, and oil from the VAZ 2112 injector gets onto the piston from below. At idle speed, the oil pressure reduction valves, which contain the VAZ 2112 oil injectors, are closed, which ensures normal lubrication of the crankshaft liners.
Advice: When overhauling the engine or repairing it, you need to replace the oil injectors on the VAZ 2112 with new ones. During operation, they wear out, and most of all they become clogged, the valve spring weakens. This leads to a decrease in engine speed, a drop in oil pressure and poor spraying.
Claim
1. A method for manufacturing a nozzle for oil cooling of pistons, which involves the manufacture and hermetically sealed connection of two halves of the nozzle, wherein the axis of the through channel in the nozzle connecting the oil line with the nozzle part lies on the interface between the halves of the nozzle, and each of the halves of the nozzle contains a zone to which supplies coolant from a common line in the block, a zone that supplies coolant to the piston, and a zone that forms a compact jet, ensuring smooth transitions from one zone to another.
2. The method of manufacturing an oil piston cooling nozzle according to claim 1, characterized in that the axis of the through channel in the nozzle connecting the oil line with the nozzle part lies in the same plane.
3. A method for manufacturing an oil piston cooling nozzle according to claim 1 or 2, characterized in that parts of the nozzle are made of metal.
4. A method for manufacturing an oil piston cooling nozzle according to claim 1 or 2, characterized in that parts of the nozzle are made of plastic.
5. A method for manufacturing oil piston cooling nozzles according to claim 1 or 2, characterized in that parts of the nozzle are manufactured by precision casting.
6. A method for manufacturing an oil piston cooling nozzle according to claim 1 or 2, characterized in that parts of the nozzle are manufactured by stamping.
7. A method for manufacturing an oil piston cooling nozzle according to claim 1 or 2, characterized in that the parts of the nozzle are connected by soldering.
8. A method for manufacturing an oil piston cooling nozzle according to claim 1 or 2, characterized in that the parts of the nozzle are connected by gluing.
9. A method for manufacturing an oil piston cooling nozzle according to claim 1 or 2, characterized in that the hole in the nozzle part of the nozzle is calibrated to the required diameter of the flow section.
10. A method for manufacturing an oil piston cooling nozzle according to claim 1 or 2, characterized in that a separately manufactured nozzle is installed in the nozzle part of the nozzle between the connected parts.
11. Piston oil cooling nozzle, which is a housing with a through channel made in it for supplying cooling oil from the oil line to the channel of the nozzle part located at the outlet, consisting of two halves hermetically connected to each other, with the axis of the through channel in the nozzle communicating with the oil line with the nozzle part, lies on the interface between the nozzle halves, and each of the nozzle halves contains a zone to which coolant is supplied from a common line in the block, a zone that supplies coolant to the piston, and a zone that forms a compact jet, ensuring smooth transitions from one zone to another.
12. The nozzle according to claim 11, characterized in that the axis of the through channel in the nozzle connecting the oil line with the nozzle part lies in the same plane.
13. Nozzle according to claim 11 or 12, characterized in that the connected parts are metal.
14. Nozzle according to claim 11 or 12, characterized in that the connected parts are plastic.
15. The nozzle according to claim 11 or 12, characterized in that the opening of the nozzle part is calibrated to the required diameter of the flow section.
16. The nozzle according to claim 11 or 12, characterized in that a separately manufactured nozzle is installed in the nozzle part of the nozzle.
Checking and replacing injectors on a VAZ 2170 Priora
/ VAZ/ vaz-2170/ Engine/ Power system/ Checking and replacing injectors
Signs of injector failure may include:
– difficult engine starting;
– unstable engine operation;
– the engine stalls at idle;
– reduced crankshaft rotation speed at idle;
– the engine does not develop full power, insufficient engine response;
– failures in engine operation when the vehicle is moving;
– increased fuel consumption;
– increased content of CH in the exhaust gases.
You will need: a 5-point hex key, a flat-blade screwdriver, a 17-point key (two), an autotester.
The block has five contacts: four for supplying a control signal to the injectors and one common “+12 V” (a crimson wire with a black stripe is connected to it).
3. In turn, connect the four control contacts to the common contact and measure the resistance in each case. It should be 11–15 ohms. If in one or more measurements the resistance value differs from the specified value, the tested injectors or their wiring harness may be faulty.
4. For a more accurate check and replacement of injectors, remove the fuel rail from the car (see “Removing and installing the fuel rail” ).
The injectors of the VAZ-21126-00 engine of the VAZ-2170 Lada Priora car have an original design and are not interchangeable with the injectors of VAZ injection engines of other models. Buy new injectors with exactly the same markings.
11. ...and similarly remove the ring from the sprayer side.
12. If you are installing old injectors, carefully wash their nozzles with solvent or carburetor cleaner.
Install new O-rings carefully, without using any tools, after lubricating them with engine oil.
15. Having installed the fuel rail, connected the fuel line and connected the wiring harness block, secure the minus terminal on the battery, turn the ignition key 3-4 times to position “I” (ignition) at intervals of 2-3 s between turns on and check for leaks pipe connections and injector seals.
16. Install all removed parts in the reverse order of removal.
Comments
Leave a comment Cancel reply
Replacing injectors without removing the receiver - Community "Lada Priora (Lada Priora Club)" on DRIVE2
Hi all! I hope the information will be useful to someone :) There is also an opinion that it is necessary to remove the injectors and wash the receiver, or that it does not take so long to remove it and so as not to suffer, it is better to remove it. This option is for those who do not want to do this for some reason :) — My story: the mileage was approaching 160 thousand, and I washed the injectors for the last time at about 60,000 km, I wondered about the next wash, but I saw information on the Internet that in theory it was advisable to replace the injectors at 100,000 km. And then I remembered that they fitted me with a fuel rail from the same engine, albeit with a mileage of 20 thousand, and it was Siemens, while I had Bosch from the factory. But as far as we know they are interchangeable. So the question immediately disappeared, the injectors were removed and washed, and the question of installation arose. There is a myth circulating at STOs that removing the ramp without removing the receiver is not realistic. But this is just a myth)) and I decided to check it.
It's actually simple:
0. Remove the block from the fuel pump under the rear seat and start the car until it stalls. This will remove pressure from the fuel system.1. Remove the air filter2. Unscrew the vent and bend it to the side3. We unscrew the dipstick (but do not remove it, it will be difficult to insert) 4. Disconnect the injector cable 5. Unscrew the ramp6. We carefully pull it towards ourselves (it came out without any problems) 7. We pull out the first injector from the ramp in place, and turn the rest with their tail to the right.8. Carefully pull out the ramp to the right (I did it in about a minute and a half)9. We install new ones or our own washed ones, making sure to replace the rings with new ones10. ! Inspect the braid for damage to the wire insulation; my wires have become stiff and the insulation has burst. I had to take a new one11. In order not to stain our clean injectors, it is advisable to stop by a car wash before this procedure and ask them to thoroughly rinse that area, or make do with a bottle of carburetor cleaner and then blow everything out of the compressor (as I did)12. We put everything back together in reverse order. With the new scythe it was more difficult, since I had to carefully press down the wires so that everything lay neatly and did not interfere with the ramp getting into place. The process took about 5-10 minutes. We start it up and check for leaks. If it doesn’t run from nowhere, we rejoice at the result
The machine began to work more smoothly. And probably a couple of dead horses came to life in it))) In general, the work was worth it
Ramp before installation
Cleaned new Siemens injectors with 4 nozzles
I washed and blew out the seats as best I could.
Replacing injectors on a 16-valve valve
From the manufacturer's factory, VAZ-2112 cars were equipped with injectors from “Bosch” and “Siemens” ( mainly Bosch 0 280 158 996 – approx.) the service life of which before the first cleaning is within 50 thousand kilometers.
Step-by-step work order
- First of all, we remove the air filter housing, the mass air flow sensor (MAF – approx.) and the pipe.
- Then you need to relieve the pressure in the fuel system. In order not to suffer, and to do this work easier, we place a rag under the pipes and unscrew the connections. This will release the pressure quickly, and the remaining gasoline will flow out onto the rag.
Using two wrenches, unscrew the fuel line.
The power supply is disconnected.
Place the loosened bolts in a safe place.
To remove the ramp, you will have to make an effort.
When the fuel rail is removed, we carry out work to dismantle a specific injector:
- We remove the power supply from the injector, first moving the block to the side.
We remove the pads one by one.
Conclusion
Oil injectors are an optional, but very interesting option, which only recently began to be included in the basic versions of many cars. Initially, such injectors were in demand for turbocharged engines, but practice has shown that they have a positive effect on the service life and performance of absolutely all internal combustion engines. Although the failure of injectors does not always affect the performance of the engine, we do not recommend ignoring this point. If your car’s engine is not equipped with oil nozzles, and you plan to use the vehicle for a long time, you should think about installing them. Typically, the installation of oil injectors by a professional does not take much time and is relatively inexpensive.
Repair of injectors VAZ 2110–2112
Repairing injectors means cleaning the product and replacing the O-rings. Simple measures to restore the functionality of the injectors can significantly increase the car’s power and make cold starts easier. Injector repair is possible in the following cases:
- there are no visible deformations on the body;
- the nozzle has not yet exhausted its service life;
- the car owner wants to optimize the operation of the power unit.
In all other cases (cracks and deformations, long service life), it is recommended to replace the nozzles with new ones.
How to blow out and clean oil molds
On cars of the tenth family, injector cleaning may be necessary after 40–50 thousand kilometers. In this case, it is best to carry out the procedure yourself, since you can always observe for yourself the true condition of the motor and its elements, and also save a significant amount on service station services.
A few words about the procedure for working with wiring
At the end of today’s article, we’ll look at exactly how you should proceed if you want to change the wiring. As an example, let's take standard models of the VAZ brand - 2110, 2109 and the like. So, to competently work with car data electronics you will need:
- First, prepare for repair procedures. The implementation of this goal lies through:
- Purchasing the required wiring and devices;
- Search for the necessary connection diagrams;
- Selection of auxiliary tools: harnesses, fasteners, gloves for work, etc.
- After this, acting according to the diagrams of the currently installed electronics, we completely remove it. Naturally, before this you need to turn off the engine, disconnect the battery and put on gloves;
- Then the actual replacement of the VAZ wiring begins. Here you also need to act taking into account the connection diagrams. First of all, we connect the injector wiring according to the principle “from the oldest element to the youngest”. Next, we connect the main wiring outputs (ECU contacts) with the current source, and at the end we connect other electronics.
Cleaning methods
There are three main ways that will allow you to clean your injectors. Decide for yourself which one to use.
Way
Peculiarities
Quite effective, but financially expensive. Plus, working with chemicals is risky because it is very dangerous to your health. Cleaning is carried out only in full compliance with safety regulations
Car services will now do everything for your money. But you'll have to pay a lot. Don’t forget that finding a really good, responsible and inexpensive service station is something out of the realm of fantasy. Therefore, either questionable quality of work, or impressive money for effective cleaning
The most economically profitable way to save money and complete the task efficiently. You should choose this option only if you have an idea about the design of the motor, the location and functions of the injectors
Do not carry out cleaning yourself if you have never climbed into the engine compartment yourself to replace or repair engine components. Trust trusted specialists, do not take risks.
Before and after cleaningApril 2009
| Mon | W | Wed | Thu | Fri | Sat | Sun |
| « Mar | May " | |||||
| 1 | 2 | 3 | 4 | 5 | ||
| 6 | 7 | 8 | 9 | 10 | 11 | 12 |
| 13 | 14 | 15 | 16 | 17 | 18 | 19 |
| 20 | 21 | 22 | 23 | 24 | 25 | 26 |
| 27 | 28 | 29 | 30 | |||
In general, as you know, Kalina blocks 11193-1002011 have such a feature - oil nozzles.
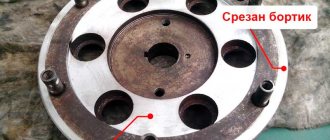
They are installed in the main bearing supports and, when a certain pressure is reached, they spray oil onto the part of the piston distant from the spark plug, thereby cooling it. The likelihood of detonation is reduced. Naturally, they are not in the standard block 21083.. (by the way, in the blocks of the new Samar 2 11183 8 cl engines, they are not there either)
Well, since we are building 16 valves, I think it would still be advisable to have them. Especially if further boosting of the engine is implied. It is especially important to have them if you plan to install a turbocharger.
But seriously, there are still debates on the Internet about whether they are needed or not. Some installed it, some didn’t and drive like that. But considering that this procedure is cheap, it was decided to do it anyway...
Injectors were purchased at the aftermarket (on Fuchika) for 250 rubles
At first I applied to Mechanics, but they refused me. It turns out that St. Petersburg Mechanics does not do this... I began to think - what to do...
I studied several forums and sites... But there is not enough information on the Internet 1. https://kvazar-3000.narod.ru An article about the OKA car. I advise you to read and look at the photos... here is one of them
2. https://www.vaz.ee/forum/ Good report from the vaz.ee forum, forum member TAZ_64
In general, I first decided to try to install them myself. Since the procedure, despite its apparent ease, is quite complex and responsible. I decided to practice on an extra block. There was an unnecessary 1.3 liter engine lying in the garage. In an hour, my friends and I disassembled it, took out pre-purchased drills 4, 6, 6.9, 7.5 and started drilling... In general, I lay down at the first nozzle. Not only did I not drill in exactly the right direction, I also managed to drill right through with a 7.5 drill... That is. the nozzle was falling through. Fortunately, the block was not needed... This was the end of my experience with installing oil nozzles on my own. I realized that I couldn’t do this job and didn’t want to risk the block (since it was already bored for the pistons) and damaging it would be “worse than ever”
In general, I searched on various forums for someone who would deal with this matter. Only one well-known St. Petersburg tuning company took on this task - https://www.rally-service.spb.ru the cost of services is 800 rubles. They installed them in an hour...
All the guys, in Bryansk we don’t install oil nozzles, so I decided to install it myself, today I installed 1 force on an unnecessary block, it looks like it worked out, tomorrow I’ll install it in my own block, guys, wish me luck!
eh... the main thing there is to be very, very careful. good luck.
By the way, I assembled the second engine without force. I didn’t dare to do it myself, just as I didn’t dare to entrust it to anyone else.
Important nuances
There are a few things to keep in mind when cleaning your injectors. Here they are:
- You cannot save on flushing fluid. The injector is too important an engine part. And it is extremely sensitive to the quality of the flushing fluid. The optimal choice for washing Priora injectors is a product from Wynns, developed specifically for injection engines. The cost of a liter bottle is 700 rubles;
The plastic bottle must be removed carefully after washing the Priora injectors.
Replacing injectors is a long procedure. Nevertheless, it is quite within the power of a novice driver if he has at least a vague understanding of the structure of an injection engine. When cleaning the injectors, the situation is much simpler: you just need to be able to use a drill and know where the main fuel hose is located.
When to clean injectors
Cleaning of injectors on Lada cars is carried out according to the condition of the car. If there are no problems with your car, then there is no need to clean them. Also, to find out for sure whether the injectors need to be cleaned, you first need to diagnose the fuel system. You can learn more about how to diagnose the fuel system in our article.
The manufacturer recommends cleaning the injectors every 50,000 km. Since the fuel at our gas stations leaves much to be desired, just before this mileage they begin to become clogged and flushing them will be useful. You can wash it at a service station, or you can do it yourself. Next, we will look in detail at how to wash the injectors on a VAZ car at home.
Cleaning procedure
Cleaning injectors can provide the car owner with the following benefits:
- restoring the original functionality of the device;
- reduction of fuel consumption;
- optimization of motor operation.
That is, in case of contamination (use of low-quality fuel), it is possible to flush and clean the valves in order to restore them to functionality.
Open the hood and make sure all vehicle systems are working properly
Several cleaning methods
Experienced drivers know that there are several ways to clean injectors on a Lada Priora. Moreover, each of them has both its pros and cons.
The first option is to use a detergent additive - the liquid is added to gasoline and, after entering the gas tank, it enters the injectors. Usually one bottle of the additive (0.5 l) is enough for a whole tank of fuel. In this case, absolutely all parts of the fuel system are washed. However, the disadvantage of this method is the lack of drainage of dirt - it will remain in the system.
The second option involves using a solvent. It is considered the most effective, since flushing is carried out while the engine is running. However, it is necessary to replace the spark plugs immediately after using the solvent, as they may stop functioning.
Ultrasonic cleaning of injectors can be considered the most modern method. However, the average car owner cannot always afford to buy this type of equipment.
The Lada Priora car owner can clean and replace faulty injectors on his own - the main thing is to carefully monitor the progress of the work. The solenoid valve on the Priora is considered a fairly reliable element of the fuel system, so you will rarely have to perform any type of work with it.
Home →
Maintenance and Repair →
Replacing Injectors VAZ 2110 16 Valves
replacing and removing injectors on a VAZ-2112 with 16 valves yourself
The injector in a car is perhaps the most important element of the fuel system. VAZ 2110 belt, crankshaft replacement. front crankshaft oil seal. Replacing the timing belt VAZ 2112 16 valves in photo a. After all, without them, the operation of the engine as a whole would be unrealistic.
The video below describes in detail how to remove injectors on a 16-valve VAZ-2112 engine:
Replacing 16 valve injectors
From the factory on the VAZ-2112, nozzles from Bosch and Siemens were installed on the car ( preferably Bosch 0 280 158 996. approx.) A resource that is within 50,000 km before the first treatment.
Step by step procedure
- First of all, the air filter housing, the mass air flow sensor (DMRV. approx.) And the pipe.
- Then the pressure in the fuel system must be relieved. Cylinder head gaskets are designed to replace the cylinder head gasket of the VAZ 2110. To avoid suffering and make this work easier, place a cloth under the nozzles and unscrew the connections. Thus, the pressure will quickly decrease, and the remaining gasoline will flow out onto the fabric.
Use 2 keys to turn off the fuel line.
The power panel is turned off.
Remove the bolts in a safe place.
It takes some effort to remove the ramp.
When the fuel rail is removed, we carry out work to dismantle the specific injector:
- We remove the chip from the nozzle after installing the block.
How to remove and wash nozzles in a sixteen valve VAZ 2110 engine. Cleaning injectors
Thank you very much for watching my videos, tell your friends who write comments
Removing injectors on the previous ones (Lada 2170, VAZ 2112)
Capture Report
from a
VAZ 2110
.
2112, engine 1.5 16 valves
. Replacing fuel injectors. Engine injector repair, instructions for replacing VAZ 2110 power system sensors, checking the VAZ 2112 fuel system, DIY procedure for removing and installing injectors. Replacement of the generator with a vibrator, air conditioning, battery, on Kalina air conditioning 16 valves. Also a way to clean the nozzle.
The gaskets are removed one by one.
Replacement or cleaning?
To understand what to do with the nozzle, replace it or simply clean it, it is better to diagnose them on a special stand. Replacement Removal and replacement Cleaning Remove the injectors on the VAZ 2110 8 and 16. Under these conditions, you can test it at different pressures and visually see how tightly it closes and smells.
If any of the nozzles need to be replaced, then you need to buy a new one with exactly the same article as the old one. Do-it-yourself replacement and repair of VAZ 2110-2112 attachments. Also, when installing clean injectors, replace all rings (about 2 pieces per injector).
Installation is strictly in reverse order, similar to the removal order.
Injector cleaning video
Warning! When working with injectors, observe all fire safety measures, as gasoline vapors are flammable and pose a high risk of fire.
What is a nozzle?
An injector is a special mechanical sprayer located in the “head” of the engine through which fuel is supplied to the cylinders under high pressure.
Three types of engine cooling
If you take an internal combustion engine (be it diesel or gasoline ), its design, to put it mildly, is not ideal! I have already written that the efficiency of a gasoline unit is only 20–25% , a diesel unit is 40–50% (which is better, but also far from ideal). And most of the fuel, to put it exaggeratedly, is converted into heat (heat losses), in gasoline versions they can reach up to 35%! And this is a lot.
But that's not the point. To prevent our engine from simply overheating and jamming, we need effective cooling. Moreover, we mainly need to cool the so-called piston group and timing system (after all, the main temperature is there).
What cooling systems do we know:
PASSIVE
Personally, that's what I call her. The metal that makes up the block can be made massive, with ribs, for effective heat dissipation. The material can be cast iron or, say, aluminum, pistons and rings (compression and oil scraper) can be made massive (like connecting rods, crankshaft, etc.) - they perfectly transfer temperature to the block. The combustion chamber is not so voluminous, and such an engine will cool itself - say, when moving. Air flows will pass through the “ribs” cooling the structure. Probably everyone remembers ZAZ cars (in common parlance “Zaporozhets”), and so, it was cooled using the air method.
PROS: There is no unnecessary equipment that takes power from the engine - such as a pump. There are also no radiators, antifreeze (antifreeze), thermostat, etc. Which extremely simplifies the design of both the motor and the cooling system
CONS: Nowadays this system is practically not found. All due to the fact that there is really not enough of it in the hot months, the engine simply overheats. There is also no liquid heating in winter, which is extremely inconvenient! This design is now found only on mopeds, motorcycles and some agricultural equipment.
ACTIVE (or forced)
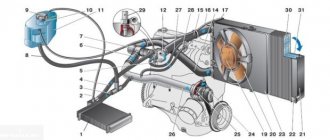
As you guessed, this system is a modern car. In simple words, a large number of channels pass through the block head and the block itself, in which coolant ( antifreeze or antifreeze ) circulates. It is she who removes heat and, with the help of radiators, dissipates it into the environment. The system is pumped by a pump, a special pump that is often powered (via a belt drive) from the crankshaft, although now electric systems (where the pump has an electric motor) are increasingly appearing.
The ADVANTAGES of this system include sufficient lightening, that is, massive blocks, pistons, crankshafts, etc. are no longer needed. Everything cools quite well anyway
CONS – I personally call it the abundance of attachments (pumps, antifreeze, etc.). And also the neglect of many manufacturers, who strive to make the engine as light as possible, make tablet pistons and thin rings (although they can no longer effectively remove heat into the walls of the cylinder block). Thoughtless relief leads to a decrease in resource.
But there is another, third type of cooling - with the help of oil, which I want to highlight as a separate item.