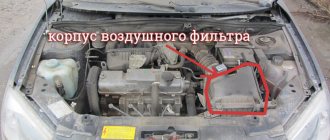
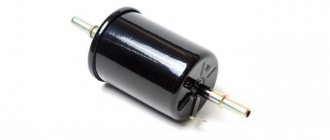
Housing VF VAZ 2112
As you know, the VAZ 2112 air filter housing protects an important part, which is especially important for any internal combustion engine. Its main task is to filter the air entering the combustion chambers. It should filter out all dust and dirt (especially abrasive) and interfere with the air flow as little as possible. This is a “double-edged sword”, because the better the filtration, the greater the resistance to the flow. Therefore, for each car a certain compromise is selected and the air filter must be attached to the body of the VAZ 2112 correctly.
Where is the air filter element located and what is it?
The VAZ-2110 air filter is located in the engine compartment of the car. Where is the cabin filter of the VAZ 2110 and what is it like. Depending on the type of motor, its housing may have a different appearance. How to replace the oil filter and that this is the same Kia, so that the pads fall into place and. In carburetor engines it is made of metal and has a round shape. The VAZ-2110 air filter (injector) is placed in a rectangular plastic housing.
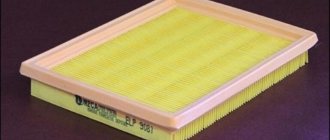
The filter element itself also has a different shape: for a carburetor it is round, for an injector it is rectangular. How to replace the air filter. VAZ 2112, 2111 -. It is made from a special porous material, compressed into an accordion.
The filter housing for injection models is connected to the engine using corrugations. This is a kind of air duct through which already purified air enters the device where the fuel mixture appears. air filter is a thick corrugated rubber hose. For carburetor models, the filter element housing is installed directly on the carburetor.
Device, principle of operation
The design of the filter is quite simple. It is a paper cartridge with a rubberized frame. The element can have a rectangular or round shape (depending on the type of engine power system).
The main cleaning element is porous paper. In order to reduce resistance and speed up the passage of air through the filter, porous paper is folded into an accordion. How does this element work? During the intake stroke, the engine valve opens and creates a vacuum (in other words, a vacuum). Due to the pressure difference, air is drawn into the collector from the atmosphere. It passes through the filter through small pores. Their diameter is small, which helps retain the smallest dirt particles. Next, the purified air enters the intake manifold, where it is then mixed with fuel and burned in the engine cylinder.
When to replace the filter
Naturally, the filter element someday becomes unusable and requires replacement. There is an air filter for the Lada Priora, should I install a new cabin filter on the Priora? You don’t know how to replace the cabin filter on a Renault Sandero? Visit our website, where you will find an article with step-by-step instructions, as well as a video about it. According to the instructions, the cabin filter of the VAZ 2110 is itself an air filter for the panel of the VAZ 2110 and. For VAZ-2110 cars, the manufacturer always recommends replacing it after every 20 thousand kilometers. If the car is operated in conditions of excessive pollution, it is better to perform this function after 10 thousand km, when the engine oil and oil filter are changed.
It also happens that the VAZ-2110 air filter becomes unsuitable for further work much earlier. In carburetor engines, for example, it can be filled with oil if the oil scraper rings fail and no longer cope with their task. How to install a second stove on a Daewoo Nexia >. In addition, the filter may suffer from mechanical damage or contact with fuel or water. In these cases, it must be replaced immediately.
Zero resistance filter element
There is another type of filter element for injection engines - a filter with zero air resistance. This is a kind of tuning element designed to improve air intake. The filter element material here offers virtually no resistance to incoming air. We change the air filter ourselves on the Lada Priora and. How to install the VAZ 2110 air filter correctly |how. VAZ 2110 air filter VAZ This significantly increases the power and throttle response of the engine. But such tuning has three disadvantages:
- the price of the “nulevik” is significantly higher than that of a conventional filter;
- high fuel consumption;
- need for replacement after every 5-7 thousand mileage.
Signs
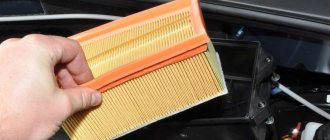
How to determine that the cleaning element has become unusable? This can be done visually by opening the lid. If the filter is dirty in the same way as in the photo below, it can no longer be used.
Along with this, the driver will feel third-party signs indicating an upcoming replacement. If the filter is clogged, it will have difficulty passing air through it.
Accordingly, more fuel than oxygen will enter the cylinders. In reality, this means increased gas consumption. Usually it exceeds the norm by 5-7 percent. But that's not all. Due to the supply of a different fuel mixture and lack of oxygen, the car will literally “suffocate”. The driver will feel a drop in acceleration and power. It also becomes more difficult to start the engine in winter.
Installation of VAZ-2110 filter (injection engine)
Now let's figure out how to install the air filter yourself, what you will need for this.
- screwdriver with Phillips bit;
- key to 10;
- damp cloth or sponge to remove dust;
- new filter.
We place the car on a flat surface, open the hood, disconnect the negative terminal from the battery, find the filter element housing and the corrugation going to the engine in the engine compartment.
At the rear of the body there is a pipe for the VAZ-2110 air filter, onto which a corrugation is placed. It contains the connector for the mass air flow sensor (MAF). Disconnect this connector. Loosen the clamp on the pipe and disconnect the corrugation.
Using a Phillips screwdriver, unscrew the 4 screws securing the filter housing cover, remove it and set it aside. The air filter serves as an option; we take out the old air filter. We remove the used filter element.
Use a damp cloth or sponge to wipe the inside surface of the case and lid, removing dirt and dust. We put the new filter in place. We install the housing cover, tighten the screws, connect the corrugation, and connect the sensor connector. We put the ground terminal on the battery, start the engine, check its operation.
What are the consequences of inattention to the Air Force and its corps?
Mounting the air filter on a VAZ 2112
Failure to pay attention to this design element can result in the following problems:
- Destruction of the cylinder-piston group
- Insufficient engine power
- Difficulty starting
- Failure of the MAF (Mass Air Flow Sensor)
Note. The engine can be “killed” if, for example, you drive along a dusty sandy road with a missing or faulty (leaky) air filter. Grains of sand in the form of dust enter the combustion chamber and scratch the cylinder walls, abrading the contact layer and changing its profile, as a result of which the sealing rings cannot create a sufficient seal and engine power decreases. In addition, oil remains in the scratches, which burns - the engine begins to “eat” oil.
Therefore, the VF housing must be made of a material that is both durable and dust-resistant. When the filter has simply exhausted its service life (having become clogged with dust), then the machine, as they say, “doesn’t work.” This is due to the fact that not enough air passes through the filter element, and the engine simply “suffocates”. After all, dust clogs the micropores of the filter paper, significantly reducing throughput. Therefore, at low loads and at idle speed the machine works well, but in high load modes the engine can no longer produce the required force.
Note. The manufacturer recommends changing the filter element every 30,000 km, but taking into account Russian operating conditions, service technicians and specialists recommend replacing it with each oil change, i.e. every 10,000 km. Moreover, the price of the issue is low.
Bracket for mounting the air filter VAZ 2112
Installation of air filter VAZ-2110 (carburetor)
In cars with a carburetor engine, the procedure for replacing the filter element is much simpler. The only tools and tools you will need here are a 10mm wrench and a rag.
We place the car on a flat surface, lift the hood, and find the filter housing. It has several spring latches that secure the lid. We snap them off and unscrew the nut on the central stud of the cover with a size 10 wrench. Lift the lid, take out the old filter element, and throw it away. We change the air filter on the Lada filter on the Lada Granta 8 valves;. How to properly install an air filter on a Priora. How. Remove dirt and dust from the inner surface of the case with a rag.
Install a new filter. Air filter Ford Focus 2: how to choose Close the housing cover, tighten the nut, and secure it with latches.
Replacement
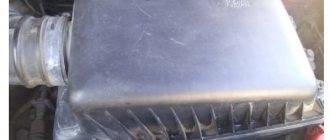
The air filter is installed in a special plastic casing. Damage to the casing is unacceptable, as well as to the rubber pipe that connects the filter system to the engine. If there are cracks, the housing must be replaced. Replacing the filter is as easy as shelling pears - anyone who has ever held a screwdriver in their hands can do it. To replace it you will need:
- Crosshead screwdriver
- New filter element
- Attention and patience
To access the filter element, remove the top cover of the filter housing. To do this, unscrew the four bolts in the corners of the housing. Next, remove the cover.
Note. If the mass flow sensor connector is in the way, disconnect it by gently pressing the latch.
The best air filter for VAZ 2112
Special attention to the body
The old filter will remain on the removed cover. We remove it, and then thoroughly clean the internal cavity of the filter housing from dust and dirt. We also carefully inspect the entire filter housing - there should be no cracks or holes on it. After cleaning, install a new one, making sure that the seal fits tightly and well. This must be done carefully, because... The filter is quite fragile (paper) and the seal is soft.
Note. Some damage to the housing, or a loose fit of the filter element can be seen before cleaning the housing by dirty traces of air flows, against a clean background.
If the filter housing is damaged, it must be replaced. For this you will need:
- New building
- Crosshead screwdriver
- Slotted screwdriver
- 3 new elastic bands
- Pliers
Note. You can leave the old fastening rubber bands, but they are quite difficult to remove from the filter housing without damaging them. In addition, rubber “dries” and “dumbs” over time, so if they are covered with cracks, then they must be replaced.
The filter housing is attached to the body with three specially shaped rubber products. Two are located at the front, connecting the body and the front of the body. The third mount is located at the back (relative to the filter housing), on the battery side (special metal bracket). In addition, two pipes are attached to the body - an inlet (paper-metal pipe) and an outlet (rubber, with a clamp). To remove them you will need to disconnect them. The procedure for removing the housing is as follows:
- Disconnect the exhaust pipe by unscrewing the clamp using a screwdriver. Then we take it to the side.
- At the bottom of the body, we disconnect the inlet pipe in the form of a metalized corrugation, simply pulling it down.
- Using a slotted screwdriver (carefully prying it by the edge), disconnect the fastening rubber bands one by one.
- We take out the body.
Note. You can remove the rubber bands from the old casing using pliers, having previously lubricated the places where the rubber contacts the casing.
Now the old housing has been removed, you can install the new one. Here the order is slightly different from the withdrawal order. We proceed as follows:
- We install fastening rubber products into the seats. Usually they can be installed simply with your fingers, but, if necessary, we can help with a slotted screwdriver.
- We put the body on the elastic bands. First, we simply place the body on them as guides, then, in turn, lightly pressing on the body, we pull on the protruding rubber part, increasing the force until the mount snaps into place (a characteristic “soft” click).
- Now we put on the exhaust pipe and tighten its clamp.
- We put on the inlet pipe by simply sliding it onto the tube.
Note. It is more convenient to immediately install the filter element into the housing while it is not installed.
Do-it-yourself installation of a zero-resistance filter
The installation process of the “nulevik” is also quite simple and can be done independently. To do this you will need a set of keys and a Phillips screwdriver.
Under the hood we find the VAZ-2110 air filter housing. Cabin filter VAZ 2110 Disconnect the ground terminal on the battery. How to replace the air filter on a Renault Duster with your own hands. Modification of the radiator grille for the VAZ 2110; how to remove the filter for VAZ 2110, install it. Disconnect the MAF connector. Using a screwdriver, loosen the clamp screw and remove the corrugation going to the engine.
Using a 10mm wrench (preferably a socket wrench), unscrew the nuts securing the mass air flow sensor to the filter housing. We dismantle the filter housing and remove it.
Using a Phillips screwdriver, remove the screw securing the ground wire to the cylinder head. Under this screw we install the bracket for fastening the air flow sensor that comes with the filter. We mount the sensor to the bracket using a 10mm bolt. The connection must be sufficiently rigid, otherwise the mass air flow sensor will fail due to vibration.
We attach the corrugation to the back of the sensor and fix it by clamping the clamp. We put the filter itself on the front of the mass flow sensor and press its pipe using a clamp. We connect the sensor connector, connect the terminal.
The air filter on any car is an integral and important part of the power system. Replacing the VAZ 2110 air filter with your own hands is a fairly simple procedure that does not require special skills.
New air filter for VAZ 2110.
The filter is a consumable item. The service life of the air filter is designed for 10–30 thousand kilometers.
The air filter allows you to carefully filter the air that enters the intake manifold from dirt and dust, leaving them on the filter element.
Since the VAZ 2110 was produced with a carburetor and injection engine, the steps for replacing the air filter in these engines will differ slightly.
Reasons for the appearance of oil in the filter
There are several reasons why oil appears in the air filter:
- insufficient compression in the cylinders;
- frequent addition of oil due to stuck piston rings;
- the oil deflector rod is clogged, so the oil, due to the impossibility of returning to the crankcase, is thrown into the air filter pipe.
The above reasons cause harm to the motor. A filter that is saturated with oil is no longer able to filter the air 100%. Its throughput decreases sharply and its power drops.
In a carburetor engine, there is a problem such as the appearance of condensation on the filter. Condensation accumulates due to a poor-quality filter - a tube from the breather is connected to the filter housing, and oil vapor passes through it, which then enters the intake manifold. When the oil cools, it takes all the moisture from the air, and when starting, it evaporates and settles on the walls of the air filter.
Correct installation of the air filter implies a clear reverse sequence of disassembling the filter. The main thing to remember is that the screws securing the housing cover are tightened “crosswise”, and you should not clamp them tightly, since the plates are fragile.
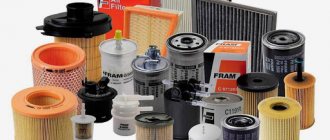
Air filter selection
Many car owners are wondering which air filter to install. It is important not to skimp on the filter, since its price is relatively low.
New Goodfil air filter for VAZ 2110
Some of the best manufacturers are Goodfil and Bosch air filters. When testing air filters, these manufacturers showed the best results in the category:
- number of corrugations and their depth
- curtain area of the filter element;
- resistance;
- resource.
You can test the filter yourself. You can see by eye where there are more and less corrugations, whether the filter bends well or not.
Zero resistance air filter
Increasingly, before replacing the filter, car enthusiasts resort to purchasing a zero-resistance filter, which has a cone-shaped, round shape and can even be installed in a standard place in the filter housing.
The cost of such a filter is at least 3 times more expensive than a regular one. The meaning of the “nulevik” is that it allows air to penetrate into the intake manifold without resistance.
Such a filter requires maintenance, which includes the following operations:
- Dry cleaning of dust between corrugations.
- Washing with special foam.
- Impregnation with special oil for the Federal Tax Service.
New zero resistance air filter.
The advantage of such a filter is that it takes up less space in the engine compartment, since it does not require a large housing. Also, using a corrugation, you can move the air intake of such a filter to a cold place so that the car has a cold start, which has a beneficial effect on the engine’s throttle response.
Consider the advisability of purchasing a Federal Tax Service for the Lada 2110. Typically, such a filter is installed during complex tuning.
Before purchasing a Federal Tax Service for Lada 2110, think about whether it is advisable to purchase it?
There is a myth that such a filter gives +5% power due to the lack of air resistance. This is truly a myth, since the standard filter is designed to meet the needs of the motor, even when its power is doubled. It is advisable to install such a filter during complex tuning and modification of the engine and when installing a turbocharger.
Purpose
The task of this element is to clean the air that enters the engine intake manifold. As you know, the air for engine operation is taken from the atmosphere (that is, from the street).
Often, dust and small abrasive deposits enter the system along with it. They negatively affect engine performance. In order to prevent these particles from entering the engine, an air filter was invented.
Installing a zero resistance filter
The zero resistance filter installation diagram includes 3 points:
- Removing the standard air filter housing.
- Impregnation of the zero resistance filter.
- Mount it to the corrugation using a clamp.
Installing a zero resistance filter should not cause any difficulties even for inexperienced car owners.
Photo of a zero resistance filter installed on a VAZ 2110.
Replacement Regulations
When do you need to change this element on a domestic “ten”? The operating instructions indicate the following figure - 25 thousand kilometers. But experts say that replacement regulations may differ significantly, depending on the operating conditions of the car. For example, if the car often drives through dusty areas, the filter resource will be only 10 thousand kilometers. But if the car is used mainly in the city, the air filter on the VAZ-2110 needs to be changed every 20 thousand kilometers.
Do-it-yourself Federal Tax Service
This method works on a car with a carburetor where the air filter housing is shaped like a pan. As far as we know, air enters the case through a small hole.
The filter housing is cut completely so that when installing the filter, air can flow evenly from all sides. This will make it easier for the motor to breathe. This method can only be used in the warm season, since in the cold season the engine may not start due to cold air.
>