Exhaust system VAZ 2110
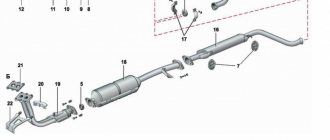
Replacing a muffler for a VAZ 2110 or its parts is not work that needs to be done systematically. It is not necessary to change parts of the exhaust system often, in cases where the muffler begins to make noise, its elements burn out, or in the event of a break in the connecting pipes. You can change any part of the muffler with your own hands. The VAZ 2110 exhaust system consists of a reception pipe (another name for pants), a neutralizer, a resonator (additional muffler), and a main muffler.
Replacing the muffler on a VAZ 2110
VAZ 2110 owners are quite lucky, since replacing the muffler is quite simple and does not require special skills or extensive experience. But you definitely need an inspection hole.
The replacement procedure sequence is as follows:
- The muffler is connected to the resonator through an O-ring on the pipe flare. Plus, the connection is compressed with a clamp, which consists of two parts.
- The clamp must be dismantled, so remove the ring. Since the O-rings used here are graphite, they should not stick to the metal.
- Now the old muffler can be dismantled quite easily.
- Be sure to check the condition of the suspension rubber bands located on different sides of the muffler body. They often end up stretched or covered with cracks. Rubber bands are quite cheap, so buy new ones and replace the old ones with them.
- The new muffler is first mounted on rubber bands, after which it is inserted into the same new graphite sealing ring between the flares. Use a clamp to compress the connection. Ready!
Changing the resonator
It is also advisable to replace the resonator on a VAZ 2110. This is done after changing the muffler.
The work of replacing the resonator is performed in the following sequence:
- The resonator is secured to the muffler with a crimp clamp with an O-ring.
- It is attached to the neutralizer using a floating flange consisting of two bolts and a flare.
- On the opposite side of the element there is a so-called fist.
- Removing bolts is often quite difficult. So that you don't have to suffer, just cut them off with a grinder and buy new bolts. This is the simplest solution to the problem.
- If you couldn’t get a grinder, use a liquid key. This is a popular product among motorists - WD40 or its analogues. Treat the bolt attachment points with this compound, wait a while, after which the bolts should come off.
- After removing the bolts, remove the muffler clamp.
- Remove the resonator from the suspension rubber bands. Check the condition of the rubber bands. If they are worn out, replace them with new ones.
- Take a new resonator, secure them to rubber and connect them to the muffler so that the pipe leading to the muffler from the resonator is parallel to the ground.
- If you notice wear, burrs, or traces of rust on the neutralizer fist, be sure to coat the connection with sealant. Moreover, it must be a high-temperature sealant.
- Armed with new bolts and nuts, tighten the catalytic converter and resonator flanges.
- The neutralizer is fixed to the resonator with two bolts using a flange connection. The fastening occurs to the states, but there is a receiving pipe, using a spring-loaded connection and two flares. The space between them contains a sealing ring made of graphite or metal asbestos.
Replacing the neutralizer
As you can see, the exhaust system of the VAZ 2110 car is designed quite standardly, its repair is not difficult even for a motorist with little experience.
When changing the muffler and resonator, it is likely that you may need to replace the converter. This operation is simple and can be done in a few steps.
The neutralizer serves to dampen vibrations from the engine and prevent them from occurring in the exhaust system of the domestically produced VAZ 2110 car.
If it needs to be replaced, it is done like this:
- If the old springs and bolts are intact and have no obvious damage, you can continue to use them. They show characteristic signs of wear, be sure to buy new elements.
- The ring should be replaced in any case, no matter how well the old one is preserved. If gases begin to leak through the old ring, this will lead to very rapid wear and damage to the converter flare and the exhaust pipe.
- After installing the neutralizer, new bolts are put on, they are carefully but firmly tightened. Moreover, the first thing you need to do is tighten the bolts that secure the resonator.
What affects the price?
To make an economical purchase, you need to go to several places of sale and compare the quality and cost of the goods. Prices for a resonator vary greatly at different sales points. When forming the final cost, sellers take into account a number of factors. For example, the price level depends on:
- Car part conditions.
- Qualities.
- Varieties.
- Originality.
- Forms.
- Size.
- Brenda.
- Places of purchase.
- Kudos to the seller.
- Prices for additional functions (delivery, replacement).
Replacing pants
The exhaust pipe, also called pants (due to its appearance), is attached to the manifold using studs and nuts. Its fixation with the neutralizer is carried out by a spring-loaded connection.
- Remove the exhaust pipe, paying special attention to its attachment to the manifold. Studs are used here, not bolts. They are screwed into the manifold, and connecting nuts are screwed onto them.
- If the pin is damaged, it will be extremely difficult to replace it. Therefore, it is important to try to keep the old one intact and safe.
- Treat the nuts with WD40, a product we all know. This will allow you to avoid using excessive force and keep the studs intact. If that doesn't work, the studs are drilled out. The process is complex, lengthy, and requires experience and skill.
- There is a gasket between the manifold and the pants that needs to be replaced. Also install a new converter o-ring.
- Now firmly press the exhaust pipe using the nuts. To do this you will need to compress the gasket.
- Then tighten the bolts of the spring-loaded connection with the neutralizer of your VAZ 2110.
As you noticed, there is nothing complicated in this work. Each element is quite easily dismantled and a new one is installed in its place. Just be careful, act carefully and consistently. Plus, of course, do not forget about the importance of the quality of new parts.
Buy only good spare parts that will ensure long-term and efficient service of the exhaust system on your VAZ 2110.
During the operation of a VAZ car, you often have to deal with various noises that come from different parts of the car and indicate that some part will soon fail. The exhaust system is no exception; extraneous noises and sounds when it malfunctions are very characteristic. Their result is the replacement of the VAZ 2110 muffler or other parts through which combustion products are emitted.
When to change the resonator, and which resonator to choose?
When to change the resonator, and which resonator to choose?
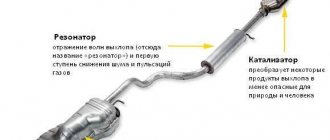
A resonator is a part of a car’s exhaust system, which is responsible for partial compensation of the sound wave that appears when the fuel mixture detonates in the engine combustion chamber.
Not every car has resonators; some small cars can be equipped without it at the factory, but in most cases it is installed in the car. This part of the exhaust system is responsible for damping the sound wave corresponding to the low-frequency range. The resonator works in tandem with a muffler, due to which it is possible to achieve relatively quiet engine operation, even at high speeds. The resonator is especially effective at compensating for resonant sound waves.
Do I need to change the resonator?
The resonator is subject to a large temperature and vibration load, which leads to its failure after some time.
In essence, the resonator, like the muffler, is a consumable component of the car. The validity period depends on the quality of production. Over time, under the influence of high temperature and corrosion processes, aging of the resonator metal occurs. As a result, the steel burns out and the resonator loses its seal. Sometimes the internal parts of the resonator (the filling of the can) are the first to fail, then the resonator may become clogged. This is often the answer to the question of why the resonator is ringing or making a humming sound.
Exhaust system diagnostics
To draw a conclusion about the need to replace a particular part of the exhaust system, diagnostics should be performed. You can do this yourself, using a viewing hole or a lift. For novice car enthusiasts, it would be useful to familiarize yourself with the system diagram in order to know the correct name of a particular part and its location.
As you can see from the diagram, the muffler is the last link in the flue gas emission system. Its main task is easy to determine from the name: to muffle the loud sound of the engine, bursting from the cylinders along with the products of fuel combustion. The muffler and the previous link in the chain - the resonator - most often fail and must be repaired or replaced.
The appearance of exhaust pipe malfunctions is characterized by a whole range of different sounds, from humming and growling to unpleasant rattling. They are united by one feature: sounds come from under the bottom of the car, its middle and rear parts. It is worth noting that not all sounds indicate a direct malfunction; sometimes it is enough to inspect the car from below and remove the cause of the noise. Recommendations for diagnosing exhaust system faults.
- After the car is placed on the inspection pit, it is necessary to prevent it from rolling, since diagnostics will have to be performed at idle engine speed while in the pit. Therefore, if you are not confident in the hand brake of the VAZ 2110, then it is better to place stops under the wheels. Start the engine and go down into the inspection hole.
- It happens that traces of a muffler burnout are immediately noticeable, and a growling sound is heard from the hole. But the hole is not always located on the bottom of the assembly; it can be located on the top and on the sides, especially in those places where pipes are welded to the muffler. It is necessary to carefully inspect the unit and identify the location of the gas breakthrough.
- The nasty rattling sound characteristic of VAZ cars coming from the muffler indicates that you need to prepare to replace it. The noise comes from a burnt-out partition, which, due to vibration, dangles inside the case and knocks on the walls. In this case, no breakthrough of flue gases is observed, the malfunction is not fatal, and the operation of the car can be continued. But this sign indicates that the muffler is nearing the end of its service life.
- Stretched or torn suspension rubber bands of the exhaust pipe allow it to dangle with a large amplitude, hitting elements of the car body. This is characterized by dull knocking sounds; being in the inspection hole, it is easy to determine their source. Such a small malfunction is not difficult to fix; you just need to replace the rubber bands.
- A hum with vibration transmitted to the car body indicates that the exhaust pipe is in contact with the bottom directly or through a foreign object. This may be the result of impact and deformation of exhaust system components. In this case, you need to take measures to straighten the pipe so that there is a gap of at least 1 cm between it and the body parts. Another reason is dirt that has accumulated between the pipe and the bottom after driving on a wet dirt road. The issue can be resolved by simply cleaning the bottom from dirt.
- After driving on various forest or field roads, it is recommended to always inspect the underbody of the vehicle for the presence of stuck foreign objects, such as branches. A stick stuck between the exhaust system pipe and the underbody element very well transfers the hum and vibration from the engine directly into the interior of the car.
Preventing peeling
If a baby's eyebrows peel and crusts form, it is not enough to simply remove them, as they can form again. To prevent peeling, it is necessary to take preventive measures:
- Monitor the humidity in the room where the child is. It must be at least 70%;
Air humidification for babies
It is important not to overheat the child and not to put a hat on him when it is not necessary. In infants, thermoregulation mechanisms are not fully developed, and the body reacts to any overheating by overly active sebaceous glands; Nursing mothers need to exclude fatty foods and foods that provoke allergic reactions from their diet; Even if there are no visible crusts and no noticeable peeling, it is necessary to regularly care for the child’s skin, lubricating it with baby oil and cream after bathing.
You can also sprinkle baby powder, which absorbs sebum well and softens the skin.
Important! If the appearance of scales and peeling is associated with the use of children's cosmetics, you need to lubricate problem areas with natural olive or almond oil and stop using cosmetics. Although seborrheic dermatitis is not a dangerous condition or the result of improper care, it should be remembered that failure to prevent and treat it can lead to serious problems.
Bacteria and fungus love to settle on thick crusts. They can cause fungal infections and weaken hair roots.
Although seborrheic dermatitis is not a dangerous condition or the result of improper care, it should be remembered that failure to prevent and treat it can lead to serious problems. Bacteria and fungus love to settle on thick crusts. They can cause fungal infections and weaken hair roots.
How can I fix the problem?
So, the place of gas breakthrough through the muffler has been detected, you just need to make a decision about replacement or try to repair the unit. Often the holes in the body are small, and in this case it is not always advisable to buy a new muffler. It is necessary to remove the unit from the car and show it to a welding specialist, who will tell you whether it can be repaired.
The craftsman will cut out the rotten part of the body, shake out the remains of the burnt partitions from the inside and apply a patch of new metal. Fistulas that occur at the points where the pipe is connected to the body must also be eliminated by welding. The only caveat is that these repairs solve the problem only temporarily. Such a muffler will not serve for a long time, and it may perform its function poorly; due to the lack of partitions, the sound will break through.
If it is decided that the muffler needs to be replaced, then you need to select and purchase it. New elements are made of black or stainless steel, so the choice is limited. The latter last much longer than black ones, but their cost is higher. In addition, welding work in case of repair of a stainless steel body will be more expensive. When purchasing a new muffler, it is worth purchasing a new set of suspension rubber bands, as well as a graphite O-ring. It is installed at the junction of the resonator and muffler pipes.
The exhaust system of the VAZ-2110 is designed for cleaning exhaust gases. The components included in it have a fairly long service life. But since the entire system is constantly experiencing temperature overloads, the metal gets tired, cracks and burnouts appear. Repairing the exhaust system yourself is quite simple. This allows owners of the “ten” to significantly save on maintenance. The design of the exhaust system includes: the main muffler, neutralizer, exhaust pipe and resonator.
Kinds
Hammerite paint comes in several forms.
With hammer effect
A coating designed for processing ferrous metals. When dried, an imitation of hammer chasing is formed on the surface of the product. This was achieved by adding aluminum flakes to the composition. The product perfectly hides unevenness in the metal; when touching up areas, the transition is almost invisible. Suitable for application to rust without pre-cleaning. Also, during the production of paint, wax is added to the composition, which additionally protects surfaces treated with this composition from moisture. This product is heat resistant, withstanding temperatures up to 80 degrees. Suitable for painting fences, gates, and various garden tools. The cost of the product is about 2,500 rubles per 2.5 liters.
Smooth glossy base for tinting
This coating is suitable for indoor and outdoor use. In addition to wax, the composition also includes silicones, which provide additional protection against corrosion. A large assortment of colors makes it possible to create the desired shade of paint. The paint gives the surface a glossy shine. The cost of the product is about 850 rubles per 0.7 liter.
Smooth glossy
The product already contains a color pigment. Suitable for both previously painted surfaces and rusty, unpainted ones. It has high resistance to such natural factors as negative temperatures, rain, snow. Does not fade when exposed to ultraviolet rays. Has a wide selection of shades. Here you will find 17 color options: from white to black. The cost of the product is about 2,000 rubles for 2.5 liters.
Typical exhaust system faults
Be sure to verify that there are any problems with the exhaust system before starting any repairs. And identify the node that has become unusable. Any breakdown reveals itself with the following signs:
- Broken connecting pipes. As a result, the integrity of the entire system is compromised and exhaust gases are not properly purified.
- Burnouts on the elements of the main muffler and resonator. This leads to the fact that the exhaust gases are not cleaned, and an extraneous sound appears when the engine is running.
- Strong noises appear from the exhaust system and the main muffler, indicating that there is damage.
If small cracks appear in the VAZ-2110 exhaust system (8-valve injector), then in the early stages they can be healed using sealants. This measure will increase the service life of the elements slightly, by no more than one year.
What does the muffler consist of?
The main part of the exhaust system serves to absorb noise. On the Lada Kalina car, this function is performed by a pipe, which includes the muffler itself and its resonator.
The thickening is the resonator, the end is the muffler itself
The pipe has a completely sealed body, which is manufactured using the rolling method, that is, without the use of a welding machine. Thanks to this, the muffler is durable and does not corrode. And the resonator, which is also located in the pipe, consists of several closed chambers. These chambers are connected to each other by small tubes with holes in them. Thanks to this structure, the resonator can quickly smooth out all acoustic vibrations. In the latest modifications of the Lada Kalina, the inside of the resonator is lined with sound-absorbing material.
The three-chamber device allows you to reduce the noise level in the car
Unfortunately, the quality of mufflers for Kalina leaves much to be desired. Often their service life does not exceed 40–50 thousand kilometers. Therefore, the car owner has to think about which “gluker” to choose. Today, mechanisms for the Lada Kalina are presented at a variety of prices - from the cheapest to the most expensive. However, it is better to navigate the world of auto parts using the following parameters:
- muffler material: original spare parts are made of stainless steel or aluminum, they will last as long as possible and ensure high-quality exhaust removal;
- cost: you should not purchase a device below the 1 thousand ruble mark;
- weight: an original and high-quality “glushak” will weigh more than a fake, since the chambers are equipped with thicker walls and sound-proofing materials.
How to remove the main muffler on a ten
As with most front-wheel drive models, replacing the exhaust system of the VAZ-2110 is quite simple. You do not need any special skills, extensive experience, or special tools.
But it is advisable to carry out all work on an inspection hole or overpass. The sequence of work is as follows:
- The connection between the resonator and the muffler is made using flared pipes and an O-ring. This connection is crimped with a metal clamp, which consists of two halves and bolts.
- First of all, dismantle the clamp; to do this, unscrew the nuts from the bolts using two 13mm wrenches and remove the O-ring. On cars of the tenth family, sealing rings made of graphite are used. Therefore, they do not stick to the surface of the pipe.
- Remove the old main muffler from the rubber hangers.
How to Replace a Graphite O-Ring
The graphite sealing ring of the muffler has become an engine part that allows you to isolate the gas joint in the area of connection between the main (or rear) muffler and its middle part (additional muffler) - the resonator. It is also designed to ensure smooth movement of the mutual movement of two connected pipes.
To carry out this repair you will need:
- new o-ring;
- lift or overpass;
- liquid key product;
- wrench with 13" head;
- lubricant for high-temperature zones - will be used on the brake caliper guides;
- wire brush or emery to remove rust;
- personal protective equipment - gloves and goggles.
There is no provision for replacing this part; if the o-ring is burnt out, it simply needs to be replaced. This process is quite simple and does not require special knowledge:
- It is enough to unscrew the bolts connecting the pipe joints. Often these flanges (spring-loaded bolts) become covered with rust over time, so you need to have a special tool on hand to facilitate the unscrewing process, for example, “liquid wrenches”. If the car is quite old, and you are unable to overcome rust, then you can cut them off with a grinder and then replace them with new ones.
- When the flanges are removed, all you have to do is tilt the resonator pipe and remove the damaged O-ring from its pipe. Sometimes it sticks tightly to the pipe, so pry at it with a screwdriver and it will come off.
- If the flanges have been safely removed, then before putting them in place, clean them with sandpaper or a brush to remove rust and carbon deposits.
- Next, install a new o-ring on the flange of the resonator itself and connect the muffler pipes.
- The last step is to fasten the pipes with a clamp and bolts, which most often come with a new ring.
Be careful when working. Although the process is quite simple, when removing the old o-ring, it may rupture, especially if it has already become fairly stuck to the pipe
The ring, made of metal-ceramic, is therefore fragile and can shoot off splinters, so protect your eyes with special glasses.
If you do not promptly replace the muffler sealing ring, then you will constantly breathe exhaust fumes in the cabin. In addition, due to its breakdown, an incredible amount of soot will accumulate under the hood, which is extremely difficult to clean; this process is long and expensive.
If you are having problems with your car's exhaust system, then it is best to have it examined and repaired as quickly as possible. To do this, it is not at all necessary to involve specialists, since due to its structure, the exhaust system of any car is very easy to use. It is easy to disassemble and change parts, so whether it is replacing an entire section or an O-ring, you can do the job yourself
The main thing is to follow all safety precautions, carry out replacement according to the instructions and work with a car that has already cooled down after driving
Moscow Automobile and Highway State University, Moscow. Level of education: Higher. Faculty: AT. Specialty: Special engineer Cars and automotive industry. Experience in the automotive industry (master consultant...
4 comments
- Anton says: My exhaust pipe manifold is getting very hot - it’s under my seat, it’s glowing so much that it’s scary to stick your hand in. How can we insulate it inexpensively and effectively?
Miroslav says:You can ask plumbers - they use fire-resistant tape to wrap pipes. In theory it should help. By the way, due to this, the power will increase - I tested it from my own experience, there is a noticeable increase in horses.
Anton says:
I don’t understand why the horses are added - what is the connection with the collector temperature?
- Stanislav Vyacheslavovich says: Good afternoon. The thermal insulation of the manifold retains more energy in it, which increases its efficiency and has a positive effect on the functioning of the turbocharger.
Installing a new muffler
The cost of these rubber bands is small, they are available in any store. Next you need to do the following:
- Install the new main muffler onto the rubber hangers.
- Insert a graphite O-ring between the pipe flares.
- Place the clamp in place and tighten the nuts using 13mm wrenches.
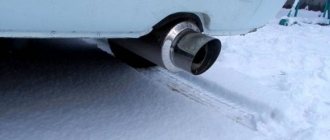
At this point, the repair of the main muffler of the VAZ-2110 exhaust system (8 valves) is completed. Start the engine and check the muffler operation. There should be virtually no sound from the exhaust pipe. The motor will run clean and smooth.
Main reasons
It is worth understanding that a change in the color of exhaust gases, their causticity and density can occur for several reasons:
- Malfunctions in the cylinder-piston group and gas distribution mechanism, read more detailed information on this topic -;
- car, for example VAZ 2109, but how to regulate the ignition;
- Injection control systems;
- Malfunctions, for example, a VAZ 2114 car;
- A number of other reasons.
The color of smoke from the exhaust pipe may also change depending on whether oil or coolant has entered the engine cylinders, engine overheating, fit of piston rings, etc.
All faults that arise are interconnected. For example, if the cooling system fails, then as a result the engine overheats, and this entails a number of other malfunctions, usually this is stuck rings, etc.
How to remove the resonator
The resonator needs to be changed only after a new muffler has been installed. The sequence of work aimed at dismantling the device:
- The resonator is secured using a crimp-type clamp and an O-ring.
- The connection to the neutralizer is made using a floating flange, which consists of flared pipes and two bolts.
- The fist is located on the opposite side of the resonator.
The work must be carried out on a cooled engine.
Quite often it is not possible to unscrew the bolts, so to make the work easier, you just need to cut them off using a grinder. Be sure to install new bolts during reassembly. If you don’t have a grinder at hand, then you need to use a penetrating lubricant, for example, WD-40. Apply this composition to all threaded connections, then wait 20-30 minutes.
Unscrew all the bolts and remove the clamps on the resonator. After this, you need to remove the old resonator from the rubber suspensions. Be sure to evaluate the condition of all rubber products. If they show signs of wear, install new ones during reassembly.
How to replace the Lada-Kalina muffler with your own hands
You can replace the “glushak” in two ways: contact a service center or do everything yourself. In the first case, you will have to do practically nothing: you will only need to take the car to a service station and pay a certain amount for repairs. If we consider the second option, then we will need to take care of preparing the tools that will be needed during work.
Tools and materials
To carry out repairs you will need:
- WD-40 type lubricant;
- wrenches 13 (socket, socket);
- hammer or flat screwdriver;
- new muffler.
Choosing a muffler and its cost
Finding a new part is not so easy. Despite all the variety of elements that the modern automotive market offers, it is quite difficult to buy a truly high-quality product. There is a high probability of purchasing a part that was made in an unknown location or manner. The only advantage of such a muffler is its low cost, but the service life compared to the factory product will be much shorter. Therefore, in order to buy a good quality element, you need to know what parameters to rely on when choosing.
First, attention is paid to the material of manufacture. Factory muffler made of stainless steel or aluminum
The first option is quite difficult to find, but it is quite possible to make it to order. Any other material in this case will last less. An important parameter is cost. A high-quality part cannot cost less than 1 thousand rubles. Although you can find a price of 5 thousand rubles, which is clearly overpriced. The price of an outright fake will fluctuate around 500 rubles.
To ensure that the muffler lasts as long as possible, when purchasing, you should choose a part made of stainless steel or aluminum
In addition to cost and material, attention should be paid to the weight of the muffler. A worthy part must be massive, which is due to the presence of compacted walls and noise-absorbing material inside
If your goal is to purchase a good quality muffler, then it will be difficult to find one in the car market. It is better to contact a service center or a store with original spare parts to purchase.
Resonator installation
In the VAZ-2110 exhaust system (16-valve injector), work is performed in exactly the same way as on 8-valve engines. The procedure is as follows:
- The new resonator must be mounted on rubber hangers and connected to the muffler. Moreover, it is necessary that the pipe from the resonator be strictly parallel to the ground.
- If the neutralizer has wear, rust, or burrs, the connection must be lubricated with high-temperature sealant. This will ensure a high-quality connection of the exhaust system components.
- Tighten the resonator and catalytic converter flanges using only new nuts and bolts.
- The resonator is fastened to the neutralizer using two bolts and flanges. Moreover, the pipe is secured to the pants using a spring connection and flaring. An O-ring made of metal asbestos or graphite is installed inside.
This completes the replacement of the resonator; repairs present no difficulties. All work can be done independently, you just need an inspection hole or overpass.
How to remove the neutralizer
The VAZ-2110 exhaust system is standard for all cars. Almost the same design is used on nines, sevens, and even foreign cars. Even a motorist with very little experience can repair all elements of the system. If you have already decided to change the resonator and muffler, then it is also advisable to install a new neutralizer. The neutralizer is necessary to dampen the vibration coming from the car engine. This is a device that mechanically separates the muffler resonator and the exhaust pipe.
Replacement is carried out as follows:
- If there is no damage to the springs and bolts, they can be reused. If there is wear, you need to purchase new elements.
- The ring is replaced in any case, even if it is in almost perfect condition. If this ring begins to allow exhaust gases to pass through, damage to the flaring of the exhaust pipe and the converter will occur.
- Unscrew all the bolts used to secure it. They must first be treated with a penetrating lubricant.
Car muffler diagrams
Fuel pump in VAZ 2110/2112: self-diagnosis and replacement
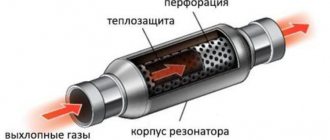
A cross-section of a car muffler allows you to see exactly how the sound reduction function is implemented in each specific muffler. In direct-flow mufflers, for example, the method of changing the direction of gas movement is never used, and a standard muffler uses turns from 90 to 360 degrees. The change in the amplitude of sound wave oscillations is realized by perforating the internal pipes. It is these internal pipes, their diameter, diameter and frequency of holes that can drown out noise in almost the entire frequency spectrum.
But only the integrated use of these methods can guarantee high efficiency of the entire exhaust system as a whole. Therefore, modern cars use from one to six different mufflers. The main ones are the resonator and the main muffler.
Installation of a new neutralizer
If you decide to modify your car, you can install the Stinger exhaust system on the VAZ-2110. It is more reliable and advanced than stock.
All work is carried out the same way. The neutralizer is installed as follows:
- Install the neutralizer, and then put on the bolts. This must be done very carefully, making half a turn, no more.
- When tightening, you must first tighten the bolts that secure the neutralizer to the resonator. The last to be tightened are the bolts securing the converter to the exhaust pipe.
Removing the exhaust pipe
Most drivers call the exhaust pipe “pants”, since the element is very similar to this item of clothing. It is secured to the exhaust manifold using bronze nuts and studs. The trousers are attached to the neutralizer using a spring-loaded connection. There is a gasket between the exhaust manifold and the pants to prevent gases from leaking.
Dismantling the intake pipe is carried out as follows:
- Using a 13mm wrench, you need to unscrew the nuts that secure it to the exhaust manifold. If there are metal plates with bent edges under the nuts, they must be bent. Please note that the connection uses studs that are screwed directly into the manifold.
- If the stud is damaged, replacement is quite problematic. Therefore, it is necessary to carry out all work carefully to keep the threaded connection intact.
- Be sure to allow the engine to cool before starting work, then apply penetrating lubricant to all threaded connections. With these simple steps, you won't have to use too much force, which will save your studs. If you break a pin, it will need to be drilled out. Before this, the exhaust manifold must be removed. Moreover, if you damage the exhaust manifold, replacing it will cost you a pretty penny. The cost of a new one is more than 2000 rubles.
- After unscrewing all the nuts, it is necessary to move the exhaust pipe to the side and remove the gasket.
- Unscrew the bolts that connect the exhaust pipe to the converter.
This completes the dismantling of the exhaust pipe of the VAZ-2110 exhaust system.
An exhaust manifold
The exhaust manifold is attached to the cylinder head directly with studs through a heat-resistant reinforced gasket. It is made of heat-resistant cast iron according to scheme 4-2. The collector is constantly subject to alterations from tuning studios, which replace the factory circuit with a wide variety of configurations and mounting options. It must be said that replacing the standard circuit, and especially replacing cast iron with steel, cannot bring anything good to the car.
The exhaust manifold is made of heat-resistant cast iron
Unless you are designing a narrow-profile car for competition. Moreover, for each discipline of motor sports, the exhaust manifold is configured separately and has some nuances in the design, which 90% of tuning studios have no idea about. Especially their customers. In most cases, the main focus is on the appearance of the pipe, but how it will work there is, by and large, all the same.
It must be said that the exhaust manifold is a rather important part and making it from steel, even the most heat-resistant, is a very questionable undertaking if the car will be used under normal conditions, and not just on the track or in rally raids. The collector temperature in operating mode can reach 1000 degrees. The cast iron is there for good reason and not at all to weigh down the engine structure. Any steel will burn out quite quickly under high load conditions, so before you buy an upgraded exhaust manifold made of super-Japanese steel, it would be worth thinking about the feasibility of such a replacement. Most of the top ten, thank God, do not participate in the world circuit racing championships; they simply have nothing to do there. Therefore, it would be more logical to correlate the rather modest capabilities of the VAZ 2110 engine with the level and quality of exhaust system tuning.
Installing a new exhaust pipe
All work is done in reverse order. But there are several features that you definitely need to know:
- Install a new exhaust pipe.
- A new gasket needs to be installed between the exhaust manifold and the pants.
- Be sure to install a new O-ring between the neutralizer and the pants.
- Tighten the nuts on the exhaust manifold studs. Tighten them evenly in a crisscross pattern.
- Tighten the bolts that are on the spring-loaded connection to the converter.
This completes the repair of the exhaust system. The sound will be muffled as much as possible, the car will become almost silent. It is advisable to lubricate the new gasket with a CV joint type compound. This will improve the seal.
The exhaust system of any car constantly suffers from hot caustic gases, dust, dirt, moisture, impacts, and the VAZ 2110 muffler is no exception. Attempts to repair by applying to through holes help only for a short time, and therefore, you have to think about a major overhaul with replacement.
Muffler device for VAZ 2110
On the “ten” the entire exhaust system consists of separate components:
- exhaust pipe (“pants”);
- neutralizer;
- Lambda probe;
- additional muffler (resonator);
- main muffler.
The most vulnerable and most often in need of repair are. It is not difficult even for a novice car enthusiast to understand the procedure for replacing these parts. Let's try to figure it out together how to gain experience in auto repair and save money.
Replacing the main muffler VAZ 2110
The main signs indicating the need to replace the muffler “can” are the appearance of pockets of through corrosion, fractures of the body and pipes, and severe deformation from impacts. Work should begin when the car is installed on the inspection hole. For a successful start and completion of the operation, a standard set and overalls are sufficient, since the bottom of the car is not the cleanest place.
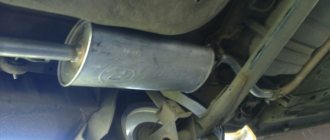
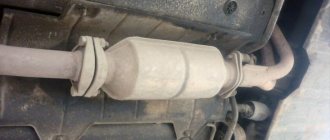
Muffler 2110 is attached to the bottom of the car on brackets through hanging rubber bands, and to the resonator pipe by means of a bolted connection of two halves of clamps, tightening the flared ends.
Dismantling and installation of the device is carried out in the following sequence:
- the bolts that tighten the clamp are unscrewed (often, due to severe corrosion, the bolts cannot be unscrewed and then they are cut off with a grinder. It is recommended to install a new clamp and bolts each time during repairs);
- the graphite sealing ring is removed;
- the muffler is removed from the suspension rubber bands;
- if necessary, the rubber bands are replaced with new ones (experts recommend doing this);
- the new muffler is suspended;
- a graphite seal is installed at the junction of the pipes;
- a clamp is put on, the parts of which are tightened with bolts.
Composition of the output unit
The exhaust system for a VAZ 2110 car consists of the following elements:
- Exhaust manifold;
- Lambda probe;
- Receiving type pipes;
- Neutralizer;
- Two mufflers: main type and additional.
Not all exhaust components are disassembled; some parts, such as the converter, as well as both mufflers, are replaced entirely.
Description of individual components
To make the structure of such an element as the discharge system clearer, it is necessary to give a detailed description of all components:
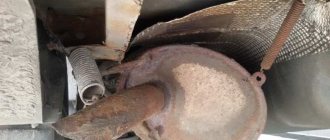
- Neutralizer. A unit designed for effective purification and suppression of emissions of harmful substances into the environment. When driving, a car produces substances such as non-combustible hydrocarbons, oxide compounds of nitrogen and carbon. The work of this system is aimed at eliminating them. The design itself is a combination of two ceramic-type components. The surface of these components is coated with special afterburning catalysts, which include rhodium, palladium and platinum. These substances make it possible to purify exhaust gases emitted into the environment by almost 100%;
- Lambda probe. It is a special sensor whose task is to control the composition and amount of fuel that enters the engine. The lambda probe thereby controls the purifier. If the lambda probe does not work properly, then the entire output assembly will quickly become unusable, after which it will have to be replaced;
- Reception pipe. Designed for forced removal of exhaust gases from the cylinders of a power unit. The pipe is made of stainless steel, and its fastening to the collector is carried out using special pins, of which there are four in total. The studs guarantee reliable fastening of the two outlet pipes and the element. In order to combine the exhaust pipe and the neutralizer, as well as an additional muffler, hinged fasteners are used;
- An exhaust manifold. A component that is cast from pure cast iron. The manifold is secured with four studs in the exhaust pipe. Heat-resistant gaskets reinforced with metal are installed between the manifold and cylinder heads.
- Silencers. Necessary for effectively suppressing the exhaust rate of burnt gases. This is necessary in order to significantly reduce the noise level in a type of transport such as the VAZ 2110. The distribution device in this part of the unit is carried out as follows: the additional one is followed by the main one. These two components are connected to each other by clamps and sealing rings and are covered with a special casing on top.
Nuances of operation
There are some points that need to be taken into account when operating the VAZ 2110 system:
- Under no circumstances should the vehicle be refueled with leaded fuel, as this will cause damage. It is very sensitive to lead compounds;
- When operating a VAZ 2110 car, you also need to monitor the proper, precise operation of the ignition, since its poor-quality operation leads to the neutralizing part being removed from its working condition. Fuel that does not burn when a spark passes during ignition enters the converter and burns out there. For this reason, the ceramic coating of the component quickly deteriorates;
- Frequent malfunctions will sooner or later lead to complete or partial blockage of the output system, in turn to the failure of the engine and its repair or replacement will be required.